安卓开发笔记——打造属于自己的博客园APP(二)
整体UI效果:

下拉刷新和上拉加载的动画效果:

在上篇文章中,我们定义的Tabs主题文字分别是(首页,精华,候选,推荐),这边的命名我是根据博客园网站首页的栏目来命名的,那时候我还没仔细看过博客园的开放接口,后来才发现原来博客园没有对应开放这些栏目的接口,博客园只开放了(文章列表,48小时阅读排行,10天内推荐排行,推荐博客列表)等接口,所以我对应的在Tabs标签主题上改动了下文字。由于是随性开发,没有做过多的前期准备,嘿嘿O(∩_∩)O~
现在已经实现的效果:主UI效果的基本搭建,网络框架的搭建,各博客列表页面的展示包括更新效果,对图片做了三级缓存处理(后面会把文章,新闻做成离线闪存,实现无网络也能照常浏览)等,功能还有很多,慢慢去实现,然后对各细节的优化也会慢慢迭代去完成。
好了,进入主题,由于文章篇幅问题,我这里只会对第一个页面进行讲解,其他大同小异了。
1、解析XML数据
这里是博客园对博客内容的开放接口: http://wcf.open.cnblogs.com/blog/help
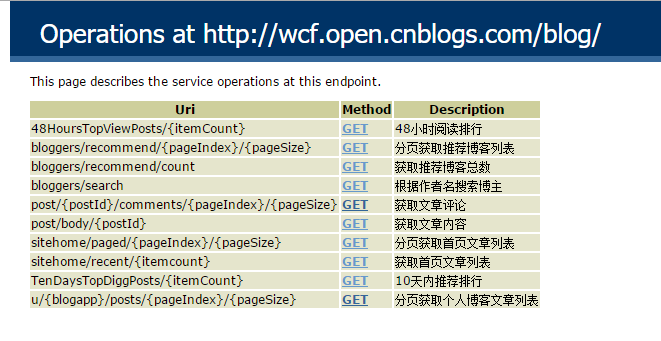
很无奈的发现,博客园的接口是用XML编写的,需要我们去解析XML,挺麻烦的,如果是Json不管在效率上或是我们代码编写上都会来得方便许多。
下面是对首页博文列表: http://wcf.open.cnblogs.com/blog/help/operations/GetSitHomeRecentPagedPosts 的XML解析代码
其中第一个参数PAGEINDEX代表页数(默认1),第二个参数PAGESIZE代表每页显示的文章条数(默认20)
1 package com.lcw.rabbit.myblog.parser; 2 3 import com.lcw.rabbit.myblog.entity.Blog; 4 5 import org.xmlpull.v1.XmlPullParser; 6 import org.xmlpull.v1.XmlPullParserException; 7 import org.xmlpull.v1.XmlPullParserFactory; 8 9 import java.io.IOException; 10 import java.io.InputStream; 11 import java.util.ArrayList; 12 import java.util.List; 13 14 /** 15 * 对博客列表xml数据的解析 16 * Created by Lichenwei 17 * Date: 2015-08-17 18 * Time: 13:32 19 */ 20 public class BlogsListXmlParser { 21 22 23 /** 24 * 用于解析博客列表的xml,返回Blog的List集合对象 25 * 26 * @param inputStream 27 * @param encode 28 * @return 29 * @throws XmlPullParserException 30 * @throws IOException 31 */ 32 public static List<Blog> getListBlogs(InputStream inputStream, String encode) throws XmlPullParserException, IOException { 33 34 List<Blog> mBlogs = null; 35 Blog mBlog = null; 36 37 //获取XmlPullParser实例 38 XmlPullParserFactory factory = XmlPullParserFactory.newInstance(); 39 XmlPullParser parser = factory.newPullParser(); 40 parser.setInput(inputStream, encode); 41 //获取解析事件 42 int eventType = parser.getEventType(); 43 //当xml文档未到尾端时 44 while (eventType != XmlPullParser.END_DOCUMENT) { 45 switch (eventType) { 46 //解析根标签的时候,实例化集合 47 case XmlPullParser.START_DOCUMENT: 48 mBlogs = new ArrayList<Blog>(); 49 mBlog = new Blog(); 50 51 break; 52 case XmlPullParser.START_TAG: 53 //当解析到entry标签的时候,实例化Blog对象 54 if ("entry".equals(parser.getName())) { 55 mBlog = new Blog(); 56 } 57 if ("id".equals(parser.getName())) { 58 parser.next(); 59 mBlog.setBlogId(parser.getText()); 60 } else if ("title".equals(parser.getName())) { 61 parser.next(); 62 //特殊处理 63 if (!"博客园".equals(parser.getText())) { 64 mBlog.setBlogTitle(parser.getText()); 65 } 66 } else if ("summary".equals(parser.getName())) { 67 parser.next(); 68 mBlog.setBlogSummary(parser.getText()); 69 } else if ("published".equals(parser.getName())) { 70 parser.next(); 71 mBlog.setBlogPublished(parser.getText()); 72 } else if ("name".equals(parser.getName())) { 73 parser.next(); 74 mBlog.setAuthorName(parser.getText()); 75 } else if ("uri".equals(parser.getName())) { 76 parser.next(); 77 mBlog.setAuthorUri(parser.getText()); 78 } else if ("avatar".equals(parser.getName())) { 79 parser.next(); 80 mBlog.setAuthorAvatar(parser.getText()); 81 } else if ("link".equals(parser.getName())) { 82 //特殊处理 83 if (parser.getAttributeName(0).equals("rel")) { 84 mBlog.setBlogLink(parser.getAttributeValue(1)); 85 } 86 } else if ("diggs".equals(parser.getName())) { 87 parser.next(); 88 mBlog.setBlogDiggs(parser.getText()); 89 } else if ("views".equals(parser.getName())) { 90 parser.next(); 91 mBlog.setBlogViews(parser.getText()); 92 } else if ("comments".equals(parser.getName())) { 93 parser.next(); 94 mBlog.setBlogComments(parser.getText()); 95 } 96 break; 97 case XmlPullParser.END_TAG: 98 //当解析到entry标签结束的时候添加入Blogs集合,清空Blog对象 99 if ("entry".equals(parser.getName())) { 100 mBlogs.add(mBlog); 101 mBlog = null; 102 } 103 break; 104 105 } 106 //手动跳转第一次遍历 107 eventType = parser.next(); 108 } 109 110 111 return mBlogs; 112 113 } 114 115 }
在JAVA中解析XML一般有三种方式(SAX,DOM,PULL),上面代码采用的是最后一种PULL方式的解析,前面两种SAX,DOM一般用于JAVAEE里,PULL方式的解析相对前两者来得比较轻量,安卓内部对XML的解析也是采用的PULL,所以没必要引入新的JAR包,关于这三种方式的解析,这里就不再多说了,不是今天的重点。(PS:之前一直做的是Json解析,XML解析几乎没用过,可能大家有更好的更有效率的解析方式,如果有可以在文章评论里帮我指点下迷津)。
好了,上面的代码已经对XML解析封装完成,我们只需要传入一个输入流和编码格式,就可以把我们想要的数据装在到List集合了。
这里是List集合里的实体类:

1 package com.lcw.rabbit.myblog.entity; 2 3 /** 4 * 博客实体类 5 * Created by Lichenwei 6 * Date: 2015-08-17 7 * Time: 13:34 8 */ 9 public class Blog { 10 //文章id 11 private String blogId; 12 //文章标题 13 private String blogTitle; 14 //文章概要 15 private String blogSummary; 16 //更新时间 17 private String blogPublished; 18 //博主昵称 19 private String authorName; 20 //博主头像地址 21 private String authorAvatar; 22 //博主博客地址 23 private String authorUri; 24 //博文链接 25 private String blogLink; 26 //博文评论数 27 private String blogComments; 28 //博文浏览数 29 private String blogViews; 30 //博文推荐数 31 private String blogDiggs; 32 33 public Blog() { 34 } 35 36 public Blog(String blogId, String blogTitle, String blogSummary, String blogPublished, String authorName, String authorAvatar, String authorUri, String blogLink, String blogComments, String blogViews, String blogDiggs) { 37 this.blogId = blogId; 38 this.blogTitle = blogTitle; 39 this.blogSummary = blogSummary; 40 this.blogPublished = blogPublished; 41 this.authorName = authorName; 42 this.authorAvatar = authorAvatar; 43 this.authorUri = authorUri; 44 this.blogLink = blogLink; 45 this.blogComments = blogComments; 46 this.blogViews = blogViews; 47 this.blogDiggs = blogDiggs; 48 } 49 50 public String getBlogId() { 51 return blogId; 52 } 53 54 public void setBlogId(String blogId) { 55 this.blogId = blogId; 56 } 57 58 public String getBlogTitle() { 59 return blogTitle; 60 } 61 62 public void setBlogTitle(String blogTitle) { 63 this.blogTitle = blogTitle; 64 } 65 66 public String getBlogSummary() { 67 return blogSummary; 68 } 69 70 public void setBlogSummary(String blogSummary) { 71 this.blogSummary = blogSummary; 72 } 73 74 public String getBlogPublished() { 75 return blogPublished; 76 } 77 78 public void setBlogPublished(String blogPublished) { 79 this.blogPublished = blogPublished; 80 } 81 82 public String getAuthorName() { 83 return authorName; 84 } 85 86 public void setAuthorName(String authorName) { 87 this.authorName = authorName; 88 } 89 90 public String getAuthorAvatar() { 91 return authorAvatar; 92 } 93 94 public void setAuthorAvatar(String authorAvatar) { 95 this.authorAvatar = authorAvatar; 96 } 97 98 public String getAuthorUri() { 99 return authorUri; 100 } 101 102 public void setAuthorUri(String authorUri) { 103 this.authorUri = authorUri; 104 } 105 106 public String getBlogLink() { 107 return blogLink; 108 } 109 110 public void setBlogLink(String blogLink) { 111 this.blogLink = blogLink; 112 } 113 114 public String getBlogComments() { 115 return blogComments; 116 } 117 118 public void setBlogComments(String blogComments) { 119 this.blogComments = blogComments; 120 } 121 122 public String getBlogViews() { 123 return blogViews; 124 } 125 126 public void setBlogViews(String blogViews) { 127 this.blogViews = blogViews; 128 } 129 130 public String getBlogDiggs() { 131 return blogDiggs; 132 } 133 134 public void setBlogDiggs(String blogDiggs) { 135 this.blogDiggs = blogDiggs; 136 } 137 138 @Override 139 public String toString() { 140 return "Blog{" + 141 "blogId='" + blogId + '/'' + 142 ", blogTitle='" + blogTitle + '/'' + 143 ", blogSummary='" + blogSummary + '/'' + 144 ", blogPublished='" + blogPublished + '/'' + 145 ", authorName='" + authorName + '/'' + 146 ", authorAvatar='" + authorAvatar + '/'' + 147 ", authorUri='" + authorUri + '/'' + 148 ", blogLink='" + blogLink + '/'' + 149 ", blogComments='" + blogComments + '/'' + 150 ", blogViews='" + blogViews + '/'' + 151 ", blogDiggs='" + blogDiggs + '/'' + 152 '}'; 153 } 154 }Blog
2、获取XML数据
我们需要对博客园开放接口的各种数据进行获取,不管是下拉刷新还是上拉加载的文字信息还是对用户头像的图片信息获取,这边需要对网络进行频繁的操作,这里我进入了Volley框架,并对图片做了三级缓存(内存,磁盘,网络)使得在没有网络的情况下也可以看到对应的图片。
对三级缓存封装不熟悉的朋友,可以参考我之前写过的文章《 安卓开发笔记——关于图片的三级缓存策略(内存LruCache+磁盘DiskLruCache+网络Volley) 》,当然你也可以用你自己的方法,这里就不再详细去说了,一篇文章写不下哈。
3、页面布局
这里的布局我采用了安卓5.0推出的新控件(未来之星RecyclerView和卡片CardView),谷歌也推出了向下兼容,大家可以在Support-V7包下找到这2个控件。为了便于代码的复用,我这里把每一部分都分开成不同的XML,下面是详细代码:
这里是博文列表栏目的主界面:(关于下拉刷新和上拉加载,下面会提到)
1 <LinearLayout xmlns:android="http://schemas.android.com/apk/res/android" 2 android:layout_width="match_parent" 3 android:layout_height="match_parent" 4 android:orientation="vertical" 5 android:gravity="center"> 6 7 <android.support.v4.widget.SwipeRefreshLayout 8 android:id="@+id/swipe_refresh" 9 android:layout_width="match_parent" 10 android:layout_height="match_parent" 11 android:layout_margin="4dp"> 12 13 <android.support.v7.widget.RecyclerView 14 android:id="@+id/rv_view" 15 android:layout_width="match_parent" 16 android:layout_height="match_parent" 17 android:background="@color/md_grey_200" 18 android:scrollbars="vertical" 19 /> 20 </android.support.v4.widget.SwipeRefreshLayout> 21 22 <com.lcw.rabbit.myblog.view.MyProgressBar 23 android:id="@+id/progressbar" 24 android:layout_width="match_parent" 25 android:layout_height="20dp" 26 android:layout_gravity="bottom" 27 android:visibility="gone" 28 /> 29 </LinearLayout>fragment_bloglist
这里是RecyclerView的item布局:
1 <android.support.v7.widget.CardView xmlns:android="http://schemas.android.com/apk/res/android" 2 xmlns:app="http://schemas.android.com/apk/res-auto" 3 android:id="@+id/cv_cardview" 4 android:layout_width="match_parent" 5 android:layout_height="wrap_content" 6 android:layout_margin="8dp" 7 android:gravity="center" 8 app:cardCornerRadius="6dp"> 9 10 <include layout="@layout/recyclerview_item_bloglist_content" /> 11 12 </android.support.v7.widget.CardView>recyclerview_item_bloglist.xml
这里是item里的详细布局:
1 <LinearLayout xmlns:android="http://schemas.android.com/apk/res/android" 2 xmlns:app="http://schemas.android.com/apk/res-auto" 3 android:layout_width="match_parent" 4 android:layout_height="wrap_content" 5 android:orientation="horizontal" 6 android:padding="3dp"> 7 <!--头像--> 8 <com.makeramen.roundedimageview.RoundedImageView 9 android:id="@+id/iv_userhead" 10 android:layout_width="60dp" 11 android:layout_height="60dp" 12 android:layout_gravity="center_vertical" 13 android:layout_marginRight="5dp" 14 android:src="@mipmap/avatar_default" 15 app:riv_border_color="#ffffff" 16 app:riv_border_width="2dip" 17 app:riv_corner_radius="30dip" 18 app:riv_mutate_background="true" 19 app:riv_oval="true" 20 app:riv_tile_mode="repeat" /> 21 <!--信息内容--> 22 <LinearLayout 23 android:layout_width="0dp" 24 android:layout_height="wrap_content" 25 android:layout_weight="1" 26 android:layout_marginLeft="3dp" 27 android:orientation="vertical"> 28 29 <TextView 30 android:id="@+id/tv_title" 31 android:layout_width="match_parent" 32 android:layout_height="wrap_content" 33 android:layout_marginTop="2dp" 34 android:layout_weight="1" 35 android:text="测试标题" 36 android:ellipsize="end" 37 android:singleLine="true" 38 android:textColor="@color/md_grey_900" 39 android:textSize="14sp" 40 android:textStyle="bold" /> 41 42 <TextView 43 android:id="@+id/tv_description" 44 android:layout_width="match_parent" 45 android:layout_height="wrap_content" 46 android:layout_weight="1" 47 android:maxLines="3" 48 android:text="浏览器类型判断方法有两种:根据浏览器特性来判断根据来检测具体使用哪种方法要看具体需求的场景场景一:为了让用户有较流畅完整的体验,在站点提示用户使用或者,这种场景对浏览器类型的判断并非特别严格,可以使用检测的方法。(因为很多浏览器厂商会篡改标识)。场景二...." 49 android:textSize="12sp" /> 50 51 <LinearLayout 52 android:layout_width="match_parent" 53 android:layout_height="match_parent" 54 android:layout_margin="1dp" 55 android:layout_weight="1" 56 android:orientation="horizontal"> 57 58 <TextView 59 android:layout_width="wrap_content" 60 android:layout_height="match_parent" 61 android:gravity="center_vertical" 62 android:text="发表:" 63 android:textColor="@color/md_grey_500" 64 android:textSize="11sp" /> 65 66 <TextView 67 android:id="@+id/tv_time" 68 android:layout_width="wrap_content" 69 android:layout_height="match_parent" 70 android:layout_marginRight="5dp" 71 android:gravity="center_vertical" 72 android:textColor="@color/md_grey_500" 73 android:textSize="11sp" /> 74 75 <TextView 76 android:layout_width="wrap_content" 77 android:layout_height="match_parent" 78 android:gravity="center_vertical" 79 android:text="推荐:" 80 android:textColor="@color/md_grey_500" 81 android:textSize="11sp" /> 82 83 <TextView 84 android:id="@+id/tv_best" 85 android:layout_width="wrap_content" 86 android:layout_height="match_parent" 87 android:layout_marginRight="5dp" 88 android:textColor="@color/md_grey_500" 89 android:textSize="11sp" /> 90 91 <TextView 92 android:layout_width="wrap_content" 93 android:layout_height="match_parent" 94 android:gravity="center_vertical" 95 android:text="评论:" 96 android:textColor="@color/md_grey_500" 97 android:textSize="11sp" /> 98 99 <TextView 100 android:id="@+id/tv_comment" 101 android:layout_width="wrap_content" 102 android:layout_height="match_parent" 103 android:layout_marginRight="5dp" 104 android:gravity="center_vertical" 105 android:textColor="@color/md_grey_500" 106 android:textSize="11sp" /> 107 108 <TextView 109 android:layout_width="wrap_content" 110 android:layout_height="match_parent" 111 android:gravity="center_vertical" 112 android:text="浏览:" 113 android:textColor="@color/md_grey_500" 114 android:textSize="11sp" /> 115 116 <TextView 117 android:id="@+id/tv_browse" 118 android:layout_width="wrap_content" 119 android:layout_height="match_parent" 120 android:gravity="center_vertical" 121 android:textColor="@color/md_grey_500" 122 android:textSize="11sp" /> 123 124 </LinearLayout> 125 126 127 </LinearLayout> 128 129 <!--操作按钮--> 130 <ImageButton 131 android:id="@+id/ib_more" 132 android:layout_width="wrap_content" 133 android:layout_height="match_parent" 134 android:layout_gravity="center" 135 android:background="?android:selectableItemBackground" 136 android:paddingLeft="5dp" 137 android:paddingRight="5dp" 138 android:src="@mipmap/ic_more_dark" /> 139 </LinearLayout>recyclerview_item_bloglist_content.xml
4、详细代码
既然用到了RecyclerView,和ListView一样需要一个适配器,它的适配器和我们以往使用ListView的,它不是继承实现BaseAdapter而是去继承RecyclerView.Adapter<RecyclerViewViewHolder>,这里谷歌已经强制开发者使用ViewHolder了,RecyclerView嘛,顾名思义,为了效率而生,看下详细代码吧。
1 package com.lcw.rabbit.myblog.adapter; 2 3 import android.content.Context; 4 import android.content.res.Resources; 5 import android.graphics.Bitmap; 6 import android.graphics.BitmapFactory; 7 import android.support.v7.widget.RecyclerView; 8 import android.view.LayoutInflater; 9 import android.view.View; 10 import android.view.ViewGroup; 11 import android.widget.ImageButton; 12 import android.widget.TextView; 13 14 import com.lcw.rabbit.myblog.R; 15 import com.lcw.rabbit.myblog.entity.Blog; 16 import com.lcw.rabbit.myblog.utils.ImageCacheManager; 17 import com.lcw.rabbit.myblog.utils.TimeUtil; 18 import com.makeramen.roundedimageview.RoundedImageView; 19 20 import java.util.List; 21 22 /** 23 * 博文列表适配器 24 * Created by Lichenwei 25 * Date: 2015-08-16 26 * Time: 22:34 27 */ 28 public class BlogListAdapter extends RecyclerView.Adapter<BlogListAdapter.RecyclerViewViewHolder> { 29 30 private Context mContext; 31 private List<Blog> mBlogs; 32 33 public BlogListAdapter(Context context, List<Blog> blogs) { 34 this.mContext = context; 35 this.mBlogs = blogs; 36 } 37 38 /** 39 * 设置新的数据源,提醒adatper更新 40 * 41 * @param blogs 42 */ 43 public void refreshData(List<Blog> blogs) { 44 this.mBlogs = blogs; 45 this.notifyDataSetChanged(); 46 } 47 48 49 /** 50 * 创建ViewHolder 51 * 52 * @param viewGroup 53 * @param i 54 * @return 55 */ 56 @Override 57 public RecyclerViewViewHolder onCreateViewHolder(ViewGroup viewGroup, int i) { 58 View view = LayoutInflater.from(viewGroup.getContext()).inflate(R.layout.recyclerview_item_bloglist, viewGroup, false); 59 return new RecyclerViewViewHolder(view); 60 } 61 62 /** 63 * 根据资源ID返回Bitmap对象 64 * 65 * @param resId 66 * @return 67 */ 68 public Bitmap getBitmapFromRes(int resId) { 69 Resources res = mContext.getResources(); 70 return BitmapFactory.decodeResource(res, resId); 71 72 } 73 74 /** 75 * 绑定数据 76 * 77 * @param viewholder 78 * @param i 79 */ 80 @Override 81 public void onBindViewHolder(RecyclerViewViewHolder viewholder, int i) { 82 //设置头像 83 if (mBlogs.get(i).getAuthorAvatar() != null && !"".equals(mBlogs.get(i).getAuthorAvatar())) { 84 ImageCacheManager.loadImage(mBlogs.get(i).getAuthorAvatar(), viewholder.mUserhead, getBitmapFromRes(R.mipmap.avatar_default), getBitmapFromRes(R.mipmap.avatar_default)); 85 } else { 86 viewholder.mUserhead.setImageResource(R.mipmap.avatar_default); 87 } 88 viewholder.mTitle.setText(mBlogs.get(i).getBlogTitle()); 89 viewholder.mDescription.setText(mBlogs.get(i).getBlogSummary()); 90 viewholder.mBest.setText(mBlogs.get(i).getBlogDiggs()); 91 viewholder.mComment.setText(mBlogs.get(i).getBlogComments()); 92 viewholder.mBrowse.setText(mBlogs.get(i).getBlogViews()); 93 //处理日期特殊格式 94 String date = TimeUtil.DateToChineseString(TimeUtil.ParseUTCDate(mBlogs.get(i).getBlogPublished())); 95 viewholder.mTime.setText(date); 96 } 97 98 @Override 99 public int getItemCount() { 100 return mBlogs.size(); 101 } 102 103 /** 104 * 自定义ViewHolder 105 */ 106 public static class RecyclerViewViewHolder extends RecyclerView.ViewHolder { 107 private RoundedImageView mUserhead; 108 private TextView mTitle; 109 private TextView mDescription; 110 private TextView mTime; 111 private TextView mBest; 112 private TextView mComment; 113 private TextView mBrowse; 114 private ImageButton mMore; 115 116 public RecyclerViewViewHolder(View view) { 117 super(view); 118 mUserhead = (RoundedImageView) view.findViewById(R.id.iv_userhead); 119 mTitle = (TextView) view.findViewById(R.id.tv_title); 120 mDescription = (TextView) view.findViewById(R.id.tv_description); 121 mTime = (TextView) view.findViewById(R.id.tv_time); 122 mBest = (TextView) view.findViewById(R.id.tv_best); 123 mComment = (TextView) view.findViewById(R.id.tv_comment); 124 mBrowse = (TextView) view.findViewById(R.id.tv_browse); 125 mMore = (ImageButton) view.findViewById(R.id.ib_more); 126 127 } 128 129 130 } 131 }
然后下拉刷新我采用了谷歌官方推出的SwipeRefreshLayout(Support-V4包下),上拉加载我采用了GitHub上的开源组件mugen(这里是开源项目地址: http://www.open-open.com/lib/view/open1431414846747.html )
这里是博文列表页面的主代码:
1 package com.lcw.rabbit.myblog.fragment; 2 3 import android.os.Bundle; 4 import android.support.v4.app.Fragment; 5 import android.support.v4.widget.SwipeRefreshLayout; 6 import android.support.v7.widget.LinearLayoutManager; 7 import android.support.v7.widget.RecyclerView; 8 import android.view.LayoutInflater; 9 import android.view.View; 10 import android.view.ViewGroup; 11 import android.widget.Toast; 12 13 import com.android.volley.Request; 14 import com.android.volley.Response; 15 import com.android.volley.VolleyError; 16 import com.android.volley.toolbox.StringRequest; 17 import com.lcw.rabbit.myblog.R; 18 import com.lcw.rabbit.myblog.adapter.BlogListAdapter; 19 import com.lcw.rabbit.myblog.entity.Blog; 20 import com.lcw.rabbit.myblog.parser.BlogsListXmlParser; 21 import com.lcw.rabbit.myblog.utils.VolleyRequestQueueManager; 22 import com.lcw.rabbit.myblog.view.MyProgressBar; 23 import com.mugen.Mugen; 24 import com.mugen.MugenCallbacks; 25 import com.mugen.attachers.BaseAttacher; 26 27 import org.xmlpull.v1.XmlPullParserException; 28 29 import java.io.ByteArrayInputStream; 30 import java.io.IOException; 31 import java.util.ArrayList; 32 import java.util.List; 33 34 /** 35 * Created by Lichenwei 36 * Date: 2015-08-16 37 * Time: 13:57 38 */ 39 public class BlogListFragment extends Fragment { 40 private View mView; 41 //下拉刷新 42 private SwipeRefreshLayout mRefreshLayout; 43 //无限滚动 44 private BaseAttacher mBaseAttacher; 45 46 private MyProgressBar myProgressBar; 47 private RecyclerView mRecyclerView; 48 private BlogListAdapter mBlogListAdapter; 49 50 //数据源 51 private List<Blog> mBlogs; 52 53 //是否正在加载 54 private boolean isLoading = false; 55 //当前页数 56 private int currentPage = 1; 57 58 59 @Override 60 public View onCreateView(LayoutInflater inflater, ViewGroup container, Bundle savedInstanceState) { 61 mView = inflater.inflate(R.layout.fragment_bloglist, null); 62 initView(); 63 initData(); 64 initAction(); 65 return mView; 66 } 67 68 /** 69 * 初始化控件监听 70 */ 71 private void initAction() { 72 mRefreshLayout.setOnRefreshListener(new SwipeRefreshLayout.OnRefreshListener() { 73 @Override 74 public void onRefresh() { 75 getData(1, 20); 76 } 77 }); 78 //设置无限滚动,上拉加载 79 mBaseAttacher = Mugen.with(mRecyclerView, new MugenCallbacks() { 80 @Override 81 public void onLoadMore() { 82 //加载更多 83 isLoading = true; 84 myProgressBar.setVisibility(View.VISIBLE); 85 getData((currentPage + 1), 20); 86 } 87 88 @Override 89 public boolean isLoading() { 90 return isLoading; 91 } 92 93 @Override 94 public boolean hasLoadedAllItems() { 95 return false; 96 } 97 }).start(); 98 99 100 } 101 102 /** 103 * 初始化数据 104 */ 105 private void initData() { 106 mBlogs = new ArrayList<Blog>(); 107 //设置空数据给RecyclerView 108 mBlogListAdapter = new BlogListAdapter(getActivity(), mBlogs); 109 mRecyclerView.setAdapter(mBlogListAdapter); 110 //显示下拉刷新样式 111 mRefreshLayout.setRefreshing(true); 112 //刚开始加载20条数据 113 getData(1, 20); 114 115 } 116 117 118 /** 119 * 初始化控件 120 */ 121 122 private void initView() { 123 mRefreshLayout = (SwipeRefreshLayout) mView.findViewById(R.id.swipe_refresh); 124 mRecyclerView = (RecyclerView) mView.findViewById(R.id.rv_view); 125 myProgressBar = (MyProgressBar) mView.findViewById(R.id.progressbar); 126 127 //设置拉下刷新滚动条颜色 128 mRefreshLayout.setColorSchemeResources(android.R.color.holo_blue_light, android.R.color.holo_red_light, android.R.color.holo_orange_light, android.R.color.holo_green_light); 129 //设置RecyclerView显示样式 130 mRecyclerView.setLayoutManager(new LinearLayoutManager(getActivity())); 131 132 } 133 134 public void getData(final int page, int num) { 135 //更新当前页数 136 this.currentPage = page; 137 String url = "http://wcf.open.cnblogs.com/blog/sitehome/paged/" + page + "/" + num; 138 StringRequest request = new StringRequest(Request.Method.GET, url, new Response.Listener<String>() { 139 @Override 140 public void onResponse(String s) { 141 try { 142 isLoading = false; 143 myProgressBar.setVisibility(View.GONE); 144 ByteArrayInputStream inputStream = new ByteArrayInputStream(s.getBytes()); 145 //获取List数据集合 146 List<Blog> blogs = BlogsListXmlParser.getListBlogs(inputStream, "utf-8"); 147 if (page == 1) { 148 //清空之前的数据预防重复加载 149 mBlogs.clear(); 150 } 151 for (Blog blog : blogs) { 152 //整理数据源 153 mBlogs.add(blog); 154 } 155 156 if (mBlogListAdapter == null) { 157 //如果Adapter不存在 158 mBlogListAdapter = new BlogListAdapter(getActivity(), mBlogs); 159 mRecyclerView.setAdapter(mBlogListAdapter); 160 } else { 161 //存在通知adatper数据源更新 162 mBlogListAdapter.refreshData(mBlogs); 163 } 164 165 166 //关闭下拉刷新样式 167 mRefreshLayout.setRefreshing(false); 168 169 } catch (XmlPullParserException e) { 170 e.printStackTrace(); 171 } catch (IOException e) { 172 e.printStackTrace(); 173 } 174 } 175 }, new Response.ErrorListener() { 176 @Override 177 public void onErrorResponse(VolleyError volleyError) { 178 Toast.makeText(getActivity(), volleyError.getMessage(), Toast.LENGTH_SHORT).show(); 179 } 180 }); 181 182 //加入Volley请求队列 183 VolleyRequestQueueManager.addRequest(request, "getBlogList"); 184 185 186 } 187 }
这里有个小技巧,对于上拉加载,为了避免重复加载数据,我们可以一开始就给RecyclerView设置一个空的Adapter,然后根据加载页码的不同来做不同的操作,如果是第一页,那么就是进行下拉刷新,我们直接清空原来的数据源加载新的即可。如果不是第一页,那就是上拉加载,我们把新的数据追加到旧数据源后面即可,这样就避免了上拉加载滚动条置顶了。
然后这里的底部上拉加载的无限滚动,我采用了自定义View圆圈滚动,你也可以用项目自带的彩色线装,下面是自定义View的具体代码:
1 package com.lcw.rabbit.myblog.view; 2 3 import android.animation.Animator; 4 import android.animation.AnimatorListenerAdapter; 5 import android.animation.ObjectAnimator; 6 import android.animation.TimeInterpolator; 7 import android.content.Context; 8 import android.graphics.Canvas; 9 import android.graphics.Paint; 10 import android.util.AttributeSet; 11 import android.util.Log; 12 import android.view.View; 13 14 /** 15 * Created by Lichenwei 16 * Date: 2015-08-19 17 * Time: 10:59 18 */ 19 public class MyProgressBar extends View { 20 21 22 private Paint paint; 23 private Paint paint1; 24 private Paint paint2; 25 private Paint paint3; 26 private Paint paint4; 27 28 private float cx0 = -10; 29 private float cx1 = -10; 30 private float cx2 = -10; 31 private float cx3 = -10; 32 private float cx4 = -10; 33 34 private long delay = 100; 35 private long duration = 1500; 36 private float start = -10; 37 private float end; 38 private int desiredWidth = 500; 39 private int desiredHeight = 10; 40 41 private ObjectAnimator animator; 42 private ObjectAnimator animator1; 43 private ObjectAnimator animator2; 44 private ObjectAnimator animator3; 45 private ObjectAnimator animator4; 46 private boolean isRunning = false; 47 48 public MyProgressBar(Context context) { 49 super(context); 50 // init(); 51 } 52 53 public MyProgressBar(Context context, AttributeSet attrs) { 54 super(context, attrs); 55 // init(); 56 } 57 58 public MyProgressBar(Context context, AttributeSet attrs, int defStyleAttr) { 59 super(context, attrs, defStyleAttr); 60 61 62 // init(); 63 } 64 65 private void init() { 66 67 paint = new Paint(Paint.ANTI_ALIAS_FLAG); 68 paint.setColor(getResources().getColor(android.R.color.holo_red_light)); 69 70 paint1 = new Paint(Paint.ANTI_ALIAS_FLAG); 71 paint1.setColor(getResources().getColor(android.R.color.holo_orange_light)); 72 73 paint2 = new Paint(Paint.ANTI_ALIAS_FLAG); 74 paint2.setColor(getResources().getColor(android.R.color.holo_green_light)); 75 76 paint3 = new Paint(Paint.ANTI_ALIAS_FLAG); 77 paint3.setColor(getResources().getColor(android.R.color.holo_blue_light)); 78 79 paint4 = new Paint(Paint.ANTI_ALIAS_FLAG); 80 paint4.setColor(getResources().getColor(android.R.color.holo_purple)); 81 82 animator = ObjectAnimator.ofFloat(this, "cx0", start, end); 83 animator.setDuration(duration); 84 animator.setInterpolator(new DecelerateAccelerateInterpolator()); 85 animator.start(); 86 87 animator1 = ObjectAnimator.ofFloat(this, "cx1", start, end); 88 animator1.setDuration(duration); 89 animator1.setStartDelay(delay); 90 animator1.setInterpolator(new DecelerateAccelerateInterpolator()); 91 92 93 animator2 = ObjectAnimator.ofFloat(this, "cx2", start, end); 94 animator2.setDuration(duration); 95 animator2.setStartDelay(delay * 2); 96 animator2.setInterpolator(new DecelerateAccelerateInterpolator()); 97 98 animator3 = ObjectAnimator.ofFloat(this, "cx3", start, end); 99 animator3.setDuration(duration); 100 animator3.setStartDelay(delay * 3); 101 animator3.setInterpolator(new DecelerateAccelerateInterpolator()); 102 103 animator4 = ObjectAnimator.ofFloat(this, "cx4", start, end); 104 animator4.setDuration(duration); 105 animator4.setStartDelay(delay * 4); 106 animator4.setInterpolator(new DecelerateAccelerateInterpolator()); 107 animator4.addListener(new AnimatorListenerAdapter() { 108 @Override 109 public void onAnimationEnd(Animator animation) { 110 if (isRunning) { 111 start(); 112 } 113 } 114 }); 115 } 116 117 @Override 118 protected void onMeasure(int widthMeasureSpec, int heightMeasureSpec) { 119 super.onMeasure(widthMeasureSpec, heightMeasureSpec); 120 121 int widthSize = MeasureSpec.getSize(widthMeasureSpec); 122 int heightSize = MeasureSpec.getSize(heightMeasureSpec); 123 int widthMode = MeasureSpec.getMode(widthMeasureSpec); 124 int heightMode = MeasureSpec.getMode(widthMeasureSpec); 125 126 Log.i("widthSize ", widthSize + ""); 127 int measuredWidth, measuredHeight; 128 129 130 measuredWidth = widthSize; 131 132 measuredHeight = heightSize; 133 134 setMeasuredDimension(measuredWidth, measuredHeight); 135 136 end = -start + measuredWidth; 137 init(); 138 } 139 140 141 @Override 142 protected void onDraw(Canvas canvas) { 143 if (!isRunning) { 144 start(); 145 isRunning = true; 146 } 147 148 canvas.drawCircle(cx0, 12, 10, paint); 149 canvas.drawCircle(cx1, 12, 10, paint1); 150 canvas.drawCircle(cx2, 12, 10, paint2); 151 canvas.drawCircle(cx3, 12, 10, paint3); 152 canvas.drawCircle(cx4, 12, 10, paint4); 153 } 154 155 public void start() { 156 157 if (animator != null && animator1 != null && animator2 != null && animator3 != null && animator4 != null) { 158 animator.start(); 159 animator1.start(); 160 animator2.start(); 161 animator3.start(); 162 animator4.start(); 163 164 isRunning = true; 165 } 166 167 168 } 169 170 public void cancel() { 171 if (animator != null && animator1 != null && animator2 != null && animator3 != null && animator4 != null) { 172 animator.cancel(); 173 animator1.cancel(); 174 animator2.cancel(); 175 animator3.cancel(); 176 animator4.cancel(); 177 isRunning = false; 178 } 179 180 } 181 182 183 @Override 184 protected void onWindowVisibilityChanged(int visibility) { 185 super.onWindowVisibilityChanged(visibility); 186 if (visibility == View.VISIBLE && !isRunning) { 187 Log.i("ProgressBar_Modern", "可见,运行"); 188 start(); 189 } else if (visibility == View.GONE && isRunning) { 190 Log.i("ProgressBar_Modern", "不可见,暂停"); 191 cancel(); 192 } 193 } 194 195 196 @Override 197 protected void onVisibilityChanged(View changedView, int visibility) { 198 super.onVisibilityChanged(changedView, visibility); 199 if (visibility == View.VISIBLE && !isRunning) { 200 Log.i("ProgressBar_Modern", "可见,运行"); 201 start(); 202 } else if (visibility == View.GONE && isRunning) { 203 Log.i("ProgressBar_Modern", "不可见,暂停"); 204 cancel(); 205 } 206 } 207 208 public float getCx0() { 209 return cx0; 210 } 211 212 public void setCx0(float cx0) { 213 this.cx0 = cx0; 214 invalidate(); 215 } 216 217 public float getCx1() { 218 return cx1; 219 } 220 221 public void setCx1(float cx1) { 222 this.cx1 = cx1; 223 invalidate(); 224 } 225 226 public float getCx2() { 227 return cx2; 228 } 229 230 public void setCx2(float cx2) { 231 this.cx2 = cx2; 232 invalidate(); 233 } 234 235 public float getCx3() { 236 return cx3; 237 } 238 239 public void setCx3(float cx3) { 240 this.cx3 = cx3; 241 invalidate(); 242 } 243 244 public float getCx4() { 245 return cx4; 246 } 247 248 public void setCx4(float cx4) { 249 this.cx4 = cx4; 250 invalidate(); 251 } 252 253 // @Override 254 // public boolean onTouchEvent(MotionEvent event) { 255 // switch (event.getAction()) { 256 // case MotionEvent.ACTION_DOWN: 257 // this.start(); 258 // } 259 // return true; 260 // } 261 262 private class DecelerateAccelerateInterpolator implements TimeInterpolator { 263 264 private DecelerateAccelerateInterpolator() { 265 266 } 267 268 @Override 269 public float getInterpolation(float input) { 270 271 // if (input < 0.5) { 272 // return (float) Math.sqrt(0.25 - (input - 0.5) * (input - 0.5)); 273 // } else { 274 // return (float) (1 - Math.sqrt(0.25 - (input - 0.5) * (input - 0.5))); 275 // } 276 return (float) (Math.asin(2 * input - 1) / Math.PI + 0.5); 277 } 278 } 279 }MyProgressBar.java
最后附上一个时间转换工具类:
1 package com.lcw.rabbit.myblog.utils; 2 3 import java.text.ParseException; 4 import java.text.SimpleDateFormat; 5 import java.util.Date; 6 import java.util.Locale; 7 8 /** 9 * 时间转换工具类 10 */ 11 public class TimeUtil { 12 /** 13 * String转换为时间 14 * 15 * @param str 16 * @return 17 */ 18 public static Date ParseDate(String str) { 19 SimpleDateFormat dateFormat = new SimpleDateFormat("yyyy-MM-dd hh:mm:ss"); 20 Date addTime = null; 21 try { 22 addTime = dateFormat.parse(str); 23 } catch (ParseException e) { 24 e.printStackTrace(); 25 } 26 return addTime; 27 } 28 29 /** 30 * 将日期转换为字符串 31 * 32 * @param date 33 * @return 34 */ 35 public static String ParseDateToString(Date date) { 36 return ParseDateToString(date, "yyyy-MM-dd HH:mm:ss"); 37 } 38 39 /** 40 * 将日期转换为字符串(重载) 41 * 42 * @param date 43 * @param format:时间格式,必须符合yyyy-MM-dd hh:mm:ss 44 * @return 45 */ 46 public static String ParseDateToString(Date date, String format) { 47 SimpleDateFormat dateFormat = new SimpleDateFormat(format); 48 49 return dateFormat.format(date); 50 } 51 52 /** 53 * 将UMT时间转换为本地时间 54 * 55 * @param str 56 * @return 57 * @throws ParseException 58 */ 59 public static Date ParseUTCDate(String str) { 60 //格式化2012-03-04T23:42:00+08:00 61 SimpleDateFormat formatter = new SimpleDateFormat("yyyy-MM-dd'T'HH:mm:ssZ", Locale.CHINA); 62 try { 63 Date date = formatter.parse(str); 64 65 return date; 66 } catch (ParseException e) { 67 //格式化Sat, 17 Mar 2012 11:37:13 +0000 68 //Sat, 17 Mar 2012 22:13:41 +0800 69 try { 70 SimpleDateFormat formatter2 = new SimpleDateFormat("EEE, dd MMM yyyy HH:mm:ss Z", Locale.CHINA); 71 Date date2 = formatter2.parse(str); 72 73 return date2; 74 } catch (ParseException ex) { 75 return null; 76 } 77 } 78 } 79 80 /** 81 * 将时间转换为中文 82 * 83 * @param datetime 84 * @return 85 */ 86 public static String DateToChineseString(Date datetime) { 87 Date today = new Date(); 88 long seconds = (today.getTime() - datetime.getTime()) / 1000; 89 90 long year = seconds / (24 * 60 * 60 * 30 * 12);// 相差年数 91 long month = seconds / (24 * 60 * 60 * 30);//相差月数 92 long date = seconds / (24 * 60 * 60); //相差的天数 93 long hour = (seconds - date * 24 * 60 * 60) / (60 * 60);//相差的小时数 94 long minute = (seconds - date * 24 * 60 * 60 - hour * 60 * 60) / (60);//相差的分钟数 95 long second = (seconds - date * 24 * 60 * 60 - hour * 60 * 60 - minute * 60);//相差的秒数 96 97 if (year > 0) { 98 return year + "年前"; 99 } 100 if (month > 0) { 101 return month + "月前"; 102 } 103 if (date > 0) { 104 return date + "天前"; 105 } 106 if (hour > 0) { 107 return hour + "小时前"; 108 } 109 if (minute > 0) { 110 return minute + "分钟前"; 111 } 112 if (second > 0) { 113 return second + "秒前"; 114 } 115 return "未知时间"; 116 } 117 }TimeUtil.java
这样第一个列表界面就完成了,后面页面的实现基本一致,这里就不重复再讲了,今天先写到这里,改天继续更新,有什么建议或疑问,可以在文章评论给我留言。
作者:李晨玮
出处: http://www.cnblogs.com/lichenwei/
本文版权归作者和博客园共有,欢迎转载,但未经作者同意必须保留此段声明,且在文章页面明显位置给出原文链接。
正在看本人博客的这位童鞋,我看你气度不凡,谈吐间隐隐有王者之气,日后必有一番作为!旁边有“推荐”二字,你就顺手把它点了吧,相得准,我分文不收;相不准,你也好回来找我!
正文到此结束
热门推荐


相关文章


Loading...
![[HBLOG]公众号](http://www.liuhaihua.cn/img/qrcode_gzh.jpg)

