QML入门之从简易音乐播放器开始
这是一篇介绍QML开发音乐播放器的文件,在于QML入门,后期还会有更多关于QML实际应用开发的博文.(本博客所有注释图片有基于Qt开发的交互式画板绘制,欢迎定制)
简易音乐播放器涉及的QML 对象:
Audio : 用于音频资源的文件的播放 ,使用时候需要导入QtMultimedia
ProgreeBar : 播放进度条,需要介绍style属性的应用
MessageDialog: 消息对话框,类似Qt QMessagebox
FileDialog : 用于打开文件
控件类对象需要导入QtQuick.COntrols, 控件对象样式(带style属性的对象)修改需要导入QtQuick.Control.Style
对话框对象需要导入QtQuick.Dialogs(例如MessageDialog,FileDialog)
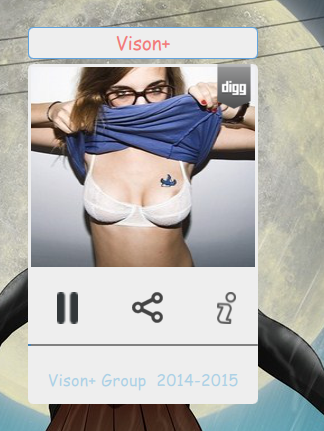
软件的最终截图 :(基于Qt5.4)
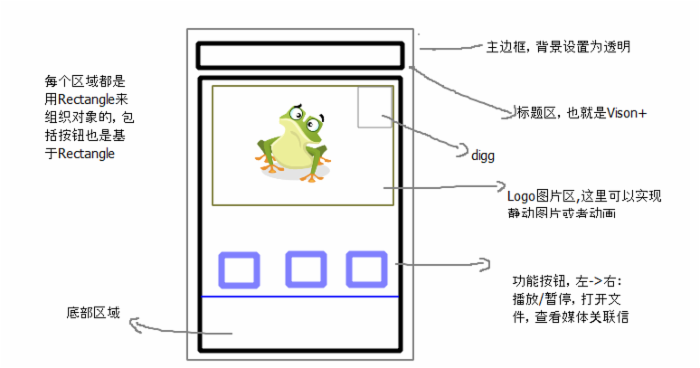
QML的存在更多是解决UI的问题,所以设计很重要,本应用的大概结构:( 本图基于我们自己用Qt开发的一款交互画板软件,定制欢迎联系... )
基于以上一推,接下来要做的就是实际的,开发了,开发编码工作本身是相对简单的,因为QML的足够强大,如果你是曾经WPF开发者那你会很容易的上手的
1. 无边框的设计,主边框,其实就是个Rectangle
Rectangle { id : _card width: 230 ; height: 390 color : Qt.rgba( 0, 0 ,0 , 0) //Title : Rectangle 标题区 //content : Rectangle 内容区 } 2. 标题区
Rectangle { id : _title color : "#eeeeee" width : _card.width height: 32 radius: 5 border.color: "#62a3dd" border.width: 1 anchors.top: parent.top anchors.left: parent.left Text { id : _logotext font.pointSize: 14 font.family: "Comic Sans MS" text : qsTr("Vison+") anchors.horizontalCenter: parent.horizontalCenter anchors.verticalCenter: parent.verticalCenter color : "#f35b5a" opacity: 0.8 } MouseArea { id : _dragmouse property point startpoint anchors.fill: parent onPressed: { startpoint = Qt.point( mouseX , mouseY) ; } onPositionChanged: { var dx = mouse.x - startpoint.x , dy = mouse.y - startpoint.y; mainWindow.setX( mainWindow.x + dx ); mainWindow.setY( mainWindow.y + dy ); mouse.accepted = false; } } } 因为应用的无边框处理,所以我们在title区可以看到添加了一个mousearea对象,mousearea主要用于响应鼠标的操作,在这里我们要实现的是窗体的拖动,处理代码见于onPositionChanged,在其中有个对象mainWIndow是QQuickView,改对象是在我们的CPP文件中通过setContextProperty传递给QML的用于对view的一些控制操作,具体看后面
2.内容区 : 内容区涵盖了应用的所有功能展示(UI代码中涉及的图片名字有点错乱,请忽略改部分)

Rectangle{ id : _content anchors.top: _title.bottom anchors.topMargin: 5 anchors.left: parent.left width: 230 ; height: 340 color : "#eee" radius: 5 Image { id : _titleimage anchors.top: parent.top anchors.left: parent.left anchors.right: parent.right anchors.margins: 3 source: "qrc:/title.jpg" width : 200 ; height : 200 smooth: true } Image { id : _diggimage width: 48 ;height: 48 anchors.top: parent.top anchors.left: parent.left anchors.leftMargin: parent.width - 48 source: "qrc:/digg.png" } Rectangle { id : _playbtn width: 21; height: 32 color : Qt.rgba(0,0,0,0) anchors.top: _titleimage.bottom anchors.topMargin: 25 anchors.left: parent.left anchors.leftMargin: 29 Image { id: _playpauseImage width: 21;height: 32 source: "qrc:/play.png" anchors.horizontalCenter: parent.horizontalCenter } MouseArea { anchors.fill: parent onClicked: { if( _audio.hasAudio ){ if( _audio.status === Audio.Loaded || _audio .status === Audio.Buffered ) { _progress.value = 0 ; _progress.maximumValue = _audio.duration; console.log("duration:" + _progress.maximumValue ); if( _audio.playbackState === Audio.PlayingState ){ _audio.pause(); }else { _audio.play(); } } } } } } Rectangle { id : _nextbtn width: 32; height: 32 color : Qt.rgba(0,0,0,0) anchors.top: _titleimage.bottom anchors.topMargin: 25 anchors.left: _playbtn.left anchors.leftMargin: 75 Image { width: 31;height: 31 source: "qrc:/next.png" anchors.horizontalCenter: parent.horizontalCenter } MouseArea { anchors.fill: parent onClicked: { _filedlg.visible = true ; } } } Rectangle { id : _deletebtn width: 32; height: 32 color : Qt.rgba(0,0,0,0) anchors.top: _titleimage.bottom anchors.topMargin: 25 anchors.right: parent.right anchors.rightMargin: 15 Image { width: 19;height: 32 source: "qrc:/info.png" anchors.horizontalCenter: parent.horizontalCenter } MouseArea { anchors.fill: parent onClicked: { _infodlg.visible = true; } } } ProgressBar{ id: _progress width: parent.width anchors.left: parent.left anchors.right: parent.right anchors.top: _deletebtn.bottom anchors.topMargin: 20 maximumValue: 100 value : 20 style: ProgressBarStyle { background: Rectangle { radius: 2 color: "#909090" border.color: "gray" border.width: 1 implicitWidth: control.width implicitHeight: 2 } progress: Rectangle { color: "#62a3dd" border.color: "steelblue" } } } Rectangle { id :_authorlb anchors.top: _progress.bottom anchors.topMargin: 15 anchors.bottom : parent.bottom anchors.bottomMargin: 5 color : "#eee" width: parent.width Text { id: _author font.pointSize: 12 font.family: "Comic Sans MS" text : qsTr("Vison+ Group 2014-2015") anchors.horizontalCenter: parent.horizontalCenter anchors.verticalCenter: parent.verticalCenter color : "#abd0e5" } } } View Code 按钮的设计基于Rectangle,QML本来有button控件,但是为了更高的定制化推荐还是给予item、rectangle来实现button
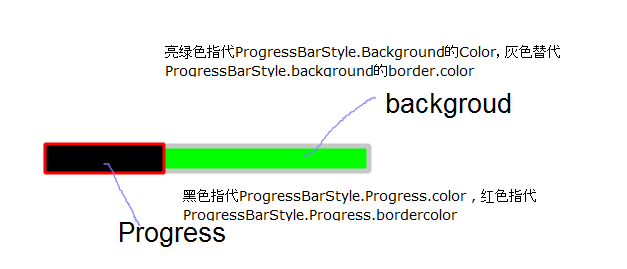
进度条我们使用progressbar,我们重写了style属性,基于progressbarstyle,ProgressBarStyle有几个参数是我们需要理解的:
ProgressBarStyle.Background : 指代当前progress的背景控件,可以基于任何QML支持的component(Item,Rectange,Image等)
,对于background的重写,需要注意下implicitWidth和implicitHeight必须指定。
ProgressBar:可以理解为progress显示的进度区域
在style中如果要访问progress控件可以通过ProgressBarStyle.control,这是个只读属性
如图:
3. Audio
Audio用于实现音频媒体数据的播放,我们只关注它的几个重要属性
- source 设置媒体数据源,QUrl类型
- duaration 当前播放的总时间,这是个以毫秒为单位的时间
- volume 声音 , position : 当前播放进度(毫秒)
- playbackState: 相对于QMediaPlayer的state,枚举类型,表示当前状态(播放,暂停,停止)
- status :表示媒体数据的加载情况,只有标识为loaded和buffed才能进行正常的播放,status在控制媒体播放,暂停等操作时候通常是配合placbackState一起使用的.
- play / pause / stop 控制媒体的播放,暂停,停止
事件我们只关注
onPositionChanged 播放进度变更通知
onPlaybackStateChanged 播放状态的切换通知
onErrorChanged 播放过程中错误通知
本应用中Audio部分代码
Audio { id : _audio source: "" function do_play_stats_changed() { if( _audio.playbackState === Audio.PlayingState ){ _playpauseImage.source = "qrc:/pause.png"; }else{ _playpauseImage .source= "qrc:/play.png"; } } onPlaybackStateChanged: { do_play_stats_changed(); } onErrorChanged: { console.log("audio error :" + _audio.errorString); } onSourceChanged: { _progress.value = 0 ; _playpauseImage.source = "qrc:/play.png"; } onPositionChanged: { _progress.value = position } } View Code 4. 打开文件FileDialog
FileDialog { id : _filedlg title : "select music file...." nameFilters: [ "MP3 files (*.mp3)", "Wave files (*.wav)" ] onAccepted: { _audio.source = ""; _audio.source = _filedlg.fileUrl ; } } nameFilters 设置文件的过滤,我们这里支持MP3和wav
onAccepted 用于选中文件通知后的处理
UI结束了,此时这只是个静态的qml文件,我们需要通过一个view将改qml所表示的内容展示出来,这里我们通过QQuickView来实现对qml文件的加载,同时实现窗体的无边框(你可以通过QML Engine来加载qml文件)
int main(int argc, char *argv[]) { QApplication app(argc, argv); QQuickView view; view.setSource(QUrl(QStringLiteral("qrc:/Card.qml"))); view.setFlags(Qt::FramelessWindowHint | Qt::WindowStaysOnTopHint); view.setColor(Qt::transparent); view.rootContext()->setContextProperty("mainWindow", &view ); view.show(); return app.exec(); }
QQuickView提供了一个窗体用于qml内容的显示,setSource用于设置显示的数据源,show用于窗体的显示。
QQuickView是从window继承过来的,所以它具备了窗体的所有事件处理操作(鼠标,键盘等)同时支持QT信号/槽。
对于我们来说QQuickView有个很重要的属性rootContext,对应QQmlContext对象,这是个qml components的上下文,我们通过该对象提供的一些方法可以实现跟QML组件的数据交互,具体的可以参考官方文档或者关注后期博文.
=> 完整的UI代码
import QtQuick 2.0 import QtQuick.Controls 1.2 import QtQuick.Controls.Styles 1.2 import QtMultimedia 5.0 import QtQuick.Dialogs 1.2 Rectangle { id : _card width: 230 ; height: 390 color : Qt.rgba( 0, 0 ,0 , 0) Rectangle { id : _title color : "#eeeeee" width : _card.width height: 32 radius: 5 border.color: "#62a3dd" border.width: 1 anchors.top: parent.top anchors.left: parent.left Text { id : _logotext font.pointSize: 14 font.family: "Comic Sans MS" text : qsTr("Vison+") anchors.horizontalCenter: parent.horizontalCenter anchors.verticalCenter: parent.verticalCenter color : "#f35b5a" opacity: 0.8 } MouseArea { id : _dragmouse property point startpoint anchors.fill: parent onPressed: { startpoint = Qt.point( mouseX , mouseY) ; } onPositionChanged: { var dx = mouse.x - startpoint.x , dy = mouse.y - startpoint.y; mainWindow.setX( mainWindow.x + dx ); mainWindow.setY( mainWindow.y + dy ); mouse.accepted = false; } } } Rectangle{ id : _content anchors.top: _title.bottom anchors.topMargin: 5 anchors.left: parent.left width: 230 ; height: 340 color : "#eee" radius: 5 Image { id : _titleimage anchors.top: parent.top anchors.left: parent.left anchors.right: parent.right anchors.margins: 3 source: "qrc:/title.jpg" width : 200 ; height : 200 smooth: true } Image { id : _diggimage width: 48 ;height: 48 anchors.top: parent.top anchors.left: parent.left anchors.leftMargin: parent.width - 48 source: "qrc:/digg.png" } Rectangle { id : _nextbtn width: 32; height: 32 color : Qt.rgba(0,0,0,0) anchors.top: _titleimage.bottom anchors.topMargin: 25 anchors.left: _playbtn.left anchors.leftMargin: 75 Image { width: 31;height: 31 source: "qrc:/next.png" anchors.horizontalCenter: parent.horizontalCenter } MouseArea { anchors.fill: parent onClicked: { _filedlg.visible = true ; } } } Rectangle { id : _deletebtn width: 32; height: 32 color : Qt.rgba(0,0,0,0) anchors.top: _titleimage.bottom anchors.topMargin: 25 anchors.right: parent.right anchors.rightMargin: 15 Image { width: 19;height: 32 source: "qrc:/info.png" anchors.horizontalCenter: parent.horizontalCenter } MouseArea { anchors.fill: parent onClicked: { _infodlg.visible = true; } } } ProgressBar{ id: _progress width: parent.width anchors.left: parent.left anchors.right: parent.right anchors.top: _deletebtn.bottom anchors.topMargin: 20 maximumValue: 100 value : 20 style: ProgressBarStyle { background: Rectangle { radius: 2 color: "#909090" border.color: "gray" border.width: 1 implicitWidth: control.width implicitHeight: 12 } progress: Rectangle { color: "#62a3dd" border.color: "steelblue" } } } Rectangle { id :_authorlb anchors.top: _progress.bottom anchors.topMargin: 15 anchors.bottom : parent.bottom anchors.bottomMargin: 5 color : "#eee" width: parent.width Text { id: _author font.pointSize: 12 font.family: "Comic Sans MS" text : qsTr("Vison+ Group 2014-2015") anchors.horizontalCenter: parent.horizontalCenter anchors.verticalCenter: parent.verticalCenter color : "#abd0e5" } } } Audio { id : _audio source: "" function do_play_stats_changed() { if( _audio.playbackState === Audio.PlayingState ){ _playpauseImage.source = "qrc:/pause.png"; }else{ _playpauseImage .source= "qrc:/play.png"; } } onPlaybackStateChanged: { do_play_stats_changed(); } onErrorChanged: { console.log("audio error :" + _audio.errorString); } onSourceChanged: { _progress.value = 0 ; _playpauseImage.source = "qrc:/play.png"; } onPositionChanged: { _progress.value = position } } FileDialog { id : _filedlg title : "select music file...." nameFilters: [ "MP3 files (*.mp3)", "Wave files (*.wav)","All files (*)" ] onAccepted: { _audio.source = ""; _audio.source = _filedlg.fileUrl ; } } MessageDialog{ id: _infodlg title: "vison+ music infomation" text: { var info = "title : " +_audio.metaData.title + "/n/n" + "author : " + _audio.metaData.author + "/n/n" + "albumTitle : " + _audio.metaData.albumTitle + "/n/n" + "category : " + _audio.metaData.category + "/n/n" + "date : " + _audio.metaData.date; return info; } } } View Code ps: 图片资源请自行替换
----------------------------------------------------------------------------------------------------------------------------
简单就是美


扩展语:

在线播放和播放列表是音乐播放器基本的功能,在这里本应用并没有实现,关于在线播放audio本身是支持网络数据源的,当然你可以通过CC++后台下载媒体后传递给audio,而播放列表更可以通过listview来实现,QT的model-view模式让实现变得更加的简单,在后面都会用相关的文章来写listview,combobox,tabview等一些组件的应用
正文到此结束
热门推荐


相关文章


Loading...
![[HBLOG]公众号](http://www.liuhaihua.cn/img/qrcode_gzh.jpg)

