LayoutInflater详解
在日常开发中经常会用到通过资源id去获取view的场景,LayoutInflater这时非常有用。这与我们经常用的findViewById()不一样。
-
LayoutInflater通常用于动态载入的界面,使用LayoutInflater的inflate方法动态接入layout文件;
-
findViewById通常用于在已经载入的界面,使用findViewById()方法来获得其中的界面元素。
一 LayoutInflater实例
获得LayoutInflater实例方式
-
通过系统服务获取布局加载器
LayoutInflater inflater = (LayoutInflater) getSystemService(Context.LAYOUT_INFLATER_SERVICE);-
通过activity中的getLayoutInflater()方法
LayoutInflater inflater = getLayoutInflater();-
通过LayoutInflater的from静态方法
LayoutInflater inflater = LayoutInflater.from(this) 这三种方式本质都是调用Context.getSystemService() 。
getLayoutInflater()源码分析
Activity 的 getLayoutInflater() 方法是调用 PhoneWindow 的getLayoutInflater()方法,看一下该源代码:
public PhoneWindow(Context context) { super(context); //可以看出它其实是调用 LayoutInflater.from(context)。 mLayoutInflater = LayoutInflater.from(context); } LayoutInflater.from(context)源码分析
public static LayoutInflater from(Context context) { LayoutInflater LayoutInflater = (LayoutInflater) context.getSystemService(Context.LAYOUT_INFLATER_SERVICE); if (LayoutInflater == null) { throw new AssertionError("LayoutInflater not found."); } return LayoutInflater; } LayoutInflater.from(context)内部是调用context.getSystemService(Context.LAYOUT_INFLATER_SERVICE)获得布局加载器.
二 inflate方法
既然已经获取到LayoutInflater实例,加载布局主要还是LayoutInflater的inflate方法。LayoutInflater类提供的下面四种inflate方法:
-
public View inflate (int resource, ViewGroup root)
-
public View inflate (int resource, ViewGroup root, boolean attachToRoot)
-
public View inflate (XmlPullParser parser, ViewGroup root)
-
public View inflate (XmlPullParser parser, ViewGroup root, boolean attachToRoot)
我们先看下源码:
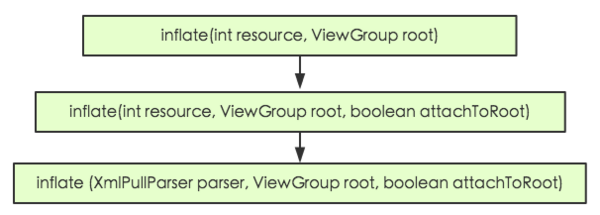
public View inflate(int resource, ViewGroup root) { //如果root不为null,attachToRoot为true,否则attachToRoot为false return inflate(resource, root, root != null); } public View inflate(int resource, ViewGroup root, boolean attachToRoot) { if (DEBUG) System.out.println("INFLATING from resource: " + resource); XmlResourceParser parser = getContext().getResources().getLayout(resource); try { return inflate(parser, root, attachToRoot); } finally { parser.close(); } } 下图可以看到inflate的调用关系:
具体处理加载逻辑的是 inflate(XmlPullParser parser, ViewGroup root, boolean attachToRoot) 方法,具体XmlPullParser的解析,不是我们讨论的主题。我们这里主要讨论的是上面两个方法的参数变化影响。因为我们通常是调用上面连个方法来加载布局。
说的更明白一点就是对 ViewGroup root , boolean attachToRoot 这两个参数的讨论。传入ViewGroup root, boolean attachToRoot的值不同,会出现什么结果呢?
先初略解释下这两个参数:
-
ViewGroup root:指实例的布局所要放入的根视图。
-
boolean attachToRoot:指是否附加到传入的根视图。
继续看下inflate(XmlPullParser parser, ViewGroup root, boolean attachToRoot)源码,然后在分析每种情况。
// 这里加载我们设置的resource,临时标记为temp final View temp = createViewFromTag(root, name, attrs, false); ViewGroup.LayoutParams params = null; if (root != null) { if (DEBUG) { System.out.println("Creating params from root: " + root); } // 如果root不是null,会根据resource最外面的layout创建layout params来匹配root(如果需要) params = root.generateLayoutParams(attrs); if (!attachToRoot) { // 如果attachToRoot为false,为temp设置布局 temp.setLayoutParams(params); } ...... //如果root != null && attachToRoot,把temp添加到root中,并设置params if (root != null && attachToRoot) { root.addView(temp, params); } //如果root == null || !attachToRoot,直接返回temp。 if (root == null || !attachToRoot) { result = temp; } ...... return result; 这里稍微分析代码:
第1段代码:动态载入resource
final View temp = createViewFromTag(root, name, attrs, false)第2段代码:创建ViewGroup的LayoutParams
ViewGroup.LayoutParams params = null; params = root.generateLayoutParams(attrs);第3段代码:当root不为空,attachToRoot为false时,为temp设置layout属性,当该view以后被添加到父view当中时,这些layout属性会自动生效
if (root != null) { params = root.generateLayoutParams(attrs); if (!attachToRoot) { // 如果attachToRoot为false,为temp设置布局 temp.setLayoutParams(params); }第4段代码:
// We are supposed to attach all the views we found (int temp) // to root. Do that now. if (root != null && attachToRoot) { root.addView(temp, params); } // Decide whether to return the root that was passed in or the // top view found in xml. if (root == null || !attachToRoot) { result = temp; } 只有当 root != null && attachToRoot) 时,root会把temp添加到root中,给加载的布局文件的指定一个父布局,即root。否则temp不会添加到root,即 root == null || !attachToRoot 时,最后直接return temp。
这里总结一下:
public View inflate(int resource, ViewGroup root, boolean attachToRoot)-
如果root为null,attachToRoot为任何值都毫无意义,只会单纯的加载布局文件。
-
如果root不为null,attachToRoot设为true,root会把temp添加到root中,此时在temp布局文件中的根view的layout属性会生效。
-
如果root不为null,attachToRoot设为false,此时view并没有添加到root,但是view的layout属性被保存了下来,以后如果调用 addView(View child) ,layout属性会自动生效。可以见下面源码:ViewGroup
public void addView(View child, int index) { if (child == null) { throw new IllegalArgumentException("Cannot add a null child view to a ViewGroup"); } //这里便是从child中获取LayoutParams LayoutParams params = child.getLayoutParams(); if (params == null) { params = generateDefaultLayoutParams(); if (params == null) { throw new IllegalArgumentException("generateDefaultLayoutParams() cannot return null"); } } //这段代码是不是和刚才inflate中代码很相似,对,这里就是把view和layout属性添加到parent中。 addView(child, index, params); } 注1 :View类也提供了两个静态方法,作用一样
View.inflate(int resource, ViewGroup root); View.inflate(int resource, ViewGroup root, boolean attachToRoot);三 Demo演示
以后遇到inflate的布局文件的layout属性失效,我想大家应该知道什么原因了。
理论上应该写个demo演示的,其实demo已写好,就是不想截图了。这里就偷懒用ListView的item的布局举个例子,我想大家写Adapter应该很熟悉了。item.xml
<LinearLayout xmlns:android="http://schemas.android.com/apk/res/android" android:layout_width="match_parent" android:layout_height="60dip" android:gravity="center_vertical" android:orientation="horizontal"> <TextView android:layout_width="wrap_content" android:layout_height="wrap_content" android:text="test" /> </LinearLayout> Adapter
public View getView(int position, View convertView, ViewGroup parent) { if (convertView == null) { convertView = inflate(R.layout.item, null); } return convertView; }这样写,android:layout_height的60dip失效了,对不对。换成下面:
public View getView(int position, View convertView, ViewGroup parent) { if (convertView == null) { convertView = inflate(R.layout.item, parent,false); } return convertView; }是不是60dip生效了。
算了再贴个Demo吧,图就不贴了。activity xml
<RelativeLayout xmlns:android="http://schemas.android.com/apk/res/android" android:id="@+id/root_view" android:layout_width="match_parent" android:layout_height="match_parent"> </RelativeLayout>inflate view
<Button xmlns:android="http://schemas.android.com/apk/res/android" android:layout_width="100dp" android:layout_height="100dp" android:orientation="vertical" android:text="test"/>activity:部分代码需要注释
//情况1 View inflateView = getLayoutInflater().inflate(R.layout.inflate_test, null); //情况2 View inflateView = getLayoutInflater().inflate(R.layout.inflate_test, null); rootView.addView(inflateView); //情况3 View inflateView = getLayoutInflater().inflate(R.layout.inflate_test, rootView,false); //情况2 View inflateView = getLayoutInflater().inflate(R.layout.inflate_test, rootView,false); rootView.addView(inflateView); //情况4 View inflateView = getLayoutInflater().inflate(R.layout.inflate_test, rootView,true);正文到此结束
热门推荐


相关文章


Loading...
![[HBLOG]公众号](http://www.liuhaihua.cn/img/qrcode_gzh.jpg)

