新手教程:使用Masonry创建一个下拉式菜单

之前看到一个swift开源项目
https://github.com/PhamBaTho/BTNavigationDropdownMenu
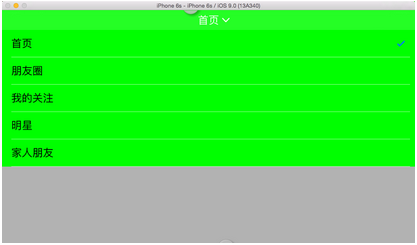
就是一个类似新浪微博的下拉式导航菜单,看看下面的效果。

之前看这个项目的时候(大概一个月之前??今天上去看的时候作者已经更新到适配横竖屏切换了!用的UIViewAutoResizingMask),不能支持横竖屏切换,这明显是没有做布局适配啊,而且没有Objective-C版本,于是自己用Objective-C重新写了一个,并且加上Masonry做自动布局适配屏幕切换。当然这里完全可以用UIViewAutoResizingMask做横竖屏切换,但是Masonry用起来也很简单。做一遍下来加深自己对View和自动布局的理解。。。写下来适合新手看看,高手就绕道吧。不啰嗦了,开始吧。
首先盗用 BTNavigationDropdownMenu 的图标元素bundle到我的新建的项目 https://github.com/tujinqiu/KTDropdownMenuView 下面。。。
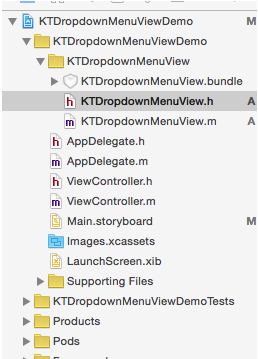
1、新建项目,集成UIView创建KTDropdownMenuView。配置CocoaPods。
BTNavigationDropdownMenu
2、添加一些基本的设置属性和初始化方法,不够的可以以后再添加
#import @interface KTDropdownMenuView : UIView // cell color default greenColor @property (nonatomic, strong) UIColor *cellColor; // cell seprator color default whiteColor @property (nonatomic, strong) UIColor *cellSeparatorColor; // cell height default 44 @property (nonatomic, assign) CGFloat cellHeight; // animation duration default 0.4 @property (nonatomic, assign) CGFloat animationDuration; // text color default whiteColor @property (nonatomic, strong) UIColor *textColor; // text font default system 17 @property (nonatomic, strong) UIFont *textFont; // background opacity default 0.3 @property (nonatomic, assign) CGFloat backgroundAlpha; - (instancetype)initWithFrame:(CGRect)frame titles:(NSArray*)titles; @end
3、在m文件中定义私有属性titles,顾名思义这个存放菜单名称的数组,初始化前面的默认值。个人喜欢用getter来实现懒加载,代码风格而已,看个人喜好。下面是代码。。。
#import "KTDropdownMenuView.h" #import @interface KTDropdownMenuView() @property (nonatomic, copy) NSArray *titles; @end @implementation KTDropdownMenuView #pragma mark -- life cycle -- - (instancetype)initWithFrame:(CGRect)frame titles:(NSArray *)titles { if (self = [super initWithFrame:frame]) { _animationDuration=0.4; _backgroundAlpha=0.3; _cellHeight=44; _selectedIndex = 0; _titles= titles; } return self; } #pragma mark -- getter and setter -- - (UIColor *)cellColor { if (!_cellColor) { _cellColor = [UIColor greenColor]; } return _cellColor; } - (UIColor *)cellSeparatorColor { if (!_cellSeparatorColor) { _cellSeparatorColor = [UIColor whiteColor]; } return _cellSeparatorColor; } - (UIColor *)textColor { if (!_textColor) { _textColor = [UIColor whiteColor]; } return _textColor; } - (UIFont *)textFont { if(!_textFont) { _textFont = [UIFont systemFontOfSize:17]; } return _textFont; } 4、在ViewController中加上如下代码
[self.navigationController.navigationBar setBarTintColor:[UIColor greenColor]]; KTDropdownMenuView*menuView = [[KTDropdownMenuView alloc] initWithFrame:CGRectMake(0,0,100,44) titles:@[@"首页",@"朋友圈",@"我的关注",@"明星",@"家人朋友"]]; self.navigationItem.titleView = menuView;
self.navigationItem.titleView = menuView的作用是替换当前的titleView为我们自定义的view。运行一下,除了导航栏变绿之外,并没有什么卵用。。。但是,运用Xcode的视图调试功能,你会发现还是有点卵用的。
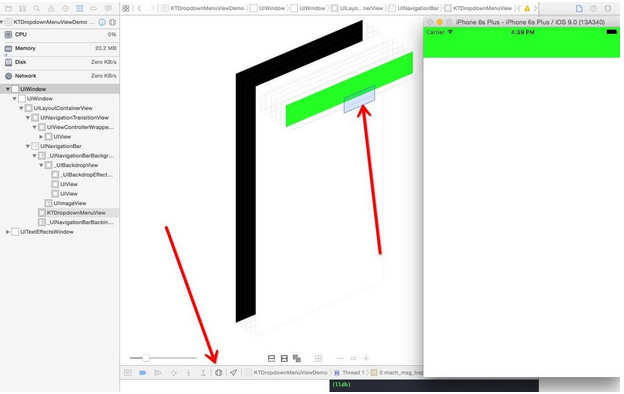
转动一下,导航栏上有个View出现了有木有。
好,下面开始在我们的View上添加控件了,首先导航栏上面有一个可以点的button,同时右边有一个箭头是吧。在m文件中加上如下控件
@property (nonatomic, strong) UIButton *titleButton; @property (nonatomic, strong) UIImageView *arrowImageView;
同时写下getter
- (UIButton *)titleButton { if (!_titleButton) { _titleButton = [[UIButton alloc] init]; [_titleButton setTitle:[self.titles objectAtIndex:0] forState:UIControlStateNormal]; [_titleButton addTarget:self action:@selector(handleTapOnTitleButton:) forControlEvents:UIControlEventTouchUpInside]; [_titleButton.titleLabel setFont:self.textFont]; [_titleButton setTitleColor:self.textColor forState:UIControlStateNormal]; } return _titleButton; } - (UIImageView *)arrowImageView { if (!_arrowImageView) { NSString * bundlePath = [[ NSBundle mainBundle] pathForResource:@"KTDropdownMenuView" ofType:@ "bundle"]; NSString *imgPath= [bundlePath stringByAppendingPathComponent:@"arrow_down_icon.png"]; UIImage *image=[UIImage imageWithContentsOfFile:imgPath]; _arrowImageView = [[UIImageView alloc] initWithImage:image]; } return _arrowImageView; } 接下来当然是addSubView是吧
(instancetype)initWithFrame:(CGRect)frame titles:(NSArray *)titles中写下
[self addSubview:self.titleButton]; [self addSubview:self.arrowImageView];
运行你会发现button和imageView的大小和位置显然不是你想的那样,因为我们并没有设置控件的frame。好,下面用Masonry了。上代码。
[self.titleButton mas_makeConstraints:^(MASConstraintMaker *make) { make.center.equalTo(self); }]; [self.arrowImageView mas_makeConstraints:^(MASConstraintMaker *make) { make.left.equalTo(self.titleButton.mas_right).offset(5); make.centerY.equalTo(self.titleButton.mas_centerY); }]; Masonry使用非常简单,就简单的三个方法,mas_makeConstraints, mas_remakeConstraints, mas_updateConstraints, 比起苹果自己写一堆的布局代码简单太多。推荐用代码写View的童鞋使用Masonry。关于Masonry的详细说明可以去 https://github.com/SnapKit/Masonry 上查看。
上面的代码很容易理解,第一个约束语句是让titleButton处于视图的中间位置。第二个约束语句是让arrowImageView保持与titleButton水平中心对齐,同时arrowImageView的左边与titleButton的右边水平距离为5。
Masonry使用链式语法让添加约束变得非常简单,要是你自己用苹果的API活着可视化语言,你得写一堆的代码来实现布局。比如下面这样又臭又长,还容易出错。
[superview addConstraints:@[ //view1 constraints [NSLayoutConstraint constraintWithItem:view1 attribute:NSLayoutAttributeTop relatedBy:NSLayoutRelationEqual toItem:superview attribute:NSLayoutAttributeTop multiplier:1.0 constant:padding.top], [NSLayoutConstraint constraintWithItem:view1 attribute:NSLayoutAttributeLeft relatedBy:NSLayoutRelationEqual toItem:superview attribute:NSLayoutAttributeLeft multiplier:1.0 constant:padding.left], [NSLayoutConstraint constraintWithItem:view1 attribute:NSLayoutAttributeBottom relatedBy:NSLayoutRelationEqual toItem:superview attribute:NSLayoutAttributeBottom multiplier:1.0 constant:-padding.bottom], [NSLayoutConstraint constraintWithItem:view1 attribute:NSLayoutAttributeRight relatedBy:NSLayoutRelationEqual toItem:superview attribute:NSLayoutAttributeRight multiplier:1 constant:-padding.right]] ];
运行之后,果然,使我们预料的效果哈
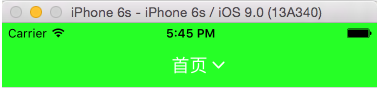
细心的会发现我用Masonry的时候并没有设置arrowImageView与titleButton的size,但是照样运行很好哈。这是因为自动布局系统中,如果你没有设置控件的size,那么就会默认使用固有内容大小(Intrinsic Content Size),固有内容会驱动设置控件的size。实际上Xcode里面大部分的控件都有Intrinsic Content Size。也就是说如果你内容多的时候,size会自动变大。自动布局的这个好处在本地化不同语言(内容长度不一致)的时候非常有用。如果中文的label就两个字,但是英文一大串的时候,建议你使用自动布局,不要手动去设置label的size。
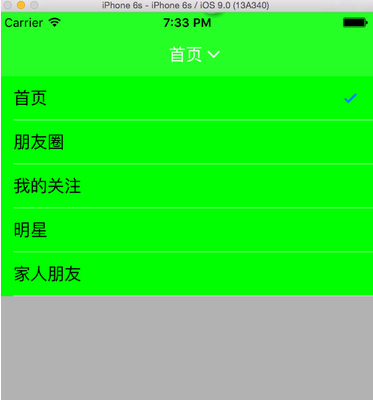
5、下面添加tableView,加上如下属性。tableView干嘛?显然是装载文字菜单列表啊。
@property (nonatomic, strong) UITableView *tableView; @property (nonatomic, strong) UIView *backgroundView; @property (nonatomic, strong) UIView *wrapperView;
backgroundView是后面的一层半透明的黑色背景,当tableView出现的时候,backgroundView也出现,菜单收起的时候一起消失。wrapperView则是tableView和backgroundView的父View。
那么问题来了,wrapperView附着到哪里?显然不能加在KTDropdownMenuView上哈,答案是附着到当前的keyWindow上面。因为初始化的过程中并没有传入其他的View,而且也不应该让KTDropdownMenuView与其他的view产生关联。直接添加到keyWindow上面,即可以显示在最上层。
另外一个问题是wrapperView的大小位置如何设置?如何保证旋转屏幕也能适配大小?利用自动布局可以适配旋转屏幕,同时wrapperView要在导航栏下面显示。那么很容易想到wrapperView的top要依靠在导航栏的bottom,同时左,右,下需要与当前keyWindow分别对齐。
那么问题又来了,如何找到navigationBar?初始化方法并没有传进来啊。。。当然简单的办法是传一个进来一个哈,这里用 BTNavigationDropdownMenu 的思路,递归搜索最前面的UINavigationController就行,代码贴上来,自己理解。。。
@implementation UIViewController (topestViewController) - (UIViewController *)topestViewController { if (self.presentedViewController) { return [self.presentedViewController topestViewController]; } if ([self isKindOfClass:[UITabBarController class]]) { UITabBarController *tab = (UITabBarController *)self; return [[tab selectedViewController] topestViewController]; } if ([self isKindOfClass:[UINavigationController class]]) { UINavigationController *nav = (UINavigationController *)self; return [[nav visibleViewController] topestViewController]; } return self; } @end 下面在初始化方法中加上如下代码
UIWindow *keyWindow = [UIApplication sharedApplication].keyWindow; UINavigationBar *navBar = [keyWindow.rootViewController topestViewController].navigationController.navigationBar; [keyWindow addSubview:self.wrapperView]; [self.wrapperView mas_makeConstraints:^(MASConstraintMaker *make) { make.left.right.bottom.equalTo(keyWindow); make.top.equalTo(navBar.mas_bottom); }]; [self.wrapperView addSubview:self.backgroundView]; [self.backgroundView mas_makeConstraints:^(MASConstraintMaker *make) { make.edges.equalTo(self.wrapperView); }]; [self.wrapperView addSubview:self.tableView]; [self.tableView mas_makeConstraints:^(MASConstraintMaker *make) { make.edges.equalTo(self.wrapperView); }]; 以上略掉tableViewDataSource的相关代码和getter。
旋转一下,很好,没有问题,自动布局工作的很好
6、下面加上按钮响应和动画
添加下面两个属性
@property (nonatomic, assign) BOOL isMenuShow; @property (nonatomic, assign) NSUInteger selectedIndex;
然后实现按钮的点击事件方法,实现tableView的delegate方法
#pragma mark -- UITableViewDataDelegate -- - (void)tableView:(UITableView *)tableView didSelectRowAtIndexPath:(NSIndexPath *)indexPath { self.selectedIndex = indexPath.row; [tableView deselectRowAtIndexPath:indexPath animated:YES]; } #pragma mark -- handle actions -- - (void)handleTapOnTitleButton:(UIButton *)button { self.isMenuShow = !self.isMenuShow; } 相应的属性setter
- (void)setIsMenuShow:(BOOL)isMenuShow { if (_isMenuShow != isMenuShow) { _isMenuShow = isMenuShow; if (isMenuShow) { [self showMenu]; } else { [self hideMenu]; } } } - (void)setSelectedIndex:(NSUInteger)selectedIndex { if (_selectedIndex != selectedIndex) { _selectedIndex = selectedIndex; [_titleButton setTitle:[_titles objectAtIndex:selectedIndex] forState:UIControlStateNormal]; [self.tableView reloadData]; } self.isMenuShow = NO; } 在实现动画方法showMenu和hideMenu之前,先考虑:这个tableView在出现的时候是从上往下出现的,也就是这个tableView的出现的这几行的下端应该在wrapperView的顶端,于是先修改init方法中设置tableView起始位置的代码。
CGFloat tableCellsHeight = _cellHeight * _titles.count; [self.tableView mas_makeConstraints:^(MASConstraintMaker *make) { make.left.right.equalTo(self.wrapperView); make.top.equalTo(self.wrapperView.mas_top).offset(-tableCellsHeight); make.bottom.equalTo(self.wrapperView.mas_bottom).offset(tableCellsHeight); }]; [self.tableView layoutIfNeeded]; self.wrapperView.hidden = YES; 注意到最后加了一句 [self.tableView layoutIfNeeded],这是因为自动布局动画都是驱动layoutIfNeeded来实现的,与以往的设置frame不一样。给View添加或者更新约束后,并不能马上看到效果,而是要等到viewlayout的时候触发。layoutIfNeeded就是手动触发这一过程。这里为了与后面的动画不冲突,首先调用一次,设置初始状态。下面是动画代码。
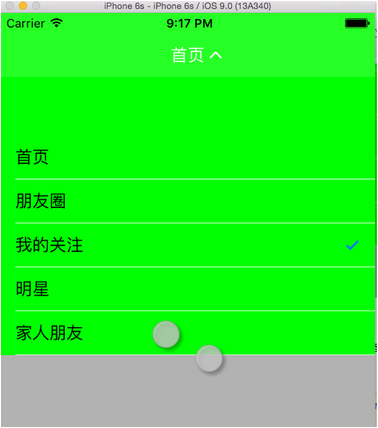
- (void)showMenu { [self.tableView mas_updateConstraints:^(MASConstraintMaker *make) { make.edges.equalTo(self.wrapperView); }]; self.wrapperView.hidden = NO; self.backgroundView.alpha = 0.0; [UIView animateWithDuration:self.animationDuration animations:^{ self.arrowImageView.transform = CGAffineTransformRotate(self.arrowImageView.transform, M_PI); }]; [UIView animateWithDuration:self.animationDuration * 1.5 delay:0 usingSpringWithDamping:0.7 initialSpringVelocity:0.5 options:UIViewAnimationOptionCurveLinear animations:^{ [self.tableView layoutIfNeeded]; self.backgroundView.alpha = self.backgroundAlpha; } completion:nil]; } - (void)hideMenu { CGFloat tableCellsHeight = _cellHeight * _titles.count; [self.tableView mas_updateConstraints:^(MASConstraintMaker *make) { make.left.right.equalTo(self.wrapperView); make.top.equalTo(self.wrapperView.mas_top).offset(-tableCellsHeight); make.bottom.equalTo(self.wrapperView.mas_bottom).offset(tableCellsHeight); }]; [UIView animateWithDuration:self.animationDuration animations:^{ self.arrowImageView.transform = CGAffineTransformRotate(self.arrowImageView.transform, M_PI); }]; [UIView animateWithDuration:self.animationDuration * 1.5 delay:0 usingSpringWithDamping:0.7 initialSpringVelocity:0.5 options:UIViewAnimationOptionCurveLinear animations:^{ [self.tableView layoutIfNeeded]; self.backgroundView.alpha = 0.0; } completion:^(BOOL finished) { self.wrapperView.hidden = YES; }]; } 代码很简单,主要是设置动画之后的tableView约束位置,旋转arrowImageView同时改变backgroundView的透明度,注意这里是调用的mas_updateConstraints是更新约束,一搬做动画都是用这个。但是细心的话会发现有一个bug,动画过程中,还有把tableView往下面拽的时候,上面和导航栏之间会出现灰色背景啊。
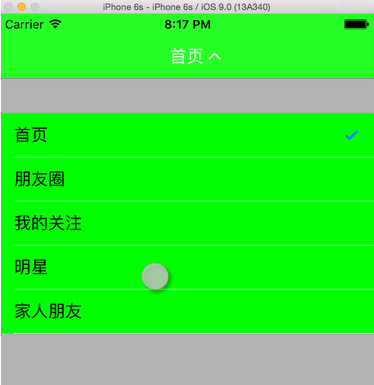
不能忍。添加一个与tableCell一样颜色的tableHeaderView到tableView上面吧。在showMenu方法的开头加上下面代码。
UIView *headerView = [[UIView alloc] initWithFrame:CGRectMake(0, 0, 0, kKTDropdownMenuViewHeaderHeight)]; headerView.backgroundColor = self.cellColor; self.tableView.tableHeaderView = headerView;
其中kKTDropdownMenuViewHeaderHeight设置为300。值得注意的是,这里并不需要设置tableHeaderView的宽度,它会自适应到tableView的宽度。还有加了tableHeaderView之后,相应的mas_updateConstraints和mas_makeConstraints方法中需要将位置上移kKTDropdownMenuViewHeaderHeight的距离。同时把init方法中的[self.tableView layoutIfNeeded]移动到添加tableHeaderView之后。现在动画还有拖拽不会看到背景了。
完整的项目在这里, https://github.com/tujinqiu/KTDropdownMenuView
欢迎讨论交流,批评指正!!!
正文到此结束
热门推荐


相关文章


Loading...
![[HBLOG]公众号](http://www.liuhaihua.cn/img/qrcode_gzh.jpg)

