【Win10】【Win2D】实现控件阴影效果
学过 WPF 的都知道,在 WPF 中,为控件添加一个阴影效果是相当容易的。
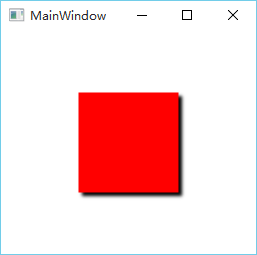
<Border Width="100" Height="100" Background="Red"> <Border.Effect> <DropShadowEffect /> </Border.Effect> </Border>
那么这样就会显示一个 100 宽、100 高,背景红色,带有阴影的矩形了。如下图所示。
但是,在 WinRT 中,基于 Metro 教义和性能考虑,巨硬扼杀了阴影。但是,需求多多少少还是会有的,以致于部分开发者不得不用渐变来实现蹩脚的“阴影”效果,而且仔细看上去会发现很假,连 duang 一下的特效都没,一眼看上去这阴影效果就是假的。
那么,真正的阴影效果真的没法实现了吗?以前是。但是现在,我们有了 Win2D,什么增强光照啊、高斯模糊啊,都不是问题。阴影当然也是。
先来看看怎么绘制一个阴影先吧。
前台 XAML:
<Page x:Class="App92.MainPage" xmlns="http://schemas.microsoft.com/winfx/2006/xaml/presentation" xmlns:x="http://schemas.microsoft.com/winfx/2006/xaml" xmlns:win2d="using:Microsoft.Graphics.Canvas.UI.Xaml" Unloaded="Page_Unloaded"> <Grid Background="{ThemeResource ApplicationPageBackgroundThemeBrush}"> <win2d:CanvasControl x:Name="canvas" Width="300" Height="300" HorizontalAlignment="Left" VerticalAlignment="Top" Draw="canvas_Draw" /> </Grid> </Page> 后台代码:
using Microsoft.Graphics.Canvas; using Microsoft.Graphics.Canvas.Effects; using Microsoft.Graphics.Canvas.UI.Xaml; using Windows.Foundation; using Windows.UI; using Windows.UI.Xaml; using Windows.UI.Xaml.Controls; namespace App92 { public sealed partial class MainPage : Page { public MainPage() { this.InitializeComponent(); } private void canvas_Draw(CanvasControl sender, CanvasDrawEventArgs args) { CanvasCommandList cl = new CanvasCommandList(sender); using (CanvasDrawingSession clds = cl.CreateDrawingSession()) { clds.FillRectangle(new Rect(100, 100, 100, 100), Colors.White); } ShadowEffect effect = new ShadowEffect() { Source = cl }; args.DrawingSession.DrawImage(effect); } private void Page_Unloaded(object sender, RoutedEventArgs e) { if (this.canvas != null) { this.canvas.RemoveFromVisualTree(); this.canvas = null; } } } } Page_Unloaded 里面是释放 Win2D 使用的资源。这点在我上次翻译的 《【Win2D】【译】Win2D 快速入门》 里面有说过。
Draw 方法的代码则类似于《快速入门》里面对图片施加高斯模糊。
编译并运行后你应该会看见这样的效果:

一坨黑乎乎的东西,而且是毛边的。
在上面的代码中,关键就是
ShadowEffect effect = new ShadowEffect() { Source = cl }; 这一句声明了一个阴影效果,并且源是上面那个命令列表,也就是表明对哪个对象施加阴影效果。在上面那个命令列表中绘制了一个在距离 canvas 左上角横坐标 100、纵坐标 100,宽高 100 的矩形。
需要注意的是,尽管我们绘制的矩形是白色的,但是阴影效果是不关心的(详细点说是不关心 RGB,A 通道还是有影响的),而且 ShadowEffect 有自己的颜色属性。
在理清了如何编写代码显示阴影之后,我们再来探究下如何实现控件阴影。
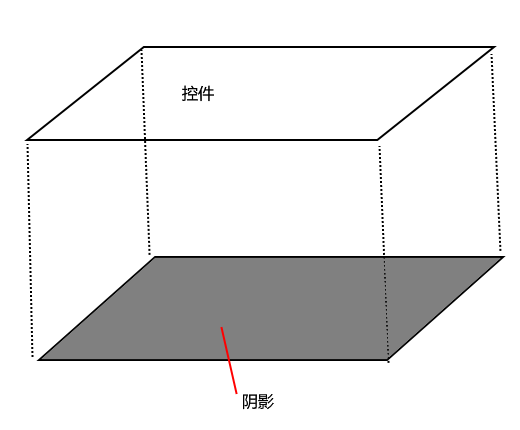
原理很简单,无非就是在控件 z 轴下面显示阴影。
于是乎我们新建一个模板控件,我就叫它 Shadow,并写出以下代码。
cs 代码:
using Microsoft.Graphics.Canvas.UI.Xaml; using Windows.UI.Xaml; using Windows.UI.Xaml.Controls; using Windows.UI.Xaml.Markup; namespace App92 { [ContentProperty(Name = nameof(Content))] public class Shadow : Control { public static readonly DependencyProperty ContentProperty = DependencyProperty.Register(nameof(Content), typeof(FrameworkElement), typeof(Shadow), new PropertyMetadata(null)); private CanvasControl _canvas; public Shadow() { this.DefaultStyleKey = typeof(Shadow); this.Unloaded += this.OnUnloaded; } public FrameworkElement Content { get { return (FrameworkElement)this.GetValue(ContentProperty); } set { this.SetValue(ContentProperty, value); } } protected override void OnApplyTemplate() { base.OnApplyTemplate(); this._canvas = (CanvasControl)this.GetTemplateChild("PART_Canvas"); this._canvas.Draw += this.Canvas_Draw; } private void Canvas_Draw(CanvasControl sender, CanvasDrawEventArgs args) { // TODO。 } private void OnUnloaded(object sender, RoutedEventArgs e) { if (this._canvas != null) { this._canvas.RemoveFromVisualTree(); this._canvas = null; } } } } Generic.xaml 代码:
<ResourceDictionary xmlns="http://schemas.microsoft.com/winfx/2006/xaml/presentation" xmlns:x="http://schemas.microsoft.com/winfx/2006/xaml" xmlns:win2d="using:Microsoft.Graphics.Canvas.UI.Xaml" xmlns:local="using:App92"> <Style TargetType="local:Shadow"> <Setter Property="Template"> <Setter.Value> <ControlTemplate TargetType="local:Shadow"> <Grid> <win2d:CanvasControl x:Name="PART_Canvas" /> <ContentControl Content="{TemplateBinding Content}" /> </Grid> </ControlTemplate> </Setter.Value> </Setter> </Style> </ResourceDictionary> 这里我不选择继承自 ContentControl 是因为 ContentControl 的 Content 属性是 object,而后文中我们需要使用到 FrameworkElement。
接下来,开始考虑编写 Draw 代码。
第一个问题,ShadowEffect 的 Source 是哪里来的?对于大部分控件,就是一个矩形,但是,部分如 Border 之类的控件,可能是圆角的(因为有 CornerRadius 属性)。那么该如何得到一个控件的形状呢?这里我们使用 RenderTargetBitmap 这个类,它能够捕获一个在可视树上的控件的外观。对于控件透明的部分,RenderTargetBitmap 就是透明的。那么 RenderTargetBitmap 得到的就相当于控件的形状。但是,RenderTargetBitmap 是异步的,因此我们要将该部分写在其它方法当中。因为 Draw 方法是不能够编写异步代码的。
第二个问题,应该何时重绘阴影?也就是应该何时重新调用 RenderTargetBitmap?这个问题很容易解决,我们使用 FrameworkElement 的 LayoutUpdated 事件好了。所以我们上面的 Content 的属性需要为 FrameworkElement。
第三个问题,从上面 Generic.xaml 来看,CanvasControl 是跟 ContentControl 一样大小的,假设我们的 Content 刚好占满了 ContentControl,那么在下面的 CanvasControl 岂不是无法显示?!也就是说,这时候我们的阴影是完全没办法显示的。所以,就必须要确保 CanvasControl 必须永远大于 ContentControl,以确保有足够的空间显示阴影。使用 ScaleTransform 可以,但是效果不是十分好。要注意一点,ShadowEffect 是会发散的!也就是说,经过 ShadowEffect 处理过的输出是会比输入要大,所以我们并不需要进行缩放,增大容纳空间即可。对 CanvasControl 使用一个负数的 Margin 是一个相对较好的解决方案。至于负多少,我个人认为 10 个像素就足够了,毕竟 ShadowEffect 的发散有限。
另外为了满足实际需要,我们仿照下 WPF 的 DropShadowEffect 类,添加阴影颜色、阴影方向、阴影距离这些属性。修改 cs 代码如下:
using Microsoft.Graphics.Canvas; using Microsoft.Graphics.Canvas.Effects; using Microsoft.Graphics.Canvas.UI.Xaml; using System; using System.Numerics; using System.Runtime.InteropServices.WindowsRuntime; using Windows.ApplicationModel; using Windows.Foundation; using Windows.Graphics.DirectX; using Windows.Graphics.Display; using Windows.UI; using Windows.UI.Xaml; using Windows.UI.Xaml.Controls; using Windows.UI.Xaml.Markup; using Windows.UI.Xaml.Media; using Windows.UI.Xaml.Media.Imaging; namespace App92 { [ContentProperty(Name = nameof(Content))] public class Shadow : Control { public static readonly DependencyProperty ColorProperty = DependencyProperty.Register(nameof(Color), typeof(Color), typeof(Shadow), new PropertyMetadata(Colors.Black)); public static readonly DependencyProperty ContentProperty = DependencyProperty.Register(nameof(Content), typeof(FrameworkElement), typeof(Shadow), new PropertyMetadata(null, ContentChanged)); public static readonly DependencyProperty DepthProperty = DependencyProperty.Register(nameof(Depth), typeof(double), typeof(Shadow), new PropertyMetadata(2.0d, DepthChanged)); public static readonly DependencyProperty DirectionProperty = DependencyProperty.Register(nameof(Direction), typeof(double), typeof(Shadow), new PropertyMetadata(270.0d)); private CanvasControl _canvas; private int _pixelHeight; private byte[] _pixels; private int _pixelWidth; public Shadow() { this.DefaultStyleKey = typeof(Shadow); this.Unloaded += this.OnUnloaded; } public Color Color { get { return (Color)this.GetValue(ColorProperty); } set { this.SetValue(ColorProperty, value); } } public FrameworkElement Content { get { return (FrameworkElement)this.GetValue(ContentProperty); } set { this.SetValue(ContentProperty, value); } } public double Depth { get { return (double)this.GetValue(DepthProperty); } set { this.SetValue(DepthProperty, value); } } public double Direction { get { return (double)this.GetValue(DirectionProperty); } set { this.SetValue(DirectionProperty, value); } } protected override void OnApplyTemplate() { base.OnApplyTemplate(); this._canvas = (CanvasControl)this.GetTemplateChild("PART_Canvas"); this._canvas.Draw += this.Canvas_Draw; this.ExpendCanvas(); } private static void ContentChanged(DependencyObject d, DependencyPropertyChangedEventArgs e) { Shadow obj = (Shadow)d; FrameworkElement oldValue = (FrameworkElement)e.OldValue; if (oldValue != null) { oldValue.LayoutUpdated -= obj.Content_LayoutUpdated; } FrameworkElement newValue = (FrameworkElement)e.NewValue; if (newValue != null) { newValue.LayoutUpdated += obj.Content_LayoutUpdated; } } private static void DepthChanged(DependencyObject d, DependencyPropertyChangedEventArgs e) { Shadow obj = (Shadow)d; obj.ExpendCanvas(); } private void Canvas_Draw(CanvasControl sender, CanvasDrawEventArgs args) { if (this.Content == null || this._pixels == null || this._pixelWidth <= 0 || this._pixelHeight <= 0) { // 不满足绘制条件,清除 Canvas。 args.DrawingSession.Clear(sender.ClearColor); } else { // 计算内容控件相对于 Canvas 的位置。 GeneralTransform transform = this.Content.TransformToVisual(sender); Vector2 location = transform.TransformPoint(new Point()).ToVector2(); using (CanvasCommandList cl = new CanvasCommandList(sender)) { using (CanvasDrawingSession clds = cl.CreateDrawingSession()) { using (CanvasBitmap bitmap = CanvasBitmap.CreateFromBytes(sender, this._pixels, this._pixelWidth, this._pixelHeight, DirectXPixelFormat.B8G8R8A8UIntNormalized, DisplayInformation.GetForCurrentView().LogicalDpi)) { // 在 Canvas 对应的位置中绘制内容控件的外观。 clds.DrawImage(bitmap, location); } } float translateX = (float)(Math.Cos(Math.PI / 180.0d * this.Direction) * this.Depth); float translateY = 0 - (float)(Math.Sin(Math.PI / 180.0d * this.Direction) * this.Depth); Transform2DEffect finalEffect = new Transform2DEffect() { Source = new ShadowEffect() { Source = cl, BlurAmount = 2,// 阴影模糊参数,越大越发散,感觉 2 足够了。 ShadowColor = this.GetShadowColor() }, TransformMatrix = Matrix3x2.CreateTranslation(translateX, translateY) }; args.DrawingSession.DrawImage(finalEffect); } } } private async void Content_LayoutUpdated(object sender, object e) { if (DesignMode.DesignModeEnabled || this.Visibility == Visibility.Collapsed || this.Content.Visibility == Visibility.Collapsed) { // DesignMode 不能调用 RenderAsync 方法。 // 控件自身隐藏或者内容隐藏时也不能调用 RenderAsync 方法。 this._pixels = null; this._pixelWidth = 0; this._pixelHeight = 0; } else { RenderTargetBitmap bitmap = new RenderTargetBitmap(); await bitmap.RenderAsync(this.Content); int pixelWidth = bitmap.PixelWidth; int pixelHeight = bitmap.PixelHeight; if (bitmap.PixelWidth > 0 && bitmap.PixelHeight > 0) { this._pixels = (await bitmap.GetPixelsAsync()).ToArray(); this._pixelWidth = pixelWidth; this._pixelHeight = pixelHeight; } else { // 内容宽或高为 0 时不能调用 GetPixelAsync 方法。 this._pixels = null; this._pixelWidth = pixelWidth; this._pixelHeight = pixelHeight; } } if (this._canvas != null) { // 请求重绘。 this._canvas.Invalidate(); } } private void ExpendCanvas() { if (this._canvas != null) { // 扩展 Canvas 以确保阴影能够显示。 this._canvas.Margin = new Thickness(0 - (this.Depth + 10)); } } private Color GetShadowColor() { if (this.Content.Visibility == Visibility.Collapsed) { return Colors.Transparent; } // 阴影透明度应该受内容的 Opacity 属性影响。 double alphaProportion = Math.Max(0, Math.Min(1, this.Content.Opacity)); return Color.FromArgb((byte)(Color.A * alphaProportion), Color.R, Color.G, Color.B); } private void OnUnloaded(object sender, RoutedEventArgs e) { if (this._canvas != null) { this._canvas.RemoveFromVisualTree(); this._canvas = null; } } } } 然后在页面上测试下吧。
<Page x:Class="App92.MainPage" xmlns="http://schemas.microsoft.com/winfx/2006/xaml/presentation" xmlns:x="http://schemas.microsoft.com/winfx/2006/xaml" xmlns:local="using:App92"> <Grid Background="{ThemeResource ApplicationPageBackgroundThemeBrush}"> <local:Shadow HorizontalAlignment="Center" VerticalAlignment="Center"> <Border Background="Red" Width="100" Height="100"></Border> </local:Shadow> </Grid> </Page> 运行效果:

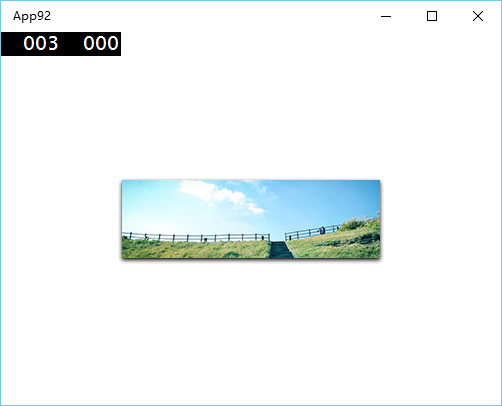
用在 Image 上也是不错的说:
不过用在默认的 Button 上就比较难看了,因为 Button 本身默认的 Background 就是半透明的,然后背后一团黑乎乎的阴影。。。所以还是比较建议这个效果用在那些非透明的控件上。
最后放上项目源代码: http://files.cnblogs.com/files/h82258652/ControlShadow.zip
Win2D 是个好东西,如果你觉得有些效果难以实现的话,可以尝试一下 Win2D 的说。
正文到此结束
热门推荐


相关文章

近期评论
-
你这基本没有更新呀,最近文章显示还是2019年的文章。不符合要求哈
-
关键词:慕云博客 链接:https://www.lilun.me 描述:分享原创文字的个人博客
-
-
-
可以提供一下源码吗
-
不是商业站,鸡娃学习笔记
-
-
-
-
听他们说很厉害的样子
Loading...
![[HBLOG]公众号](http://www.liuhaihua.cn/img/qrcode_gzh.jpg)

