ViewController 瘦身的另一种解决方案

对于Massive View Controller,现在流行的解决方案是MVVM架构,把业务逻辑移入ViewModel来减少ViewController中的代码。
这几天又看到另一种方案,在此介绍一下。
例子
我们通过例子来说明,这里举的例子是一个常见的基于TableView的界面——一个通讯录用户信息列表。
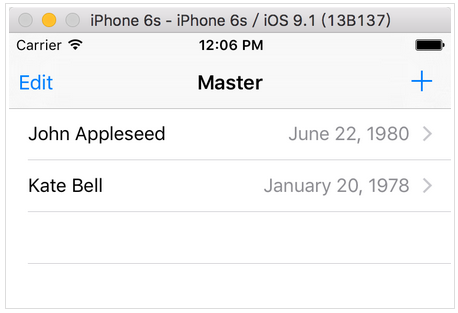
我们要实现的业务流程如下
App启动后首先读取本地Core Data中的数据,并展现出来,然后调用Web API来获取到用户数据列表,然后更新本地Core Data数据库,只要数据更新了,UI上的展现也随之变化。
用户也可以在本地添加用户数据,然后这些数据会同步到服务端。
1. 声明协议
我们不会把所有的业务逻辑都写到ViewController里,而是首先声明两个protocol:
PeopleListDataProviderProtocol
定义了数据源对象要实现的属性和方法
public protocol PeopleListDataProviderProtocol: UITableViewDataSource { var managedObjectContext: NSManagedObjectContext? { get set } weak var tableView: UITableView! { get set } func addPerson(personInfo: PersonInfo) func fetch() } APICommunicatorProtocol
定义了API请求者要实现的属性和方法
public protocol APICommunicatorProtocol { func getPeople() -> (NSError?, [PersonInfo]?) func postPerson(personInfo: PersonInfo) -> NSError? } 2. 编写ViewController
我们的ViewController叫做PeopleListViewController,在其中声明两个属性:
public var dataProvider: PeopleListDataProviderProtocol? public var communicator: APICommunicatorProtocol = APICommunicator()
实现ViewDidLoad
override public func viewDidLoad() { super.viewDidLoad() // Do any additional setup after loading the view, typically from a nib. self.navigationItem.leftBarButtonItem = self.editButtonItem() let addButton = UIBarButtonItem(barButtonSystemItem: .Add, target: self, action: "addPerson") self.navigationItem.rightBarButtonItem = addButton // ViewController继承于UITableViewController assert(dataProvider != nil, "dataProvider is not allowed to be nil at this point") tableView.dataSource = dataProvider dataProvider?.tableView = tableView } 添加按钮的事件响应方法和回调:
func addPerson() { let picker = ABPeoplePickerNavigationController() picker.peoplePickerDelegate = self presentViewController(picker, animated: true, completion: nil) } extension PeopleListViewController: ABPeoplePickerNavigationControllerDelegate { public func peoplePickerNavigationController(peoplePicker: ABPeoplePickerNavigationController, didSelectPerson person: ABRecord) { let personInfo = PersonInfo(abRecord: person) dataProvider?.addPerson(personInfo) } } 然后再添加两个方法来请求和同步数据:
public func fetchPeopleFromAPI() { let allPersonInfos = communicator.getPeople().1 if let allPersonInfos = allPersonInfos { for personInfo in allPersonInfos { dataProvider?.addPerson(personInfo) } } } public func sendPersonToAPI(personInfo: PersonInfo) { communicator.postPerson(personInfo) } 到此,我们的ViewController已经全部完成了,只有60行代码,是不是很开森。
那Web API调用、Core Data操作,业务逻辑的代码都去哪儿了呢?
OK,我们可以开始编写实现那两个协议的类了。
3. 实现Protocol
首先是实现了APICommunicatorProtocol的APICommunicator类:
public struct APICommunicator: APICommunicatorProtocol { public func getPeople() -> (NSError?, [PersonInfo]?) { return (nil, nil) } public func postPerson(personInfo: PersonInfo) -> NSError? { return nil } } 与服务端的交互这里就先省略了,就简单实现一下。
然后再看实现了PeopleListDataProviderProtocol的PeopleListDataProvider类:
主要是以下几个部分:
对Core Data操作的实现:
public func fetch() { let sortKey = NSUserDefaults.standardUserDefaults().integerForKey("sort") == 0 ? "lastName" : "firstName" let sortDescriptor = NSSortDescriptor(key: sortKey, ascending: true) let sortDescriptors = [sortDescriptor] fetchedResultsController.fetchRequest.sortDescriptors = sortDescriptors var error: NSError? = nil do { try fetchedResultsController.performFetch() } catch let error1 as NSError { error = error1 print("error: /(error)") } tableView.reloadData() } 对TableViewDataSource的实现:
public func numberOfSectionsInTableView(tableView: UITableView) -> Int { return self.fetchedResultsController.sections?.count ?? 0 } public func tableView(tableView: UITableView, cellForRowAtIndexPath indexPath: NSIndexPath) -> UITableViewCell { let cell = tableView.dequeueReusableCellWithIdentifier("Cell", forIndexPath: indexPath) self.configureCell(cell, atIndexPath: indexPath) return cell } func configureCell(cell: UITableViewCell, atIndexPath indexPath: NSIndexPath) { let person = self.fetchedResultsController.objectAtIndexPath(indexPath) as! Person cell.textLabel!.text = person.fullname cell.detailTextLabel!.text = dateFormatter.stringFromDate(person.birthday) } 对NSFetchedResultsControllerDelegate的实现:
public func controller(controller: NSFetchedResultsController, didChangeObject anObject: AnyObject, atIndexPath indexPath: NSIndexPath?, forChangeType type: NSFetchedResultsChangeType, newIndexPath: NSIndexPath?) { switch type { case .Insert: tableView.insertRowsAtIndexPaths([newIndexPath!], withRowAnimation: .Fade) case .Delete: tableView.deleteRowsAtIndexPaths([indexPath!], withRowAnimation: .Fade) case .Update: self.configureCell(tableView.cellForRowAtIndexPath(indexPath!)!, atIndexPath: indexPath!) case .Move: tableView.deleteRowsAtIndexPaths([indexPath!], withRowAnimation: .Fade) tableView.insertRowsAtIndexPaths([newIndexPath!], withRowAnimation: .Fade) } } (未列出所有代码)
可以看到,我们把业务逻辑都放入了PeopleListDataProviderProtocol和APICommunicatorProtocol这两个协议的实现中。在ViewController中通过属性来引用这两个协议的实现类,并且调用协议中定义的方法。
优势
-
ViewController中的代码就变的短小而清晰。
-
同MVVM一样也实现了界面和业务逻辑的分离。
-
相对与MVVM,学习成本较低。
-
可以方便的创建Mock对象。
Mock对象
例如这个APICommunicator
public var communicator: APICommunicatorProtocol = APICommunicator()
在开发过程中或者单元测试时都可以用一个Mock对象MockAPICommunicator来替代它,来提供fake data。
class MockAPICommunicator: APICommunicatorProtocol { var allPersonInfo = [PersonInfo]() var postPersonGotCalled = false func getPeople() -> (NSError?, [PersonInfo]?) { return (nil, allPersonInfo) } func postPerson(personInfo: PersonInfo) -> NSError? { postPersonGotCalled = true return nil } } 这样在服务端API还没有部署时,我们可以很方便的用一些假数据来帮助完成功能的开发,等API上线后换成真正的APICommunicator类。
同样可以提供一个实现了PeopleListDataProviderProtocol的MockDataProvider类。
也可以很方便的借用Mock对象来进行单元测试。
例如:
func testFetchingPeopleFromAPICallsAddPeople() { // given let mockDataProvider = MockDataProvider() viewController.dataProvider = mockDataProvider let mockCommunicator = MockAPICommunicator() mockCommunicator.allPersonInfo = [PersonInfo(firstName: "firstname", lastName: "lastname", birthday: NSDate())] viewController.communicator = mockCommunicator // when viewController.fetchPeopleFromAPI() // then XCTAssertTrue(mockDataProvider.addPersonGotCalled, "addPerson should have been called") } 总结
MVVM的优势在于较为普遍,大家都懂的模式,减少了沟通成本。但是对于响应式编程、事件管道,ReactiveCocoa等概念,还是需要一定学习成本的。
在不使用MVVM的情况下,不妨试试本文介绍的结构来实现ViewController,为ViewController瘦身。
参考资料:
http://www.raywenderlich.com/101306/unit-testing-tutorial-mocking-objects
源码下载:
http://cdn2.raywenderlich.com/wp-content/uploads/2015/04/Birthdays_Final1.zip
正文到此结束
热门推荐


相关文章


Loading...
![[HBLOG]公众号](http://www.liuhaihua.cn/img/qrcode_gzh.jpg)

