如何实现iOS图书动画:第1部分
- 原文链接 : How to Create an iOS Book Open Animation: Part 1
- 原文作者 : Vincent Ngo
- 译文出自 : 开发技术前线 www.devtf.cn
- 译者 :
- 校对者: lastdays
- 状态 : 校对中

本教程分为2个部分,教你开发一个漂亮的iOS图书打开和翻页动画,就像你在Paper 53中所见到的一样:
在第1部分,你将学习到如何定制化Collection View Layout,并通过使用深度和阴影使App看起来更真实。
在第2部分,你将学习如何以一种合理的方法在两个不同的控制器之间创建自定义的过渡特效,以及利用手势在两个视图间创建自然的、直观的过渡效果。
本教程适用于中级-高级的开发者;你将使用自定义过渡动画和自定义Collection View Layout。如果你从来没有用过Colleciton View,请先参考 其他iOS教程 。
注意:感谢 Attila Hegdüs 创建了本教程中的示例项目。
Getting Started
开始
从 此处 下载本教程的开始项目;解开zip压缩包,用Xcode打开Paper.xcodeproj。
编译项目,在模拟器中运行App;你将看到如下画面:

这个App的功能已经很完善了,你可以在你的书库中滚动,查看图书,选中某本图书进行浏览。但当你读一本书的时候,为什么它的书页都是并排放置的?通过一些UICollectionView的知识,你可以让这些书页看起来更好一些!
The Project Structure
项目结构
Here’s a quick rundown of the most important bits of the starter project:
关于这个开始项目,有几个重要的地方需要解释:
Data Models文件夹包含3个文件:
- Books.plist 中包含了几本用于演示的图书信息。每本图书包含一张封面图片,以及一个表示每一页的内容的图片的数组。
- BookStore.swift实现了单例,在整个App声明周期中只能创建一次对象。BookStore的职责是从Books.plist中加载数据并创建Book类实例。
- Book.swift用于存放图书相关信息的类,比如图书的封面,每一页的图片,以及页号。
Books文件夹包含了两个文件:
- BooksViewController.swift是一个UICollectionViewController子类。负责以水平方式显式图书列表。
- BookCoverCell.swift负责显示图书的封面,这个类被BooksViewController类所引用。
在Book文件夹中则包括:
- BookViewController.swift也是UICollectionViewController的子类。当用户在BooksViewController中选定的一本书后,它负责显示图书中的书页。
- BookPageCell.swift被BookViewController用于显示图书中的书页。
在最后一个文件夹Helper中包含了:
- UIImage+Helpers.swift是UIImage的扩展。该扩展包含了两个实用方法,一个用于让图片呈圆角显示,一个用于将图片缩放到指定大小。
这就是整个开始项目的大致介绍——接下来该是我们写点代码的时候了!
定制化图书界面
首先我们需要在BooksViewController中覆盖Collection View的默认布局方式。但当前的布局是在屏幕上显示3张图书封面的大图。为了美观,我们将这些图片缩减到一定大小,如下图所示:

当我们滑动图片,移动到屏幕中心的图片将被放大,以表示该图书为选中状态。如果继续滑动,该图书的封面又会缩小到一边,表示我们放弃选择该图书。
在App/Books文件夹下新建一个文件夹组:Layout。在Layout上点击右键,选择New File…,然后选择iOS/Source/Cocoa Touch Class模板,并点击Next。类名命名为BooksLayout,继承UICollectionViewFlowLayout类,语言设置为Swift。
然后需要告诉BooksViewController中的Collection View,适用我们新建的BooksLayout。
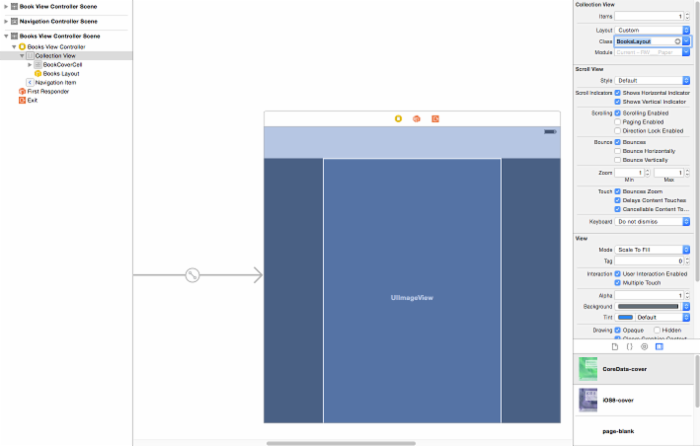
打开Main.storyboard,展开BooksViewController对象,然后选择Collection View。在属性面板中,设置Layout 属性为 Custom,设置Class属性为BooksLayout,如下图所示:
打开BooksLayout.swift,在BooksLayout类声明之上加入以下代码:
private let PageWidth: CGFloat = 362 private let PageHeight: CGFloat = 568
privateletPageWidth:CGFloat=362 privateletPageHeight:CGFloat=568
这个两个常量将用于设置单元格的的大小。现在,在类定义内部定义如下初始化方法:
required init(coder aDecoder: NSCoder) { super.init(coder: aDecoder) scrollDirection = UICollectionViewScrollDirection.Horizontal //1 itemSize = CGSizeMake(PageWidth, PageHeight) //2 minimumInteritemSpacing = 10 //3 } required init(coderaDecoder:NSCoder){ super.init(coder:aDecoder) scrollDirection=UICollectionViewScrollDirection.Horizontal//1 itemSize=CGSizeMake(PageWidth,PageHeight)//2 minimumInteritemSpacing=10//3 } 上述代码作用如下:
- 设置Collectioin View的滚动方向为水平方向。
- 设置单元格的大小为PageWidth和PageHeight,即362×568。
- 设置两个单元格间距10。
然后,在init(coder:)方法中加入代码:
override func prepareLayout() { super.prepareLayout() //The rate at which we scroll the collection view. //1 collectionView?.decelerationRate = UIScrollViewDecelerationRateFast //2 collectionView?.contentInset = UIEdgeInsets( top: 0, left: collectionView!.bounds.width / 2 - PageWidth / 2, bottom: 0, right: collectionView!.bounds.width / 2 - PageWidth / 2 ) } override funcprepareLayout(){ super.prepareLayout() //The rate at which we scroll the collection view. //1 collectionView?.decelerationRate=UIScrollViewDecelerationRateFast //2 collectionView?.contentInset=UIEdgeInsets( top:0, left:collectionView!.bounds.width/2-PageWidth/2, bottom:0, right:collectionView!.bounds.width/2-PageWidth/2 ) } prepareLayout()方法允许我们在每个单元格的布局信息生效之前可以进行一些计算。
对应注释中的编号,以上代码分别说明如下:
- 设置当用户手指离开屏幕后,Collection
View停止滚动的速度。默认的设置为UIScrollViewDecelerationRateFast,这是一个较快的速度。你可以尝试着设置为Normal 和 Fast,看看二者之间有什么区别。 - 设置Collection View的contentInset,以使第一本书的封面位于Collection View的中心。
现在我们需要处理每一个单元格的布局信息。在prepareLayout()方法下面,加入以下代码:
override func layoutAttributesForElementsInRect(rect: CGRect) -> [AnyObject]? { //1 var array = super.layoutAttributesForElementsInRect(rect) as! [UICollectionViewLayoutAttributes] //2 for attributes in array { //3 var frame = attributes.frame //4 var distance = abs(collectionView!.contentOffset.x + collectionView!.contentInset.left - frame.origin.x) //5 var scale = 0.7 * min(max(1 - distance / (collectionView!.bounds.width), 0.75), 1) //6 attributes.transform = CGAffineTransformMakeScale(scale, scale) } return array } override funclayoutAttributesForElementsInRect(rect:CGRect)->[AnyObject]?{ //1 vararray=super.layoutAttributesForElementsInRect(rect)as![UICollectionViewLayoutAttributes] //2 forattributesinarray{ //3 varframe=attributes.frame //4 vardistance=abs(collectionView!.contentOffset.x+collectionView!.contentInset.left-frame.origin.x) //5 varscale=0.7*min(max(1-distance/(collectionView!.bounds.width),0.75),1) //6 attributes.transform=CGAffineTransformMakeScale(scale,scale) } returnarray } layoutAttributesForElementsInRect(_:) 方法返回一个UICollectionViewLayoutAttributes对象数组,其中包含了每一个单元格的布局属性。以上代码稍作说明如下:
- 调用父类的layoutAttributesForElementsInRect方法,已获得默认的单元格布局属性。
- 遍历数组中的每个单元格布局属性。
- 从单元格布局属性中读取frame。
- 计算两本书的封面之间的间距——即两个单元格之间的间距——以及屏幕的中心点。
- 以0.75~1之间的比率缩放封面,具体的比率取决于前面计算出来的间距。然后为了美观,将所有的封面都缩放70%。
- 最后,应用仿射变换。
接下来,在layoutAttributesForElementsInRect(_:)方法后增加如下代码:
override func shouldInvalidateLayoutForBoundsChange(newBounds: CGRect) -> Bool { return true } override funcshouldInvalidateLayoutForBoundsChange(newBounds:CGRect)->Bool{ returntrue } 返回true表示每当Collection View的bounds发生改变时都强制重新计算布局属性。Collection View在滚动时会改变它的bounds,因此我们需要重新计算单元格的布局属性。
编译运行程序,我们将看到位于中央的封面明显比其他封面要大上一圈:

拖动Colleciton View,查看每本书放大、缩小。但仍然有一点稍显不足,为什么不让书本能够卡到固定的位置呢?接下来我们介绍的这个方法就是干这个的。
Snapping to a Book
对齐书本
targetContentOffsetForProposedContentOffset(_:withScrollingVelocity:)方法用于计算每本书应该在对齐到哪个位置,它返回一个偏移位置,可用于设置Collection View的contentOffset。如果你不覆盖这个方法,它会返回一个默认的值。
在shouldInvalidateLayoutForBoundsChange(_:)方法后添加如下代码:
override func targetContentOffsetForProposedContentOffset(proposedContentOffset: CGPoint, withScrollingVelocity velocity: CGPoint) -> CGPoint { // Snap cells to centre //1 var newOffset = CGPoint() //2 var layout = collectionView!.collectionViewLayout as! UICollectionViewFlowLayout //3 var width = layout.itemSize.width + layout.minimumLineSpacing //4 var offset = proposedContentOffset.x + collectionView!.contentInset.left //5 if velocity.x > 0 { //ceil returns next biggest number offset = width * ceil(offset / width) } else if velocity.x == 0 { //6 //rounds the argument offset = width * round(offset / width) } else if velocity.x < 0 { //7 //removes decimal part of argument offset = width * floor(offset / width) } //8 newOffset.x = offset - collectionView!.contentInset.left newOffset.y = proposedContentOffset.y //y will always be the same... return newOffset } override functargetContentOffsetForProposedContentOffset(proposedContentOffset:CGPoint,withScrollingVelocityvelocity:CGPoint)->CGPoint{ // Snap cells to centre //1 varnewOffset=CGPoint() //2 varlayout=collectionView!.collectionViewLayoutas!UICollectionViewFlowLayout //3 varwidth=layout.itemSize.width+layout.minimumLineSpacing //4 varoffset=proposedContentOffset.x+collectionView!.contentInset.left //5 ifvelocity.x>0{ //ceil returns next biggest number offset=width *ceil(offset/width) }elseifvelocity.x==0{//6 //rounds the argument offset=width *round(offset/width) }elseifvelocity.x<0{//7 //removes decimal part of argument offset=width *floor(offset/width) } //8 newOffset.x=offset-collectionView!.contentInset.left newOffset.y=proposedContentOffset.y//y will always be the same... returnnewOffset } 这段代码计算当用户手指离开屏幕时,封面应该位于哪个偏移位置:
- 声明一个CGPoint。
- 获得Collection View的当前布局。
- 获得单元格的总宽度。
- 计算相对于屏幕中央的currentOffset。
- 如果velocity.x>0,表明用户向右滚动,用offset除以width,得到书的索引,并滚动到相应的位置。
- 如果velocity.x=0,表明用户是无意识的滚动,原来的选择不会发生改变。
- 如果velocity.x<0,表明用户向左滚动。
- 修改newOffset.x,然后返回newOffset。这样就保证书本总是对齐到屏幕的中央。
编译运行程序;再次滚动封面,你会注意到滚动动作将变得更整齐了。
要完成这个布局,我们还需要使用一种机制,以限制用户只能点击位于中央的封面。目前,不管哪个位置的封面都是可点击的。
打开BooksViewController.swift,在注释”//MARK:Helpers”下面加入以下代码:
func selectedCell() -> BookCoverCell? { if let indexPath = collectionView?.indexPathForItemAtPoint(CGPointMake(collectionView!.contentOffset.x + collectionView!.bounds.width / 2, collectionView!.bounds.height / 2)) { if let cell = collectionView?.cellForItemAtIndexPath(indexPath) as? BookCoverCell { return cell } } return nil } func selectedCell()->BookCoverCell?{ ifletindexPath=collectionView?.indexPathForItemAtPoint(CGPointMake(collectionView!.contentOffset.x+collectionView!.bounds.width/2,collectionView!.bounds.height/2)){ ifletcell=collectionView?.cellForItemAtIndexPath(indexPath)as?BookCoverCell{ returncell } } returnnil } selectedCell()方法返回位于中央的那个单元格。替换openBook(_:)方法的代码如下:
func openBook() { let vc = storyboard?.instantiateViewControllerWithIdentifier("BookViewController") as! BookViewController vc.book = selectedCell()?.book // UICollectionView loads it's cells on a background thread, so make sure it's loaded before passing it to the animation handler dispatch_async(dispatch_get_main_queue(), { () -> Void in self.navigationController?.pushViewController(vc, animated: true) return }) } func openBook(){ letvc=storyboard?.instantiateViewControllerWithIdentifier("BookViewController")as!BookViewController vc.book=selectedCell()?.book // UICollectionView loads it's cells on a background thread, so make sure it's loaded before passing it to the animation handler dispatch_async(dispatch_get_main_queue(),{()->Voidin self.navigationController?.pushViewController(vc,animated:true) return }) } 这里,直接调用新的selectedCell方法,并用它的book属性代替原来的book参数。然后,将collectionView(_:didSelectItemAtIndexPath:)方法替换为:
override func collectionView(collectionView: UICollectionView, didSelectItemAtIndexPath indexPath: NSIndexPath) { openBook() } override funccollectionView(collectionView:UICollectionView,didSelectItemAtIndexPathindexPath:NSIndexPath){ openBook() } 这里,我们简单地删除了原来的打开某个索引处的图书的代码,而直接打开了当前位于屏幕中央的图书。编译运行程序,我们将看到每次打开的图书总是位于屏幕中央的那本。
BooksLayout的工作就到这里了。后面我们将使这本电子书显得更真实,能够让用户”翻动“书里的每一页!
翻页布局
最终实现的效果如下:

这看起来就像是一本真正的书! :]
在Book文件夹下新建一个Layout文件夹。在Layout文件夹上右键,选择New File…,然后适用iOS/Source/Cocoa Touch Class模板,然后点Next。类名命名为BookLayout,继承于UICollectionViewFlowLayout,语言选择Swift。
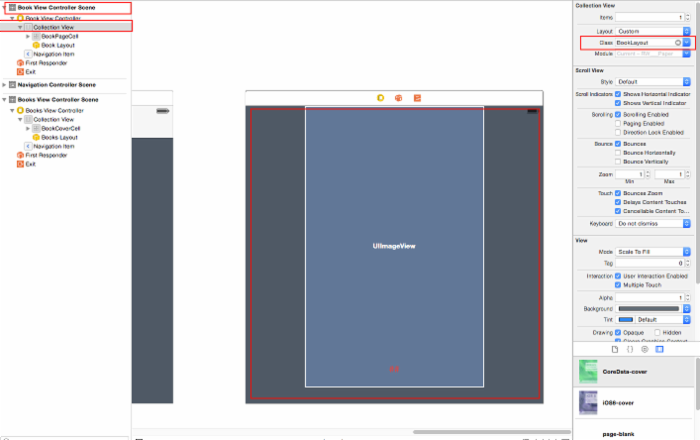
同前面一样,图书所使用的Collection View需要适用新的布局。打开Main.storyboard,然后选择Book View Controller场景,展开并选中其中的Collection View,然后设置Layout属性为Custom。
然后,将Layout属性下的 Class属性设置为BookLayout:
打开BookLayout.swift,在类声明之上加入如下代码:
private let PageWidth: CGFloat = 362 private let PageHeight: CGFloat = 568 private var numberOfItems = 0
privateletPageWidth:CGFloat=362 privateletPageHeight:CGFloat=568 privatevarnumberOfItems=0
这几个常量将用于设置单元格的大小,以及记录整本书的页数。接着,在类声明内部加入代码:
override func prepareLayout() { super.prepareLayout() collectionView?.decelerationRate = UIScrollViewDecelerationRateFast numberOfItems = collectionView!.numberOfItemsInSection(0) collectionView?.pagingEnabled = true } override funcprepareLayout(){ super.prepareLayout() collectionView?.decelerationRate=UIScrollViewDecelerationRateFast numberOfItems=collectionView!.numberOfItemsInSection(0) collectionView?.pagingEnabled=true } 这段代码和我们在BooksLayout中所写的差不多,仅有以下几处差别:
- 将减速速度设置为UIScrollViewDecelerationRateFast,以加快Scroll View滚动速度变慢的节奏。
- 记住本书的页数。
- 启用分页,这样Scroll View滚动时将以其宽度的固定倍数滚动(而不是持续滚动)。
仍然在BookLayout.swift中,加入以下代码:
override func shouldInvalidateLayoutForBoundsChange(newBounds: CGRect) -> Bool { return true } override funcshouldInvalidateLayoutForBoundsChange(newBounds:CGRect)->Bool{ returntrue } 跟前面一样,返回true,以表示用户每次滚动都会重新计算布局。
然后,覆盖collectionViewContentSize() ,以指定Collection View的contentSize:
override func collectionViewContentSize() -> CGSize { return CGSizeMake((CGFloat(numberOfItems / 2)) * collectionView!.bounds.width, collectionView!.bounds.height) } override funccollectionViewContentSize()->CGSize{ returnCGSizeMake((CGFloat(numberOfItems/2))*collectionView!.bounds.width,collectionView!.bounds.height) } 这个方法返回了内容区域的整个大小。内容区域的高度总是不变的,但宽度是随着页数变化的——即书的页数除以2倍,再乘以屏幕宽度。除以2是因为书页有两面,内容区域一次显示2页。
就如我们在BooksLayout中所做的一样,我们还需要覆盖layoutAttributesForElementsInRect(_:)方法,以便我们能够在单元格上增加翻页效果。
在collectionViewContentSize()方法后加入:
override func layoutAttributesForElementsInRect(rect: CGRect) -> [AnyObject]? { //1 var array: [UICollectionViewLayoutAttributes] = [] //2 for i in 0 ... max(0, numberOfItems - 1) { //3 var indexPath = NSIndexPath(forItem: i, inSection: 0) //4 var attributes = layoutAttributesForItemAtIndexPath(indexPath) if attributes != nil { //5 array += [attributes] } } //6 return array } override funclayoutAttributesForElementsInRect(rect:CGRect)->[AnyObject]?{ //1 vararray:[UICollectionViewLayoutAttributes]=[] //2 foriin0...max(0,numberOfItems-1){ //3 varindexPath=NSIndexPath(forItem:i,inSection:0) //4 varattributes=layoutAttributesForItemAtIndexPath(indexPath) ifattributes!=nil{ //5 array+=[attributes] } } //6 returnarray } 不同于在BooksLayout中的将所有计算布局属性的代码放在这个方法里面,我们这次将这个任务放到layoutAttributesForItemAtIndexPath(_:)中进行,因为在图书的实现中,所有单元格都是同时可见的。
Here’s a line by line explanation:
以上代码解释如下:
- 声明一个数组,用于保存所有单元格的布局属性。
- 遍历所有的书页。
- 对于CollecitonView中的每个单元格,都创建一个NSIndexPath。
- 通过每个NSIndexPath来获得单元格的布局属性,在后面,我们会覆盖layoutAttributesForItemAtIndexPath(_:)方法。
- 把每个单元格布局属性添加到数组。
- 返回数组。
Handling the Page Geometry
处理页面的几何计算
在我们开始实现layoutAttributesForItemAtIndexPath(_:)方法之前,花几分钟好好思考一下布局的问题,它是怎样实现的,如果能够写几个助手方法将会让我们的代码更漂亮和模块化。:]
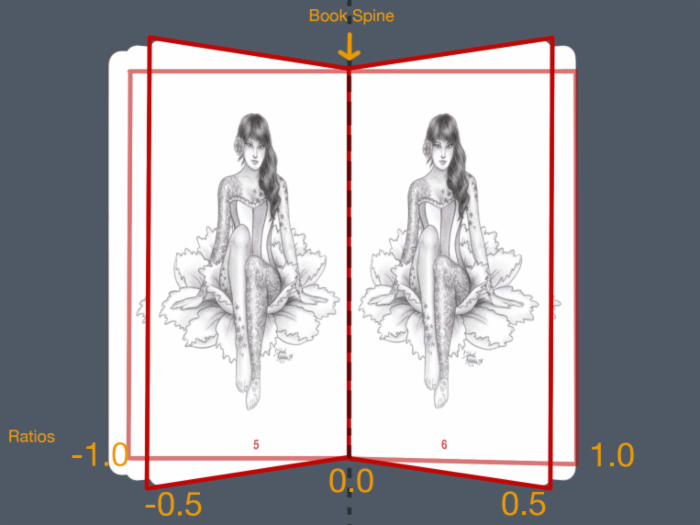
上图演示了翻页时以书籍为轴旋转的过程。图中书页的”打开度“用-1到1来表示。为什么?你可以想象一下放在桌子上的一本书,书脊所在的位置代表0.0。当你从左向右翻动书页时,书页张开的程度从-1(最左)到1(最右)。因此,我们可以用下列数字表示“翻页”的过程:
- 0.0表示一个书页翻成90度,与桌面成直角。
- +/-0.5表示书页翻至于桌面成45度角。
- +/-1.0表示书页翻至与桌面平行。
注意,因为角度是按照反时针方向增加的,因此角度的符号和对应的打开度是相反的。
首先,在layoutAttributesForElementsInRect(_:)方法后加入助手方法:
//MARK: - Attribute Logic Helpers func getFrame(collectionView: UICollectionView) -> CGRect { var frame = CGRect() frame.origin.x = (collectionView.bounds.width / 2) - (PageWidth / 2) + collectionView.contentOffset.x frame.origin.y = (collectionViewContentSize().height - PageHeight) / 2 frame.size.width = PageWidth frame.size.height = PageHeight return frame } //MARK: - Attribute Logic Helpers func getFrame(collectionView:UICollectionView)->CGRect{ varframe=CGRect() frame.origin.x=(collectionView.bounds.width/2)-(PageWidth/2)+collectionView.contentOffset.x frame.origin.y=(collectionViewContentSize().height-PageHeight)/2 frame.size.width=PageWidth frame.size.height=PageHeight returnframe } 对于每一页,我们都可以计算出相对于Collection View中心的frame。getFrame(_:)方法会将每一页的一边对齐到书脊。唯一会变的是Collectoin View的contentOffset在x方向上的改变。
然后,在getFrame(_:)方法后添加如下方法:
func getRatio(collectionView: UICollectionView, indexPath: NSIndexPath) -> CGFloat { //1 let page = CGFloat(indexPath.item - indexPath.item % 2) * 0.5 //2 var ratio: CGFloat = -0.5 + page - (collectionView.contentOffset.x / collectionView.bounds.width) //3 if ratio > 0.5 { ratio = 0.5 + 0.1 * (ratio - 0.5) } else if ratio < -0.5 { ratio = -0.5 + 0.1 * (ratio + 0.5) } return ratio } func getRatio(collectionView:UICollectionView,indexPath:NSIndexPath)->CGFloat{ //1 letpage=CGFloat(indexPath.item-indexPath.item%2)*0.5 //2 varratio:CGFloat=-0.5+page-(collectionView.contentOffset.x/collectionView.bounds.width) //3 ifratio>0.5{ ratio=0.5+0.1*(ratio-0.5) }elseifratio<-0.5{ ratio=-0.5+0.1*(ratio+0.5) } returnratio } 上面的方法计算书页翻开的程度。对每一段有注释的代码分别说明如下:
- 算出书页的页码——记住,书是双面的。 除以2就是你真正在翻读的那一页。
- 算出书页的打开度。注意,这个值被我们加了一个权重。
- 书页的打开度必须限制在-0.5到0.5之间。另外乘以0.1的作用,是为位了在页与页之间增加一条细缝,以表示它们是上下叠放在一起的。
一旦我们计算出书页的打开度,我们就可以将之转变为旋转的角度。在getRation(_:indexPath:)方法后面加入代码:
func getAngle(indexPath: NSIndexPath, ratio: CGFloat) -> CGFloat { // Set rotation var angle: CGFloat = 0 //1 if indexPath.item % 2 == 0 { // The book's spine is on the left of the page angle = (1-ratio) * CGFloat(-M_PI_2) } else { //2 // The book's spine is on the right of the page angle = (1 + ratio) * CGFloat(M_PI_2) } //3 // Make sure the odd and even page don't have the exact same angle angle += CGFloat(indexPath.row % 2) / 1000 //4 return angle } func getAngle(indexPath:NSIndexPath,ratio:CGFloat)->CGFloat{ // Set rotation varangle:CGFloat=0 //1 ifindexPath.item%2==0{ // The book's spine is on the left of the page angle=(1-ratio)*CGFloat(-M_PI_2) }else{ //2 // The book's spine is on the right of the page angle=(1+ratio)*CGFloat(M_PI_2) } //3 // Make sure the odd and even page don't have the exact same angle angle+=CGFloat(indexPath.row%2)/1000 //4 returnangle } 这个方法中有大量计算,我们一点点拆开来看:
- 判断该页是否是偶数页。如果是,则该页将翻到书脊的右边。翻到右边的页是反手翻转,同时书脊右边的页其角度必然是负数。注意,我们将打开度定义为-0.5到0.5之间。
- 如果当前页是奇数,则该页将位于书脊左边,当书页被翻到左边时,它的按正手翻转,书脊左边的页其角度为正数。
- 每页之间加一个小夹角,使它们彼此分离。
- 返回旋转角度。
得到旋转角度之后,我们可以操纵书页使其旋转。增加如下方法:
func makePerspectiveTransform() -> CATransform3D { var transform = CATransform3DIdentity transform.m34 = 1.0 / -2000 return transform } func makePerspectiveTransform()->CATransform3D{ vartransform=CATransform3DIdentity transform.m34=1.0/-2000 returntransform } 修改转换矩阵的m34属性,已达到一定的立体效果。
然后应用旋转动画。实现下面的方法:
func getRotation(indexPath: NSIndexPath, ratio: CGFloat) -> CATransform3D { var transform = makePerspectiveTransform() var angle = getAngle(indexPath, ratio: ratio) transform = CATransform3DRotate(transform, angle, 0, 1, 0) return transform } func getRotation(indexPath:NSIndexPath,ratio:CGFloat)->CATransform3D{ vartransform=makePerspectiveTransform() varangle=getAngle(indexPath,ratio:ratio) transform=CATransform3DRotate(transform,angle,0,1,0) returntransform } 在这个方法中,我们用到了刚才创建的两个助手方法去计算旋转的角度,然后通过一个CATransform3D对象让书页在y轴上旋转。
所有的助手方法都实现了,我们最终需要配置每个单元格的属性。在layoutAttributesForElementsInRect(_:)方法后加入以下方法:
override func layoutAttributesForItemAtIndexPath(indexPath: NSIndexPath) -> UICollectionViewLayoutAttributes! { //1 var layoutAttributes = UICollectionViewLayoutAttributes(forCellWithIndexPath: indexPath) //2 var frame = getFrame(collectionView!) layoutAttributes.frame = frame //3 var ratio = getRatio(collectionView!, indexPath: indexPath) //4 if ratio > 0 && indexPath.item % 2 == 1 || ratio < 0 && indexPath.item % 2 == 0 { // Make sure the cover is always visible if indexPath.row != 0 { return nil } } //5 var rotation = getRotation(indexPath, ratio: min(max(ratio, -1), 1)) layoutAttributes.transform3D = rotation //6 if indexPath.row == 0 { layoutAttributes.zIndex = Int.max } return layoutAttributes } override funclayoutAttributesForItemAtIndexPath(indexPath:NSIndexPath)->UICollectionViewLayoutAttributes!{ //1 varlayoutAttributes=UICollectionViewLayoutAttributes(forCellWithIndexPath:indexPath) //2 varframe=getFrame(collectionView!) layoutAttributes.frame=frame //3 varratio=getRatio(collectionView!,indexPath:indexPath) //4 ifratio>0&&indexPath.item%2==1 ||ratio<0&&indexPath.item%2==0{ // Make sure the cover is always visible ifindexPath.row!=0{ returnnil } } //5 varrotation=getRotation(indexPath,ratio:min(max(ratio,-1),1)) layoutAttributes.transform3D=rotation //6 ifindexPath.row==0{ layoutAttributes.zIndex=Int.max } returnlayoutAttributes } 在Collection View的每个单元格上,都会调用这个方法。这个方法做了如下工作:
- 创建一个UICollectionViewLayoutAttributes对象layoutAttributes,供IndexPath所指的单元格使用。
- 调用我们先前定义的getFrame方法设置layoutAttributes的frame,确保单元格对齐于书脊。
- 调用先前定义的getRatio方法算出单元格的打开度。
- 判断当前页是否位于正确的打开度范围之内。如果不,不显示该单元格。为了优化(也是为了符合常理),除了正面向上的书页,我们不应当显示书页的背面——书的封面例外,那个不管什么时候都需要显示。
- 应用旋转动画,使用前面算出的打开度。
- 判断是否是第一页,如果是,将它的zIndex放在其他页的上面,否则有可能出现画面闪烁的Bug。
编译,运行。打开书,翻动每一页……呃?什么情况?

书被错误地从中间装订了,而不是从书的侧边装订。
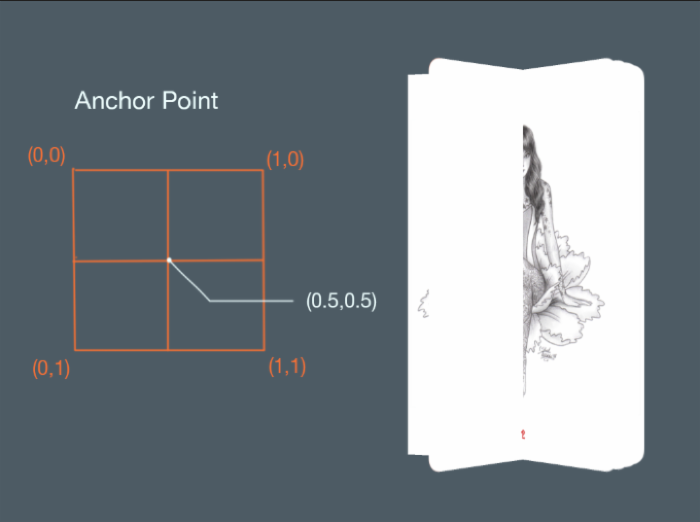
如图中所示,每个书页的锚点默认是x轴和y轴的0.5倍处。现在你知道怎么做了吗?
很显然,我们需要修改书页的锚点为它的侧边缘。如果这个书页是位于书的右边,则它的锚点应该是(0,0.5)。如果书页是位于书的左边,测锚点应该是(1,0.5)。
打开BookePageCell.swift,添加如下代码:
override func applyLayoutAttributes(layoutAttributes: UICollectionViewLayoutAttributes!) { super.applyLayoutAttributes(layoutAttributes) //1 if layoutAttributes.indexPath.item % 2 == 0 { //2 layer.anchorPoint = CGPointMake(0, 0.5) isRightPage = true } else { //3 //4 layer.anchorPoint = CGPointMake(1, 0.5) isRightPage = false } //5 self.updateShadowLayer() } override funcapplyLayoutAttributes(layoutAttributes:UICollectionViewLayoutAttributes!){ super.applyLayoutAttributes(layoutAttributes) //1 iflayoutAttributes.indexPath.item%2==0{ //2 layer.anchorPoint=CGPointMake(0,0.5) isRightPage=true }else{//3 //4 layer.anchorPoint=CGPointMake(1,0.5) isRightPage=false } //5 self.updateShadowLayer() } 我们重写了applyLayoutAttributes(_:)方法,这个方法用于将BookLoayout创建的布局属性应用到第一个。上述代码非常简单:
- 检查当前单元格是否是偶数,也就是说书脊是否位于书页的左边。
- 如果是,将书页的锚点设置为单元格的左边缘,同时isRightPage设置为true。isRightPage变量可用于决定书页的圆角样式应当在那一边应用。
- 如果是奇数页,书脊应当位于书页的右边。
- 这只书页的锚点为单元格的右边缘,isRightPage设为false。
- 最后,设置当前书页的阴影层。
编译,运行。翻动书页,这次的效果已经好了许多:

本教程第一部分就到此为止了。你是不是觉得自己干了一件了不起的事情呢——效果做得很棒,不是吗?
接下来做什么
第一部分的完整代码在此处下载:http://cdn1.raywenderlich.com/wp-content/uploads/2015/05/Part-1-Paper-Completed.zip
我们从一个默认的Collection View布局开始,学习了如何定制自己的layout,并用它取得了令人叫绝的效果!用户在用这个App时,会觉得自己真的是在翻一本书。其实,将一个普通的电子阅读App变成一个让用户体验更加真实的带翻页效果的App,只需要做很小的改动。
当然,我们还没有完成这个App。在本教程的第二部分,我们将使App变得更加完善和生动,我们将在打开书和关上书的一瞬间加入自定义动画。
在开发App过程中,你也可能曾经有过一些关于布局的“疯狂”想法。如果你对本文有任何问题、意见或想法,请加入到下面的讨论中来!
正文到此结束
热门推荐


相关文章


Loading...
![[HBLOG]公众号](http://www.liuhaihua.cn/img/qrcode_gzh.jpg)

