AFNETWorking2.0实战教程
上一篇文章介绍了优秀的第三方网络请求框架AFNETWorking2.0,本篇就通过一个实战例子来总结AFNetworking的使用。
本文参考http://www.raywenderlich.com/59255/afnetworking-2-0-tutorial#comments的例子。英文好的可以阅读看看,我觉得太啰嗦了。不利于抓住要点,本文就是它的提炼中文版。
一、准备工作
1.下载初始程序项目,地址:http://pan.baidu.com/s/1sj3SNeP。因为本文专注于使用AFNETWorking2.0请求网络数据,所以一些其他工作已经做好,您可以下载下来熟悉一下。
2.最终程序,地址:http://pan.baidu.com/s/1gdjo2hd。这是我在完成本教程后的最终程序效果。
3.查看本程序请求的服务器返回的数据格式:
JSON:http:// www.raywenderlich.com/demos/weather_sample/weather.php?format=json
XML:http:// www.raywenderlich.com/demos/weather_sample/weather.php?format=xml
PLIST:http://www.raywenderlich.com/demos/weather_sample/weather.php?format=plist (部分浏览器显示不正确)
二、实战
实战1.通过AFNetworkReachabilityManager 可以用来检测网络状态的变化
找到WTTableViewController.m文件,在viewDidLoad:方法下面添加一个新方法netWorkMonitor。
#pragma mark - 监控网络 - (void)netWorkMonitor { /*知识点1: 通过AFNetworkReachabilityManager 可以用来检测网络状态的变化 */ AFNetworkReachabilityManager *reachManager = [AFNetworkReachabilityManager sharedManager]; [reachManager startMonitoring]; [reachManager setReachabilityStatusChangeBlock:^(AFNetworkReachabilityStatus status) { switch (status) { case AFNetworkReachabilityStatusUnknown: { UIAlertView *alertView = [[UIAlertView alloc] initWithTitle:@"网络状态" message:@"网络异常" delegate:nil cancelButtonTitle:@"确定" otherButtonTitles:nil]; [alertView show]; break; } case AFNetworkReachabilityStatusNotReachable: { UIAlertView *alertView = [[UIAlertView alloc] initWithTitle:@"网络状态" message:@"网络未连接" delegate:nil cancelButtonTitle:@"确定" otherButtonTitles:nil]; [alertView show]; break; } case AFNetworkReachabilityStatusReachableViaWWAN: { self.title = @"WWAN连接"; break; } case AFNetworkReachabilityStatusReachableViaWiFi: { self.title = @"WIFI连接"; break; } default: { break; } } }]; } netWorkMonitor方法 2.在viewDidLoad:方法的self.navigationController.toolbarHidden = NO;下面一行调用此方法:
//检测网络状态 [self netWorkMonitor];
3. 然后在真机上运行,然后切换WiFi、WWAN或者飞行模式看看效果把。

实战2:通过AFHTTPRequestOperation来请求JSON,XML和PLIST格式的服务器响应数据
1.找到WTTableViewController.m文件,使WTTableViewController类继承NSXMLParserDelegate代理,用于XML解析。代码如下:
@interface WTTableViewController ()<NSXMLParserDelegate,CLLocationManagerDelegate>
2.替换中WTTableViewController.m文件中的的jsonTapped:,plistTapped:,xmlTapped:方法,将他们替换成如下代码:
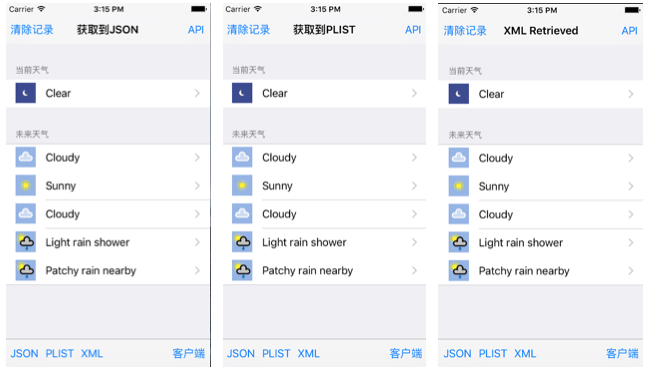
#pragma mark - AFHTTPRequestOperation相关 /*知识点2:AFHTTPRequestOperation 继承自 AFURLConnectionOperation,使用HTTP以及HTTPS协议来处理网络请求。它封装成了一个可以令人接受的代码形式。当然AFHTTPRequestOperationManager 目前是最好的用来处理网络请求的方式,但AFHTTPRequestOperation 也有它自己的用武之地。*/ //json数据 - (IBAction)jsonTapped:(id)sender { // 创建请求的URL,然后创建NSURLRequest NSString *string = [NSString stringWithFormat:@"%@weather.php?format=json", BaseURLString]; NSURL *url = [NSURL URLWithString:string]; NSURLRequest *request = [NSURLRequest requestWithURL:url]; // 利用AFHTTPRequestOperation处理网络请求 AFHTTPRequestOperation *operation = [[AFHTTPRequestOperation alloc] initWithRequest:request]; //使用JSON序列化 operation.responseSerializer = [AFJSONResponseSerializer serializer]; //请求成功处理返回json数据,自动转为字典类型;请求失败弹出提示 [operation setCompletionBlockWithSuccess:^(AFHTTPRequestOperation *operation, id responseObject) { // 3将返回数据序列化,返回的字典赋值给属性weather self.weather = (NSDictionary *)responseObject; self.title = @"获取到JSON"; [self.tableView reloadData]; } failure:^(AFHTTPRequestOperation *operation, NSError *error) { // 失败提示 UIAlertView *alertView = [[UIAlertView alloc] initWithTitle:@"获取天气信息失败" message:[error localizedDescription] delegate:nil cancelButtonTitle:@"确定" otherButtonTitles:nil]; [alertView show]; }]; // 5 [operation start]; } //plist数据 - (IBAction)plistTapped:(id)sender { NSString *string = [NSString stringWithFormat:@"%@weather.php?format=plist", BaseURLString]; NSURL *url = [NSURL URLWithString:string]; NSURLRequest *request = [NSURLRequest requestWithURL:url]; AFHTTPRequestOperation *operation = [[AFHTTPRequestOperation alloc] initWithRequest:request]; // 解析plist就必须设置序列化对象为AFPropertyListResponseSerializer operation.responseSerializer = [AFPropertyListResponseSerializer serializer]; [operation setCompletionBlockWithSuccess:^(AFHTTPRequestOperation *operation, id responseObject) { self.weather = (NSDictionary *)responseObject; self.title = @"获取到PLIST"; [self.tableView reloadData]; } failure:^(AFHTTPRequestOperation *operation, NSError *error) { UIAlertView *alertView = [[UIAlertView alloc] initWithTitle:@"获取天气信息失败" message:[error localizedDescription] delegate:nil cancelButtonTitle:@"确定" otherButtonTitles:nil]; [alertView show]; }]; [operation start]; } //xml数据 - (IBAction)xmlTapped:(id)sender { NSString *string = [NSString stringWithFormat:@"%@weather.php?format=xml", BaseURLString]; NSURL *url = [NSURL URLWithString:string]; NSURLRequest *request = [NSURLRequest requestWithURL:url]; AFHTTPRequestOperation *operation = [[AFHTTPRequestOperation alloc] initWithRequest:request]; // Make sure to set the responseSerializer correctly operation.responseSerializer = [AFXMLParserResponseSerializer serializer]; [operation setCompletionBlockWithSuccess:^(AFHTTPRequestOperation *operation, id responseObject) { NSXMLParser *XMLParser = (NSXMLParser *)responseObject; [XMLParser setShouldProcessNamespaces:YES]; //解析XML数据要复杂许多,参考代理实现 XMLParser.delegate = self; [XMLParser parse]; } failure:^(AFHTTPRequestOperation *operation, NSError *error) { UIAlertView *alertView = [[UIAlertView alloc] initWithTitle:@"获取天气信息失败" message:[error localizedDescription] delegate:nil cancelButtonTitle:@"确定" otherButtonTitles:nil]; [alertView show]; }]; [operation start]; } #pragma mark - NSXMLParserDelegate //开始解析 - (void)parserDidStartDocument:(NSXMLParser *)parser { self.xmlWeather = [NSMutableDictionary dictionary]; } //找到新标签解析 - (void)parser:(NSXMLParser *)parser didStartElement:(NSString *)elementName namespaceURI:(NSString *)namespaceURI qualifiedName:(NSString *)qName attributes:(NSDictionary<NSString *,NSString *> *)attributeDict { self.elementName = qName; if([qName isEqualToString:@"current_condition"] || [qName isEqualToString:@"weather"] || [qName isEqualToString:@"request"]) { self.currentDictionary = [NSMutableDictionary dictionary]; } self.outstring = [NSMutableString string]; } - (void)parser:(NSXMLParser *)parser foundCharacters:(NSString *)string { if (!self.elementName) return; [self.outstring appendFormat:@"%@", string]; } - (void)parser:(NSXMLParser *)parser didEndElement:(NSString *)elementName namespaceURI:(NSString *)namespaceURI qualifiedName:(NSString *)qName { // 1 if ([qName isEqualToString:@"current_condition"] || [qName isEqualToString:@"request"]) { self.xmlWeather[qName] = @[self.currentDictionary]; self.currentDictionary = nil; } // 2 else if ([qName isEqualToString:@"weather"]) { // Initialize the list of weather items if it doesn't exist NSMutableArray *array = self.xmlWeather[@"weather"] ?: [NSMutableArray array]; // Add the current weather object [array addObject:self.currentDictionary]; // Set the new array to the "weather" key on xmlWeather dictionary self.xmlWeather[@"weather"] = array; self.currentDictionary = nil; } // 3 else if ([qName isEqualToString:@"value"]) { // Ignore value tags, they only appear in the two conditions below } // 4 else if ([qName isEqualToString:@"weatherDesc"] || [qName isEqualToString:@"weatherIconUrl"]) { NSDictionary *dictionary = @{@"value": self.outstring}; NSArray *array = @[dictionary]; self.currentDictionary[qName] = array; } // 5 else if (qName) { self.currentDictionary[qName] = self.outstring; } self.elementName = nil; } - (void)parserDidEndDocument:(NSXMLParser *)parser { self.weather = @{@"data": self.xmlWeather}; self.title = @"XML Retrieved"; [self.tableView reloadData]; } AFHTTPRequestOperation 3.然后你在运行,点击JSON,XML或者PLIST按钮看看效果。我的APP效果如图:
实战3:使用AFHTTPSessionManager方法实现GET和POST请求
1.找到找到WTTableViewController.m文件中的clientTapped:方法,给它添加一个弹出菜单选择GET和Post请求,替换代码如下:
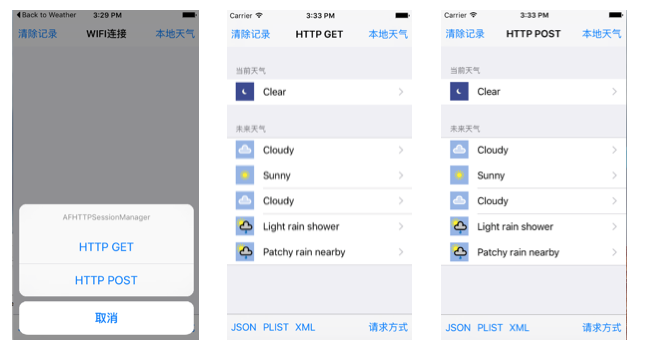
/*知识点3:AFHTTPSessionManager iOS7之后,使用AFHTTPSessionManager iOS6之后,使用AFHTTPRequestOperationManager 使用方便,只要我们设置一个服务器的URL地址,在设置请求参数字典 GET 和 POST请求 使用基本相同,这是AFNetworking牛逼的地方,都帮我们封装好了参数 */ - (IBAction)clientTapped:(id)sender { //弹出菜单 UIActionSheet *actionSheet = [[UIActionSheet alloc] initWithTitle:@"AFHTTPSessionManager" delegate:self cancelButtonTitle:@"取消" destructiveButtonTitle:nil otherButtonTitles:@"HTTP GET", @"HTTP POST", nil]; [actionSheet showFromBarButtonItem:sender animated:YES]; clientTapped: 2.然后WTTableViewControlle类继承UIActionSheetDelegate。
@interface WTTableViewController ()<NSXMLParserDelegate,CLLocationManagerDelegate,UIActionSheetDelegate>
3.实现代理方法,在上面代码下面添加actionSheet:clickedButtonAtIndex:代理方法:
#pragma mark - UIActionSheetDelegate - (void)actionSheet:(UIActionSheet *)actionSheet clickedButtonAtIndex:(NSInteger)buttonIndex { if (buttonIndex == [actionSheet cancelButtonIndex]) { // User pressed cancel -- abort return; } // 设置请求URL和请求参数 NSURL *baseURL = [NSURL URLWithString:BaseURLString]; NSDictionary *parameters = @{@"format":@"json"}; // 初始化AFHTTPSessionManager对象,并设置JSON序列化 AFHTTPSessionManager *manager = [[AFHTTPSessionManager alloc] initWithBaseURL:baseURL]; manager.responseSerializer = [AFJSONResponseSerializer serializer]; // GET请求方式 if (buttonIndex == 0) { [manager GET:@"weather.php" parameters:parameters success:^(NSURLSessionDataTask *task, id responseObject) { self.weather = responseObject; self.title = @"HTTP GET"; [self.tableView reloadData]; } failure:^(NSURLSessionDataTask *task, NSError *error) { UIAlertView *alertView = [[UIAlertView alloc] initWithTitle:@"获取天气信息失败" message:[error localizedDescription] delegate:nil cancelButtonTitle:@"确定" otherButtonTitles:nil]; [alertView show]; }]; } // POST请求方式 else if (buttonIndex == 1) { [manager POST:@"weather.php" parameters:parameters success:^(NSURLSessionDataTask *task, id responseObject) { self.weather = responseObject; self.title = @"HTTP POST"; [self.tableView reloadData]; } failure:^(NSURLSessionDataTask *task, NSError *error) { UIAlertView *alertView = [[UIAlertView alloc] initWithTitle:@"获取天气信息失败" message:[error localizedDescription] delegate:nil cancelButtonTitle:@"确定" otherButtonTitles:nil]; [alertView show]; }]; } } UIActionSheetDelegate 4.运行看看效果,当我们点击请求方式,会弹出选择菜单,我们选择任意一种请求方式,都能得到我们的天气数据:
实战3:使用AFHTTPSessionManager获取实时数据
使用AFHTTPSessionManager获取服务器数据,建议封装网络层。 1.为每一个网络服务创建一个AFHTTPSessionManager的子类 2.在每个子类中,创建一个单例方法。3.在该类中请求网络数据。
1.新建WeatherHTTPClient类,使其继承AFHTTPSessionManager。类的实现代码如下:
WeatherHTTPClient.h文件
#import "AFHTTPSessionManager.h" @protocol WeatherHTTPClientDelegate; /** * 封装网络请求 */ @interface WeatherHTTPClient : AFHTTPSessionManager @property (nonatomic, weak) id<WeatherHTTPClientDelegate>delegate; /** * 单例方法 * * @return 返回当前对象 */ + (WeatherHTTPClient *)sharedWeatherHTTPClient; /** * 初始化对象 * * @param url 请求的URL * * @return 返回当前对象 */ - (instancetype)initWithBaseURL:(NSURL *)url; /** * 根据地理位置以及天数,来请求服务器多少天的该地理位置的天气数据 * * @param location 地理位置 * @param number 天数 */ - (void)updateWeatherAtLocation:(CLLocation *)location forNumberOfDays:(NSUInteger)number; @end /** * 协议,用于代理回调 */ @protocol WeatherHTTPClientDelegate <NSObject> @optional - (void)weatherHTTPClient:(WeatherHTTPClient *)client didUpdateWithWeather:(id)weahter; - (void)weatherHTTPClient:(WeatherHTTPClient *)client didFailWithError:(NSError *)error; @end WeatherHTTPClient.h
WeatherHTTPClient.m文件
#import "WeatherHTTPClient.h" /** 这里我们用到的实时数据来自World Weather Online的实时天气数据,您可以使用我这个API进行测试,不过建议您自己注册一个API,注册地址:https://developer.worldweatheronline.com/member/register 注册用户,然后验证邮箱,然后注册APP,你可以注册Free-Weather-API-V2和Premium-Weather-API 不过访问的地址Base URL不同: Free API: HTTP: http://api.worldweatheronline.com/free/v2/weather.ashx HTTPS: https://api.worldweatheronline.com/free/v2/weather.ashx Premium API: HTTP: http://api.worldweatheronline.com/premium/v1/weather.ashx HTTPS: https://api.worldweatheronline.com/premium/v1/weather.ashx 查看API文档 http://www.worldweatheronline.com/api/docs/local-city-town-weather-api.aspx */ static NSString * const WorldWeatherOnlineAPIKey = @"cb0e4506e3590fdd85bbd9b2a9fc8"; static NSString * const WorldWeatherOnlineURLString = @"http://api.worldweatheronline.com/free/v2/"; @implementation WeatherHTTPClient //单例 + (WeatherHTTPClient *)sharedWeatherHTTPClient { static WeatherHTTPClient *_sharedWeatherHTTPClient = nil; static dispatch_once_t onceToken; dispatch_once(&onceToken, ^{ _sharedWeatherHTTPClient = [[self alloc] initWithBaseURL:[NSURL URLWithString:WorldWeatherOnlineURLString]]; }); return _sharedWeatherHTTPClient; } //根据URL初始化,并默认为JSON序列化 - (instancetype)initWithBaseURL:(NSURL *)url { self = [super initWithBaseURL:url]; if (self) { self.responseSerializer = [AFJSONResponseSerializer serializer]; self.requestSerializer = [AFJSONRequestSerializer serializer]; } return self; } - (void)updateWeatherAtLocation:(CLLocation *)location forNumberOfDays:(NSUInteger)number { NSMutableDictionary *parameters = [NSMutableDictionary dictionary]; parameters[@"num_of_days"] = @(number); parameters[@"q"] = [NSString stringWithFormat:@"%f,%f",location.coordinate.latitude,location.coordinate.longitude]; parameters[@"format"] = @"json"; parameters[@"key"] = WorldWeatherOnlineAPIKey; [self GET:@"weather.ashx" parameters:parameters success:^(NSURLSessionDataTask *task, id responseObject) { if ([self.delegate respondsToSelector:@selector(weatherHTTPClient:didUpdateWithWeather:)]) { [self.delegate weatherHTTPClient:self didUpdateWithWeather:responseObject]; } } failure:^(NSURLSessionDataTask *task, NSError *error) { if ([self.delegate respondsToSelector:@selector(weatherHTTPClient:didFailWithError:)]) { [self.delegate weatherHTTPClient:self didFailWithError:error]; } }]; } @end WeatherHTTPClient.m 2.在WTTableViewController.m文件中找到locationManager:didUpdateLocations:方法,替换成如下代码:
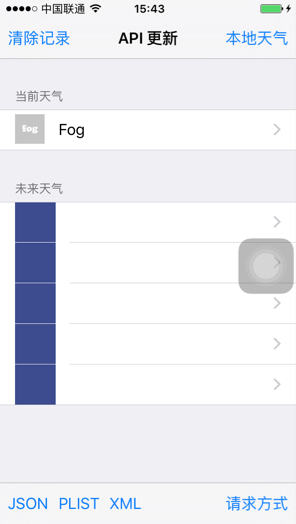
#pragma mark - CLLocationManagerDelegate - (void)locationManager:(CLLocationManager *)manager didUpdateLocations:(NSArray<CLLocation *> *)locations { // 获取最新的位置信息 CLLocation *newLocation = [locations lastObject]; // 如果新位置在5分钟之前就不更新 if([newLocation.timestamp timeIntervalSinceNow] > 300) return; //获取到新位置就停止更新 [self.locationManager stopUpdatingLocation]; /*知识5:使用AFHTTPSessionManager的建议:封装网络层请求 1.为每一个网络服务创建一个AFHTTPSessionManager的子类 2.在每个子类中,创建一个单例方法 */ WeatherHTTPClient *client = [WeatherHTTPClient sharedWeatherHTTPClient]; client.delegate = self; [client updateWeatherAtLocation:newLocation forNumberOfDays:5]; } CLLocationManagerDelegate 3.然后我们运行(最好在真机运行,模拟器可能获取不到经纬度信息),点击“本地天气”按钮,这是我的效果,北京又是个大雾霾天。希望您那的天气很美好。
实战4.利用AFNetworkActivityIndicatorManager显示加载提示
我们现在已经可以利用AFNetworling2.0的类轻易获取到数据,可是,在加载数据的时候,如果网络慢的情况下,用户并不知道发生了什么,这样子的用户体验不太好不是吗,所以我们需要提示用户正在请求数据,AFNetworking已经为我们考虑了这些,而且使用很方便。
1.打开WTAppDelegate.m文件,找到application:didFinishLaunchingWithOptions:方法,在返回前添加如下代码:
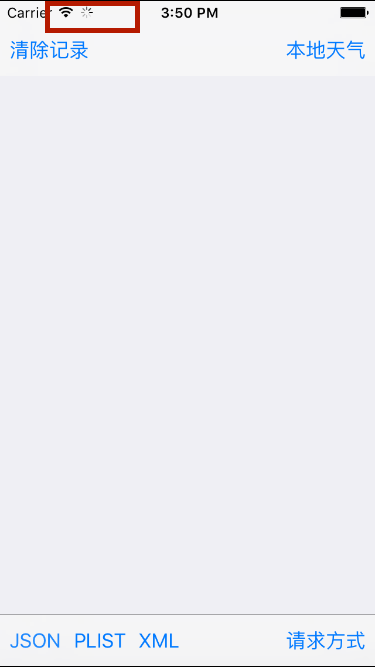
/*知识点4:AFNetworkActivityIndicatorManager让我们很容易的指导网络是否在请求,如果在向网络请求数据就会在状态来出现一个旋转的提示,如果请求结束或者无请求,提示消失,使用方便简单*/ [AFNetworkActivityIndicatorManager sharedManager].enabled = YES;
2.OK,这么多就够了。我运行看看吧,注意下状态栏,在我们选择JSON,XML或PLIST等按钮时,会出现一个加载提示,当数据获取后,加载提示又会消失。
实战5.使用AFImageResponseSerializer序列化图片数据
从服务器返回的数据会有各种类型,有JOSN,XML,PLIST等,有时候也会直接获取一张图片,这时候苹果原生技术职能用NSData的方式获取数据,然后再转换数据,而AFNetwroking确可以直接序列化图片数据,一个小技巧而已。
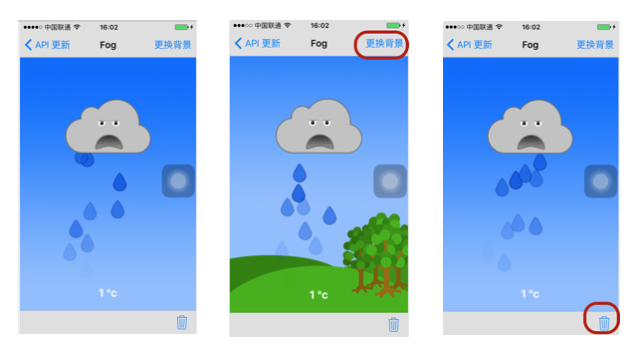
1.找到WeatherAnimationViewController.m文件,找到updateBackgroundImage:方法,替换为如下代码 :
- (IBAction)updateBackgroundImage:(id)sender { NSURL *url = [NSURL URLWithString:@"http://www.raywenderlich.com/wp-content/uploads/2014/01/sunny-background.png"]; NSURLRequest *request = [NSURLRequest requestWithURL:url]; AFHTTPRequestOperation *operation = [[AFHTTPRequestOperation alloc] initWithRequest:request]; //设置为图片序列化方式,如果我们确定获取到的数据为图片,就可以这么做 operation.responseSerializer = [AFImageResponseSerializer serializer]; [operation setCompletionBlockWithSuccess:^(AFHTTPRequestOperation *operation, id responseObject) { self.backgroundImageView.image = responseObject; [self saveImage:responseObject withFilename:@"background.png"]; } failure:^(AFHTTPRequestOperation *operation, NSError *error) { NSLog(@"Error: %@", error); }]; [operation start]; } updateBackgroundImage: 2.找到deleteBackgroundImage:方法,替换为如下代码:
- (IBAction)deleteBackgroundImage:(id)sender { NSArray *paths = NSSearchPathForDirectoriesInDomains(NSDocumentDirectory, NSUserDomainMask, YES); NSString *path = [[paths objectAtIndex:0] stringByAppendingPathComponent:@"WeatherHTTPClientImages/"]; NSError *error = nil; [[NSFileManager defaultManager] removeItemAtPath:path error:&error]; NSString *desc = [self.weatherDictionary weatherDescription]; [self start:desc]; } 3.这个方法会删除我们刚刚更新的背景图片。我们可以再次运行看看,测试下更新背景图和删除按钮把。
自此我们的实战就算完成了。辛苦各位亲了,不过再麻烦大家耐心一点,我们花一点点的时间,来总结一下如何利用AFNetworking来请求外部网络数据:
1.我们可以使用AFNetworkReachabilityManager来监控网络状态的变化,如WiFi,WWAN,或者关闭网络等状态。
2.我们可以使用AFHTTPOperation配合AFJSONResponseSerializer、AFPropertyListResponseSerializer、AFXMLParserResponseSerializer、AFImageResponseSerializer等序列化方式,请求网络数据。
3.我们可以使用AFNetworkActivityIndicatorManager,在网络请求时,给用户友好的请求提示显示。
4.我们AFHTTPSessionManager为 网络 请求设置参数, 根据需要更改请求参数,从而实时的 请求数据。
谢谢各位亲。
正文到此结束
- 本文标签: CTO json Developer 文章 PHP git HBase URLs 苹果 ACE update struct cat 时间 Select 总结 删除 ip description 代码 DOM 参数 http db 雾霾 API Document list ask tab tar NSA parse value src 测试 IDE 解析 key client 协议 js 数据 App XML Connection 下载 服务器 https UI
- 版权声明: 本文为互联网转载文章,出处已在文章中说明(部分除外)。如果侵权,请联系本站长删除,谢谢。
- 本文海报: 生成海报一 生成海报二
热门推荐


相关文章


Loading...
![[HBLOG]公众号](http://www.liuhaihua.cn/img/qrcode_gzh.jpg)

