Corosync+Pacemaker实现web集群高可用
一、简介
高可用集群结构

a.Messaging Layer:信息层,心跳信息传输层。
b.RA(Resource Allocation):资源分配层。该层的核心组件叫CRM。
1).CRM(Cluster Resources Manager): 集群资源管理器,依赖于各自底层的Messaging Layer。高可用集群中任何资源都不应该自行启动,而是由CRM管理启动的,是由CRM做决策的。
2).ha_aware: 如果一个应用程序自己能够利用底层心跳信息传递层的功能完成集群事物决策的过程的软件就叫ha_aware。
3).DC(Designated Coordinator):指 定协调员 ,CRM上必须有一个资源被推举为管理者,它的工作是决策集群中的所有事物,当DC所在的主机挂了就会先选出一个新的DC,再由DC做出事物的决策。
4).LRM(Local Resource Manager) :本地资源管理层,该层是真正去把CRM层的决策去落实的层次。
5).PE(Policy Engine) :策略引擎,决定决策的引擎。所谓策略引擎就是将底层信息层收集的整个集群中所有节点上的信息进行整合,决定策略节点运行在哪个节点上,并通知其它节点上的资源管理器来实现资源的启动和关闭等操作的引擎。
6).TE(Transition Engine) :传输引擎,把PE做出的决策通告给对应节点的CRM的引擎。
7).CIB(Cluster Information Base): 集群信息库,集群信息都是通过XML文件来进行传输的。
c.RA(Resource Agent):资源代理。资源代理就是能够接收CRM的调度,用于实现在节点上对某一资源完成管理的工具,通常是一些脚本。
1). LSB(linux standard base) :/etc/init.d/*下的脚本就属于LSB
2).OCF(Open Cluster Framework): / .isolation heartbeat linbit openstack pacemaker。开放集群架构,那些提供资源代理脚本的组织叫provider,pacemaker、linbit、heartbeat都是provider。
3).service: 一些系统的服务
4).stonith(Shoot-The-Other-Node-In-The-Head[爆其他节点的头]): 在某些情况下,可能会需要关闭节点的电源来保证共享数据的完整性或是完全地恢复资源。为此Pacemaker引入了STONITHd。在Pacemaker中,STONITH设备被当成资源(并且是在CIB中配置)从而轻松地监控,然而STONITHd会注意理解STONITH拓扑,比如它的客户端请求隔离一个节点,它会重启那个机器。
5).systemd: 一些系统的服务
Corosync :
Corosync是集群管理套件的一部分,它在传递信息的时候可以通过一个简单的配置文件来定义信息传递的方式和协议等,是一组通信系统与附加功能中实现高可用性的应用程序。
官网: http://corosync.github.io/corosync/
Pacemaker :
Pacemaker是一个集群资源管理器。它利用你喜欢的集群基础构件(OpenAIS 或heartbeat)提供的消息和成员管理能力来探测并从节点或资源级别的故障中恢复,以实现群集服务(亦称资源)的最大可用性。
它可以做几乎任何规模的集群,并带有一个强大的依赖模式,让管理员能够准确地表达的群集资源之间的关系(包括顺序和位置)。
几乎任何可以编写的脚本,都可以作为管理起搏器集群的一部分。
尤为重要的是Pacemaker不是一个heartbeat的工具,可能有人存在这样的误解。Pacemaker是一个延续CRM(亦称V2资源管理器)的项目。最初开发的项目是heartbeat,已经成为该项目的子项目。
官网: http://clusterlabs.org/wiki/Get_Pacemaker
官网wiki页: http://clusterlabs.org/wiki/Pacemaker
①Pacemaker本身由四个关键组件组成:
a.CIB (集群信息基础)
b.CRMd (集群资源管理守护进程)
c.PEngine (PE or 策略引擎)
d.STONITHd

②Pacemaker集群的种类
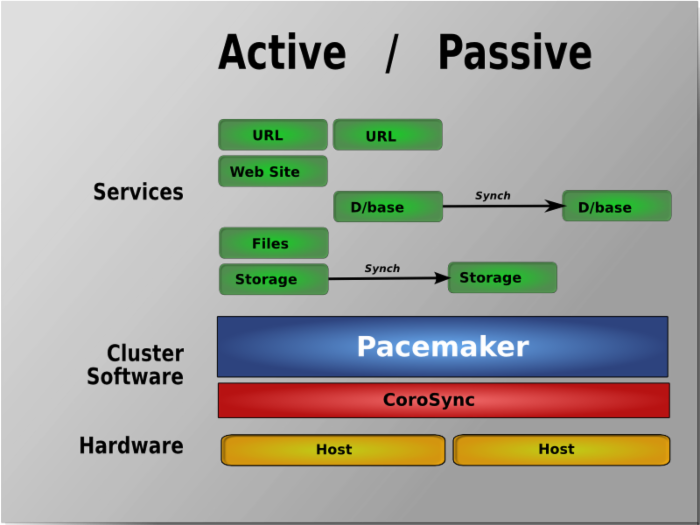
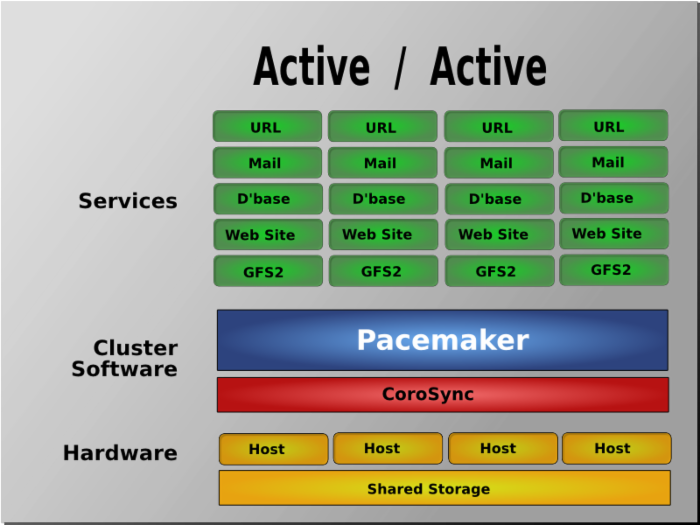
Pacemaker对环境没有特定要求,这使得它支持任何的冗余配置,包括 Active/Active, Active/Passive, N+1, N+M, N-to-1 and N-to-N。
Active/Passive冗余:
N to N 冗余:
二、安装
# yum install pacemaker pcs resource-agents ##corosync作为依赖被安装 # wget -O /etc/yum.repos.d/network:ha-clustering:Stable.repo http://download.opensuse.org/repositories/network:/ha-clustering:/Stable/CentOS_CentOS-7/network:ha-clustering:Stable.repo # yum install pssh crmsh ##安装pacemaker配置接口crmsh
三、配置corosync
# cd /etc/corosync/ # cp corosync.conf.example corosync.conf # cat /etc/corosync/corosync.conf|grep -v "#" ##配置主配置文件 totem { ##图腾,定义集群中各节点的通信及参数 version: 2 ##用于各节点通信的协议版本 crypto_cipher: none ##密码:无 crypto_hash: none ##密钥hash:无 interface { ringnumber: 0 ##冗余环号,#环号码,集群中有多个节点,每个节点上有多个网卡,别的节点可以接收,同时我们本机的另一块网卡也可以接收,为了避免这些信息在这样的环状发送,因此要为这个网卡定义一个唯一的环号码,以避免心跳信息环发送。 bindnetaddr: 192.168.10.0 ##绑定心跳网段 mcastaddr: 239.255.1.1 ##心跳组播地址 mcastport: 5405 ##心跳组播使用端口 ttl: 1 ##表示只向外播一次 } } logging { fileline: off ##指定要打印的行 to_stderr: no ##是否发送到标准错误输出 to_logfile: yes ##是否记录到日志文件 logfile: /var/log/cluster/corosync.log ##定义日志文件路径 to_syslog: yes ##是否记录到系统日志 debug: off ##是否启动调试 timestamp: on ##是否打印时间戳 logger_subsys { ##日志的子系统 subsys: QUORUM debug: off } } quorum { ##法定票数子系统 provider: corosync_votequorum expected_votes: 2 two_node: 1 } service { ver: 1 ##定义版本 name: pacemaker ##定义服务名 } aisexec { ##表示启动corosync的ajs功能,以哪个用户的身份允许 user: root group: root } amf { ##定义编程接口相关 mode: disabled } 四、生成密钥文件key
对于corosync而言,各节点之间通信需要安全认证,所有需要安全密钥,生成后会自动保存至
当前目录下,命名为authkey,权限为400。生成的密钥文件是1024字节的,但在这个生成密钥的
过程中,系统会调用/etc/random中的随机数,如果没有足够的熵,就是提示让我们狂敲键盘来弥补
随机数的不足,直至生成密钥。
# corosync-keygen Corosync Cluster Engine Authentication key generator. Gathering 1024 bits for key from /dev/random. Press keys on your keyboard to generate entropy. Press keys on your keyboard to generate entropy (bits = 40). Press keys on your keyboard to generate entropy (bits = 104). Press keys on your keyboard to generate entropy (bits = 168). Press keys on your keyboard to generate entropy (bits = 232). Press keys on your keyboard to generate entropy (bits = 296). Press keys on your keyboard to generate entropy (bits = 360). Press keys on your keyboard to generate entropy (bits = 424). Press keys on your keyboard to generate entropy (bits = 488). Press keys on your keyboard to generate entropy (bits = 552). Press keys on your keyboard to generate entropy (bits = 624). Press keys on your keyboard to generate entropy (bits = 688). Press keys on your keyboard to generate entropy (bits = 752). Press keys on your keyboard to generate entropy (bits = 816). Press keys on your keyboard to generate entropy (bits = 888). Press keys on your keyboard to generate entropy (bits = 952). Press keys on your keyboard to generate entropy (bits = 1016). Writing corosync key to /etc/corosync/authkey.
五、配置互信
①互信配置
HA-01:
# ssh-keygen -t rsa -f ~/.ssh/id_rsa -P '' # ssh-copy-id -i .ssh/id_rsa.pub root@192.168.10.133
HA-02::
# ssh-keygen -t rsa -f ~/.ssh/id_rsa -P '' # ssh-copy-id -i .ssh/id_rsa.pub root@192.168.10.132
②更改hosts
# cat /etc/hosts 192.168.10.132 node1 192.168.10.133 node2
③复制配置至其他节点并启用
# scp -p corosync.conf authkey root@node2:/etc/corosync/ # systemctl start pacemaker ##开启pacemaker自动开启corosync # systemctl status corosync # systemctl status pacemaker # ssh node2 -- systemctl start pacemaker
六、配置pacemaker
①禁用stonith
corosync默认启用了stonith功能,而我们要配置的集群并没有stonith设备,因此在配置集群的全局属性时要对其禁用。
方法1:
# crm crm(live)# configure ##进入配置模式 crm(live)configure# property stonith-enabled=false ##禁用stonith crm(live)configure# verify ##校验 crm(live)configure# commit ##校验没有错误再提交 crm(live)configure# show ##查看当前配置 node 3232238212: node1 node 3232238213: node2 property cib-bootstrap-options: / have-watchdog=false / dc-version=1.1.13-a14efad / cluster-infrastructure=corosync / stonith-enabled=false
方法2:
# crm configure property stonith-enabled=false
②定义法定票数不够时应该做忽略操作
法定票数(quorum, 票数>半数票数的集群成为满足法定票数)是为了避免集群分裂而出现的。在集群通信故障时,为了避免资源抢占,所以进行投票操作,只有具有法定票数的一方才有资格做为集群,不满足的一方就应该退出集群,但它放弃后并不代表服务停止,所以应该让其释放资源,关闭电源。stonith设备的用处就在于此。
方法1:
# crm crm(live)# configure crm(live)configure# property no-quorum-policy=ignore crm(live)configure# verify crm(live)configure# commit crm(live)configure# show node 3232238212: node1 node 3232238213: node2 property cib-bootstrap-options: / have-watchdog=false / dc-version=1.1.13-a14efad / cluster-infrastructure=corosync / stonith-enabled=false / no-quorum-policy=ignore
方法2:
# crm configure property no-quorum-policy=ignore
③防止资源在节点恢复后移动
故障发生时,资源会迁移到正常节点上,但当故障节点恢复后,资源可能再次回到原来节点,
这在有些情况下并非是最好的策略,因为资源的迁移是有停机时间的,特别是一些复杂的应用。为了避免这种情况,可以根据需要,使用资源粘性策略。
方法1:
# crm crm(live)# configure crm(live)configure# rsc_defaults resource-stickiness=100 ##设置资源粘性为100 crm(live)configure# verify crm(live)configure# commit crm(live)configure# show node 3232238212: node1 node 3232238213: node2 property cib-bootstrap-options: / have-watchdog=false / dc-version=1.1.13-a14efad / cluster-infrastructure=corosync / stonith-enabled=false / no-quorum-policy=ignore rsc_defaults rsc-options: / resource-stickiness=100
方法2:
# crm configure rsc_defaults resource-stickiness=100
④资源黏性值范围及其作用 :
0 :默认选项。资源放置在系统中的最适合位置。这意味着当负载能力“较好”或较差的节点
变得可用时才转移资源。此选项的作用基本等同于自动故障回复,只是资源可能会转移到非之前活动的节点上;
大于0 :资源更愿意留在当前位置,但是如果有更合适的节点可用时会移动。值越高表示资源
越愿意留在当前位置;
小于0 :资源更愿意移离当前位置。绝对值越高表示资源越愿意离开当前位置;
INFINITY :如果不是因节点不适合运行资源(节点关机、节点待机、达到migration-threshold或配置更改)而强制资源转移,资源总是留在当前位置。此选项的作用几乎等同于完全禁用自动故障回复;
-INFINITY :资源总是移离当前位置.
# crm status ##查看集群状态(初始,未配置) Last updated: Mon Nov 16 15:03:25 2015 Last change: Mon Nov 16 15:01:16 2015 by root via cibadmin on node1 Stack: corosync Current DC: node1 (version 1.1.13-a14efad) - partition with quorum 2 nodes and 0 resources configured Online: [ node1 node2 ]
从集群状态信息中可以看到,节点node1和node2都在线,node1是DC且拥有法定票数,但是0 Rewources configured,集群中没有任何资源,所以接下来的任务就是使用pacemaker配置资源。
⑤配置资源
a.查看当前集群所支持的RA类型列表
# crm crm(live)# ra ##进入RA(资源代理配置)模式 crm(live)ra# ? classes List classes and providers ##查看RA类型 info Show meta data for a RA ##查看RA详细信息 list List RA for a class (and provider) ##查看指定类型(或提供商)的RA providers Show providers for a RA and a class ##查看指定资源的提供商或类型 crm(live)ra# classes ##查看当前集群支持的RA类型 lsb ocf / .isolation heartbeat linbit openstack pacemaker service stonith systemd
b.查看某种类别下的所有资源代理的列表
# crm crm(live)# ra crm(live)ra# list lsb ##注:/etc/init.d/*下的脚本就属于LSB crm(live)ra# list ocf heartbeat crm(live)ra# list ocf pacemaker
c.查看代理信息
格式:
# crm ra info [class:[provider:]]resource_agent
例子:
# crm(live)ra# info ocf:heartbeat:IPaddr
d.为集群创建IP地址资源
webip是要实现转移的,目的是为了实现一个节点出现故障时,webip可以转移到另一台备用服务器,
以实现web服务器高可用。
# crm crm(live)# configure crm(live)configure# primitive myip ocf:heartbeat:IPaddr params ip=192.168.10.222 op monitor interval=30s timeout=20s on-fail=restart crm(live)configure# verify crm(live)configure# commit crm(live)configure# cd crm(live)# status ##查看集群状态 Last updated: Mon Nov 16 15:03:25 2015 Last change: Mon Nov 16 15:01:16 2015 by root via cibadmin on node1 Stack: corosync Current DC: node1 (version 1.1.13-a14efad) - partition with quorum 2 nodes and 1 resource configured Online: [ node1 node2 ] myip(ocf::heartbeat:IPaddr):Started node1 ##资源myip运行在node1上
注:
primitive:定义资源命令
myip:资源ID名,可自行定义
ocf:heartbeat:IPaddr:资源代理(RA)
params ip=192.168.10.222:定义VIP
op monitor:监控该资源
interval=30s:间隔时间
timeout=20s:超时时间
on-fail=restart:如服务非正常关闭,让其重启,如重启不了,再转移至其他节点
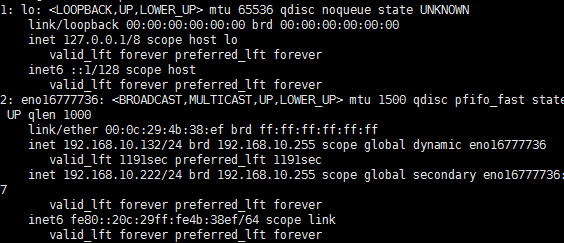
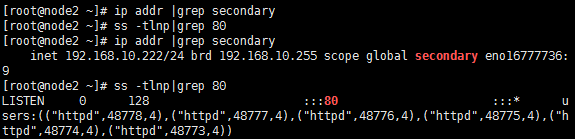
查看资源是否生效
# ip addr
七、配置httpd并测试
①安装
# yum install httpd # ssh node2 -- yum install httpd
②配置index.html
node1:
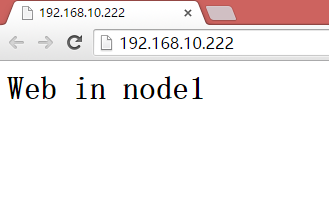
# echo "<h1>Web in node1<h1>">> /var/www/html/index.html
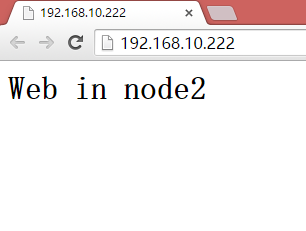
node2:
# echo "<h1>Web in node2<h1>">> /var/www/html/index.html
③配置httpd资源
# crm crm(live)# configure crm(live)configure# primitive WebSite ocf:heartbeat:apache params configfile=/etc/httpd/conf/httpd.conf op monitor op start timeout=60 op stop timeout=60 crm(live)configure# verify crm(live)configure# commit crm(live)# status Last updated: Mon Nov 16 15:09:26 2015 Last change: Mon Nov 16 15:01:16 2015 by root via cibadmin on node1 Stack: corosync Current DC: node1 (version 1.1.13-a14efad) - partition with quorum 2 nodes and 2 resources configured Online: [ node1 node2 ] myip (ocf::heartbeat:IPaddr): Started node1 WebSite (ocf::heartbeat:apache): Started node2
myip资源运行在node1,而WebSite资源则运行在node2上,因此我们要确保资源在同一节点运行。
注:
primitive:定义资源命令
WebSite:资源ID
ocf:heartbeat:apache:资源代理(RA)
op monitor :对此资源进行监控
op start timeout=60:启动超时时间
op stop timeout=60:停止超时时间
④确保资源在同一节点运行
# crm crm(live)# configure crm(live)configure# colocation website-with-ip inf: WebSite myip crm(live)configure# verify crm(live)configure# commit crm(live)configure# show node 3232238212: node1 node 3232238213: node2 primitive WebSite apache / params configfile="/etc/httpd/conf/httpd.conf" / op monitor interval=0 / op start timeout=60 interval=0 / op stop timeout=60 interval=0 primitive myip IPaddr / params ip=192.168.10.222 / op monitor interval=30s timeout=20s on-fail=restart colocation website-with-ip inf: WebSite myip property cib-bootstrap-options: / have-watchdog=false / dc-version=1.1.13-a14efad / cluster-infrastructure=corosync / stonith-enabled=false / no-quorum-policy=ignore / rsc_defaults rsc-options: / resource-stickiness=100
注:
colocation:排列约束
website-with-ip:约束ID
inf:资源黏性
⑤控制资源的启动停止顺序
# crm crm(live)# configure crm(live)configure# order apache-after-ip mandatory: myip WebSite crm(live)configure# verify crm(live)configure# commit crm(live)configure# show node 3232238212: node1 node 3232238213: node2 primitive WebSite apache / params configfile="/etc/httpd/conf/httpd.conf" / op monitor interval=0 / op start timeout=60 interval=0 / op stop timeout=60 interval=0 primitive myip IPaddr / params ip=192.168.10.222 / op monitor interval=30s timeout=20s on-fail=restart colocation website-with-ip inf: WebSite myip order apache-after-ip Mandatory: myip WebSite property cib-bootstrap-options: / have-watchdog=false / dc-version=1.1.13-a14efad / cluster-infrastructure=corosync / stonith-enabled=false / no-quorum-policy=ignore / last-lrm-refresh=1447658335 rsc_defaults rsc-options: / resource-stickiness=100
注:
order:顺序约束
apache-after-ip:约束ID
mandatory: 指定级别(三种级别:mandatory,强制;optional,可选;serialize,序列化)
⑥测试
a).查看资源运行状况
# crm status Last updated: Mon Nov 16 16:11:26 2015Last change: Mon Nov 16 16:11:18 2015 by root via crm_attribute on node2 Stack: corosync Current DC: node1 (version 1.1.13-a14efad) - partition with quorum 2 nodes and 2 resources configured Node node2: standby Online: [ node1 ] myip(ocf::heartbeat:IPaddr):Started node1 WebSite(ocf::heartbeat:apache):Started node1

此时资源运行在node1上
b).进行故障转移
node1:
# crm node standby ##将node1下线 # crm status Last updated: Mon Nov 16 16:23:31 2015Last change: Mon Nov 16 16:23:22 2015 by root via crm_attribute on node1 Stack: corosync Current DC: node1 (version 1.1.13-a14efad) - partition with quorum 2 nodes and 2 resources configured Node node1: standby Online: [ node2 ] myip(ocf::heartbeat:IPaddr):Started node2 WebSite(ocf::heartbeat:apache):Started node2
此时资源myip和WebSite已运行在node2上。
node2:
# crm status Last updated: Mon Nov 16 16:40:03 2015Last change: Mon Nov 16 16:38:37 2015 by root via crm_attribute on node1 Stack: corosync Current DC: node1 (version 1.1.13-a14efad) - partition with quorum 2 nodes and 2 resources configured Node node1: standby Online: [ node2 ] myip(ocf::heartbeat:IPaddr):Started node2 WebSite(ocf::heartbeat:apache):Started node2
已转移至node2
c).恢复节点
# crm node online ##上线节点 # crm status Last updated: Mon Nov 16 16:43:33 2015Last change: Mon Nov 16 16:41:26 2015 by root via crm_attribute on node1 Stack: corosync Current DC: node1 (version 1.1.13-a14efad) - partition with quorum 2 nodes and 2 resources configured Online: [ node1 node2 ] myip(ocf::heartbeat:IPaddr):Started node2 WebSite(ocf::heartbeat:apache):Started node2
资源依然运行在node2上
附 :corosync命令
①语法
corosync-cfgtool [-i <interface ip>] -s] [-r] [-H] [service_name] [-k] [nodeid] [-a] [nodeid]
-s:显示当前节点信息
-a:显示指定节点IP地址
-k:根据node id来杀死某个节点
-R:重载corosync.conf配置文件
-H:关闭当前节点的corosync服务
②示例
# corosync-cfgtool -s ##显示当前节点信息 Printing ring status. Local node ID -1062729084 RING ID 0 id= 192.168.10.132 status= ring 0 active with no faults # corosync-cfgtool -a node1 ##显示指定节点IP地址 192.168.10.132
正文到此结束
- 本文标签: Bootstrap key example apache 端口 js 密钥 IDE XML provider wget tab git centos DOM 开发 update 认证 struct 集群 数据 HTML 参数 2015 ssh 测试 网卡 cat 调试 时间 REST ACE 目录 协议 ip 进程 UI GitHub 软件 http linux 服务器 heartbeat grep 配置 OpenStack 组织 主机 root db tar 安装 管理 list src web node 安全
- 版权声明: 本文为互联网转载文章,出处已在文章中说明(部分除外)。如果侵权,请联系本站长删除,谢谢。
- 本文海报: 生成海报一 生成海报二
热门推荐


相关文章

近期评论
-
你这基本没有更新呀,最近文章显示还是2019年的文章。不符合要求哈
-
关键词:慕云博客 链接:https://www.lilun.me 描述:分享原创文字的个人博客
-
-
-
可以提供一下源码吗
-
不是商业站,鸡娃学习笔记
-
-
-
-
听他们说很厉害的样子
Loading...
![[HBLOG]公众号](http://www.liuhaihua.cn/img/qrcode_gzh.jpg)

