Create views of OpenCASCADE objects in the Debugger
Create views of OpenCASCADE objects in the Debugger
eryar@163.com
Abstract.The Visual Studio Natvis framework lets you customize the way Visual Studio displays native types in debugger variable windows such as the Watch, Locals and Data Tips windows. It supersedes the autoexp.dat file that has been used in earlier versions of Visual Studio and offers XML syntax, better diagnostics, versioning, and multiple file support. The container in OpenCASCADE is difficult for debugging, such as TColStd_Array1OfInteger in the TColStd package, .etc. Use the natvis framework to create views of these objects will make it easy for developers to inspect them during debugging and so accelerate the debug process.
Key Words.Visual Studio Natvis, OpenCASCADE
1. Introduction
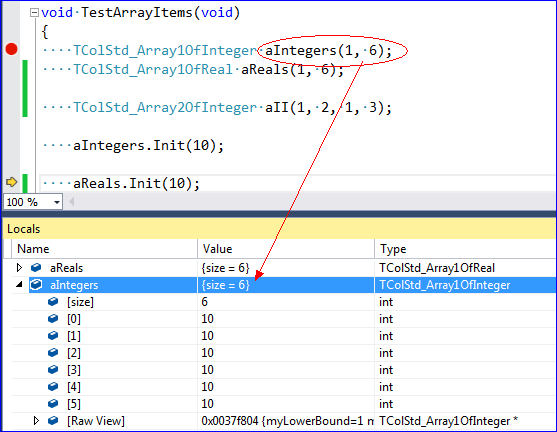
因 为OpenCASCADE早期使用C开发,所以自定义了一些容器类,如包TColStd中的类,TColGeom包及包TopTools中的类等,这些类 在C++中都可以使用STL来替代了。这些类在Debug过程中,很难查看其中的值,如TColStd_Array1OfInteger,这个类相当于 std::vector<int>,但是Debug时只能看到数据的指针,不容易查看容器中每个元素的值,如下图1.1所示:

Figure 1.1 View of TColStd_Array1OfInteger in Locals Window
由 上图1.1可知,对于这个类的对象,Debug时只能看到数据的起始指针。为了方便自定义类型调试,Visual Studio在2012版本以后,引入了Natvis框架,用来替代原来的autoexp.dat来为自定义类型定义调试时的数据显示。Natvis使用 了XML文件,可读性更好,易于实现。
本文使用Visual Studio的Natvis框架,来对OpenCASCADE中的一些容器类数据进行可视化,方便开发者对OpenCASCADE的调试。
2.For Array Container
对于OpenCASCADE的包TColStd中的数组类,定义其natvis如下所示:
<Type Name="TColStd_Array1OfInteger"> <DisplayString Condition="isAllocated != 1">empty</DisplayString> <DisplayString>{{size = {myUpperBound - myLowerBound + 1}}}</DisplayString> <Expand> <Item Condition="isAllocated == 1" Name="[size]">myUpperBound - myLowerBound + 1</Item> <ArrayItems Condition="isAllocated == 1"> <Size>myUpperBound - myLowerBound + 1</Size> <ValuePointer>(Standard_Integer*)(myStart) + myLowerBound</ValuePointer> </ArrayItems> </Expand> </Type>
调试时数据显示如下图2.1所示:

Figure 2.1 OpenCASCADE array in Locals Windows
同理,可对此包中其他一维数组使用同样的规则,即可对其中的数据可视化,与std::vector显示的效果一样,方便调试。
3.For List Container
对于OpenCASCADE的包TColStd中的链表类,定义其natvis如下所示:
<Type Name="TColStd_ListNodeOfListOfInteger"> <DisplayString>{{current = {myValue}}}</DisplayString> <Expand> <LinkedListItems> <HeadPointer>this</HeadPointer> <NextPointer>(TColStd_ListNodeOfListOfInteger*)myNext</NextPointer> <ValueNode>this->myValue</ValueNode> </LinkedListItems> </Expand> </Type> <Type Name="TColStd_ListOfInteger"> <DisplayString Condition="myFirst == 0">empty</DisplayString> <Expand> <Item Name="first">(TColStd_ListNodeOfListOfInteger*)myFirst</Item> </Expand> </Type>
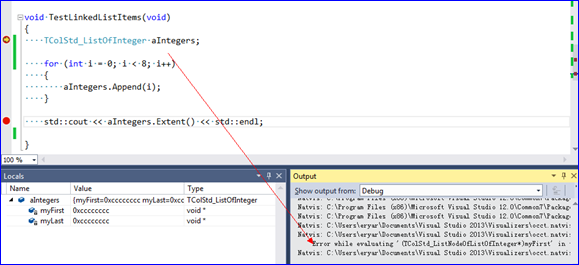
调试时对于类TColStd_ListOfInteger,natvis诊断说找不到类TColStd_ListNodeOfListOfInteger定义,当跟踪到此类一个具体函数时,就可以看到具体的值了:

Figure 3.1 Natvis gives a Error info
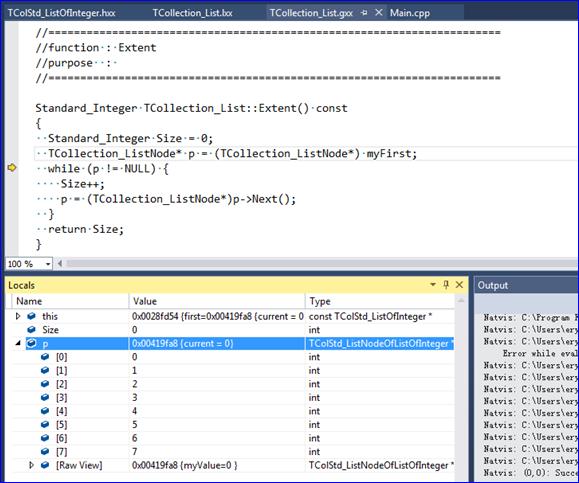
跟踪到TColStd_ListOfInteger内部后,就可以看到类TColStd_ListNodeOfListOfInteger中的数据了,但是从TColStd_ListOfInteger的函数中出来后,就看不到了。
如果这个问题解决了,对于类TopoDS_ListOfShape中的数据也可以用同样的方式来显示,极大地方便了开发者对其调试。如果你对此有解决办法,欢迎不吝赐教。

Figure 3.2 Data view for TColStd_ListNodeOfListOfInteger
先从简单的容器类着手,解决后可将TopoDS_ListOfShape中的数据显示出来,为OpenCASCADE程序的调试提供方便。
4.Conclusion
Visual Studio 2012版本以后引入了Natvis框架来对自定义的类进行可视化,方便调试。OpenCASCADE中有很多容器类直接使用了指针,调试程序时数据很不 直观。应用Natvis来对一些类在调试时的视图进行配置,可以方便查看其中数据,使OpenCASCADE的调试更轻松。
对于一维数组的natvis定义还是很简单的,但是对于List出现了问题。如果这个问题解决了,对TopoDS_ListOfShape的可视化也可做同样的处理,方便造型算法调试。若您有解决方案,望不吝赐教。
5. References
1. Create custom views of native objects in the debugger.
https://msdn.microsoft.com/en-us/library/vstudio/jj620914.aspx
2. Writing debugger type visualizers for C++ using .natvis files
https://code.msdn.microsoft.com/Writing-type-visualizers-2eae77a2#content
3. vczh. C++实用技巧之配置Visual C++的调试器显示数据结构的格式.
http://www.cppblog.com/vczh/archive/2013/03/21/198665.html
4. stl.natvis in %VSINSTALLDIR%/Common7/Packages/Debugger/Visualizers
5. qt5.natvis in %VSINSTALLDIR%/Common7/Packages/Debugger/Visualizers
PDF Version: Create views of OpenCASCADE objects in the Debugger


![[HBLOG]公众号](http://www.liuhaihua.cn/img/qrcode_gzh.jpg)

