Get started系列- React Native

ReactJS 提供了一种前段开发的新模式,而React Native更是在这个基础上将Web和Mobile两个领域的开发无缝地衔接了在一起。如果你是一名web开发者,而对移动端开发感兴趣的话,不妨通过这篇文章来入门吧。
Facebook 在 React.js Conf 2015 大会上推出了基于 JavaScript 的开源框架 React Native 。用这个框架,我们就可以用Javascript开发原生iOS程序了(安卓版现已发布)!3月底,Facebook已经放出了官方 repository 。
Contents
- 1 起步
- 2 Hello React Native
- 3 Hello JSX
- 4 添加导航控制
- 5 构建搜索页面
- 6 用Flexbox来布局
- 7 添加组件state(状态参数)
- 8 启动搜索功能
- 9 发起API请求
- 10 显示结果
- 11 妙手生花
- 12 房产详情视图
- 13 基于地理位置的搜索
- 14 附:React-Native学习指南
- 14.1 React Native
- 14.2 深入浅出系列教程
- 14.3 React.js
- 14.4 ES6
- 14.5 React Native探索系列教程
- 14.6 开源APP
我们都在用JS和HTML5写App,然后用PhoneGap包好发布到iOS(和安卓)了。 React Native真的好用么?
React Native还真就是那么好用。程序猿都为此兴奋无比,主要有以下两个原因:
- 用了React Native, 你的程序尽管用JavaScript写,UI却是本地的,因此无需承受HTML5的UI带来的用户体验损失。
- React 有特别的构建用户界面的技巧,使得界面成为一个叙述软件工作状态的交流窗口。
关键是,React Native是要把React的编程方式带到移动端App开发中。和Java的“开发一次,到处使用”的谎言不同,React主张“学习一次,到处开发”,至少比较现实。本教程暂时只讨论iOS,但是你看完以后,一定也知道在安卓上怎么用了。
如果你只用Objective-C或者Swift开发程序,可能你不会对用JavaScript开发程序有想法。但是作为Swift的开发者,多一门手艺并不是坏事。
用过Swift的你,一定掌握了更为有效和规范的算法,更好的控制程序的稳定性和可移植性。但实际上,构建UI的方法和Objective-C并没有多大区别:还是在用UIKit而且别无选择。
而我们的React引入了虚拟DOM的概念,将功能性(甚至面向对象)直接带到了UI开发中来。
本教程中,咱们来做一个搜索英国房产并生成列表的软件。

如果你没用过JavaScript也没关系,本会会详解代码。React 用CSS属性来管理样式,很简单,当然如果你有需要的话可以专门去学习一下。
好,我们开始吧。
起步
React Native框架就在 GitHub 上,你可以克隆一个项目,也可以下载一个zip文件。如果并不想看源代码,也可以用命令行来创建一个React Native项目。本教程中,咱们就这么做。
React使用Node.js,来构建JavaScript代码。如果没有的话需要装上。
先安装Homebrew(本机使用的是MAC,应该不用解释了),然后命令行安装Node.js
brew install node
再安装 watchman ,Facebook的一款文件监控程序。
brew install watchman
有了这个React Native就可以监察文件的变化并重建。就好比每次保存都用Xcode来build一次。
接下来就可以用npm安装 React Native CLI(命令行工具)。
npm install -g react-native-cli
这就用Node的包管理工具在全局安装了CLI。这方面npm有点像CocoaPods 或者Carthage。
创建一个项目目录,然后进入这个目录:
react-native init PropertyFinder
这就创建了一个叫做PropertyFinder(找房产)的初始项目,里面包含了构建和运行 React Native 程序所需的所有内容。
进入这个目录,你会找到一个node_modules文件夹,这里面放着React Native框架。
同时还会找到一个 index.ios.js文件,这就是CLI创建的程序文件的骨架。
最后,还会看到一个Xcode项目文件和iOS目录,包含了启动程序必须的相关文件。
下面我们build和运行一下这个程序:
同时我们会注意到一个窗口跳出来:
=============================================================== | Running packager on port 8081. | Keep this packager running while developing on any JS | projects. Feel free to close this tab and run your own | packager instance if you prefer. | | https://github.com/facebook/react-native | =============================================================== Looking for JS files in /Users/colineberhardt/Temp/TestProject React packager ready.
这是React Native的包管理程序,在Node下面运行,咱们就知道这是干什么的了。
不要关掉这个窗口,让它在后台自己运行。如果不小心关掉了,重新运行Xcode项目就行。
注意:我们等一下要写大量的JavaScript代码,最好选一个轻量级的编辑器,推荐Sublime Text,当然你自己可以在网上找找。
Hello React Native
在做房产搜索App之前,咱们先做一个Hello World程序。我们在这里会接触到很多重要的组件。
在编辑器中打开index.ios.js,删掉全部内容,然后写下这么一行:
'use strict';启用Strict模式可以增强JavaScript的除错能力并关掉一些不好的功能。
Note: 了解更多JavaScript的strict模式,请参考 Jon Resig’s article “ECMAScript 5 Strict Mode, JSON, and More”.
然后加上下面这行:
var React = require('react-native');这就把React Native组件调用起来,并赋予React变量。其中require功能和Node.js是一样的。
Note: 关于JavaScript的模块化组织方式,请参考 this article by Addy Osmani on writing modular JavaScript.
接下来,加上下面这些:
var styles = React.StyleSheet.create({ text: { color: 'black', backgroundColor: 'white', fontSize: 30, margin: 80 } }); 这段代码添加了文字的样式。如果你干过web开发,你一定知道这就是CSS。
好了,下面真的是app程序了。
class PropertyFinderApp extends React.Component { render() { return React.createElement(React.Text, {style: styles.text}, "Hello World!"); } }看到了吗?一个JavaScript类(Class)!
类从ECMAScript 6 (ES6)被引入JavaScript。由于JavaScript不断在改进,web开发人员经常因为浏览器兼容性(万恶的IE)而不得不放弃一些功能。React Native有一个JavaScriptCore,因此无需为浏览器兼容性操心。
Note: 如果你是web开发者,我建议先从新的JavaScript标准出发,然后使用 Babel 之类的工具兼容旧版浏览器
PropertyFinderApp 继承 React.Component,React UI的基础模块。Component(组件)包含了不可变的property(属性变量),可变的state(状态变量),并提供一个render(渲染)方法。
React Native 组件不是UIKit类,而是轻量级的。框架会将React组件树转换为本地UI。
最后我们加上这行:
React.AppRegistry.registerComponent('PropertyFinder', function() { return PropertyFinderApp }); AppRegistry 定义了程序的入口变量,并提供了根组件。
保存好 index.ios.js ,返回Xcode,确认把 PropertyFinder 加进iPhone模拟器,我们重建并运行一下项目。

这可是本地UI,没有任何浏览器,代码全是JavaScript写的哦!
还是不信?:)打开Xcode的 Debug/View Debugging/Capture View Hierarchy ,是不是哪都找不到 UIWebView ,只有一个真正的View!牛啊。

你一定很好奇是怎么回事。在Xcode中找到 application:didFinishLaunchingWithOptions: ,这个方法创建了一个 RCTRootView ,来载入JavaScript并渲染了View。
程序一运行, RCTRootView 立刻读取:
http://localhost:8081/index.ios.bundle
来加载程序。
现在知道前面弹出来那个窗口是干什么的了吧,就是处理这个东西的。
程序启动时,代码会载入JavaScriptCore 框架并执行。在这个程序中, PropertyFinderApp 这个component会被加载并创建一个本地的UIKit视图。后面会详细讲到。
Hello JSX
我们现在的程序使用 React.createElement 创建,然后React转换为本地文件。尽管目前我们的js文件很清楚,但随着代码更复杂,各种元素的嵌套会导致代码一团乱麻。
在app继续运行的情况下,我们回到 index.ios.js ,把return改一改:
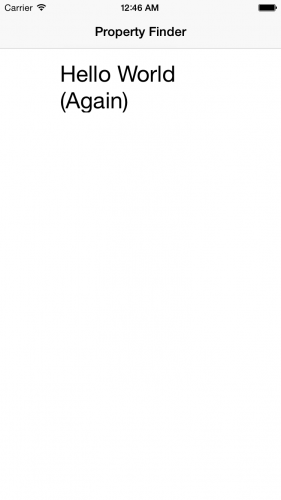
return <React.Text style={styles.text}>Hello World (again)</React.Text>; 这是JSX代码,全称叫做JavaScript syntax extension,使用类似HTML的标签。如果是web开发者,一看就懂。我们全程会大量使用JSX代码。
保存文件返回模拟器,按下Cmd+R,我们可以看到“Hello World (again)”,看到没,重新加载React Native程序就跟刷新一下网页一样简单。
由于我们的程序使用的是同一套JavaScript文件,以后只需要修改 index.ios.js 并保存,就可以实现内容的调整。
好了,玩够了Hello World,我们来做真正的程序吧。
添加导航控制
我们的寻找房产程序使用和UIKit类似的栈形导航。下面来做这个导航。
在 index.ios.js 中,我们把 PropertyFinderApp 重命名为HelloWorld。
class HelloWorld extends React.Component { Hello World还是会显示,不过已经不是咱们的根组件了。
我们在下面加一点真货:
class PropertyFinderApp extends React.Component { render() { return ( <React.NavigatorIOS style={styles.container} initialRoute={{ title: 'Property Finder', component: HelloWorld, }}/> ); } }这样就添加了一个导航控制器,使用了原本HellowWorld组件的路径和样式。在web开发时,routing(路由或路径)被用来设计程序的导航结构,根据URL来分配页面。
然后我们要调整样式:
var styles = React.StyleSheet.create({ text: { color: 'black', backgroundColor: 'white', fontSize: 30, margin: 80 }, container: { flex: 1 } });回到Xcode再刷新一次。
好了现在我们有了导航框架,可以开始在里面做UI了。
构建搜索页面
我们创建一个新文件 SearchPage.js ,和 index.ios.js 放在一起。添加如下代码:
'use strict'; var React = require('react-native'); var { StyleSheet, Text, TextInput, View, TouchableHighlight, ActivityIndicatorIOS, Image, Component } = React;前面就不说了,下面那个变量声明你可能没有见过。
这叫做 destructuring assignment (解构化赋值),可以把对象的多个属性赋给相应变量。于是,之后你就不必使用React这个前缀,比如你可以直接调用 StyleSheet 而不是 React.StyleSheet 。它还可以用来操作数组,非常好用。
我们还要添加样式:
var styles = StyleSheet.create({ description: { marginBottom: 20, fontSize: 18, textAlign: 'center', color: '#656565' }, container: { padding: 30, marginTop: 65, alignItems: 'center' } });虽然用css没有Interface Builder那么可视化,但比用 viewDidLoad() 一个一个设置视图属性可方便多了。:)
下面来写组件:
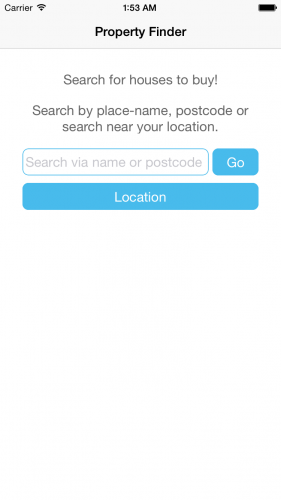
class SearchPage extends Component { render() { return ( <View style={styles.container}> <Text style={styles.description}> Search for houses to buy! </Text> <Text style={styles.description}> Search by place-name, postcode or search near your location. </Text> </View> ); } }render 可以完美应用JSX的结构。用css我们很容易就实现了这个图形界面:一个容器和两条label。
最后加上:
module.exports = SearchPage;
这条命令制定了输出 SearchPage 以为他用。
下一步就是路由(Routing)的制作。
打开 index.ios.js ,并且在require下面加上这行:
var SearchPage = require('./SearchPage'); 在 PropertyFinderApp 的render里面替换 initialRoute :
component: SearchPage
现在可以干掉Hello World这种新手用的东西了,现在我们是高手了。
回模拟器我们刷新一下Cmd + R:

这就是我们的新组件,搜索页 SearchPage 。
用Flexbox来布局
现在,我们用css调整了margin、padding和颜色,不过你可能对flexbox并不熟悉,这是最近出现的新规范,用来做app的UI布局再好不过了。
React Native用的是 css-layout 库,是flexbox标准的一种javascript实现,可以转化为C(iOS)和Java(安卓)。
在App中,默认的排列是依据column(列),所以,子元素默认是垂直排列的。

这个被叫做主轴(main axis),可以竖着也可以横着。
每个子元素的垂直位置由margin、height和padding决定。容器同时将 alignItems 设置为 center ,所以文档是居中的。
好了,现在要加上input和button了。打开 SearchPage.js 并将下面这段插入到第二段text元素后面:
<View style={styles.flowRight}> <TextInput style={styles.searchInput} placeholder='Search via name or postcode'/> <TouchableHighlight style={styles.button} underlayColor='#99d9f4'> <Text style={styles.buttonText}>Go</Text> </TouchableHighlight> </View><TouchableHighlight style={styles.button} underlayColor='#99d9f4'> <Text style={styles.buttonText}>Location</Text> </TouchableHighlight>现在我们有两个顶级视图了,一个有一个输入框和按钮,一个只有按钮。
下面我们把样式加进style里面:
flowRight: { flexDirection: 'row', alignItems: 'center', alignSelf: 'stretch' }, buttonText: { fontSize: 18, color: 'white', alignSelf: 'center' }, button: { height: 36, flex: 1, flexDirection: 'row', backgroundColor: '#48BBEC', borderColor: '#48BBEC', borderWidth: 1, borderRadius: 8, marginBottom: 10, alignSelf: 'stretch', justifyContent: 'center' }, searchInput: { height: 36, padding: 4, marginRight: 5, flex: 4, fontSize: 18, borderWidth: 1, borderColor: '#48BBEC', borderRadius: 8, color: '#48BBEC' }每项属性中用“,”隔开。这些就是输入框和按钮的样式。
我们会模拟器刷新一下 Cmd + R。
输入框和Go按钮在同一行,因为把它们放在了 flexDirection: 'row' 的容器中。我们并没有明确声明它们的宽度,而是给了一个flex值。输入框 flex: 4 ,而按钮则是 flex: 1 ,所以它们的宽度比为4:1.
你可能已经注意到,这个按钮……并不是按钮。在UIKit中,按钮只不过是可以点击的Label,所以React Native团队决定直接用JavaScript构建按钮。程序中的按钮使用 TouchableHighlight 这个组件,使得按钮按下时显示透明和不同的颜色。
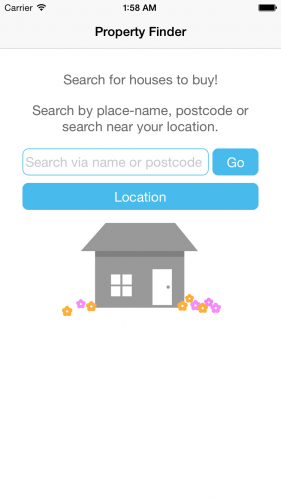
最后我们添上一些图片。 可以在这里下载 。在Xcode中,打开 Images.xcassets ,点击加号添加图片。接下来鼠标拖动图片到相应的格子。

这次需要停掉程序并重启,来让图片加载出现。
将下面这行添加到location按钮 TouchableHighlight 组件的下面:
<Image source={require('image!house')} style={styles.image}/> 下面添加图片的样式:
image: { width: 217, height: 138 } 上面的 require('image!house') 是为了获取图片的位置。在Xcode中,如果打开 Images.xcassets 的话,我们会找到房屋图标。
返回模拟器刷新一下页面,Cmd + R。
注意:如果看不到图片而显示“image!house”的话,重启包管理器(或者命令行npm start)
添加组件state(状态参数)
每一个React组件都有其state状态参数,用来储存关键变量。组件初始化之前要先初始化state。
在 SearchPage.js 中,在render()上面添加如下代码:
constructor(props) { super(props); this.state = { searchString: 'london' }; }我们的组件现在有了一个state变量,名为searchString值为’london’。
然后就可以使用组件的状态了。在Render中,改变TextInput如下代码:
<TextInput style={styles.searchInput} value={this.state.searchString} placeholder='Search via name or postcode'/> 我们把输入框的值——也就是用户看到的那个——和我们的state值 searchString 绑定起来了。
好了,值是初始化好了,但是,当用户输入时,会发生什么呢?(自己去试试)
我们要绑定一个事件,在 SearchPage 中添加如下方法:
onSearchTextChanged(event) { console.log('onSearchTextChanged'); this.setState({ searchString: event.nativeEvent.text }); console.log(this.state.searchString); }这样,系统就会取出输入框的值并且替换state的值。
下面要把这个方法串进输入框中,要将函数绑定到onChange属性上:
<TextInput style={styles.searchInput} value={this.state.searchString} onChange={this.onSearchTextChanged.bind(this)} placeholder='Search via name or postcode'/>这样每次用户在输入框中输入,都会触动onChange,并执行 onSearchTextChanged 。
注意:如果不明白bind(this)方法是干什么的,JavaScript处理this关键字与其他语言不太一样,用Swift翻译就是self。用bind是为了确保this指向组件实例。可以自己去试试就明白了。
最后,把下面这些记录函数添加到render中,return上面:
console.log('SearchPage.render'); 这样我们就会明白一些非常神奇的东西。
现在刷新一下程序。我们应该可以看到界面中的”london”,并且在命令行中,我们看到:
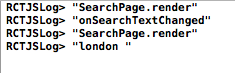
嗯……顺序似乎有点问题。
- 首次启动render
- 当输入框有变化,启动 onSearchTextChanged()
- 更新state,并引发另一次render
- onSearchTextChanged() 并装入新的搜索内容
每次任何state发生变化,React组件会将整个UI全部重新render一遍,这是好的,这就解耦了state与UI状态。
在其他的UI框架中,要么你手动更改UI的内容,要么进行双向绑定,比如某些MVVM模式的框架。
在React中,你无需担心哪块UI绑到什么地方,整个UI都是state的一个体现。
看到这里,你可能已经发现这个模式的缺点了——性能问题!
我们总不能每次state有点改动,就把整个UI全部扔掉,然后重新加载吧?好了React在这个问题上相当智能化。每次UI渲染时,都会把render方法返回的视图树,拿去与现存的UIKit视图树作对比。于是对比的结果,就是需要更改的视图树。所以只有改变了的部分需要重新渲染。
看到这里我是非常佩服React.js的虚拟DOM给iOS带来的如此特别的合作方式。
我们把上面那些日志方法全部删掉,下面我们开始完善程序。
启动搜索功能
要实现搜索功能,我们要处理Go按钮的按下事件,并发出API请求,同时视觉上告诉用户请求正在进行。
在 SearchPage.js 中,更改初始化state:
this.state = { searchString: 'london', isLoading: false };在render中增加如下内容:
var spinner = this.state.isLoading ? ( <ActivityIndicatorIOS hidden='true' size='large'/> ) : ( <View/>);根据isLoading这个state是否为真,显示活动视图或空视图。
在搜索UI的return中,在 Image 下面,增加:
{spinner} 把下面这个属性加到Go按钮的渲染方法中的 TouchableHighlight 标签里:
onPress={this.onSearchPressed.bind(this)} 然后在 SearchPage 类中加入以下方法:
_executeQuery(query) { console.log(query); this.setState({ isLoading: true }); } onSearchPressed() { var query = urlForQueryAndPage('place_name', this.state.searchString, 1); this._executeQuery(query); }现在的_executeQuery只是写一条日志,将来会完善的。
注意: JavaScript的类没有私有前缀,所以前面加个_来表示私有。
当Go按钮按下时,程序会执行 onSearchPressed() ,启动查询。
最后,在searchPage类的声明上加上这个工具函数:
function urlForQueryAndPage(key, value, pageNumber) { var data = { country: 'uk', pretty: '1', encoding: 'json', listing_type: 'buy', action: 'search_listings', page: pageNumber }; data[key] = value; var querystring = Object.keys(data) .map(key => key + '=' + encodeURIComponent(data[key])) .join('&'); return 'http://api.nestoria.co.uk/api?' + querystring; };这个函数和searchPage没有依赖,所以作为一个独立函数,而不作为类的方法。这个函数先用一个data来储存参数,然后构建查询请求。其中,=>这是个新语法,(参数)=>{函数体}。
回到模拟器,按下Cmd + R刷新,点击Go,就会看到滚动图标,然后我们看看后台。

我们会看到url,复制下来贴进浏览器,我们来看看结果,会看到一大段JSON内容。现在还不用管这些。
注意:本教程使用了 Nestoria API 来获取房产信息。相关细节可以参考网站文档。
下一步,就是在App内发起请求了。
发起API请求
还是在 SearchPage.js ,添加一个message变量。
this.state = { searchString: 'london', isLoading: false, message: '' };在render中,在底部添加一行:
<Text style={styles.description}>{this.state.message}</Text> 这个可以用来显示信息给用户看。
在 SearchPage 中,添加以下代码到 _executeQuery() 中:
fetch(query) .then(response => response.json()) .then(json => this._handleResponse(json.response)) .catch(error => this.setState({ isLoading: false, message: 'Something bad happened ' + error }));这里用到了fetch方法,来自Web API,提供了一个比XMLHttpRequest更好的API接口。异步回应返回一个promise,带来目标路径以及JSON文档。
最后我们来处理返回的文档,把这段加在SearchPage里面:
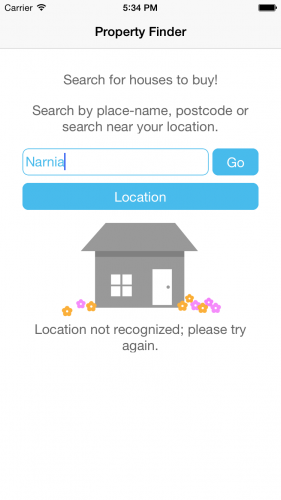
_handleResponse(response) { this.setState({ isLoading: false , message: '' }); if (response.application_response_code.substr(0, 1) === '1') { console.log('Properties found: ' + response.listings.length); } else { this.setState({ message: 'Location not recognized; please try again.'}); } }拿掉了isLoading并且做了日志记录。
保存起来,然后回模拟器Cmd + R。我们搜索london,应该会看到20条记录在日志里面。然后试一下随便输一个’ narnia’,你会看到如下情况:
显示结果
创建一个 SearchResults.js ,并添加代码如下:
'use strict'; var React = require('react-native'); var { StyleSheet, Image, View, TouchableHighlight, ListView, Text, Component } = React; 这一段,看是很眼熟吧?
然后是组件本身:
class SearchResults extends Component { constructor(props) { super(props); var dataSource = new ListView.DataSource( {rowHasChanged: (r1, r2) => r1.guid !== r2.guid}); this.state = { dataSource: dataSource.cloneWithRows(this.props.listings) }; } renderRow(rowData, sectionID, rowID) { return ( <TouchableHighlight underlayColor='#dddddd'> <View> <Text>{rowData.title}</Text> </View> </TouchableHighlight> ); } render() { return ( <ListView dataSource={this.state.dataSource} renderRow={this.renderRow.bind(this)}/> ); } } 上面的代码用了一个 ListView 组件,用于在可滚动的容器内添加多行内容,有点像UITableView。数据的来源是 ListView.DataSource 。
构建数据源时,需要提供一个函数来对比一对数据。ListView在组建的过程中会调用这个函数,用于编制列表。这次的回传数据中,Nestoria API提供 guid ,就刚好适合这个目的。
别忘了添加输出模块代码:
module.exports = SearchResults;
讲一下这段添加到 SearchPage.js 中,require下面:
var SearchResults = require('./SearchResults'); 这样我们就可以在 SearchPage 中调用 SearchResults 了。
编辑 _handleResponse 方法:
this.props.navigator.push({ title: 'Results', component: SearchResults, passProps: {listings: response.listings} }); 上面的代码导向 SearchResults 页面,并且将结果列表传进去。用push方法将搜索结果传入导航,这样就可以用回退功能返回之前页面。
返回模拟器并Cmd + R,你会看到列表:
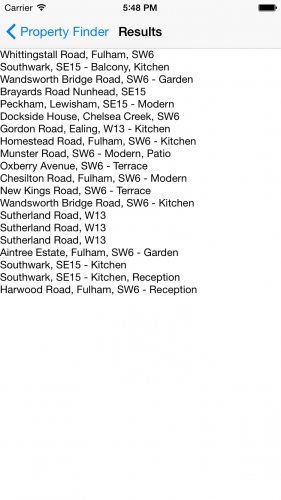
当然,这是看不得的,太丑了。
妙手生花
React Native 对你来说应该比较熟了,我们就加快脚步。
将代码加到 SearchResults.js :中的结构化定义下面:
var styles = StyleSheet.create({ thumb: { width: 80, height: 80, marginRight: 10 }, textContainer: { flex: 1 }, separator: { height: 1, backgroundColor: '#dddddd' }, price: { fontSize: 25, fontWeight: 'bold', color: '#48BBEC' }, title: { fontSize: 20, color: '#656565' }, rowContainer: { flexDirection: 'row', padding: 10 } });然后把 renderRow() 替换成下面这些
renderRow(rowData, sectionID, rowID) { var price = rowData.price_formatted.split(' ')[0]; return ( <TouchableHighlight onPress={() => this.rowPressed(rowData.guid)} underlayColor='#dddddd'> <View> <View style={styles.rowContainer}> <Image style={styles.thumb} source={{ uri: rowData.img_url }} /> <View style={styles.textContainer}> <Text style={styles.price}>£{price}</Text> <Text style={styles.title} numberOfLines={1}>{rowData.title}</Text> </View> </View> <View style={styles.separator}/> </View> </TouchableHighlight> ); } 这次,图片使用URL,React Native会负责从主线程中解析。而且rowData.grid使用=>方法来获取。
最后一步是处理按下:
rowPressed(propertyGuid) { var property = this.props.listings.filter(prop => prop.guid === propertyGuid)[0]; }刷新一下,我们可以看到:

看起来很不错。但是,这个房价根本没人买的起吧。
我们准备将最后一个视图做出来
房产详情视图
新建一个 PropertyView.js ,然后添加以下代码:
'use strict'; var React = require('react-native'); var { StyleSheet, Image, View, Text, Component } = React;现在,你睡着了都应该写的出来。
然后是样式:
var styles = StyleSheet.create({ container: { marginTop: 65 }, heading: { backgroundColor: '#F8F8F8', }, separator: { height: 1, backgroundColor: '#DDDDDD' }, image: { width: 400, height: 300 }, price: { fontSize: 25, fontWeight: 'bold', margin: 5, color: '#48BBEC' }, title: { fontSize: 20, margin: 5, color: '#656565' }, description: { fontSize: 18, margin: 5, color: '#656565' } });接着是组件:
class PropertyView extends Component { render() { var property = this.props.property; var stats = property.bedroom_number + ' bed ' + property.property_type; if (property.bathroom_number) { stats += ', ' + property.bathroom_number + ' ' + (property.bathroom_number > 1 ? 'bathrooms' : 'bathroom'); } var price = property.price_formatted.split(' ')[0]; return ( <View style={styles.container}> <Image style={styles.image} source={{uri: property.img_url}} /> <View style={styles.heading}> <Text style={styles.price}>£{price}</Text> <Text style={styles.title}>{property.title}</Text> <View style={styles.separator}/> </View> <Text style={styles.description}>{stats}</Text> <Text style={styles.description}>{property.summary}</Text> </View> ); } }render的第一部分对数据做了一些处理,因为很多情况下数据是不完整的。
最后别忘了输出:
module.exports = PropertyView;
回到 SearchResults.js ,增加一个require,你懂的:
var PropertyView = require('./PropertyView'); 改一下 rowPressed() 来实现 PropertyView 的导航。
rowPressed(propertyGuid) { var property = this.props.listings.filter(prop => prop.guid === propertyGuid)[0]; this.props.navigator.push({ title: "Property", component: PropertyView, passProps: {property: property} }); }刷新一下,你也懂的。

最后一步:让用户搜索附近的房子。
基于地理位置的搜索
在Xcode中,打开 Info.plist 并添加新key,右键点击编辑期内并选择 Add Row 。 用 NSLocationWhenInUseUsageDescription 作为键名,以下作为键值:
PropertyFinder would like to use your location to find nearby properties
以下是完成的plist :

打开 SearchPage.js ,找到渲染“Location”那个按钮的 TouchableHighlight ,并且加上下列:.
onPress={this.onLocationPressed.bind(this)} 当你点击按钮,就会触发 onLocationPressed 。
打开 SearchPage ,添加:
onLocationPressed() { navigator.geolocation.getCurrentPosition( location => { var search = location.coords.latitude + ',' + location.coords.longitude; this.setState({ searchString: search }); var query = urlForQueryAndPage('centre_point', search, 1); this._executeQuery(query); }, error => { this.setState({ message: 'There was a problem with obtaining your location: ' + error }); }); }获取现在位置的方法是 navigator.geolocation ,这是Web API,React有自己的一套实现,用的是iOS原生的位置服务。
如果成功获取现在的位置,系统会向Nestoria拉取数据,如果失败,就会显示错误信息。
由于改变了plist,这次我们就不能Cmd +R了。重新建立工程并启动吧。
在启动位置搜索服务前,我们必须指定一处Nestoria 数据库覆盖的地方。作为测试,我们在模拟器中选择 Debug/Location/Custom Location , 输入北纬55.02,经度 -1.42 ,这是北英格兰一处安静的港口。

附:React-Native学习指南
React Native
- React-Native入门指南 https://github.com/vczero/react-native-lession
- React-Native视频教程(部分免费) https://egghead.io/technologies/react
- react-native 官方api文档 http://facebook.github.io/react-native/docs/getting-started.html
- react-native中文文档(极客学院) http://wiki.jikexueyuan.com/project/react-native/
- react-native中文文档(react native中文网,人工翻译,官网完全同步) http://react-native.cn/docs/getting-started.html
- react-native第一课 http://html-js.com/article/2783
- 深入浅出 React Native:使用 JavaScript 构建原生应用 http://zhuanlan.zhihu.com/FrontendMagazine/19996445
- React Native通信机制详解 http://blog.cnbang.net/tech/2698/
- React Native布局篇 http://segmentfault.com/a/1190000002658374
- React Native 基础练习指北(一) http://segmentfault.com/a/1190000002645929
- React Native 基础练习指北(二) http://segmentfault.com/a/1190000002647733
- Diary of Building an iOS App with React Native http://herman.asia/building-a-flashcard-app-with-react-native
- Use React Native in Existing iOS App http://blog-en.leapoahead.com/post/use-react-native-in-existing-ios-app
- React Native For Beginners – The Next Big Thing? http://devdactic.com/react-native-for-beginners/
- How To Implement A Tab Bar With React Native http://devdactic.com/react-native-tab-bar/
- tcomb-form-native使用视频教程(需翻墙) http://react.rocks/example/tcomb-form-native
- React Native分享记录 http://segmentfault.com/a/1190000002678782
- React Native构建本地视图组件 http://www.dobest.me/post/react-native-build-native-componenets/
- react-native-android-lession(安卓系列教程) https://github.com/yipengmu/react-native-android-lession
- React Native模块桥接详解 http://www.dobest.me/post/react-native-bridge/
- React Native: 配置和起步 http://www.liaohuqiu.net/cn/posts/react-native-1/
- React Native: Android 的打包 http://www.liaohuqiu.net/cn/posts/react-native-android-package/
深入浅出系列教程
- 深入浅出React(一):React的设计哲学 - 简单之美 http://www.infoq.com/cn/articles/react-art-of-simplity
- 深入浅出React(二):React开发神器Webpack http://www.infoq.com/cn/articles/react-and-webpack
- 深入浅出React(三):理解JSX和组件 http://www.infoq.com/cn/articles/react-jsx-and-component
- 深入浅出React(四):虚拟DOM Diff算法解析 http://www.infoq.com/cn/articles/react-dom-diff
- react-webpack-cookbook中文版 http://fakefish.github.io/react-webpack-cookbook/
- Flex 布局语法教程 http://www.ruanyifeng.com/blog/2015/07/flex-grammar.html
- React 初探 http://www.alloyteam.com/2015/04/react-explore/
- React虚拟DOM浅析 http://www.alloyteam.com/2015/10/react-virtual-analysis-of-the-dom/
- react组件间通信 http://www.alloyteam.com/2015/07/react-zu-jian-jian-tong-xin/
- React 数据流管理架构之 Redux 介绍 http://www.alloyteam.com/2015/09/react-redux/
- React服务器端渲染实践小结 http://www.alloyteam.com/2015/10/8783/
- React Native Android 踩坑之旅 http://www.alloyteam.com/2015/10/react-native-android-steps-on-tour/
- React Native 之 JSBridge http://www.alloyteam.com/2015/05/react-native-zhi-jsbridge/
React.js
- react.js中文文档 http://reactjs.cn/
- react.js入门教程(gitbook) https://hulufei.gitbooks.io/react-tutorial/content/introduction.html
- react.js快速入门教程 - 阮一峰 http://www.ruanyifeng.com/blog/2015/03/react.html
- react.js视频教程 http://react.nodejs-china.org/t/reactjs/584
ES6
- 深入浅出ES6(一):ES6是什么 http://www.infoq.com/cn/articles/es6-in-depth-an-introduction
- 深入浅出ES6(二):迭代器和for-of循环 http://www.infoq.com/cn/articles/es6-in-depth-iterators-and-the-for-of-loop
- 深入浅出ES6(三):生成器 Generators http://www.infoq.com/cn/articles/es6-in-depth-generators
- 深入浅出ES6(四):模板字符串 http://www.infoq.com/cn/articles/es6-in-depth-template-string
- 深入浅出ES6(五):不定参数和默认参数 http://www.infoq.com/cn/articles/es6-in-depth-rest-parameters-and-defaults
React Native探索系列教程
- React Native探索(一):背景、规划和风险 http://www.infoq.com/cn/articles/react-native-overview
- React Native探索(二):布局篇 http://www.infoq.com/cn/articles/react-native-layout
- React Native探索(三):与 react-web 的融合 http://www.infoq.com/cn/articles/react-native-web
开源APP
- 官方演示App https://github.com/facebook/react-native/tree/master/Examples
- react-native-dribbble-app https://github.com/catalinmiron/react-native-dribbble-app
- Leanote for iOS(云笔记) https://github.com/leanote/leanote-ios
- ReactNativeRubyChina https://github.com/henter/ReactNativeRubyChina
- HackerNews-React-Native https://github.com/iSimar/HackerNews-React-Native
- React-Native新闻客户端 https://github.com/tabalt/ReactNativeNews
- newswatch(新闻客户端) https://github.com/bradoyler/newswatch-react-native
- buyscreen(购买页面) https://github.com/appintheair/react-native-buyscreen
- V2EX客户端 https://github.com/samuel1112/v2er
- react-native-todo https://github.com/joemaddalone/react-native-todo
- react-native-beer https://github.com/muratsu/react-native-beer
- react-native-stars https://github.com/86/react-native-stars
- 模仿天猫首页的app https://github.com/hugohua/react-native-demo
- ReactNativeChess https://github.com/csarsam/ReactNativeChess
- react native 编写的音乐软件 https://github.com/Johnqing/miumiu
- react-native-pokedex https://github.com/ababol/react-native-pokedex
- CNode-React-Native https://github.com/SFantasy/CNode-React-Native
- 8tracks电台客户端 https://github.com/voronianski/EightTracksReactNative
- React-Native实现的计算器 https://github.com/yoxisem544/Calculator-using-React-Native
- 房产搜索app https://github.com/jawee/react-native-PropertyFinder
- 知乎专栏app https://github.com/LeezQ/react-native-zhihu-app
- ForeignExchangeApp https://github.com/peralmq/ForeignExchangeApp
- Segmentfault 客户端 https://github.com/fakefish/sf-react-native
- 糗事百科app https://github.com/stormhouse/QiuShiReactNative
- 孢子社区app https://github.com/Hi-Rube/baoz-ReactNative
- 深JS app https://github.com/fraserxu/shenjs
- Den - 房屋销售app* https://github.com/asamiller/den
- Noder-cnodejs客户端 https://github.com/soliury/noder-react-native
- 知乎日报Android版 https://github.com/race604/ZhiHuDaily-React-Native
- ziliun-react-native https://github.com/sonnylazuardi/ziliun-react-native
- react-native-weather-app https://github.com/shevawen/react-native-weather-app
- React Native Sample App(Navigation,Flux) https://github.com/taskrabbit/ReactNativeSampleApp
- TesterHome社区app https://github.com/qddegtya/A-ReactNative-TesterHome
- Finance - 股票报价app https://github.com/7kfpun/FinanceReactNative
- shopping - 购物app https://github.com/bigsui/shopping-react-native
- zhuiyuan - 追源cms app https://github.com/kazaff/ZhuiYuanDemo
转载自: http://1ke.co/course/269
原作: React Native Tutorial: Building Apps with JavaScript
正文到此结束
- 本文标签: 开发者 HTML5 DOM onchange 开源 core 免费 翻译 git 数据库 UI GitHub 解析 组织 性能问题 src 2015 服务器 struct description 配置 Node.js Android list 开发 build 下载 root ip find 安装 API HTML value 参数 example 神器 web db 房产 管理 App key 入门教程 dataSource 文章 zip node tar map Facebook 智能 XML 程序猿 Swift ACE java cmd 网站 CSS CTO json REST CocoaPods http 目录 tab js cat 数据 代码 实例 软件 同步 ask 云 测试 https 线程
- 版权声明: 本文为互联网转载文章,出处已在文章中说明(部分除外)。如果侵权,请联系本站长删除,谢谢。
- 本文海报: 生成海报一 生成海报二
热门推荐


相关文章

近期评论
-
你这基本没有更新呀,最近文章显示还是2019年的文章。不符合要求哈
-
关键词:慕云博客 链接:https://www.lilun.me 描述:分享原创文字的个人博客
-
-
-
可以提供一下源码吗
-
不是商业站,鸡娃学习笔记
-
-
-
-
听他们说很厉害的样子
Loading...
![[HBLOG]公众号](http://www.liuhaihua.cn/img/qrcode_gzh.jpg)

