iOS push服务
Push的原理:
Push 的工作机制可以简单的概括为下图

图中,Provider是指某个iPhone软件的Push服务器,比如我们的应用程序的服务器。
APNS 是Apple Push Notification Service(Apple Push服务器)的缩写,是苹果的服务器。
上图可以分为三个阶段。
第一阶段:Provider把要发送的消息、目的iPhone的标识打包,发给APNS。
第二阶段:APNS在自身的已注册Push服务的iPhone列表中,查找有相应标识的iPhone,并把消息发到iPhone。
第三阶段:iPhone把发来的消息传递给相应的应用程序, 并且按照设定弹出Push通知

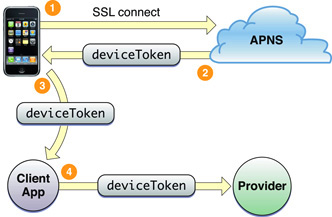
从上面的图中我们可以看到。
1、 首先是应用程序注册消息推送。
2、 IOS跟APNS Server要deviceToken。应用程序接受deviceToken。
3、 应用程序将deviceToken发送给Push服务端程序。
4、 服务端程序向APNS服务发送消息。
5、APNS服务将消息发送给iPhone应用程序。
如果我们的app用到了push服务,就是你新建app ID的时候设置了enable pushnotification那个属性,并且成功生成了ssl证书。
客户端就不说了,主要说下怎么把我们的证书等移到java,php,c/c++等服务端
假设我们现在有一下文件
*.certSigningRequest文件 //请求文件
SSL certificate文件 // 分为开发和发布2个证书,发布你上传app的时候要用到的
*.p12文件 //Apple Development IOS Push Services 密钥
假设我们这3个文件为
1、Push.certSigningRequest
2、aps_developer_identity.cer
3、PushKey.p12
我们怎么把这些文件应用到服务端呢?
1、将aps_developer_identity.cer转换成 aps_developer_identity.pem格式。
openssl x509 -in aps_developer_identity.cer -inform DER -out aps_developer_identity.pem -outform PEM
2、将p12格式的私钥转换成pem。
openssl pkcs12 -inPushKey.p12 -outPushKey.pem -nodes
3、用aps_developer_identity.pem和PushKey.pem,Push.certSigningRequest创建P12格式的文件。
openssl pkcs12 -export -in aps_developer_identity.pem -inkey PushKey.pem -certfile Push.certSigningRequest -name “aps_developer_identity” -out aps_developer_identity.p12
这样我们就得到了证书文件:aps_developer_identity.p12
关于证书
cer后缀的证书文件有两种编码:
DER二进制编码或者BASE64编码(也就是.pem)
p7b一般是证书链,里面包括1到多个证书
pfx是指以pkcs#12格式存储的证书和相应私钥。
在Security编程中,有几种典型的密码交换信息文件格式:
DER-encoded certificate: .cer, .crt
PEM-encoded message: .pem
PKCS#12 Personal Information Exchange: .pfx, .p12
PKCS#10 Certification Request: .p10
PKCS#7 cert request response: .p7r
PKCS#7 binary message: .p7b
.cer/.crt是用于存放证书,它是2进制形式存放的,不含私钥。
.pem跟crt/cer的区别是它以Ascii来表示。
.pfx/p12用于存放个人证书/私钥,他通常包含保护密码,2进制方式
.p10是证书请求
.p7r是CA对证书请求的回复,只用于导入
.p7b以树状展示证书链(certificate chain),同时也支持单个证书,不含私钥。
关于openssl
-in :(目录名字) 指定输入文件名(路径)
-out :(目录名字) 指定输出文件名(路径)
-outform: 指定输出文件格式
-inform : 指定输入文件格式
-export: 表示创建pkcs12文件,而不是简单地解读一个pkcs12文件
-inkey: 私钥文件,可选
-certfile: 其他的证书文件,可选
-name: 这个名称只作显示用,导入此文件的软件会显示这个名字
-req: 创建csr
-new: 用于创建csr
-newkey: 创建csr和私钥
-nodes: 无需passphrase
-keyout: 生成私钥文件
-days: 证书有效期
-genrsa: 生成密钥对的算法
-des3: passphrase算法
继续上次的
在工程中
我们首先需要注册一下,得到一个token
-(BOOL)application:(UIApplication*)application didFinishLaunchingWithOptions:(NSDictionary*)launchOptions
{
self.window.rootViewController=self.viewController;
[self.window makeKeyAndVisible];
[[UIApplication sharedApplication] registerForRemoteNotificationTypes:
(UIRemoteNotificationTypeBadge |UIRemoteNotificationTypeSound|UIRemoteNotificationTypeAlert)];
returnYES;
}
如果注册成功的话,我们需要得到这个token
-(void)application:(UIApplication*)application didRegisterForRemoteNotificationsWithDeviceToken:(NSData*)deviceToken
{
NSLog(@” token is: %@”, deviceToken);
}
如果失败的话
-(void)application:(UIApplication*)application didFailToRegisterForRemoteNotificationsWithError:(NSError*)error
{
NSLog(@”Failed ! error is: %@”, error);
}
如果收到消息通知的话
- (void)application:(UIApplication *)application didReceiveRemoteNotification:(NSDictionary *)userInfo
{
NSLog(@”userinfor is : %@”, userInfo);
}
关于The Notification Payload
这个payload啊,你可以这样理解:
1.每一个push notification都有一个payload,这个payload指明应该怎么提示用户,是只有声音,或者声音和badge一起等。
2.它不能超过256字节,这说明你需要传输简明信息。
3.它是一个json 字典,同时它必须包含 key 为 “aps” 的另一个字典,因为提示信息在这个字典中。
4.在 key为 “aps”的字典中我们可以 1) 发送一个alert message 2)显示 badge 数目 3)播放一个sound
| key | 类型 | 说明 |
| alert | string 或者字典 | 可以是字符串或者字典 看下面 |
| badge | number | application icon上显示的数目 |
| sound | string | application bundle中的声音名字 |
如果你的alert 设置的是字符串,你应该这样
{
“aps” : {
“alert” :“hello message”,
“badge” :2,
”sound“:”sound.aiff“
}
}
如果你的alert设置的是字典,你因该这样
{
“aps” : {
“alert” :{
“body”:“your message”,
“launch-image”:“img.png”
},
“badge” :2,
”sound“:”sound.aiff“
}
}
关于服务器
php 看这里
java 看这里
c 看这里
objective-c 看这里
关于本地通知
第一步:创建本地推送
// 创建一个本地推送
UILocalNotification*notification = [[[UILocalNotificationalloc]init]autorelease];
//设置10秒之后
NSDate*pushDate = [NSDatedateWithTimeIntervalSinceNow:10];
if(notification != nil) {
// 设置推送时间
notification.fireDate= pushDate;
// 设置时区
notification.timeZone= [NSTimeZonedefaultTimeZone];
// 设置重复间隔
notification.repeatInterval= kCFCalendarUnitDay;
// 推送声音
notification.soundName= UILocalNotificationDefaultSoundName;
// 推送内容
notification.alertBody= @”推送内容”;
//显示在icon上的红色圈中的数子
notification.applicationIconBadgeNumber= 1;
//设置userinfo 方便在之后需要撤销的时候使用
NSDictionary*info = [NSDictionarydictionaryWithObject:@"name"forKey:@"key"];
notification.userInfo= info;
//添加推送到UIApplication
UIApplication*app = [UIApplicationsharedApplication];
[appscheduleLocalNotification:notification];
}
第二步:接收本地推送
- (void)application:(UIApplication*)application didReceiveLocalNotification:(UILocalNotification*)notification{
UIAlertView*alert = [[UIAlertViewalloc]initWithTitle:@”iWeibo”message:notification.alertBodydelegate:nilcancelButtonTitle:@”确定”otherButtonTitles:nil];
[alertshow];
// 图标上的数字减1
application.applicationIconBadgeNumber-= 1;
}
第三步:解除本地推送
// 获得 UIApplication
UIApplication*app = [UIApplicationsharedApplication];
//获取本地推送数组
NSArray*localArray = [app scheduledLocalNotifications];
//声明本地通知对象
UILocalNotification*localNotification;
if(localArray) {
for(UILocalNotification*noti inlocalArray) {
NSDictionary*dict = noti.userInfo;
if(dict) {
NSString*inKey = [dict objectForKey:@"key"];
if([inKey isEqualToString:@"对应的key值"]) {
if(localNotification){
[localNotificationrelease];
localNotification = nil;
}
localNotification = [noti retain];
break;
}
}
}
//判断是否找到已经存在的相同key的推送
if(!localNotification) {
//不存在初始化
localNotification = [[UILocalNotificationalloc]init];
}
if(localNotification) {
//不推送 取消推送
[appcancelLocalNotification:localNotification];
[localNotificationrelease];
return;
}
}
正文到此结束
热门推荐


相关文章


Loading...
![[HBLOG]公众号](http://www.liuhaihua.cn/img/qrcode_gzh.jpg)

