RxJava开发精要7 – Schedulers-解决Android主线程问题
- 原文出自《RxJava Essentials》
- 原文作者 : Ivan Morgillo
- 译文出自 : 开发技术前线 www.devtf.cn
- 转载声明: 本译文已授权 开发者头条 享有独家转载权,未经允许,不得转载!
- 译者 : yuxingxin
- 项目地址 : RxJava-Essentials-CN
前面一章是最后一章关于RxJava的Observable的创建和操作的章节。我们学习到了如何将两个或更多的Observables合并在一起, join 它们, zip 它们, merge 它们以及如何创建一个新的Observable来满足我们特殊的需求。
本章中,我们提升标准看看如何使用RxJava的调度器来处理多线程和并发编程的问题。我们将学习到如何以响应式的方式创建网络操作,内存访问,以及耗时任务。
StrictMode
为了获得更多出现在代码中的关于公共问题的信息,我们激活了 StrictMode 模式。
StrictMode 帮助我们侦测敏感的活动,如我们无意的在主线程执行磁盘访问或者网络调用。正如你所知道的,在主线程执行繁重的或者长时的任务是不可取的。因为Android应用的主线程时UI线程,它被用来处理和UI相关的操作:这也是获得更平滑的动画体验和响应式App的唯一方法。
为了在我们的App中激活 StrictMode ,我们只需要在 MainActivity 中添加几行代码,即 onCreate() 方法中这样:
@Override public void onCreate() { super.onCreate(); if (BuildConfig.DEBUG) { StrictMode.setThreadPolicy(new StrictMode.ThreadPolicy.Builder().detectAll().penaltyLog().build()); StrictMode.setVmPolicy(new StrictMode.VmPolicy.Builder().detectAll().penaltyLog().build()); } } @Override public void onCreate() { super.onCreate(); if (BuildConfig.DEBUG) { StrictMode.setThreadPolicy(new StrictMode.ThreadPolicy.Builder().detectAll().penaltyLog().build()); StrictMode.setVmPolicy(new StrictMode.VmPolicy.Builder().detectAll().penaltyLog().build()); } } 我们并不想它总是激活着,因此我们只在debug构建时使用。这种配置将报告每一种关于主线程用法的违规做法,并且这些做法都可能与内存泄露有关: Activities 、 BroadcastReceivers 、 Sqlite 等对象。
选择了 penaltyLog() ,当违规做法发生时, StrictMode 将会在logcat打印一条信息。
避免阻塞I/O的操作
阻塞I/O的操作将使App能够进行下一步操作前会强制使其等待结果的返回。在UI线程上执行一个阻塞操作将强制使UI卡住,这将直接产生不好的用户体验。
我们激活 StrictMode 后,我们开始收到了关于我们的App错误操作磁盘I/O的不友好信息。
D/StrictMode StrictMode policy violation; ~duration=998 ms: android.os.StrictMode$StrictModeDiskReadViolation: policy=31 violation=2 at android.os.StrictMode$AndroidBlockGuardPolicy.onReadFromDisk (StrictMode.java:1135) at libcore.io.BlockGuardOs.open(BlockGuardOs.java:106) at libcore.io.IoBridge.open(IoBridge.java:393) at java.io.FileOutputStream.<init>(FileOutputStream.java:88) at android.app.ContextImpl.openFileOutput(ContextImpl.java:918) at android.content.ContextWrapper.openFileOutput(ContextWrapper. java:185) at com.packtpub.apps.rxjava_essentials.Utils.storeBitmap (Utils.java:30)
D/StrictMode StrictModepolicyviolation; ~duration=998 ms: android.os.StrictMode$StrictModeDiskReadViolation: policy=31 violation=2 atandroid.os.StrictMode$AndroidBlockGuardPolicy.onReadFromDisk (StrictMode.java:1135) atlibcore.io.BlockGuardOs.open(BlockGuardOs.java:106) atlibcore.io.IoBridge.open(IoBridge.java:393) atjava.io.FileOutputStream.<init>(FileOutputStream.java:88) atandroid.app.ContextImpl.openFileOutput(ContextImpl.java:918) atandroid.content.ContextWrapper.openFileOutput(ContextWrapper. java:185) atcom.packtpub.apps.rxjava_essentials.Utils.storeBitmap (Utils.java:30)
上一条信息告诉我们 Utils.storeBitmap() 函数执行完耗时998ms:在UI线程上近1秒的不必要的工作和App上近1秒不必要的迟钝。这是因为我们以阻塞的方式访问磁盘。我们的 storeBitmap() 函数包含了:
FileOutputStream fOut = context.openFileOutput(filename, Context.MODE_PRIVATE);
FileOutputStreamfOut = context.openFileOutput(filename, Context.MODE_PRIVATE);
它直接访问智能手机的固态存储然后就慢了。我们该如何提高访问速度呢? storeBitmap() 函数保存了已安装App的图标。他返回了 void ,因此在执行下一个操作前我们毫无理由去等待直到它完成。我们可以启动它并让它执行在不同的线程。Android中这些年线程管理的变化产生了App诡异的行为。我们可以使用 AsyncTask ,但是我们要避免掉入前几章里的 onPrehttps://github.com/yuxingxin/RxJava-Essentials-CN/raw/master. onPosthttps://github.com/yuxingxin/RxJava-Essentials-CN/raw/master.doInBackGround 地狱。我们将使用RxJava的方式;万岁的调度器!
Schedulers
调度器以一种最简单的方式将多线程用在你的Apps的中。它们时RxJava重要的一部分并能很好地与Observables协同工作。它们无需处理实现、同步、线程、平台限制、平台变化而可以提供一种灵活的方式来创建并发程序。
RxJava提供了5种调度器:
-
.io() -
.computation() -
.immediate() -
.newThread() -
.trampoline()
让我们一个一个的来看下它们:
Schedulers.io()
这个调度器时用于I/O操作。它基于根据需要,增长或缩减来自适应的线程池。我们将使用它来修复我们之前看到的 StrictMode 违规做法。由于它专用于I/O操作,所以并不是RxJava的默认方法;正确的使用它是由开发者决定的。
重点需要注意的是线程池是无限制的,大量的I/O调度操作将创建许多个线程并占用内存。一如既往的是,我们需要在性能和简捷两者之间找到一个有效的平衡点。
Schedulers.computation()
这个是计算工作默认的调度器,它与I/O操作无关。它也是许多RxJava方法的默认调度器: buffer() , debounce() , delay() , interval() , sample() , skip() 。
Schedulers.immediate()
这个调度器允许你立即在当前线程执行你指定的工作。它是 timeout() , timeInterval() ,以及 timestamp() 方法默认的调度器。
Schedulers.newThread()
这个调度器正如它所看起来的那样:它为指定任务启动一个新的线程。
Schedulers.trampoline()
当我们想在当前线程执行一个任务时,并不是立即,我们可以用 .trampoline() 将它入队。这个调度器将会处理它的队列并且按序运行队列中每一个任务。它是 repeat() 和 retry() 方法默认的调度器。
非阻塞I/O操作
现在我们知道如何在一个指定I/O调度器上来调度一个任务,我们可以修改 storeBitmap() 函数并再次检查 StrictMode 的不合规做法。为了这个例子,我们可以在新的 blockingStoreBitmap() 函数中重排代码。
private static void blockingStoreBitmap(Context context, Bitmap bitmap, String filename) { FileOutputStream fOut = null; try { fOut = context.openFileOutput(filename, Context.MODE_PRIVATE); bitmap.compress(Bitmap.CompressFormat.PNG, 100, fOut); fOut.flush(); fOut.close(); } catch (Exception e) { throw new RuntimeException(e); } finally { try { if (fOut != null) { fOut.close(); } } catch (IOException e) { throw new RuntimeException(e); } } } private static void blockingStoreBitmap(Contextcontext, Bitmapbitmap, String filename) { FileOutputStreamfOut = null; try { fOut = context.openFileOutput(filename, Context.MODE_PRIVATE); bitmap.compress(Bitmap.CompressFormat.PNG, 100, fOut); fOut.flush(); fOut.close(); } catch (Exception e) { throw new RuntimeException(e); } finally { try { if (fOut != null) { fOut.close(); } } catch (IOException e) { throw new RuntimeException(e); } } } 现在我们可以使用 Schedulers.io() 创建非阻塞的版本:
public static void storeBitmap(Context context, Bitmap bitmap, String filename) { Schedulers.io().createWorker().schedule(() -> { blockingStoreBitmap(context, bitmap, filename); }); } public static void storeBitmap(Contextcontext, Bitmapbitmap, String filename) { Schedulers.io().createWorker().schedule(() -> { blockingStoreBitmap(context, bitmap, filename); }); } 每次我们调用 storeBitmap() ,RxJava处理创建所有它需要从I / O线程池一个特定的I/ O线程执行我们的任务。所有要执行的操作都避免在UI线程执行并且我们的App比之前要快上1秒:logcat上也不再有 StrictMode 的不合规做法。
下图展示了我们在 storeBitmap() 场景看到的两种方法的不同:

SubscribeOn and ObserveOn
我们学到了如何在一个调度器上运行一个任务。但是我们如何利用它来和Observables一起工作呢?RxJava提供了 subscribeOn() 方法来用于每个Observable对象。 subscribeOn() 方法用 Scheduler 来作为参数并在这个Scheduler上执行Observable调用。
在“真实世界”这个例子中,我们调整 loadList() 函数。首先,我们需要一个新的 getApps() 方法来检索已安装的应用列表:
private Observable<AppInfo> getApps() { return Observable.create(subscriber -> { List<AppInfo> apps = new ArrayList<>(); SharedPreferences sharedPref = getActivity().getPreferences(Context.MODE_PRIVATE); Type appInfoType = new TypeToken<List<AppInfo>>(){}.getType(); String serializedApps = sharedPref.getString("APPS", ""); if (!"".equals(serializedApps)) { apps = new Gson().fromJson(serializedApps,appInfoType); } for (AppInfo app : apps) { subscriber.onNext(app); } subscriber.onCompleted(); }); } private Observable<AppInfo> getApps() { return Observable.create(subscriber -> { List<AppInfo> apps = new ArrayList<>(); SharedPreferencessharedPref = getActivity().getPreferences(Context.MODE_PRIVATE); TypeappInfoType = new TypeToken<List<AppInfo>>(){}.getType(); String serializedApps = sharedPref.getString("APPS", ""); if (!"".equals(serializedApps)) { apps = new Gson().fromJson(serializedApps,appInfoType); } for (AppInfoapp : apps) { subscriber.onNext(app); } subscriber.onCompleted(); }); } getApps() 方法返回一个 AppInfo 的Observable。它先从Android的SharePreferences读取到已安装的应用程序列表。反序列化,并一个接一个的发射AppInfo数据。使用新的方法来检索列表, loadList() 函数改成下面这样:
private void loadList() { mRecyclerView.setVisibility(View.VISIBLE); getApps().subscribe(new Observer<AppInfo>() { @Override public void onCompleted() { mSwipeRefreshLayout.setRefreshing(false); Toast.makeText(getActivity(), "Here is the list!", Toast.LENGTH_LONG).show(); } @Override public void onError(Throwable e) { Toast.makeText(getActivity(), "Something went wrong!", Toast.LENGTH_SHORT).show(); mSwipeRefreshLayout.setRefreshing(false); } @Override public void onNext(AppInfo appInfo) { mAddedApps.add(appInfo); mAdapter.addApplication(mAddedApps.size() - 1, appInfo); } }); } private void loadList() { mRecyclerView.setVisibility(View.VISIBLE); getApps().subscribe(new Observer<AppInfo>() { @Override public void onCompleted() { mSwipeRefreshLayout.setRefreshing(false); Toast.makeText(getActivity(), "Here is the list!", Toast.LENGTH_LONG).show(); } @Override public void onError(Throwable e) { Toast.makeText(getActivity(), "Something went wrong!", Toast.LENGTH_SHORT).show(); mSwipeRefreshLayout.setRefreshing(false); } @Override public void onNext(AppInfoappInfo) { mAddedApps.add(appInfo); mAdapter.addApplication(mAddedApps.size() - 1, appInfo); } }); } 如果我们运行代码, StrictMode 将会报告一个不合规操作,这是因为 SharePreferences 会减慢I/O操作。我们所需要做的是指定 getApps() 需要在调度器上执行:
<br />getApps().subscribeOn(Schedulers.io()) .subscribe(new Observer<AppInfo>() { [https://github.com/yuxingxin/RxJava-Essentials-CN/raw/master.] <br />getApps().subscribeOn(Schedulers.io()) .subscribe(new Observer<AppInfo>() { [https://github.com/yuxingxin/RxJava-Essentials-CN/raw/master.] Schedulers.io() 将会去掉 StrictMode 的不合规操作,但是我们的App现在崩溃了是因为:
at rx.internal.schedulers.ScheduledAction.run(ScheduledAction.jav a:58) at java.util.concurrent.Executors$RunnableAdapter.call(Executors. java:422) at java.util.concurrent.FutureTask.run(FutureTask.java:237) at java.util.concurrent.ScheduledThreadPoolExecutor$ScheduledFutu reTask.access$201(ScheduledThreadPoolExecutor.java:152) at java.util.concurrent.ScheduledThreadPoolExecutor$ScheduledFutu reTask.run(ScheduledThreadPoolExecutor.java:265) at java.util.concurrent.ThreadPoolExecutor.runWorker(ThreadPoolEx ecutor.java:1112) at java.util.concurrent.ThreadPoolExecutor$Worker.run(ThreadPoolE xecutor.java:587) at java.lang.Thread.run(Thread.java:841) Caused by: android.view.ViewRootImpl$CalledFromWrongThreadException: Only the original thread that created a view hierarchy can touch its views.
atrx.internal.schedulers.ScheduledAction.run(ScheduledAction.jav a:58) atjava.util.concurrent.Executors$RunnableAdapter.call(Executors. java:422) atjava.util.concurrent.FutureTask.run(FutureTask.java:237) atjava.util.concurrent.ScheduledThreadPoolExecutor$ScheduledFutureTask.access$201(ScheduledThreadPoolExecutor.java:152) atjava.util.concurrent.ScheduledThreadPoolExecutor$ScheduledFutureTask.run(ScheduledThreadPoolExecutor.java:265) atjava.util.concurrent.ThreadPoolExecutor.runWorker(ThreadPoolExecutor.java:1112) atjava.util.concurrent.ThreadPoolExecutor$Worker.run(ThreadPoolExecutor.java:587) atjava.lang.Thread.run(Thread.java:841) Causedby: android.view.ViewRootImpl$CalledFromWrongThreadException: Onlytheoriginalthreadthatcreated a viewhierarchycantouchitsviews.
Only the original thread that created a view hierarchy can touch its views.
我们再次回到Android的世界。这条信息简单的告诉我们我们试图在一个非UI线程来修改UI操作。意思是我们需要在I/O调度器上执行我们的代码。因此我们需要和I/O调度器一起执行代码,但是当结果返回时我们需要在UI线程上操作。RxJava让你能够订阅一个指定的调度器并观察它。我们只需在 loadList() 函数添加几行代码,那么每一项就都准备好了:
getApps() .onBackpressureBuffer() .subscribeOn(Schedulers.io()) .observeOn(AndroidSchedulers.mainThread()) .subscribe(new Observer<AppInfo>() { [https://github.com/yuxingxin/RxJava-Essentials-CN/raw/master.] getApps() .onBackpressureBuffer() .subscribeOn(Schedulers.io()) .observeOn(AndroidSchedulers.mainThread()) .subscribe(new Observer<AppInfo>() { [https://github.com/yuxingxin/RxJava-Essentials-CN/raw/master.] observeOn() 方法将会在指定的调度器上返回结果:如例子中的UI线程。 onBackpressureBuffer() 方法将告诉Observable发射的数据如果比观察者消费的数据要更快的话,它必须把它们存储在缓存中并提供一个合适的时间给它们。做完这些工作之后,如果我们运行App,就会出现已安装的程序列表:

处理耗时的任务
我们已经知道如何处理缓慢的I/O操作。让我们看一个与I/O无关的耗时的任务。例如,我们修改 loadList() 函数并创建一个新的 slow 函数发射我们已安装的app数据。
private Observable
private Observable<AppInfo> getObservableApps(List<AppInfo> apps) { return Observable .create(subscriber -> { for (double i = 0; i < 1000000000; i++) { double y = i * i; } for (AppInfoapp : apps) { subscriber.onNext(app); } subscriber.onCompleted(); }); } 正如你看到的,这个函数执行了一些毫无意义的计算,只是针对这个例子消耗时间,然后从 List<AppInfo> 对象中发射我们的 AppInfo 数据,现在,我们重排 loadList() 函数如下:
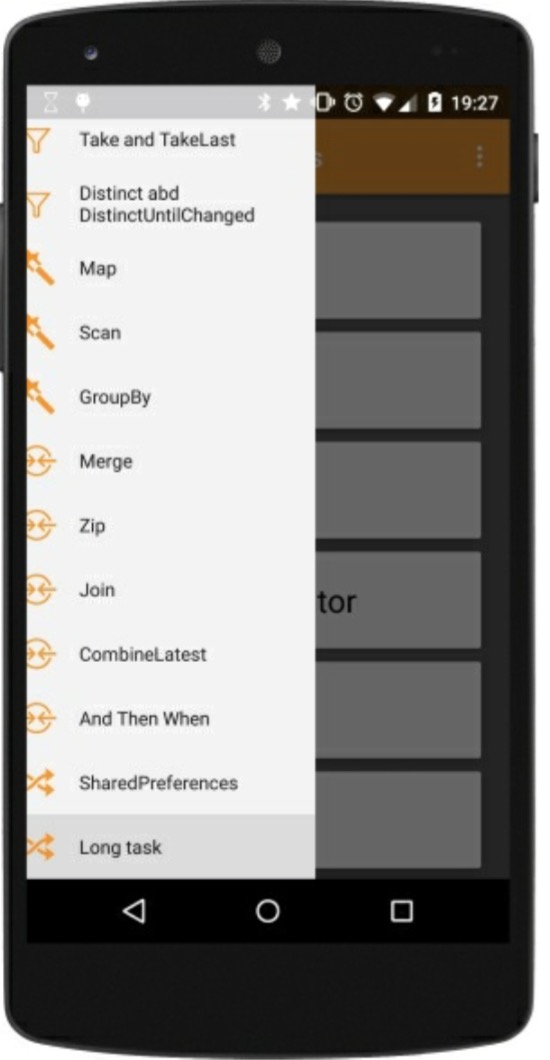
private void loadList(List<AppInfo> apps) { mRecyclerView.setVisibility(View.VISIBLE); getObservableApps(apps) .subscribe(new Observer<AppInfo>() { @Override public void onCompleted() { mSwipeRefreshLayout.setRefreshing(false); Toast.makeText(getActivity(), "Here is the list!", Toast.LENGTH_LONG).show(); } @Override public void onError(Throwable e) { Toast.makeText(getActivity(), "Something went wrong!", Toast.LENGTH_SHORT).show(); mSwipeRefreshLayout.setRefreshing(false); } @Override public void onNext(AppInfo appInfo) { mAddedApps.add(appInfo); mAdapter.addApplication(mAddedApps.size() - 1, appInfo); } }); } private void loadList(List<AppInfo> apps) { mRecyclerView.setVisibility(View.VISIBLE); getObservableApps(apps) .subscribe(new Observer<AppInfo>() { @Override public void onCompleted() { mSwipeRefreshLayout.setRefreshing(false); Toast.makeText(getActivity(), "Here is the list!", Toast.LENGTH_LONG).show(); } @Override public void onError(Throwable e) { Toast.makeText(getActivity(), "Something went wrong!", Toast.LENGTH_SHORT).show(); mSwipeRefreshLayout.setRefreshing(false); } @Override public void onNext(AppInfoappInfo) { mAddedApps.add(appInfo); mAdapter.addApplication(mAddedApps.size() - 1, appInfo); } }); } 如果我们运行这段代码,当我们点击 Navigation Drawer 菜单项时App将会卡住一会,然后你能看到下图中半关闭的菜单:
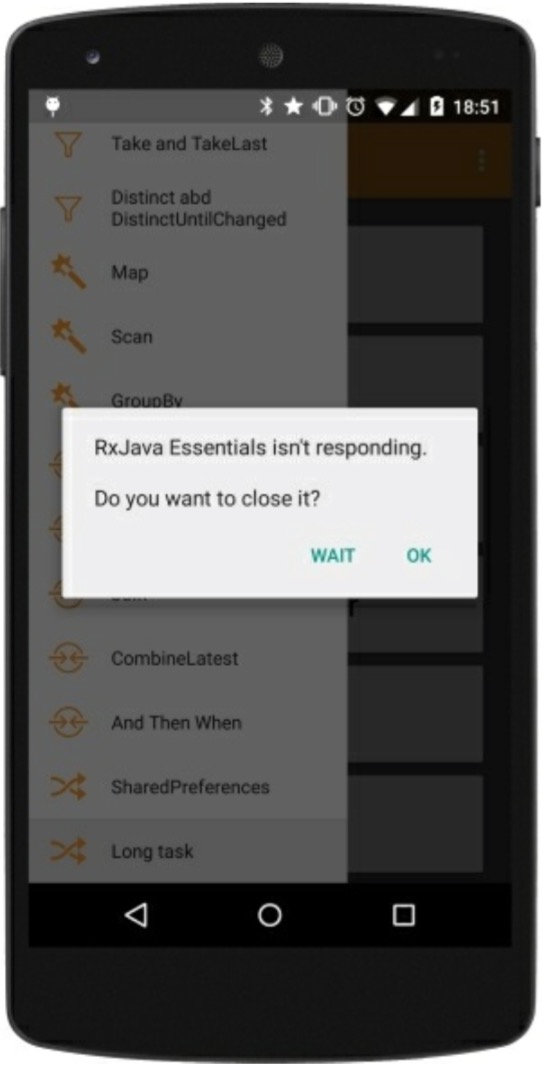
如果我们不够走运的话,我们可以看到下图中经典的ANR信息框:
可以确定的是,我们将会看到下面在logcat中不愉快的信息:
I/Choreographer Skipped 598 frames! The application may be doing too much work on its main thread.
I/Choreographer Skipped 598 frames! Theapplicationmaybedoingtoomuchworkonitsmainthread.
这条信息比较清楚,Android在告诉我们用户体验非常差的原因是我们用不必要的工作量阻塞了UI线程。但是我们已经知道了如何处理它:我们有调度器!我们只须添加几行代码到我们的Observable链中就能去掉加载慢和 Choreographer 信息:
getObservableApps(apps) .onBackpressureBuffer() .subscribeOn(Schedulers.computation()) .observeOn(AndroidSchedulers.mainThread()) .subscribe(new Observer<AppInfo>() { [https://github.com/yuxingxin/RxJava-Essentials-CN/raw/master.] getObservableApps(apps) .onBackpressureBuffer() .subscribeOn(Schedulers.computation()) .observeOn(AndroidSchedulers.mainThread()) .subscribe(new Observer<AppInfo>() { [https://github.com/yuxingxin/RxJava-Essentials-CN/raw/master.] 用这几行代码,我们将可以快速关掉 Navigation Drawer ,一个漂亮的进度条,一个工作在独立的线程缓慢执行的计算任务,并在主线程返回结果让我们更新已安装的应用列表。
执行网络任务
网络在今天是99%的移动应用的一部分:我们总是连接远端服务器来检索我们App需要的信息。
作为网络访问的第一个方法,我们将创建下面这样一个场景:
- 加载一个进度条。
- 用一个按钮开始文件下载。
- 下载过程中更新进度条。
- 下载完后开始视频播放。
我们的用户界面非常简单,我们只需要一个有趣的进度条和一个下载按钮。
首先,我们创建 mDownloadProgress
private PublishSubject<Integer>mDownloadProgress = PublishSubject.create();
private PublishSubject<Integer>mDownloadProgress = PublishSubject.create();
这个主题我们用来管理进度的更新,它和 download 函数协同工作。
private boolean downloadFile(String source, String destination) { boolean result = false; InputStream input = null; OutputStream output = null; HttpURLConnection connection = null; try { URL url = new URL(source); connection = (HttpURLConnection) url.openConnection(); connection.connect(); if (connection.getResponseCode() != HttpURLConnection.HTTP_OK) { return false; } int fileLength = connection.getContentLength(); input = connection.getInputStream(); output = new FileOutputStream(destination); byte data[] = new byte[4096]; long total = 0; int count; while ((count = input.read(data)) != -1) { total += count; if (fileLength >0) { int percentage = (int) (total * 100 / fileLength); mDownloadProgress.onNext(percentage); } output.write(data, 0, count); } mDownloadProgress.onCompleted(); result = true; } catch (Exception e) { mDownloadProgress.onError(e); } finally { try { if (output != null) { output.close(); } if (input != null) { input.close(); } } catch (IOException e) {mDownloadProgress.onError(e); } if (connection != null) { connection.disconnect(); mDownloadProgress.onCompleted(); } } return result; }
private boolean downloadFile(String source, String destination) { boolean result = false; InputStreaminput = null; OutputStreamoutput = null; HttpURLConnectionconnection = null; try { URLurl = new URL(source); connection = (HttpURLConnection) url.openConnection(); connection.connect(); if (connection.getResponseCode() != HttpURLConnection.HTTP_OK) { return false; } int fileLength = connection.getContentLength(); input = connection.getInputStream(); output = new FileOutputStream(destination); byte data[] = new byte[4096]; long total = 0; int count; while ((count = input.read(data)) != -1) { total += count; if (fileLength >0) { int percentage = (int) (total * 100 / fileLength); mDownloadProgress.onNext(percentage); } output.write(data, 0, count); } mDownloadProgress.onCompleted(); result = true; } catch (Exception e) { mDownloadProgress.onError(e); } finally { try { if (output != null) { output.close(); } if (input != null) { input.close(); } } catch (IOException e) { mDownloadProgress.onError(e); } if (connection != null) { connection.disconnect(); mDownloadProgress.onCompleted(); } } return result; } 上面的这段代码将会触发 NetworkOnMainThreadException 异常。我们可以创建RxJava版本的函数进入我们挚爱的响应式世界来解决这个问题:
private Observable<Boolean> obserbableDownload(String source, String destination) { return Observable.create(subscriber -> { try { boolean result = downloadFile(source, destination); if (result) { subscriber.onNext(true); subscriber.onCompleted(); } else { subscriber.onError(new Throwable("Download failed.")); } } catch (Exception e) { subscriber.onError(e); } }); } private Observable<Boolean> obserbableDownload(String source, String destination) { return Observable.create(subscriber -> { try { boolean result = downloadFile(source, destination); if (result) { subscriber.onNext(true); subscriber.onCompleted(); } else { subscriber.onError(new Throwable("Download failed.")); } } catch (Exception e) { subscriber.onError(e); } }); } 现在我们需要触发下载操作,点击下载按钮:
@OnClick(R.id.button_download) void download() { mButton.setText(getString(R.string.downloading)); mButton.setClickable(false); mDownloadProgress.distinct() .observeOn(AndroidSchedulers.mainThread()) .subscribe(new Observer<Integer>() { @Override public void onCompleted() { App.L.debug("Completed"); } @Override public void onError(Throwable e) { App.L.error(e.toString()); } @Override public void onNext(Integer progress) { mArcProgress.setProgress(progress); } }); String destination = "sdcardsoftboy.avi"; obserbableDownload("http://archive.blender.org/fileadmin/movies/softboy.avi", destination) .subscribeOn(Schedulers.io()) .observeOn(AndroidSchedulers.mainThread()) .subscribe(success -> { resetDownloadButton(); Intent intent = new Intent(android.content.Intent.ACTION_VIEW); File file = new File(destination); intent.setDataAndType(Uri.fromFile(file),"video/avi"); intent.addFlags(Intent.FLAG_ACTIVITY_NEW_TASK); startActivity(intent); }, error -> { Toast.makeText(getActivity(), "Something went south", Toast.LENGTH_SHORT).show(); resetDownloadButton(); }); } @OnClick(R.id.button_download) void download() { mButton.setText(getString(R.string.downloading)); mButton.setClickable(false); mDownloadProgress.distinct() .observeOn(AndroidSchedulers.mainThread()) .subscribe(new Observer<Integer>() { @Override public void onCompleted() { App.L.debug("Completed"); } @Override public void onError(Throwable e) { App.L.error(e.toString()); } @Override public void onNext(Integer progress) { mArcProgress.setProgress(progress); } }); String destination = "sdcardsoftboy.avi"; obserbableDownload("http://archive.blender.org/fileadmin/movies/softboy.avi", destination) .subscribeOn(Schedulers.io()) .observeOn(AndroidSchedulers.mainThread()) .subscribe(success -> { resetDownloadButton(); Intentintent = new Intent(android.content.Intent.ACTION_VIEW); Filefile = new File(destination); intent.setDataAndType(Uri.fromFile(file),"video/avi"); intent.addFlags(Intent.FLAG_ACTIVITY_NEW_TASK); startActivity(intent); }, error -> { Toast.makeText(getActivity(), "Something went south", Toast.LENGTH_SHORT).show(); resetDownloadButton(); }); } 我们使用Butter Knife的注解 @OnClick 来绑定按钮的方法并更新按钮信息和点击状态:我们不想让用户点击多次从而触发多次下载事件。
然后,我们创建一个subscription来观察下载进度并相应的更新进度条。很明显,我们我们观测主线程是因为进度条是UI元素。
obserbableDownload("http://archive.blender.org/fileadmin/movies/softboy.avi", "sdcardsoftboy.avi";) obserbableDownload("http://archive.blender.org/fileadmin/movies/softboy.avi", "sdcardsoftboy.avi";) 这是一个下载Observable。网络调用是一个I/O任务和我们预料的那样使用I/O调度器。当下载完成时,我们在 onNext() 启动视频播放器,并且播放器将会在目的URL找到下载的文件.。
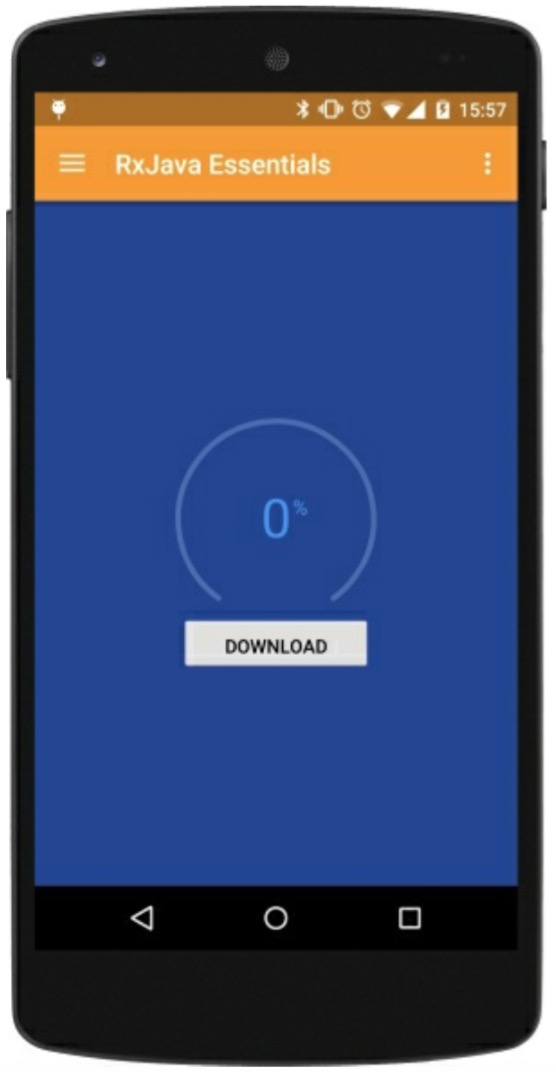
下图展示了下载进度和视频播放器对话框:

总结
这一章中,我们学习了如何简单的将多线程应用在我们的App中。RxJava为此提供了极其有用的工具:调度器。调度器来自不同的指定优化场景并且我们也不避免了 StrictMode 不合法操作以及阻塞I/O函数。我们现在可以用简单的,响应式的并在整个App中保持一致的方式来访问内存和网络。
下一章中,我们将会提高风险并创建一个 真实世界 App,并使用Square公司开源的REST API库Retrofit从不同的远程资源获取数据来创建一个复杂的material design UI。
正文到此结束
- 本文标签: db cat IDE 需求 REST 同步 src 服务器 线程 数据 代码 list 开源 lib root tar 开发者 视频播放器 json 总结 dist zip UI GitHub Android final build ssh js 配置 多线程 App 并发编程 Connection 下载 java https 安装 FIT 智能 开发 自适应 http git map API 响应式 参数 ThreadPoolExecutor ask ip sql 管理 时间 快的 智能手机 core
- 版权声明: 本文为互联网转载文章,出处已在文章中说明(部分除外)。如果侵权,请联系本站长删除,谢谢。
- 本文海报: 生成海报一 生成海报二
热门推荐


相关文章

近期评论
-
你这基本没有更新呀,最近文章显示还是2019年的文章。不符合要求哈
-
关键词:慕云博客 链接:https://www.lilun.me 描述:分享原创文字的个人博客
-
-
-
可以提供一下源码吗
-
不是商业站,鸡娃学习笔记
-
-
-
-
听他们说很厉害的样子
Loading...
![[HBLOG]公众号](http://www.liuhaihua.cn/img/qrcode_gzh.jpg)

