IDAPython:让你的生活更美好(四)
前三部分已经验证了用IDAPython能够让工作变的更简单,这一部分让我们看看逆向工程师如何使用IDAPython的颜色和强大的脚本特性。
分析者经常需要面对越来越复杂的代码,而且有时候无法轻易看出动态执行的时候执行的代码。而通过IDAPython的强大功能,我们不但能静态的标识指令,并且能够统计出对应的指令被使用了多少次。
背景
在这一部分中,我用C语言写了一个简单的程序。下面的代码是为了这次的练习而编写和编译的:
#include "stdafx.h" #include <stdlib.h> #include <time.h> int _tmain(int argc, _TCHAR* argv[]) { char* start = "Running the program."; printf("[+] %s/n", start); char* loop_string = "Looping..."; srand (time(NULL)); int bool_value = rand() % 10 + 1; printf("[+] %d selected./n", bool_value); if(bool_value > 5) { char* over_five = "Number over 5 selected. Looping 2 times."; printf("[+] %s/n", over_five); for(int x = 0; x < 2; x++) printf("[+] %s/n", loop_string); } else { char* under_five = "Number under 5 selected. Looping 5 times."; printf("[+] %s/n", under_five); for(int x = 0; x < 5; x++) printf("[+] %s/n", loop_string); } return 0; } 当我们将这个二进制加载到IDA中时,我们可以看到预期的循环与代码重定向语句。如果我们在不知道源码的情况下来看这个例子,通过静态分析能够大概判断代码实现的功能。

然而,如果我们想知道运行的时候执行了哪个区块的代码呢?这个问题可以用IDAPython来解决哦!
编写IDAPYTHON脚本
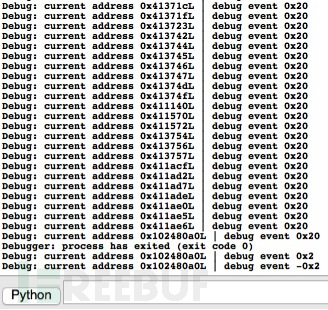
我们第一个需要处理的难题是如何逐句遍历每一条指令,以下代码将可以帮助我们来解决:(调试信息会输出已经被执行的指令)
RunTo(BeginEA()) event = GetDebuggerEvent(WFNE_SUSP, -1) EnableTracing(TRACE_STEP, 1) event = GetDebuggerEvent(WFNE_ANY|WFNE_CONT, -1) while True: event = GetDebuggerEvent(WFNE_ANY, -1) addr = GetEventEa() print "Debug: current address", hex(addr), "| debug event", hex(event) if event <= 1: break
在上面的代码中我们首先启动了调试器并且执行到函数的入口处,通过调用‘RunTo(BeginEA())’函数。接下来调用的GetDebuggerEvent()函数会等待直到断点到达。
接着我们调用EnableTracing()函数来打开IDA的跟踪功能,然后GetDebuggerEvent()函数调用会继续执行调试器,配置跟踪步骤。最后,我们会进入一个循环遍历每一个地址直到遇到结束条件。这个脚本在IDA中的输出如下所示:
下一个步骤是检索出执行的每一行并标识颜色。我们可以使用GetColor()和SetColor()函数来分别解决这两个问题。下面的代码会获取给定行数代码的当前颜色,并决定将代码设置成什么颜色,并进行设定。
在这个例子,我使用四种不同深浅的蓝色。深蓝色表示这一行被重复执行。(读者可以根据跟人喜好修改这部分代码)
def get_new_color(current_color): colors = [0xffe699, 0xffcc33, 0xe6ac00, 0xb38600] if current_color == 0xFFFFFF: return colors[0] if current_color in colors: pos = colors.index(current_color) if pos == len(colors)-1: return colors[pos] else: return colors[pos+1] return 0xFFFFFF current_color = GetColor(addr, CIC_ITEM) new_color = get_new_color(current_color) SetColor(addr, CIC_ITEM, new_color)
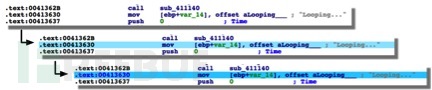
运行上面的代码能够将无颜色的行数修改为高亮的蓝色。另外,如果同一行代码运行多次会变成深蓝色。
可以使用下面的代码来删除IDA文件中之前设置的所有颜色。将颜色设置成0XFFFFFF将会变成白色,或者高效的将之前设置的所有颜色删除。
heads = Heads(SegStart(ScreenEA()), SegEnd(ScreenEA())) for i in heads: SetColor(i, CIC_ITEM, 0xFFFFFF)
将所有的代码合到一起,我们会得到如下结果:
heads = Heads(SegStart(ScreenEA()), SegEnd(ScreenEA())) for i in heads: SetColor(i, CIC_ITEM, 0xFFFFFF) def get_new_color(current_color): colors = [0xffe699, 0xffcc33, 0xe6ac00, 0xb38600] if current_color == 0xFFFFFF: return colors[0] if current_color in colors: pos = colors.index(current_color) if pos == len(colors)-1: return colors[pos] else: return colors[pos+1] return 0xFFFFFF RunTo(BeginEA()) event = GetDebuggerEvent(WFNE_SUSP, -1) EnableTracing(TRACE_STEP, 1) event = GetDebuggerEvent(WFNE_ANY|WFNE_CONT, -1) while True: event = GetDebuggerEvent(WFNE_ANY, -1) addr = GetEventEa() current_color = GetColor(addr, CIC_ITEM) new_color = get_new_color(current_color) SetColor(addr, CIC_ITEM, new_color) if event <= 1: break
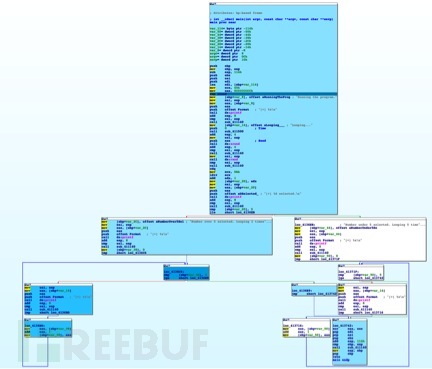
当我在程序用运行这段代码时,我们看到执行过的反汇编指令被高亮了。如下图所示,多次执行的指令被设置成了深蓝色,让我们能够更容易理解代码执行流程。
总结
这一部分演示的例子确实很简单,结合了IDA调试功能与颜色相关API的使用。这项技术能够让分析者在复杂应用代码分析中节省大量的时间。
*原文: Paloaltone , 东二门陈冠希/编译,转载请注明来自FreeBuf黑客与极客(FreeBuf.COM)
正文到此结束
热门推荐


相关文章

近期评论
-
你这基本没有更新呀,最近文章显示还是2019年的文章。不符合要求哈
-
关键词:慕云博客 链接:https://www.lilun.me 描述:分享原创文字的个人博客
-
-
-
可以提供一下源码吗
-
不是商业站,鸡娃学习笔记
-
-
-
-
听他们说很厉害的样子
Loading...
![[HBLOG]公众号](http://www.liuhaihua.cn/img/qrcode_gzh.jpg)

