其实没那么复杂!探究react-native通信机制
近段时间来Android上最火的框架非react native莫属了,这里我不去评价这个框架的好坏,毕竟只有用过的人才会有深刻的体会。但是我个人有一个习惯,在使用一个开源库之前,一定要看过它的源码,不说百分百搞懂吧,至少得弄清楚它的工作原理,所以在使用RN之前我就看了看它的源码。不看不知道,一看吓一跳,它其中最核心的那一部分——java和js的通信写的确实是非常的精妙,把整个流程搞懂以后让我受益无穷。
这里插一句题外话,阿里的weex也马上就要开源了,我身边的小伙伴也有已经拿到源码投身于其中的,等到它开源的时候我也会去看看它的源码,了解下它和RN的区别到底是什么。
废话也不说了,让我们好好看看RN的通信机制吧。
前言
在看这篇文章之前,你得确保你有一定的RN开发基础,如果是零基础的同学,建议大家先去看看 这个系列的文章 ,里面非常清楚的介绍了如何使用RN来进行开发。当然如果你不满足仅仅是[了解]的话,也可以去网上查阅关于RN的一些资料,其实里面一些东西是非常值得一看的,比如virtual DOM,diff机制等等。
通信方式
我们所说的[通信],指的是RN中Java和js的通信,也就是js部分中的那些jsx代码是如何转化成一个java层真实的view和事件的,java层又是如何调用js来找出它所需要的那些view和事件的。
简单的说,RN的两端通信靠的是一张配置表,java端和js端持有同一张表,通信的时候就是靠这张表的各个条目的对应来进行的。
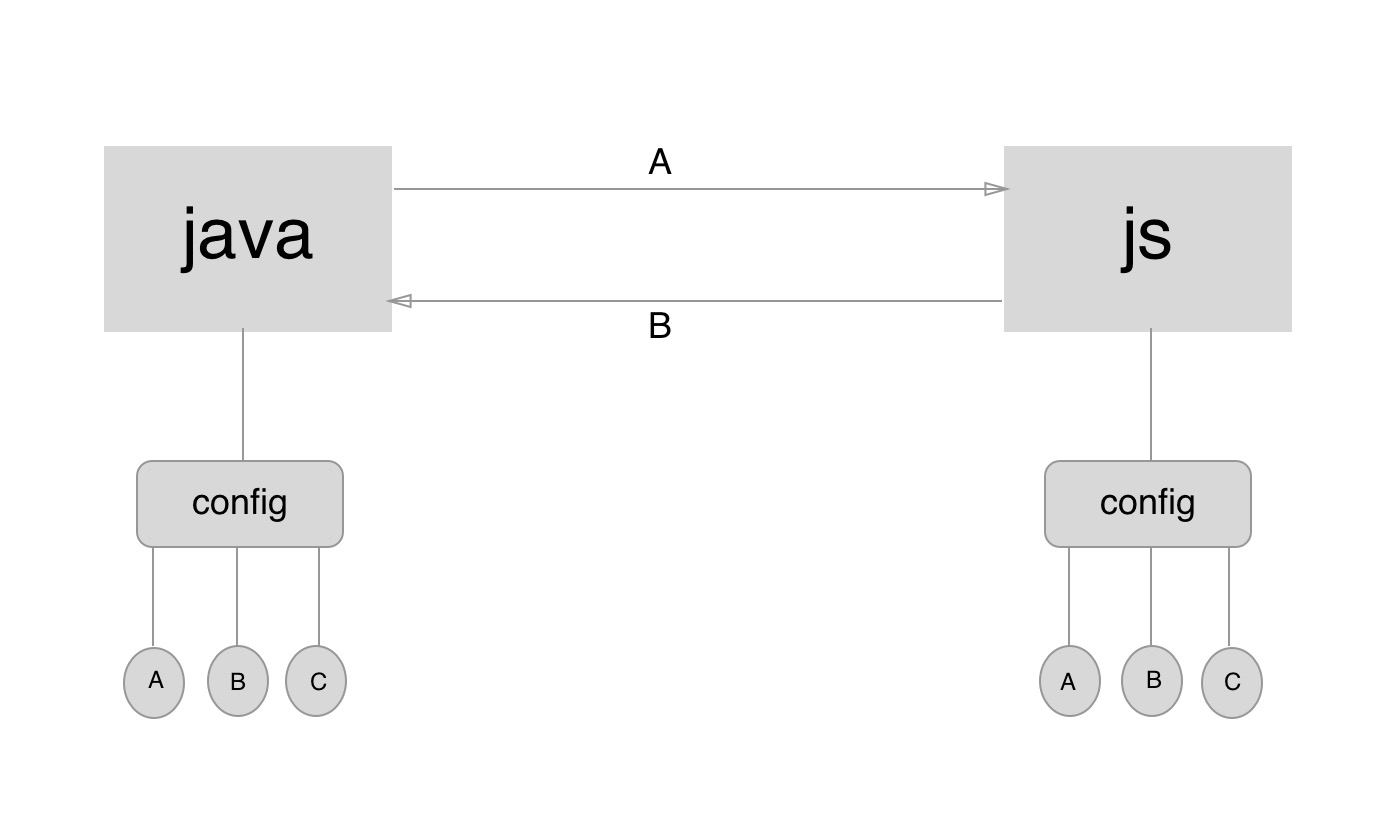
大致的就是和上面这张图一样,两端各持有一份相同的config,config中有一些已经注册的模块,两端的通信就是通过传输这样的“A”,“B”或者”C”来实现的。这个config对应到RN的代码是NativeModuleRegistry和JavaScriptModuleRegistry。如果大家想象不出来的话我可以给大家打个比喻,java端和js端的通信就好比一个中国人和一个美国人在对话,而这个config,也就是注册表就相当于两个翻译,有了翻译两个语言不通的人才能正常交流。那这两张表是如何生成的呢?还是让我们从代码中寻找答案吧。
首先我们知道在使用RN的时候,我们对应的activity要继承自ReactActivity并且重写一个叫做getPackages的方法。
@Override
protected List<ReactPackage> getPackages() {
    return Arrays.<ReactPackage>asList(
            new MainReactPackage()
    );
}
可以看到里面的这个MainReactPackage是RN帮我们生成好。
public class MainReactPackage implements ReactPackage {

  @Override
  public List<NativeModule> createNativeModules(ReactApplicationContext reactContext) {
    return Arrays.<NativeModule>asList(
      new AppStateModule(reactContext),
      new AsyncStorageModule(reactContext),
      new CameraRollManager(reactContext),
      new ClipboardModule(reactContext),
      new DatePickerDialogModule(reactContext),
      new DialogModule(reactContext),
      new FrescoModule(reactContext),
      new ImageEditingManager(reactContext),
      new ImageStoreManager(reactContext),
      new IntentModule(reactContext),
      new LocationModule(reactContext),
      new NetworkingModule(reactContext),
      new NetInfoModule(reactContext),
      new StatusBarModule(reactContext),
      new TimePickerDialogModule(reactContext),
      new ToastModule(reactContext),
      new VibrationModule(reactContext),
      new WebSocketModule(reactContext)
    );
  }

  @Override
  public List<Class<? extends JavaScriptModule>> createJSModules() {
    return Collections.emptyList();
  }

  @Override
  public List<ViewManager> createViewManagers(ReactApplicationContext reactContext) {
    return Arrays.<ViewManager>asList(
      ARTRenderableViewManager.createARTGroupViewManager(),
      ARTRenderableViewManager.createARTShapeViewManager(),
      ARTRenderableViewManager.createARTTextViewManager(),
      new ARTSurfaceViewManager(),
      new ReactDialogPickerManager(),
      new ReactDrawerLayoutManager(),
      new ReactDropdownPickerManager(),
      new ReactHorizontalScrollViewManager(),
      new ReactImageManager(),
      new ReactModalHostManager(),
      new ReactProgressBarViewManager(),
      new ReactRawTextManager(),
      new ReactScrollViewManager(),
      new ReactSliderManager(),
      new ReactSwitchManager(),
      new FrescoBasedReactTextInlineImageViewManager(),
      new ReactTextInputManager(),
      new ReactTextViewManager(),
      new ReactToolbarManager(),
      new ReactViewManager(),
      new ReactViewPagerManager(),
      new ReactVirtualTextViewManager(),
      new ReactWebViewManager(),
      new RecyclerViewBackedScrollViewManager(),
      new SwipeRefreshLayoutManager());
  }
}
可以看到的是其中定义了一些基础的组件和事件,具体就不说了,大家都看得懂。如果你想要自定义一些组件或者事件的话必须要自己去写一个package,至于怎么写大家看我前面提到的那一系列文章就知道了。而我们前面提到的那两个注册表——NativeModuleRegistry和JavaScriptModuleRegistry就是通过这样的package去生成的,具体方法我们看下去就知道了。
既然我们的activity继承自了ReactActivity,那我们就去看看ReactActivity里面做了什么。第一个要看的当然是onCreate函数。
@Override
protected void onCreate(Bundle savedInstanceState) {
  super.onCreate(savedInstanceState);

  if (getUseDeveloperSupport() && Build.VERSION.SDK_INT >= 23) {
    // Get permission to show redbox in dev builds.
    if (!Settings.canDrawOverlays(this)) {
      Intent serviceIntent = new Intent(Settings.ACTION_MANAGE_OVERLAY_PERMISSION);
      startActivity(serviceIntent);
      FLog.w(ReactConstants.TAG, REDBOX_PERMISSION_MESSAGE);
      Toast.makeText(this, REDBOX_PERMISSION_MESSAGE, Toast.LENGTH_LONG).show();
    }
  }

  mReactInstanceManager = createReactInstanceManager();
  ReactRootView mReactRootView = createRootView();
  mReactRootView.startReactApplication(mReactInstanceManager, getMainComponentName(), getLaunchOptions());
  setContentView(mReactRootView);
}
可以看到我们创建了一个ReactInstanceManager,看看是怎么创建的。
protected ReactInstanceManager createReactInstanceManager() {
  ReactInstanceManager.Builder builder = ReactInstanceManager.builder()
      .setApplication(getApplication())
      .setJSMainModuleName(getJSMainModuleName())
      .setUseDeveloperSupport(getUseDeveloperSupport())
      .setInitialLifecycleState(mLifecycleState);

  for (ReactPackage reactPackage : getPackages()) {
    builder.addPackage(reactPackage);
  }

  String jsBundleFile = getJSBundleFile();

  if (jsBundleFile != null) {
    builder.setJSBundleFile(jsBundleFile);
  } else {
    builder.setBundleAssetName(getBundleAssetName());
  }

  return builder.build();
}
中间有一段这样的代码
for (ReactPackage reactPackage : getPackages()) {
  builder.addPackage(reactPackage);
}
通过builder模式把我们的package注入到了builder中并且最后调用build方法创建出一个ReactInstanceManagerImpl实例。
public ReactInstanceManager build() {

  .......无关代码

  return new ReactInstanceManagerImpl(
      Assertions.assertNotNull(
          mApplication,
          "Application property has not been set with this builder"),
      mJSBundleFile,
      mJSMainModuleName,
      mPackages,
      mUseDeveloperSupport,
      mBridgeIdleDebugListener,
      Assertions.assertNotNull(mInitialLifecycleState, "Initial lifecycle state was not set"),
      mUIImplementationProvider,
      mNativeModuleCallExceptionHandler,
      mJSCConfig);
}
其中我们的package作为构造函数的参数传递到了ReactInstanceManagerImpl中。
回过头来看onCreate函数,在这之后我们创建一个ReactRootView作为我们的根视图,并且调用它的startReactApplication函数,从函数名字就可以看出来,这个函数的作用非常重要,从这儿开始,算是启动了我们的RN程序。
public void startReactApplication(
    ReactInstanceManager reactInstanceManager,
    String moduleName,
    @Nullable Bundle launchOptions) {
  UiThreadUtil.assertOnUiThread();

  // TODO(6788889): Use POJO instead of bundle here, apparently we can't just use WritableMap
  // here as it may be deallocated in native after passing via JNI bridge, but we want to reuse
  // it in the case of re-creating the catalyst instance
  Assertions.assertCondition(
      mReactInstanceManager == null,
      "This root view has already " +
        "been attached to a catalyst instance manager");

  mReactInstanceManager = reactInstanceManager;
  mJSModuleName = moduleName;
  mLaunchOptions = launchOptions;

  if (!mReactInstanceManager.hasStartedCreatingInitialContext()) {
    mReactInstanceManager.createReactContextInBackground();
  }

  // We need to wait for the initial onMeasure, if this view has not yet been measured, we set
  // mAttachScheduled flag, which will make this view startReactApplication itself to instance
  // manager once onMeasure is called.
  if (mWasMeasured && mIsAttachedToWindow) {
    mReactInstanceManager.attachMeasuredRootView(this);
    mIsAttachedToInstance = true;
    getViewTreeObserver().addOnGlobalLayoutListener(getKeyboardListener());
  } else {
    mAttachScheduled = true;
  }
}
其中我们调用了ReactInstanceManager的createReactContextInBackground()方法去构造属于RN程序的上下文。
@Override
public void createReactContextInBackground() {
  Assertions.assertCondition(
      !mHasStartedCreatingInitialContext,
      "createReactContextInBackground should only be called when creating the react " +
          "application for the first time. When reloading JS, e.g. from a new file, explicitly" +
          "use recreateReactContextInBackground");

  mHasStartedCreatingInitialContext = true;
  recreateReactContextInBackgroundInner();
}

private void recreateReactContextInBackgroundInner() {
    UiThreadUtil.assertOnUiThread();

    if (mUseDeveloperSupport && mJSMainModuleName != null) {
      if (mDevSupportManager.hasUpToDateJSBundleInCache()) {
        // If there is a up-to-date bundle downloaded from server, always use that
        onJSBundleLoadedFromServer();
      } else if (mJSBundleFile == null) {
        mDevSupportManager.handleReloadJS();
      } else {
        mDevSupportManager.isPackagerRunning(
            new DevServerHelper.PackagerStatusCallback() {
              @Override
              public void onPackagerStatusFetched(final boolean packagerIsRunning) {
                UiThreadUtil.runOnUiThread(
                    new Runnable() {
                      @Override
                      public void run() {
                        if (packagerIsRunning) {
                          mDevSupportManager.handleReloadJS();
                        } else {
                          recreateReactContextInBackgroundFromBundleFile();
                        }
                      }
                    });
              }
            });
      }
      return;
    }

    recreateReactContextInBackgroundFromBundleFile();
  }
其中的逻辑判断是如果你是开发模式的,就会调用onJSBundleLoadedFromServer()这个函数。否则直接走recreateReactContextInBackgroundFromBundleFile()。这里我们只关注前者,其实两者的差别不是很大,主要差别是jsBundle的获取方式。
private void onJSBundleLoadedFromServer() {
  recreateReactContextInBackground(
      new JSCJavaScriptExecutor.Factory(),
      JSBundleLoader.createCachedBundleFromNetworkLoader(
          mDevSupportManager.getSourceUrl(),
          mDevSupportManager.getDownloadedJSBundleFile()));
}

private void recreateReactContextInBackground(
      JavaScriptExecutor.Factory jsExecutorFactory,
      JSBundleLoader jsBundleLoader) {
    UiThreadUtil.assertOnUiThread();

    ReactContextInitParams initParams =
        new ReactContextInitParams(jsExecutorFactory, jsBundleLoader);
    if (mReactContextInitAsyncTask == null) {
      // No background task to create react context is currently running, create and execute one.
      mReactContextInitAsyncTask = new ReactContextInitAsyncTask();
      mReactContextInitAsyncTask.execute(initParams);
    } else {
      // Background task is currently running, queue up most recent init params to recreate context
      // once task completes.
      mPendingReactContextInitParams = initParams;
    }
  }
在onJSBundleLoadedFromServer方法中我们调用JSBundleLoader的createCachedBundleFromNetworkLoader方法去创建了一个jsBundleLoader。
public static JSBundleLoader createCachedBundleFromNetworkLoader(
    final String sourceURL,
    final String cachedFileLocation) {
  return new JSBundleLoader() {
    @Override
    public void loadScript(ReactBridge bridge) {
      bridge.loadScriptFromFile(cachedFileLocation, sourceURL);
    }

    @Override
    public String getSourceUrl() {
      return sourceURL;
    }
  };
}
它的主要作用是去加载jsBundle。大家可以去看看JSBundleLoader这个类,其中还有两种创建loader的方式,如果我们要发release版了,调用的是createFileLoader,也就是说release的情况下我们需要用gradle生成了jsBundler之后将其放在assets目录上或者文件中。
下面让我们看看之后的recreateReactContextInBackground方法。
它会调用了一个叫做mReactContextInitAsyncTask的AsyncTask去执行异步任务。
@Override
protected Result<ReactApplicationContext> doInBackground(ReactContextInitParams... params) {
  Assertions.assertCondition(params != null && params.length > 0 && params[0] != null);
  try {
    JavaScriptExecutor jsExecutor =
        params[0].getJsExecutorFactory().create(
          mJSCConfig == null ? new WritableNativeMap() : mJSCConfig.getConfigMap());
    return Result.of(createReactContext(jsExecutor, params[0].getJsBundleLoader()));
  } catch (Exception e) {
    // Pass exception to onPostExecute() so it can be handled on the main thread
    return Result.of(e);
  }
}
我们可以看到它的doInBackground方法调用了createReactContext()方法去创建上下文。
private ReactApplicationContext createReactContext(
    JavaScriptExecutor jsExecutor,
    JSBundleLoader jsBundleLoader) {
  FLog.i(ReactConstants.TAG, "Creating react context.");
  ReactMarker.logMarker(CREATE_REACT_CONTEXT_START);
  mSourceUrl = jsBundleLoader.getSourceUrl();
  NativeModuleRegistry.Builder nativeRegistryBuilder = new NativeModuleRegistry.Builder();
  JavaScriptModulesConfig.Builder jsModulesBuilder = new JavaScriptModulesConfig.Builder();

  ReactApplicationContext reactContext = new ReactApplicationContext(mApplicationContext);
  if (mUseDeveloperSupport) {
    reactContext.setNativeModuleCallExceptionHandler(mDevSupportManager);
  }

  ReactMarker.logMarker(PROCESS_PACKAGES_START);
  Systrace.beginSection(
      Systrace.TRACE_TAG_REACT_JAVA_BRIDGE,
      "createAndProcessCoreModulesPackage");
  try {
    CoreModulesPackage coreModulesPackage =
        new CoreModulesPackage(this, mBackBtnHandler, mUIImplementationProvider);
    processPackage(coreModulesPackage, reactContext, nativeRegistryBuilder, jsModulesBuilder);
  } finally {
    Systrace.endSection(Systrace.TRACE_TAG_REACT_JAVA_BRIDGE);
  }

  // TODO(6818138): Solve use-case of native/js modules overriding
  for (ReactPackage reactPackage : mPackages) {
    Systrace.beginSection(
        Systrace.TRACE_TAG_REACT_JAVA_BRIDGE,
        "createAndProcessCustomReactPackage");
    try {
      processPackage(reactPackage, reactContext, nativeRegistryBuilder, jsModulesBuilder);
    } finally {
      Systrace.endSection(Systrace.TRACE_TAG_REACT_JAVA_BRIDGE);
    }
  }
  ReactMarker.logMarker(PROCESS_PACKAGES_END);

  ReactMarker.logMarker(BUILD_NATIVE_MODULE_REGISTRY_START);
  Systrace.beginSection(Systrace.TRACE_TAG_REACT_JAVA_BRIDGE, "buildNativeModuleRegistry");
  NativeModuleRegistry nativeModuleRegistry;
  try {
     nativeModuleRegistry = nativeRegistryBuilder.build();
  } finally {
    Systrace.endSection(Systrace.TRACE_TAG_REACT_JAVA_BRIDGE);
    ReactMarker.logMarker(BUILD_NATIVE_MODULE_REGISTRY_END);
  }

  ReactMarker.logMarker(BUILD_JS_MODULE_CONFIG_START);
  Systrace.beginSection(Systrace.TRACE_TAG_REACT_JAVA_BRIDGE, "buildJSModuleConfig");
  JavaScriptModulesConfig javaScriptModulesConfig;
  try {
    javaScriptModulesConfig = jsModulesBuilder.build();
  } finally {
    Systrace.endSection(Systrace.TRACE_TAG_REACT_JAVA_BRIDGE);
    ReactMarker.logMarker(BUILD_JS_MODULE_CONFIG_END);
  }

  NativeModuleCallExceptionHandler exceptionHandler = mNativeModuleCallExceptionHandler != null
      ? mNativeModuleCallExceptionHandler
      : mDevSupportManager;
  CatalystInstanceImpl.Builder catalystInstanceBuilder = new CatalystInstanceImpl.Builder()
      .setReactQueueConfigurationSpec(ReactQueueConfigurationSpec.createDefault())
      .setJSExecutor(jsExecutor)
      .setRegistry(nativeModuleRegistry)
      .setJSModulesConfig(javaScriptModulesConfig)
      .setJSBundleLoader(jsBundleLoader)
      .setNativeModuleCallExceptionHandler(exceptionHandler);

  ReactMarker.logMarker(CREATE_CATALYST_INSTANCE_START);
  // CREATE_CATALYST_INSTANCE_END is in JSCExecutor.cpp
  Systrace.beginSection(Systrace.TRACE_TAG_REACT_JAVA_BRIDGE, "createCatalystInstance");
  CatalystInstance catalystInstance;
  try {
    catalystInstance = catalystInstanceBuilder.build();
  } finally {
    Systrace.endSection(Systrace.TRACE_TAG_REACT_JAVA_BRIDGE);
    ReactMarker.logMarker(CREATE_CATALYST_INSTANCE_END);
  }

  if (mBridgeIdleDebugListener != null) {
    catalystInstance.addBridgeIdleDebugListener(mBridgeIdleDebugListener);
  }

  reactContext.initializeWithInstance(catalystInstance);

  ReactMarker.logMarker(RUN_JS_BUNDLE_START);
  Systrace.beginSection(Systrace.TRACE_TAG_REACT_JAVA_BRIDGE, "runJSBundle");
  try {
    catalystInstance.runJSBundle();
  } finally {
    Systrace.endSection(Systrace.TRACE_TAG_REACT_JAVA_BRIDGE);
    ReactMarker.logMarker(RUN_JS_BUNDLE_END);
  }

  return reactContext;
}
这个方法的代码就比较多了,但是我们现在只看我们所关注的。大家应该还记得我们的关注点吧?[两个注册表NativeModuleRegistry和JavaScriptModuleRegistry是如何生成的]。这里给出了答案。
NativeModuleRegistry.Builder nativeRegistryBuilder = new NativeModuleRegistry.Builder();
JavaScriptModulesConfig.Builder jsModulesBuilder = new JavaScriptModulesConfig.Builder();
首先创建出两个builder。
try {
  CoreModulesPackage coreModulesPackage =
      new CoreModulesPackage(this, mBackBtnHandler, mUIImplementationProvider);
  processPackage(coreModulesPackage, reactContext, nativeRegistryBuilder, jsModulesBuilder);
} finally {
  Systrace.endSection(Systrace.TRACE_TAG_REACT_JAVA_BRIDGE);
}
然后回去new一个CoreModulesPackage并且使用了processPackage方法去处理它,这又是什么呢?
/* package */ class CoreModulesPackage implements ReactPackage {

  private final ReactInstanceManager mReactInstanceManager;
  private final DefaultHardwareBackBtnHandler mHardwareBackBtnHandler;
  private final UIImplementationProvider mUIImplementationProvider;

  CoreModulesPackage(
      ReactInstanceManager reactInstanceManager,
      DefaultHardwareBackBtnHandler hardwareBackBtnHandler,
      UIImplementationProvider uiImplementationProvider) {
    mReactInstanceManager = reactInstanceManager;
    mHardwareBackBtnHandler = hardwareBackBtnHandler;
    mUIImplementationProvider = uiImplementationProvider;
  }

  @Override
  public List<NativeModule> createNativeModules(
      ReactApplicationContext catalystApplicationContext) {
    Systrace.beginSection(Systrace.TRACE_TAG_REACT_JAVA_BRIDGE, "createUIManagerModule");
    UIManagerModule uiManagerModule;
    try {
      List<ViewManager> viewManagersList = mReactInstanceManager.createAllViewManagers(
          catalystApplicationContext);
      uiManagerModule = new UIManagerModule(
          catalystApplicationContext,
          viewManagersList,
          mUIImplementationProvider.createUIImplementation(
              catalystApplicationContext,
              viewManagersList));
    } finally {
      Systrace.endSection(Systrace.TRACE_TAG_REACT_JAVA_BRIDGE);
    }

    return Arrays.<NativeModule>asList(
        new AnimationsDebugModule(
            catalystApplicationContext,
            mReactInstanceManager.getDevSupportManager().getDevSettings()),
        new AndroidInfoModule(),
        new DeviceEventManagerModule(catalystApplicationContext, mHardwareBackBtnHandler),
        new ExceptionsManagerModule(mReactInstanceManager.getDevSupportManager()),
        new Timing(catalystApplicationContext),
        new SourceCodeModule(
            mReactInstanceManager.getSourceUrl(),
            mReactInstanceManager.getDevSupportManager().getSourceMapUrl()),
        uiManagerModule,
        new DebugComponentOwnershipModule(catalystApplicationContext));
  }

  @Override
  public List<Class<? extends JavaScriptModule>> createJSModules() {
    return Arrays.asList(
        DeviceEventManagerModule.RCTDeviceEventEmitter.class,
        JSTimersExecution.class,
        RCTEventEmitter.class,
        RCTNativeAppEventEmitter.class,
        AppRegistry.class,
        com.facebook.react.bridge.Systrace.class,
        HMRClient.class,
        DebugComponentOwnershipModule.RCTDebugComponentOwnership.class);
  }

  @Override
  public List<ViewManager> createViewManagers(ReactApplicationContext reactContext) {
    return new ArrayList<>(0);
  }
}
可以看到,它里面有很多的JSModules和NativeModules,而这些modules是运行RN程序必备的,也是最核心的几个module。下面让我们看看processPackage方法。
private void processPackage(
    ReactPackage reactPackage,
    ReactApplicationContext reactContext,
    NativeModuleRegistry.Builder nativeRegistryBuilder,
    JavaScriptModulesConfig.Builder jsModulesBuilder) {
  for (NativeModule nativeModule : reactPackage.createNativeModules(reactContext)) {
    nativeRegistryBuilder.add(nativeModule);
  }
  for (Class<? extends JavaScriptModule> jsModuleClass : reactPackage.createJSModules()) {
    jsModulesBuilder.add(jsModuleClass);
  }
}
很简单,拿到具体的native和js的module把它们添加到对应的builder中。
再处理完了CoreModulesPackage之后,程序又会去处理我们在activity中注入的那些package。
for (ReactPackage reactPackage : mPackages) {
  Systrace.beginSection(
      Systrace.TRACE_TAG_REACT_JAVA_BRIDGE,
      "createAndProcessCustomReactPackage");
  try {
    processPackage(reactPackage, reactContext, nativeRegistryBuilder, jsModulesBuilder);
  } finally {
    Systrace.endSection(Systrace.TRACE_TAG_REACT_JAVA_BRIDGE);
  }
}
接下去就是生成注册表了。
try {
   nativeModuleRegistry = nativeRegistryBuilder.build();
} finally {
   Systrace.endSection(Systrace.TRACE_TAG_REACT_JAVA_BRIDGE);
   ReactMarker.logMarker(BUILD_NATIVE_MODULE_REGISTRY_END);
}

try {
   javaScriptModulesConfig = jsModulesBuilder.build();
} finally {
   Systrace.endSection(Systrace.TRACE_TAG_REACT_JAVA_BRIDGE);
   ReactMarker.logMarker(BUILD_JS_MODULE_CONFIG_END);
}
至此,我们就把所有的packages,包括RN核心的CoreModulesPackage和我们activity自己注入的package里面的各个modules全部写到了对应Registry的builder中。
现在这两份注册表是存在于java端的,那要怎么传输到js端呢?我们继续看下去。
再创建完了对应的注册表之后,ReactInstanceManagerImpl会通过builder模式去创建一个CatalystInstance的实例CatalystInstanceImpl。
CatalystInstance catalystInstance;
try {
  catalystInstance = catalystInstanceBuilder.build();
} finally {
  Systrace.endSection(Systrace.TRACE_TAG_REACT_JAVA_BRIDGE);
  ReactMarker.logMarker(CREATE_CATALYST_INSTANCE_END);
}
让我们看看CatalystInstanceImpl的构造函数做了什么。
private final ReactBridge mBridge;

private CatalystInstanceImpl(
    final ReactQueueConfigurationSpec ReactQueueConfigurationSpec,
    final JavaScriptExecutor jsExecutor,
    final NativeModuleRegistry registry,
    final JavaScriptModulesConfig jsModulesConfig,
    final JSBundleLoader jsBundleLoader,
    NativeModuleCallExceptionHandler nativeModuleCallExceptionHandler) {
  FLog.d(ReactConstants.TAG, "Initializing React Bridge.");
  mReactQueueConfiguration = ReactQueueConfigurationImpl.create(
      ReactQueueConfigurationSpec,
      new NativeExceptionHandler());
  mBridgeIdleListeners = new CopyOnWriteArrayList<>();
  mJavaRegistry = registry;
  mJSModuleRegistry = new JavaScriptModuleRegistry(CatalystInstanceImpl.this, jsModulesConfig);
  mJSBundleLoader = jsBundleLoader;
  mNativeModuleCallExceptionHandler = nativeModuleCallExceptionHandler;
  mTraceListener = new JSProfilerTraceListener();

  try {
    mBridge = mReactQueueConfiguration.getJSQueueThread().callOnQueue(
        new Callable<ReactBridge>() {
          @Override
          public ReactBridge call() throws Exception {
            Systrace.beginSection(Systrace.TRACE_TAG_REACT_JAVA_BRIDGE, "initializeBridge");
            try {
              return initializeBridge(jsExecutor, jsModulesConfig);
            } finally {
              Systrace.endSection(Systrace.TRACE_TAG_REACT_JAVA_BRIDGE);
            }
          }
        }).get();
  } catch (Exception t) {
    throw new RuntimeException("Failed to initialize bridge", t);
  }
}
代码很多,大家要知道的就是它会去创建一个ReactBridge。并且会调用initializeBridge(jsExecutor, jsModulesConfig);这个方法。
private ReactBridge initializeBridge(
    JavaScriptExecutor jsExecutor,
    JavaScriptModulesConfig jsModulesConfig) {
  mReactQueueConfiguration.getJSQueueThread().assertIsOnThread();
  Assertions.assertCondition(mBridge == null, "initializeBridge should be called once");

  Systrace.beginSection(Systrace.TRACE_TAG_REACT_JAVA_BRIDGE, "ReactBridgeCtor");
  ReactBridge bridge;
  try {
    bridge = new ReactBridge(
        jsExecutor,
        new NativeModulesReactCallback(),
        mReactQueueConfiguration.getNativeModulesQueueThread());
    mMainExecutorToken = bridge.getMainExecutorToken();
  } finally {
    Systrace.endSection(Systrace.TRACE_TAG_REACT_JAVA_BRIDGE);
  }

  Systrace.beginSection(Systrace.TRACE_TAG_REACT_JAVA_BRIDGE, "setBatchedBridgeConfig");
  try {
    bridge.setGlobalVariable(
        "__fbBatchedBridgeConfig",
        buildModulesConfigJSONProperty(mJavaRegistry, jsModulesConfig));
    bridge.setGlobalVariable(
        "__RCTProfileIsProfiling",
        Systrace.isTracing(Systrace.TRACE_TAG_REACT_APPS) ? "true" : "false");
  } finally {
    Systrace.endSection(Systrace.TRACE_TAG_REACT_JAVA_BRIDGE);
  }

  mJavaRegistry.notifyReactBridgeInitialized(bridge);
  return bridge;
}
其中有这么一段:
bridge.setGlobalVariable(
    "__fbBatchedBridgeConfig",
    buildModulesConfigJSONProperty(mJavaRegistry, jsModulesConfig));
调用了bridge的setGlobalVariable方法,这是一个native的方法。
public native void setGlobalVariable(String propertyName, String jsonEncodedArgument);
这个方法的作用就是先把JavaRegistry格式化成json,并且调用C层的代码传输到js端。由于本人C层学艺不精,能看懂个大概,怕会有细节讲错,就不带大家进行分析了。
总结
到这里,真相就水落石出了,我们来总结一下吧。在程序启动的时候,也就是ReactActivity的onCreate函数中,我们会去创建一个ReactInstanceManagerImpl对象,并且通过ReactRootView的startReactApplication方法开启整个RN世界的大门。在这个方法中,我们会通过一个AsyncTask去创建ReactContext。在创建ReactContext过程中,我们把我们自己注入(MainReactPackage)的和系统生成(CoreModulesPackage)的package通过processPackage方法将其中的各个modules注入到了对应的Registry中,最后通过CatalystInstanceImpl中的ReactBridge将java的注册表通过jni传输到了js层。这样,js层就获取到了java层的所有接口和方法,相当于一个美国人身边有了以为中文翻译。而js层的注册表本来就是由java层生成的,所以就相当于一个中国人身边有了一个英文翻译,从此他们就可以愉快的交流了。
Java->js
前面我们讲了两端通信的方式和注册表是如何从Java端发送到js端的,下面让我们讲讲这样的准备工作完成以后,java是如何调用js的方法的。
首先,经过上面的学习,其实这个问题已经有了一个初步的答案了,因为[将JavaRegistry从java端传输到js端]这个过程就是一个java向js通信的过程,具体的过程在上一节的总结中已经说了,让我们回想一下,之前所有的事情都是在ReactInstanceManagerImpl中ReactContextInitAsyncTask的doInBackground方法中完成的,那这个方法完成之后又做了什么呢?
@Override
protected void onPostExecute(Result<ReactApplicationContext> result) {
  try {
    setupReactContext(result.get());
  } catch (Exception e) {
    mDevSupportManager.handleException(e);
  } finally {
    mReactContextInitAsyncTask = null;
  }

  // Handle enqueued request to re-initialize react context.
  if (mPendingReactContextInitParams != null) {
    recreateReactContextInBackground(
        mPendingReactContextInitParams.getJsExecutorFactory(),
        mPendingReactContextInitParams.getJsBundleLoader());
    mPendingReactContextInitParams = null;
  }
}
可以看到,在onPstEcexute方法中调用了setupReactContext并且把我们创建出来的Context传了进去。
private void setupReactContext(ReactApplicationContext reactContext) {
  UiThreadUtil.assertOnUiThread();
  Assertions.assertCondition(mCurrentReactContext == null);
  mCurrentReactContext = Assertions.assertNotNull(reactContext);
  CatalystInstance catalystInstance =
      Assertions.assertNotNull(reactContext.getCatalystInstance());

  catalystInstance.initialize();
  mDevSupportManager.onNewReactContextCreated(reactContext);
  mMemoryPressureRouter.addMemoryPressureListener(catalystInstance);
  moveReactContextToCurrentLifecycleState();

  for (ReactRootView rootView : mAttachedRootViews) {
    attachMeasuredRootViewToInstance(rootView, catalystInstance);
  }

  ReactInstanceEventListener[] listeners =
    new ReactInstanceEventListener[mReactInstanceEventListeners.size()];
  listeners = mReactInstanceEventListeners.toArray(listeners);

  for (ReactInstanceEventListener listener : listeners) {
    listener.onReactContextInitialized(reactContext);
  }
}
在这个方法中,有一个很重要的语句:
attachMeasuredRootViewToInstance(rootView, catalystInstance);
看看它又做了什么
private void attachMeasuredRootViewToInstance(
    ReactRootView rootView,
    CatalystInstance catalystInstance) {
  UiThreadUtil.assertOnUiThread();

  // Reset view content as it's going to be populated by the application content from JS
  rootView.removeAllViews();
  rootView.setId(View.NO_ID);

  UIManagerModule uiManagerModule = catalystInstance.getNativeModule(UIManagerModule.class);
  int rootTag = uiManagerModule.addMeasuredRootView(rootView);
  @Nullable Bundle launchOptions = rootView.getLaunchOptions();
  WritableMap initialProps = launchOptions != null
      ? Arguments.fromBundle(launchOptions)
      : Arguments.createMap();
  String jsAppModuleName = rootView.getJSModuleName();

  WritableNativeMap appParams = new WritableNativeMap();
  appParams.putDouble("rootTag", rootTag);
  appParams.putMap("initialProps", initialProps);
  catalystInstance.getJSModule(AppRegistry.class).runApplication(jsAppModuleName, appParams);
}
这个方法的最后用了我们的CatalystInstanceImpl的getJSModule方法去获得具体的JSModule并且调用它的方法。让我们看看getJSModule做了什么。
@Override
public <T extends JavaScriptModule> T getJSModule(Class<T> jsInterface) {
  return getJSModule(Assertions.assertNotNull(mMainExecutorToken), jsInterface);
}

@Override
public <T extends JavaScriptModule> T getJSModule(ExecutorToken executorToken, Class<T> jsInterface) {
  return Assertions.assertNotNull(mJSModuleRegistry).getJavaScriptModule(executorToken, jsInterface);
}
它会去JavaScriptModuleRegistry中获取对应的JavaScriptModule,也就是从注册表中获取对应的模块。
public synchronized  <T extends JavaScriptModule> T getJavaScriptModule(ExecutorToken executorToken, Class<T> moduleInterface) {
  HashMap<Class<? extends JavaScriptModule>, JavaScriptModule> instancesForContext =
      mModuleInstances.get(executorToken);
  if (instancesForContext == null) {
    instancesForContext = new HashMap<>();
    mModuleInstances.put(executorToken, instancesForContext);
  }

  JavaScriptModule module = instancesForContext.get(moduleInterface);
  if (module != null) {
    return (T) module;
  }

  JavaScriptModuleRegistration registration =
      Assertions.assertNotNull(
          mModuleRegistrations.get(moduleInterface),
          "JS module " + moduleInterface.getSimpleName() + " hasn't been registered!");
  JavaScriptModule interfaceProxy = (JavaScriptModule) Proxy.newProxyInstance(
      moduleInterface.getClassLoader(),
      new Class[]{moduleInterface},
      new JavaScriptModuleInvocationHandler(executorToken, mCatalystInstance, registration));
  instancesForContext.put(moduleInterface, interfaceProxy);
  return (T) interfaceProxy;
}
这个方法就比较神奇了,首先去缓存中找,如果找到就返回,没找到就去创建,怎么创建的呢,用的是动态代理!
JavaScriptModule interfaceProxy = (JavaScriptModule) Proxy.newProxyInstance(
    moduleInterface.getClassLoader(),
    new Class[]{moduleInterface},
    new JavaScriptModuleInvocationHandler(executorToken, mCatalystInstance, registration));
这里大家必须要对动态代理有所了解,可以自己去找相关的知识。让我们看看JavaScriptModuleInvocationHandler。
@Override
public @Nullable Object invoke(Object proxy, Method method, Object[] args) throws Throwable {
  ExecutorToken executorToken = mExecutorToken.get();
  if (executorToken == null) {
    FLog.w(ReactConstants.TAG, "Dropping JS call, ExecutorToken went away...");
    return null;
  }
  String tracingName = mModuleRegistration.getTracingName(method);
  mCatalystInstance.callFunction(
    executorToken,
      mModuleRegistration.getModuleId(),
      mModuleRegistration.getMethodId(method),
      Arguments.fromJavaArgs(args),
      tracingName);
  return null;
}
我们看它最核心的invoke方法。里面获取了调用方法的moduleId,methodId和参数,然后调用了CatalystInstanceImpl的callFunction去执行。
@Override
public void callFunction(
    ExecutorToken executorToken,
    int moduleId,
    int methodId,
    NativeArray arguments,
    String tracingName) {
  synchronized (mJavaToJSCallsTeardownLock) {
    if (mDestroyed) {
      FLog.w(ReactConstants.TAG, "Calling JS function after bridge has been destroyed.");
      return;
    }

    incrementPendingJSCalls();

    Assertions.assertNotNull(mBridge).callFunction(executorToken, moduleId, methodId, arguments, tracingName);
  }
}
直接调用了ReactBridge的同名函数。
public native void callFunction(ExecutorToken executorToken, int moduleId, int methodId, NativeArray arguments, String tracingName);
可以看到又是一个native函数,具体作用就是将想用调用的方法对应的moduleId,methodId和arguments通过jni传递到js端进行调用。而我们这边调用的是AppRegistry的runApplication方法,这个方法在js端的作用就是开始运行整个js程序,从而将我们的RN程序真正的跑起来。
总结
首先,对于我们java端要调用的js端的类和方法,我们都必须要注册到js的注册表中,这个过程在上一部分的分析中已经带大家走过了。当真正要调用的时候,是通过CatalystInstanceImpl这个类的getJSModule方法去得到对应的JSModule,然后通过动态代理拿到方法的各种参数,通过ReactBridge传递到C层然后再传递到js层的。
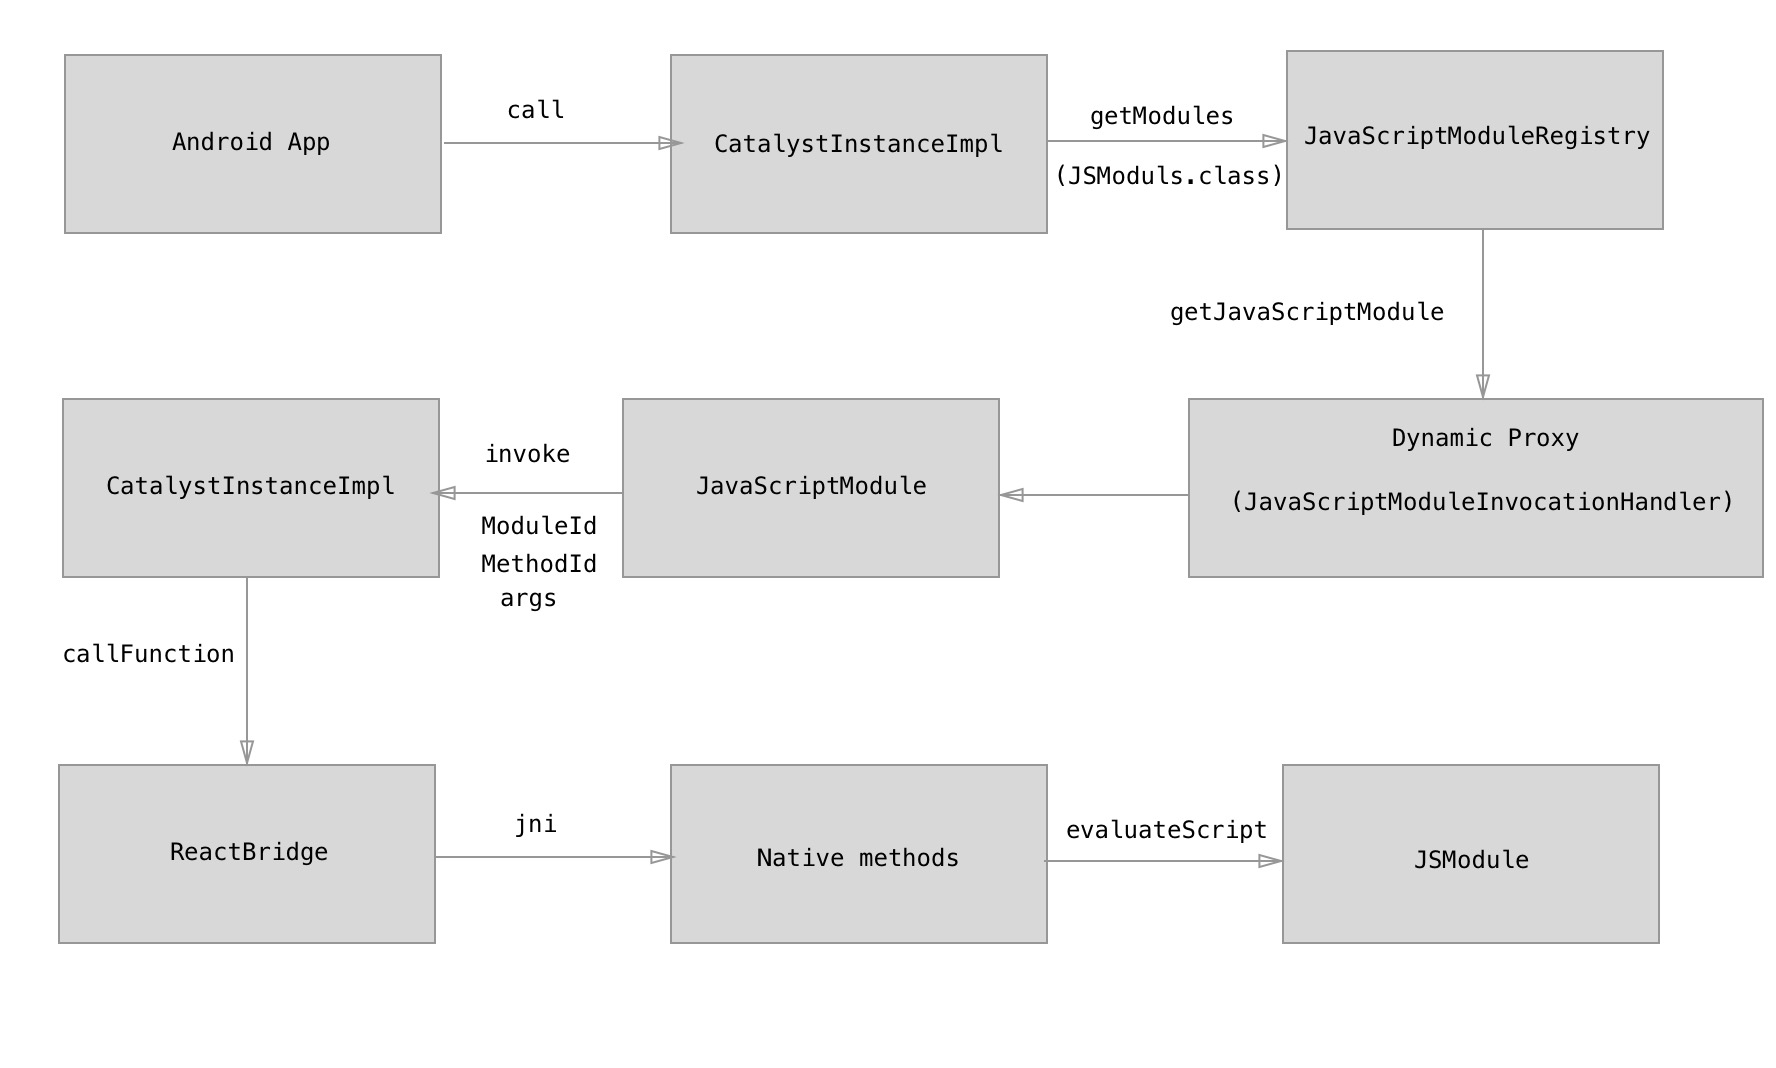
通过这个图配合上代码应该能比较好的理解了。
js->Java
RN的js调java的流程可以说是让我觉得最新颖的地方,具体就是js不是直接通过注册接口去调用java方法的,而是将对应的的参数(moduleId和methodId)push到一个messageQueue中,等待java层的事件来驱动它,当java层的事件传递过来以后,js层把messageQueue中所有的数据返回给java层,再通过注册表JavaRegistry去调用方法。
首先,我们说了js层是把对应的参数push到messageQueue中,具体的方法是MessageQueue.js的__nativeCall方法。
__nativeCall(module, method, params, onFail, onSucc) {
if (onFail || onSucc) {
  // eventually delete old debug info
  (this._callbackID > (1 << 5)) &&
    (this._debugInfo[this._callbackID >> 5] = null);

  this._debugInfo[this._callbackID >> 1] = [module, method];
  onFail && params.push(this._callbackID);
  this._callbacks[this._callbackID++] = onFail;
  onSucc && params.push(this._callbackID);
  this._callbacks[this._callbackID++] = onSucc;
}

global.nativeTraceBeginAsyncFlow &&
  global.nativeTraceBeginAsyncFlow(TRACE_TAG_REACT_APPS, 'native', this._callID);
this._callID++;

this._queue[MODULE_IDS].push(module);
this._queue[METHOD_IDS].push(method);
this._queue[PARAMS].push(params);

var now = new Date().getTime();
if (global.nativeFlushQueueImmediate &&
    now - this._lastFlush >= MIN_TIME_BETWEEN_FLUSHES_MS) {
  global.nativeFlushQueueImmediate(this._queue);
  this._queue = [[], [], [], this._callID];
  this._lastFlush = now;
}
Systrace.counterEvent('pending_js_to_native_queue', this._queue[0].length);
if (__DEV__ && SPY_MODE && isFinite(module)) {
  console.log('JS->N : ' + this._remoteModuleTable[module] + '.' +
    this._remoteMethodTable[module][method] + '(' + JSON.stringify(params) + ')');
  }
}
其中
this._queue[MODULE_IDS].push(module);
this._queue[METHOD_IDS].push(method);
this._queue[PARAMS].push(params);
把对应的module,method和params push到了队列里面,然后就是等待java层的事件驱动。
java层的事件驱动其实也可以看成java层向js层的通信,最终会走到MessageQueue.js的callFunctionReturnFlushedQueue方法和invokeCallbackAndReturnFlushedQueue方法。
callFunctionReturnFlushedQueue(module, method, args) {
guard(() => {
  this.__callFunction(module, method, args);
  this.__callImmediates();
});

return this.flushedQueue();
}
调用了flushedQueue将MessageQueue中的所有数据通过C层发往java层。
到了java层以后,会回调到NativeModulesReactCallback类执行call方法。
private class NativeModulesReactCallback implements ReactCallback {

  @Override
  public void call(ExecutorToken executorToken, int moduleId, int methodId, ReadableNativeArray parameters) {
    mReactQueueConfiguration.getNativeModulesQueueThread().assertIsOnThread();

    synchronized (mJSToJavaCallsTeardownLock) {
      // Suppress any callbacks if destroyed - will only lead to sadness.
      if (mDestroyed) {
        return;
      }
      mJavaRegistry.call(CatalystInstanceImpl.this, executorToken, moduleId, methodId, parameters);
    }
  }
  .....
}
可以看到里面通过JavaRegistry调用了它的call方法。
/* package */ void call(
    CatalystInstance catalystInstance,
    ExecutorToken executorToken,
    int moduleId,
    int methodId,
    ReadableNativeArray parameters) {
  ModuleDefinition definition = mModuleTable.get(moduleId);
  if (definition == null) {
    throw new RuntimeException("Call to unknown module: " + moduleId);
  }
  definition.call(catalystInstance, executorToken, methodId, parameters);
}
拿到对应的module,调用call方法。
public void call(
      CatalystInstance catalystInstance,
      ExecutorToken executorToken,
      int methodId,
      ReadableNativeArray parameters) {
    MethodRegistration method = this.methods.get(methodId);
    Systrace.beginSection(Systrace.TRACE_TAG_REACT_JAVA_BRIDGE, method.tracingName);
    try {
      this.methods.get(methodId).method.invoke(catalystInstance, executorToken, parameters);
    } finally {
      Systrace.endSection(Systrace.TRACE_TAG_REACT_JAVA_BRIDGE);
    }
  }
}
其中根据methodId拿到对应module的方法,执行invoke。
最终执行的是BaseJavaModule的invoke方法。
@Override
public void invoke(CatalystInstance catalystInstance, ExecutorToken executorToken, ReadableNativeArray parameters) {

 .........
 mMethod.invoke(BaseJavaModule.this, mArguments);
 .........
}
通过反射调用最终的方法。
总结
这里我们重点要了解的就是js向java的通信靠的是事件驱动模式,也就是说js将方法的对应参数push到MessageQueue中,等java端事件传递过来以后再将其中所有的数据通过C层传递给java层,然后通过JavaRegistry这个Java注册表拿到对应的module和method,通过反射执行方法。
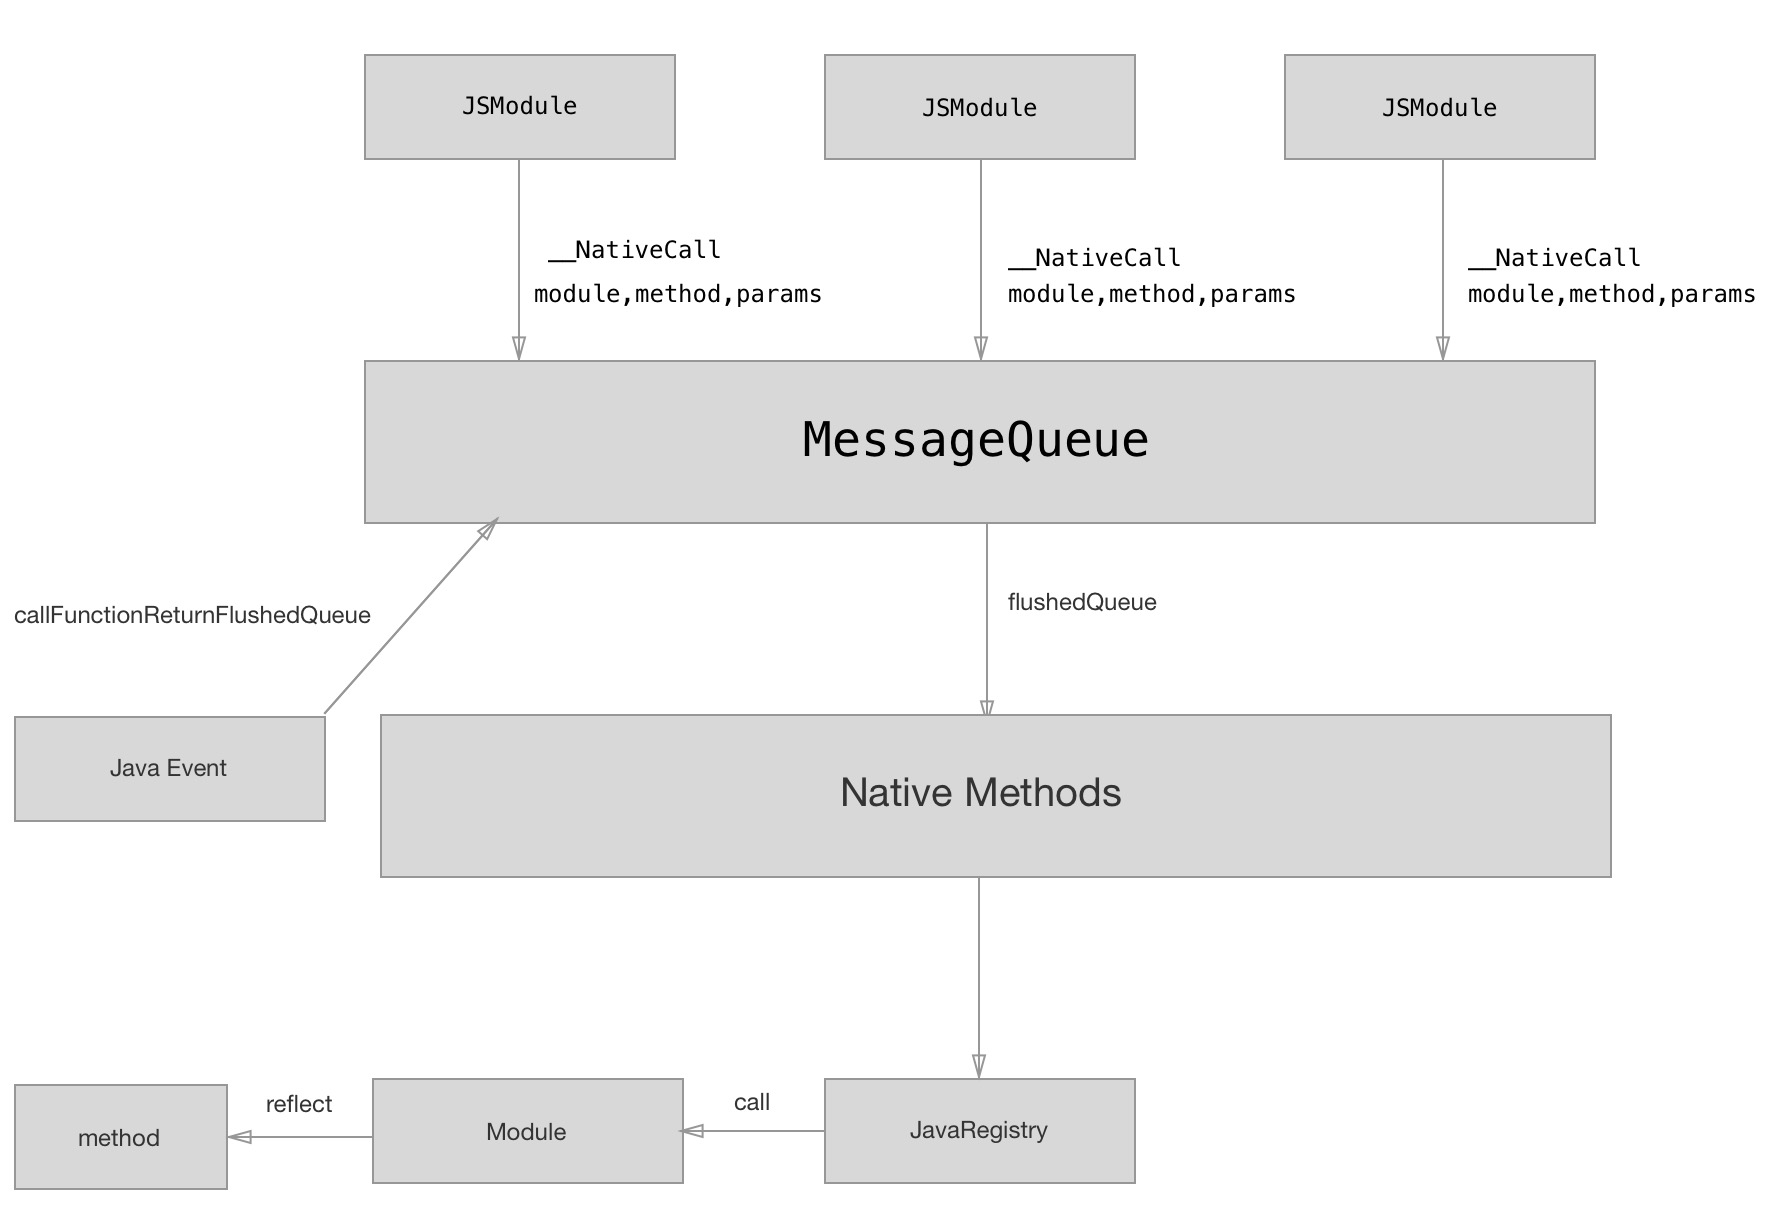
老规矩,通过图配合代码来理解流程。
重要类的作用
最后我们通过总结一下前面提到的几个重要的类的作用来加深印象。
ReactInstanceManager:它的作用是创建出ReactContext,CatalystInstance等类,解析package生成注册表,并且配合ReactRootView管理View的创建,生命周期等功能。
ReactRootView:RN程序的根视图,startReactApplication方法开启RN世界的大门。
CatalystInstance:Java端通信的管理类,提供通信的环境,方法和回调方法,内部通过ReactBridge进行通信。
ReactBridge:通信的核心类,通过jni的方式进行通信。
NativeModuleRegistry:Java接口的注册表。
JavascriptModuleRegistry:js接口的注册表。
CoreModulePackage:RN核心框架的package,包括Java接口和js接口,前文提到的AppResgitry就是在这里面注册的。
MainReactPackage:RN帮我们封装的一些通用的Java组件和事件。
JsBundleLoader:用于加载JSBundle的类,其中会根据应用的情况创建不同的loader。
JSBundle:存有js核心逻辑,在release环境下要通过gradle任务去创建并且放在对应的目录下。
正文到此结束
- 本文标签: 代码 json 总结 ask queue web db 人才 管理 实例 final core message java remote cat Facebook DOM 开发 src Listeners rmi tab 美国 IDE 解析 参数 client 文章 目录 源码 tar 数据 Android 快的 build ACE 中文翻译 App list Developer strace 翻译 js UI CTO key provider 生命 ssl git 配置 时间 Collections 开源 http JavaScript root ip map
- 版权声明: 本文为互联网转载文章,出处已在文章中说明(部分除外)。如果侵权,请联系本站长删除,谢谢。
- 本文海报: 生成海报一 生成海报二
热门推荐


相关文章

近期评论
-
你这基本没有更新呀,最近文章显示还是2019年的文章。不符合要求哈
-
关键词:慕云博客 链接:https://www.lilun.me 描述:分享原创文字的个人博客
-
-
-
可以提供一下源码吗
-
不是商业站,鸡娃学习笔记
-
-
-
-
听他们说很厉害的样子
Loading...
![[HBLOG]公众号](http://www.liuhaihua.cn/img/qrcode_gzh.jpg)

