CAKeyFrameAnimation
KeyFrameAnimation来源于动画产业,最早做动画片的时候,会分为几个角色,牛点的人会根据剧情等因素把场景中的关键画面画出来,剩下的不那么牛的人则根据这些关键画面把一些过渡性的图片补足,假设一秒需要20张图片,关键图片可能有5张,剩下的15张则根据这5张的内容来补齐,这就是最早的key frame的来源。其实在视频编解码中也经常会碰到类似的属于,比如KeyFrame和I帧P帧这些名词,都是跟这些有关的。
在iOS中,如果你使用CAKeyFrameAnimation,则需要提供一些关键点,然后iOS在显示的过程中会根据这些信息自动补齐过渡性的内容。
我们可以用下面一个飞机飞行线路的例子来说明
- (void)drawSpaceCurve { // Create a path UIBezierPath *bezierPath = [[UIBezierPath alloc] init]; [bezierPath moveToPoint:CGPointMake(0, 150)]; [bezierPath addCurveToPoint:CGPointMake(300, 150) controlPoint1:CGPointMake(75, 0) controlPoint2:CGPointMake(225, 300)]; // Draw the path using CAShapeLayer CAShapeLayer *pathLayer = [CAShapeLayer layer]; pathLayer.path = bezierPath.CGPath; pathLayer.fillColor = [UIColor clearColor].CGColor; pathLayer.strokeColor = [UIColor redColor].CGColor; pathLayer.lineWidth = 3.0f; [self.view.layer addSublayer:pathLayer]; // Add the ship CALayer *shipLayer = [CALayer layer]; shipLayer.frame = CGRectMake(0, 0, 64, 64); shipLayer.position = CGPointMake(0, 150); shipLayer.contents = (__bridge id)[UIImage imageNamed:@"Ship"].CGImage; [self.view.layer addSublayer:shipLayer]; // Create the keyframe animation CAKeyframeAnimation *animation = [CAKeyframeAnimation animation]; animation.keyPath = @"position"; animation.duration = 4.0f; animation.path = bezierPath.CGPath; [shipLayer addAnimation:animation forKey:nil]; } 
在代码运行中,我们确实看到了飞机的运行轨迹和我们定义的bezierPath一致,但有个问题,就是飞机的机头方向没有在运行过程中做调整,这便使动画看起来怪怪的,不过好在Apple已经预见到这个需求,所以在CAKeyFrameAnimation中提供了一个名为rotationMode的属性,当我们把这个属性设置为kCAAnimationRotateAuto时,飞机在运行过程中机头始终超前,实现了我们的需求。
animation.rotationMode = kCAAnimationRotateAuto;
另外在实际的动画应用中,我们经常会使用到多个动画效果一同展示的情况,这种情况我们可以通过CAAnimationGroup来实现,它的用法和单独设置一个动画的效果没有太大的区别,但当你把多种效果组合到一起,在展示的时候,就可以轻松完成多个效果的同时展示。
我们还是用上面的轨迹来演示,不过把飞机换成了一个色块,动画是使色块不但按照我们规定好的路径运动,并且在运动中进行颜色的变换。
- (void)testAnimationGroup { UIBezierPath *bezierPath = [[UIBezierPath alloc] init]; [bezierPath moveToPoint:CGPointMake(0, 150)]; [bezierPath addCurveToPoint:CGPointMake(300, 150) controlPoint1:CGPointMake(75, 0) controlPoint2:CGPointMake(225, 300)]; CAShapeLayer *pathLayer = [CAShapeLayer layer]; pathLayer.path = bezierPath.CGPath; pathLayer.fillColor = [UIColor clearColor].CGColor; pathLayer.strokeColor = [UIColor redColor].CGColor; pathLayer.lineWidth = 3.0f; [self.view.layer addSublayer:pathLayer]; CALayer *colorLayer = [CALayer layer]; colorLayer.frame = CGRectMake(0, 0, 64, 64); colorLayer.position = CGPointMake(0, 150); colorLayer.backgroundColor = [UIColor greenColor].CGColor; [self.view.layer addSublayer:colorLayer]; CAKeyframeAnimation *animation1 = [CAKeyframeAnimation animation]; animation1.keyPath = @"position"; animation1.path = bezierPath.CGPath; animation1.rotationMode = kCAAnimationRotateAuto; CABasicAnimation *animation2 = [CABasicAnimation animation]; animation2.keyPath = @"backgroundColor"; animation2.toValue = (__bridge id)[UIColor redColor].CGColor; CAAnimationGroup *group = [CAAnimationGroup animation]; group.animations = @[animation1, animation2]; group.duration = 4.0f; [colorLayer addAnimation:group forKey:nil]; } 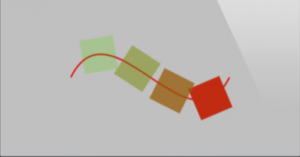
正文到此结束
热门推荐


相关文章

近期评论
-
你这基本没有更新呀,最近文章显示还是2019年的文章。不符合要求哈
-
关键词:慕云博客 链接:https://www.lilun.me 描述:分享原创文字的个人博客
-
-
-
可以提供一下源码吗
-
不是商业站,鸡娃学习笔记
-
-
-
-
听他们说很厉害的样子
Loading...
![[HBLOG]公众号](http://www.liuhaihua.cn/img/qrcode_gzh.jpg)

