当喜悦、愤怒、疑惑、懵逼等等这些情绪都能使用表情表达时,我干嘛还要打字
这是一个移动端快速发展的时代,不管你承不承认,作为一个app开发者,社交属性总是或多或少出现在我们开发的业务需求中,其中作为IM最重要的组成元素——表情,如何进行文字和表情混合编程是一门重要的技术。
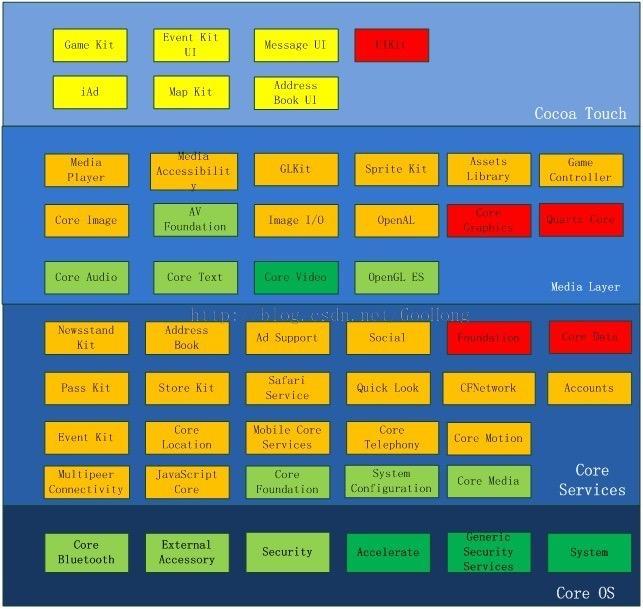
本文将使用iOS中的coreText框架来完成我们的图文混编之旅,除此之外,还实现文本超链接效果。在开始本篇的代码之前,我们先通过iOS框架结构图来了解CoreText所处的位置:
coreText基础
首先我们要知道图文混编的原理 —— 在需要显示图片的文本位置使用特殊的字符显示,然后在绘制这些文本的将图片直接绘制显示在这些特殊文本的位置上。因此,图文混编的任务离不开一个重要的角色——NSAttributedString
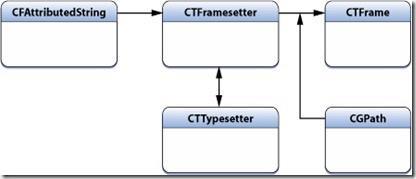
这个对比NSString多了各种类似粗斜体、下划线、背景色等文本属性的NSAttributedString,每个属性都有其对应的字符区域。这意味着你可以将前几个字符设置为粗体,而后面的字符为斜体且带着下划线。在iOS6之后已经有能够设置控件的富文本属性了,但如果想要实现我们的图文混编,我们需要使用coreText来对属性字符串进行绘制。在coreText绘制字符的过程中,最重要的两个概念是CTFramesetterRef跟CTFrameRef ,他们的概念如下:
在创建好要绘制的富文本字符串之后,我们用它来创建一个CTFramesetterRef变量,这个变量可以看做是CTFrameRef 的一个工厂,用来辅助我们创建后者。在传入一个CGPathRef的变量之后我们可以创建相应的CTFrameRef然后将富文本渲染在对应的路径区域内。这段创建代码如下(由于coreText基于C语言的库,所有对象都需要我们手动释放内存):
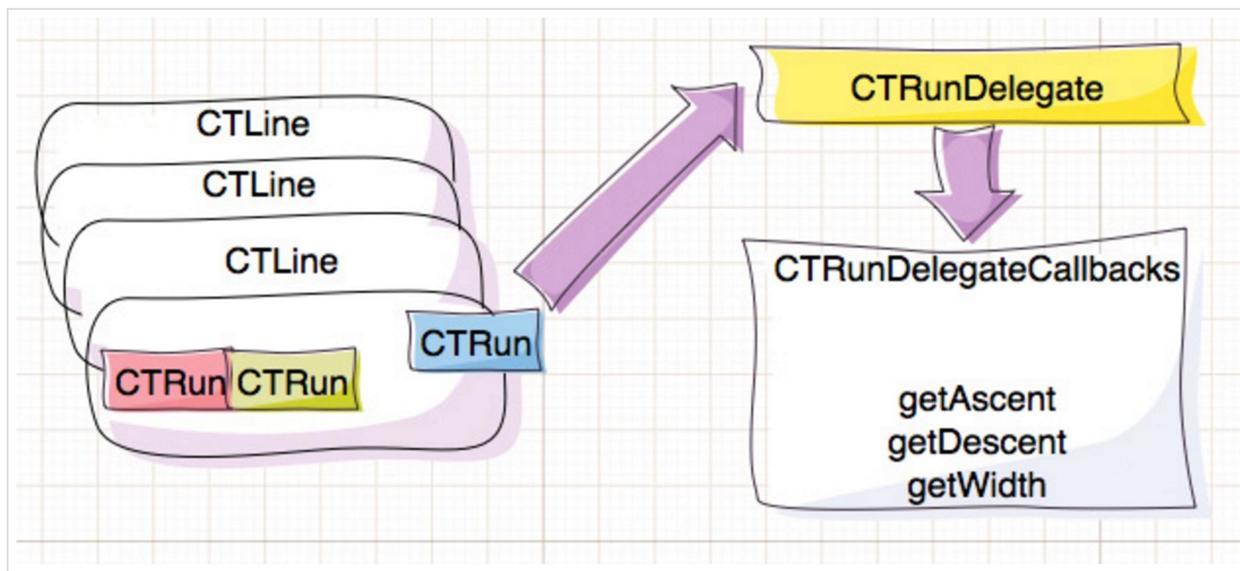
CGContextRef ctx = UIGraphicsGetCurrentContext(); NSAttributedString * content = [[NSAttributedString alloc] initWithString: @"这是一个测试的富文本,这是一个测试的富文本"]; CTFramesetterRef framesetter = CTFramesetterCreateWithAttributedString((CFAttributedStringRef)content); CGMutablePathRef paths = CGPathCreateMutable(); CGPathAddRect(paths, NULL, CGRectMake(0, 0, 100, 100)); CTFrameRef frame = CTFramesetterCreateFrame(framesetter, CFRangeMake(0, content), paths, NULL); CTFrameDraw(frame, ctx); //绘制文字 // 释放内存 CFRelease(paths); CFRelease(frame); CFRelease(framesetter); 除此之外,每一个创建的CTFrameRef中存在一个或者更多的CTLineRef变量,这个变量表示绘制文本中的每一行文本。每个CTLineRef变量中存在一个或者更多个CTRunRef变量,在文本绘制过程中,我们并不关心CTLineRef或者CTRunRef变量具体对应的是什么字符,这些工作在更深层次系统已经帮我们完成了创建。创建过程的图如下:

通过CTFrameRef获取文本内容的行以及字符串组的代码如下:
CFArrayRef lines = CTFrameGetLines(frame); CGPoint lineOrigins[CFArrayGetCount(lines)]; CTFrameGetLineOrigins(_frame, CFRangeMake(0, 0), lineOrigins); for (int idx = 0; idx < CFArrayGetCount(lines); idx++) { NSLog(@"第%d行起始坐标%@", idx, NSStringFromCGPoint(lineOrigins[idx])); CTLineRef line = CFArrayGetValueAtIndex(lines, idx); CFArrayRef runs = CTLineGetGlyphRuns(line); CGFloat runAscent; CGFloat runDescent; CGFloat runWidth = CTRunGetTypographicBounds(run, CFRangeMake(0, 0), &runAscent, &runDescent, NULL); NSLog(@"第%d个字符组的宽度为%f", idx, runWidth); } 图文混编的做法就是在我们需要插入表情的富文本位置插入一个空字符占位,然后实现自定义的CTRunDelegateCallbacks来设置这个占位字符的宽高位置信息等,为占位字符添加一个自定义的文本属性用来存储对应的表情图片名字。接着我们通过CTFrameRef获取渲染的文本行以及文本字符,判断是否存在存储的表情图片,如果是就将图片绘制在占位字符的位置上。
下面代码是创建一个CTRunDelegate的代码,用来设置这个字符组的大小尺寸:
void RunDelegateDeallocCallback(void * refCon) {} CGFloat RunDelegateGetAscentCallback(void * refCon) { return 20; } CGFloat RunDelegateGetDescentCallback(void * refCon) { return 0; } CGFloat RunDelegateGetWidthCallback(void * refCon) { return 20; } CTRunDelegateCallbacks imageCallbacks; imageCallbacks.version = kCTRunDelegateVersion1; imageCallbacks.dealloc = RunDelegateDeallocCallback; imageCallbacks.getWidth = RunDelegateGetWidthCallback; imageCallbacks.getAscent = RunDelegateGetAscentCallback; imageCallbacks.getDescent = RunDelegateGetDescentCallback; CTRunDelegateRef runDelegate = CTRunDelegateCreate(&imageCallbacks, "这是回调函数的参数"); 文字排版
文字排版属于又臭又长的理论概念,但是对于我们更好的使用coreText框架,这些理论知识却是不可缺少的。 - 字体
与我们所认知的字体不同的是,在计算机中字体指的是一系列的相同样式、相同大小的字形的集合,即14号宋体跟15号宋体在计算机看来是两种字体。而我们所说的字体指 宋体 / 楷体 这些字体类型
-
字符与字形
文本排版的过程实际上是从字符到字形之间的转换。字符表示的是文字本身的信息意义,而字形表示的是这个文字的图形表现格式。同一个字符由于大小、体形之间的差别,存在着不同字形。由于连写的存在,多个字符可能只对应一个字形:
-
字形描述集
描述了字形表现的多个参数,包括:
1、边框(Bounding box):一个假想的边框,尽可能的将整个字形容纳
2、基线(Baseline):一条假想的参考线,以此为基础渲染字形。正常来说字母x、m、s最下方的位置就是参考线所在y坐标
3、基础原点(Origin):基线最左侧的坐标点
4、行间距(Leading):行与行之间的间距
5、字间距(Kerning):字与字之间的间距
6、上行高度(Ascent):字形最高点到基线的距离,正数。同一行取字符最大的上行高度为该行的上行高度
7、下行高度(Descent):字形最低点到基线的距离,负数。同一行取字符最小的下行高度为该行的下行高度
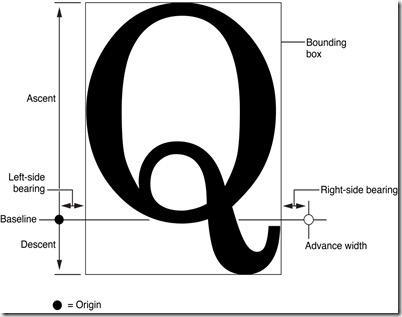
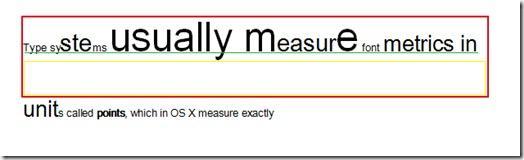
下图中绿色线条表示基线,黄色线条表示下行高度,绿色线条到红框最顶部的距离为上行高度,而黄色线条到红框底部的距离为行间距。因此行高的计算公式是lineHeight = Ascent + Descent + Leading
图文混编
前文讲了诸多的理论知识,终于来到了实战的阶段,先放上本文的demo地址和效果图:
由于富文本的绘制需要用到一个CGContextRef类型的上下文,那么创建一个继承自UIView的自定义控件并且在drawRect: 方法中完成富文本绘制是最方便的方式,我给自己创建的类命名为LXDTextView
在CoreText绘制文本的时候,坐标系的原点位于左下角,因此我们需要在绘制文字之前对坐标系进行一次翻转。并且在绘制富文本之前,我们需要构建好渲染的富文本并在方法里返回:
- (NSMutableAttributedString *)buildAttributedString { //创建富文本,并且将超链接文本设置为蓝色+下划线 NSMutableAttributedString * content = [[NSMutableAttributedString alloc] initWithString: @"这是一个富文本内容"]; NSString * hyperlinkText = @"@这是链接"; NSRange range = NSMakeRange(content.length, hyperlinkText.length); [content appendAttributedString: [[NSAttributedString alloc] initWithString: hyperlinkText]]; [content addAttributes: @{ NSForegroundColorAttributeName: [UIColor blueColor] } range: range]; [content addAttributes: @{ NSUnderlineStyleAttributeName: @(NSUnderlineStyleSingle) } range: range]; //创建CTRunDelegateRef并设置回调函数 CTRunDelegateCallbacks imageCallbacks; imageCallbacks.version = kCTRunDelegateVersion1; imageCallbacks.dealloc = RunDelegateDeallocCallback; imageCallbacks.getWidth = RunDelegateGetWidthCallback; imageCallbacks.getAscent = RunDelegateGetAscentCallback; imageCallbacks.getDescent = RunDelegateGetDescentCallback; NSString * imageName = @"emoji"; CTRunDelegateRef runDelegate = CTRunDelegateCreate(&imageCallbacks, (__bridge void *)imageName); //插入空白表情占位符 NSMutableAttributedString * imageAttributedString = [[NSMutableAttributedString alloc] initWithString: @" "]; [imageAttributedString addAttribute: (NSString *)kCTRunDelegateAttributeName value: (__bridge id)runDelegate range: NSMakeRange(0, 1)]; [imageAttributedString addAttribute: @"imageNameKey" value: imageName range: NSMakeRange(0, 1)]; [content appendAttributedString: imageAttributedString]; CFRelease(runDelegate); return content; } - (void)drawRect: (CGRect)rect { //获取图形上下文并且翻转坐标系 CGContextRef ctx = UIGraphicsGetCurrentContext(); CGContextSetTextMatrix(ctx, CGAffineTransformIdentity); CGContextConcatCTM(ctx, CGAffineTransformMake(1, 0, 0, -1, 0, self.bounds.size.height)); NSMutableAttributedString * content = [self buildAttributedString]; //创建CTFramesetterRef和CTFrameRef变量 CTFramesetterRef framesetter = CTFramesetterCreateWithAttributedString((CFAttributedStringRef)content); CGMutablePathRef paths = CGPathCreateMutable(); CGPathAddRect(paths, NULL, self.bounds); CTFrameRef frame = CTFramesetterCreateFrame(framesetter, CFRangeMake(0, content.length), paths, NULL); CTFrameDraw(frame, ctx); //遍历文本行以及CTRunRef,将表情文本对应的表情图片绘制到图形上下文 CFArrayRef lines = CTFrameGetLines(_frame); CGPoint lineOrigins[CFArrayGetCount(lines)]; CTFrameGetLineOrigins(frame, CFRangeMake(0, 0), lineOrigins); for (int idx = 0; idx < CFArrayGetCount(lines); idx++) { CTLineRef line = CFArrayGetValueAtIndex(lines, idx); CGPoint lineOrigin = lineOrigins[idx]; CFArrayRef runs = CTLineGetGlyphRuns(line); //遍历字符组 for (int index = 0; index < CFArrayGetCount(runs); index++) { CGFloat runAscent; CGFloat runDescent; CGPoint lineOrigin = lineOrigins[idx]; CTRunRef run = CFArrayGetValueAtIndex(runs, index); CGRect runRect; runRect.size.width = CTRunGetTypographicBounds(run, CFRangeMake(0, 0), &runAscent, &runDescent, NULL); runRect = CGRectMake(lineOrigin.x + CTLineGetOffsetForStringIndex(line, CTRunGetStringRange(run).location, NULL), lineOrigin.y - runDescent, runRect.size.width, runAscent + runDescent); //查找表情文本替换表情视图 NSDictionary * attributes = (NSDictionary *)CTRunGetAttributes(run); NSString * imageName = attributes[@"imageNameKey"]; if (imageName) { UIImage * image = [UIImage imageNamed: imageName]; if (image) { CGRect imageDrawRect; CGFloat imageSize = ceil(runRect.size.height); imageDrawRect.size = CGSizeMake(imageSize, imageSize); imageDrawRect.origin.x = runRect.origin.x + lineOrigin.x; imageDrawRect.origin.y = lineOrigin.y; CGContextDrawImage(ctx, imageDrawRect, image.CGImage); } } } } CFRelease(paths); CFRelease(frame); CFRelease(framesetter); } 代码运行之后,代码的运行图应该是这样:

现在富文本像模像样了,但我们怎样才能在点击超链接文本的时候发生响应回调呢?像图片那样判断点击是否处在rect范围内的判断是不可取的,因为超链接文本可能刚好处在换行的位置,从而存在多个rect。对此,CoreText同样提供了一个函数
CTLineGetStringIndexForPosition(CTLineRef, CGPoint) 方法来获取点击坐标位于文本行的字符的下标位置。但在此之前,我们必须先获取点击点所在的文本行数位置,为了达到获取文本行的目的,绘制文本的CTFrameRef变量必须保存下来,因此我定义了一个实例变量存储文本渲染中生成的CTFrameRef。同样的,对于超链接文本所在的位置,我们应该把这个位置转换成字符串作为key值,文本对应的链接作为value值存到一个实例字典中。
@implementation LXDTextView { CTFrameRef _frame; NSMutableDictionary * _textTouchMapper; } - (NSMutableAttributedString *)buildattrinbutedstring { //do something... _textTouchMapper[NSStringFromRange(range)] = @"https://www.baidu.com"; //do something... } - (void)drawRect: (CGRect)rect { //do something... _frame = frame; //do something... } - (void)touchesEnded: (NSSet<UITouch *> *)touches withEvent: (UIEvent *)event { CGPoint touchPoint = [touches.anyObject locationInView: self]; CFArrayRef lines = CTFrameGetLines(_frame); CGPoint origins[CFArrayGetCount(lines)]; for (int idx = 0; idx < CFArrayGetCount(lines); idx++) { CGPoint origin = origins[idx]; CGPathRef path = CTFrameGetPath(_frame); CGRect rect = CGPathGetBoundingBox(path); //将坐标点更改为左上角坐标系原点的坐标 CGFloat y = rect.origin.y + rect.size.height - origin.y; if (touchPoint.y <= y && (touchPoint.x >= origin.x && touchPoint.x <= rect.origin.x + rect.size.width)) { line = CFArrayGetValueAtIndex(lines, idx); lineOrigin = origin; NSLog(@"点击第%d行", idx); break; } } if (line == NULL) { return; } touchPoint.x -= lineOrigin.x; CFIndex index = CTLineGetStringIndexForPosition(line, touchPoint); for (NSString * textRange in _textTouchMapper) { NSRange range = NSRangeFromString(textRange); if (index >= range.location && index <= range.location + range.length) { NSLog(@"点击了图片链接:%@", _textTouchMapper[textRange]); break; } } } @end 现在运行代码,看看点击富文本的超链接时,控制台是不是输出了点击图片链接了呢? 进一步封装
我们已经完成了富文本的实现,下一步是思考如何从外界传入文本内容和对应关系,然后显示。因此,我们需要在头文件中提供两个字典类型的属性,分别用于使用者传入文本-超链接以及文本-表情图片的对应关系:
@interface LXDTextView : UIView /*! * @brief 显示文本(所有的链接文本、图片名称都应该放到这里面) */ @property (nonatomic, copy) NSString * text; /*! * @brief 文本-超链接映射 */ @property (nonatomic, strong) NSDictionary * hyperlinkMapper; /*! * @brief 文本-表情映射 */ @property (nonatomic, strong) NSDictionary * emojiTextMapper; @end 当然,这时候buildAttributedString也应该进行相应的修改,由于富文本中可能存在多个表情,因此需要把往富文本中插入表情占位符的逻辑封装出来。另一方面,把富文本对象content作为类成员变量来使用,会让代码更方便:
/*! * @brief 在富文本中插入表情占位符,然后设置好属性 * * @param imageName 表情图片的名称 * @param emojiRange 表情文本在富文本中的位置,用于替换富文本 */ - (void)insertEmojiAttributed: (NSString *)imageName emojiRange: (NSRange)emojiRange { CTRunDelegateCallbacks imageCallbacks; imageCallbacks.version = kCTRunDelegateVersion1; imageCallbacks.dealloc = RunDelegateDeallocCallback; imageCallbacks.getWidth = RunDelegateGetWidthCallback; imageCallbacks.getAscent = RunDelegateGetAscentCallback; imageCallbacks.getDescent = RunDelegateGetDescentCallback; /*! * @brief 插入图片属性文本 */ CTRunDelegateRef runDelegate = CTRunDelegateCreate(&imageCallbacks, (__bridge void *)imageName); NSMutableAttributedString * imageAttributedString = [[NSMutableAttributedString alloc] initWithString: @" "]; [imageAttributedString addAttribute: (NSString *)kCTRunDelegateAttributeName value: (__bridge id)runDelegate range: NSMakeRange(0, 1)]; [imageAttributedString addAttribute: LXDEmojiImageNameKey value: imageName range: NSMakeRange(0, 1)]; [_content deleteCharactersInRange: emojiRange]; [_content insertAttributedString: imageAttributedString atIndex: emojiRange.location]; CFRelease(runDelegate); } 在buildAttributedString 方法也增加了根据传入的两个字典进行富文本字符替换的逻辑。其中表情文本替换应该放在超链接文本替换之前——因为表情文本最终替换成一个空格字符串,但是表情文本的长度往往总是大于1。先替换表情文本就不会导致超链接文本查找中的位置出错:
- (void)buildAttributedString { _content = [[NSMutableAttributedString alloc] initWithString: _text attributes: self.textAttributes]; /*! * @brief 获取所有转换emoji表情的文本位置 */ for (NSString * emojiText in self.emojiTextMapper) { NSRange range = [_content.string rangeOfString: emojiText]; while (range.location != NSNotFound) { [self insertEmojiAttributed: self.emojiTextMapper[emojiText] emojiRange: range]; range = [_content.string rangeOfString: emojiText]; } } /*! * @brief 获取所有转换超链接的文本位置 */ for (NSString * hyperlinkText in self.hyperlinkMapper) { NSRange range = [_content.string rangeOfString: hyperlinkText]; while (range.location != NSNotFound) { [self.textTouchMapper setValue: self.hyperlinkMapper[hyperlinkText] forKey: NSStringFromRange(range)]; [_content addAttributes: @{ NSForegroundColorAttributeName: [UIColor blueColor] } range: range]; [_content addAttributes: @{ NSUnderlineStyleAttributeName: @(NSUnderlineStyleSingle) } range: range]; range = [_content.string rangeOfString: hyperlinkText]; } } } 当然了,如果你乐意的话,还可以顺带的增加一下文本换行类型等属性的设置:
/*! * @brief 设置字体属性 */ CTParagraphStyleSetting styleSetting; CTLineBreakMode lineBreak = kCTLineBreakByWordWrapping; styleSetting.spec = kCTParagraphStyleSpecifierLineBreakMode; styleSetting.value = &lineBreak; styleSetting.valueSize = sizeof(CTLineBreakMode); CTParagraphStyleSetting settings[] = { styleSetting }; CTParagraphStyleRef style = CTParagraphStyleCreate(settings, 1); NSMutableDictionary * attributes = @{ (id)kCTParagraphStyleAttributeName: (id)style }.mutableCopy; [_content addAttributes: attributes range: NSMakeRange(0, _content.length)]; CTFontRef font = CTFontCreateWithName((CFStringRef)[UIFont systemFontOfSize: 16].fontName, 16, NULL); [_content addAttributes: @{ (id)kCTFontAttributeName: (__bridge id)font } range: NSMakeRange(0, _content.length)]; CFRelease(font); CFRelease(style); 由于富文本的渲染流程不会因为富文本内容变化而变化,所以drawRect:内的逻辑几乎没有任何改变。但是同样的,如果你需要拥有点击表情的事件,那么我们同样需要像超链接文本实现的方式一样增加一个用来判断是否点击在表情frame里面的工具,将表情的rect作为key,表情图片名字作为value,我把这个字典命名为emojiTouchMapper。此外,前文说过CoreText的坐标系跟常规坐标系是相反的,即使我们在drawRect:开头翻转了坐标系,在获取这些文本坐标时,仍然是按照左下角坐标系计算的。因此如果不做适当处理,那么在点击的时候就没办法按照正常的frame来判断是否处于点击范围内。因此我们需要在遍历文本行之前声明一个存储文本内容最顶部的y坐标变量,在遍历完成之后用这个变量依次和存储的表情视图进行坐标计算,从而存储正确的frame
- (void)drawRect: (CGRect)rect { //do something... CGRect imageDrawRect; CGFloat imageSize = ceil(runRect.size.height); imageDrawRect.size = CGSizeMake(imageSize, imageSize); imageDrawRect.origin.x = runRect.origin.x + lineOrigin.x; imageDrawRect.origin.y = lineOrigin.y - lineDescent; CGContextDrawImage(ctx, imageDrawRect, image.CGImage); imageDrawRect.origin.y = topPoint - imageDrawRect.origin.y; self.emojiTouchMapper[NSStringFromCGRect(imageDrawRect)] = imageName; //do something... } 写完上面的代码之后,自定义的富文本视图就已经完成了,最后需要实现的是点击结束时判断点击位置是否处在表情视图或者超链接文本上,然后进行相应的回调处理。这里使用的是代理方式回调:
- (void)touchesEnded: (NSSet<UITouch *> *)touches withEvent: (UIEvent *)event { CGPoint touchPoint = [touches.anyObject locationInView: self]; CFArrayRef lines = CTFrameGetLines(_frame); CGPoint origins[CFArrayGetCount(lines)]; CTFrameGetLineOrigins(_frame, CFRangeMake(0, 0), origins); CTLineRef line = NULL; CGPoint lineOrigin = CGPointZero; //查找点击坐标所在的文本行 for (int idx = 0; idx < CFArrayGetCount(lines); idx++) { CGPoint origin = origins[idx]; CGPathRef path = CTFrameGetPath(_frame); CGRect rect = CGPathGetBoundingBox(path); //转换点击坐标 CGFloat y = rect.origin.y + rect.size.height - origin.y; if (touchPoint.y <= y && (touchPoint.x >= origin.x && touchPoint.x <= rect.origin.x + rect.size.width)) { line = CFArrayGetValueAtIndex(lines, idx); lineOrigin = origin; NSLog(@"点击第%d行", idx); break; } } if (line == NULL) { return; } touchPoint.x -= lineOrigin.x; CFIndex index = CTLineGetStringIndexForPosition(line, touchPoint); //判断是否点击超链接文本 for (NSString * textRange in self.textTouchMapper) { NSRange range = NSRangeFromString(textRange); if (index >= range.location && index <= range.location + range.length) { if ([_delegate respondsToSelector: @selector(textView:didSelectedHyperlink:)]) { [_delegate textView: self didSelectedHyperlink: self.textTouchMapper[textRange]]; } return; } } //判断是否点击表情 if (!_emojiUserInteractionEnabled) { return; } for (NSString * rectString in self.emojiTouchMapper) { CGRect textRect = CGRectFromString(rectString); if (CGRectContainsPoint(textRect, touchPoint)) { if ([_delegate respondsToSelector: @selector(textView:didSelectedEmoji:)]) { [_delegate textView: self didSelectedEmoji: self.emojiTouchMapper[rectString]]; } } } } 按照上面的代码完成之后,我们实现了一个富文本控件,我用下面的代码测试这个图文混编:
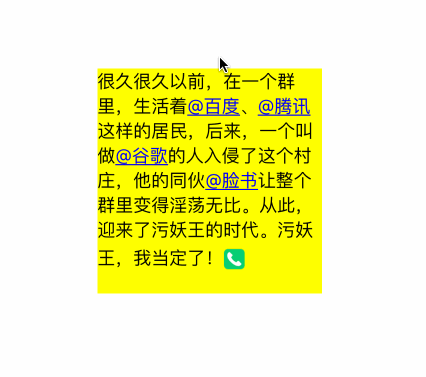
LXDTextView * textView = [[LXDTextView alloc] initWithFrame: CGRectMake(0, 0, 200, 300)]; textView.delegate = self; [self.view addSubview: textView]; textView.emojiUserInteractionEnabled = YES; textView.center = self.view.center; textView.emojiTextMapper = @{ @"[emoji]": @"emoji" }; textView.hyperlinkMapper = @{ @"@百度": @"https://www.baidu.com", @"@腾讯": @"https://www.qq.com", @"@谷歌": @"https://www.google.com", @"@脸书": @"https://www.facebook.com", }; textView.text = @"很久很久以前[emoji],在一个群里,生活着@百度、@腾讯这样的居民,后来,一个[emoji]叫做@谷歌的人入侵了这个村庄,他的同伙@脸书让整个群里变得淫荡无比。从此[emoji],迎来了污妖王的时代。污妖王,我当定了![emoji]"; 运行效果:

##关于TextKit
使用CoreText来实现图文混编十分的强大,但同样带来了更多的代码,更复杂的逻辑。在iOS7之后苹果推出了TextKit框架,基于CoreText进行的高级封装无疑带来了更简洁的代码,其中新的NSTextAttachment类能让我们轻松的将图片转换成富文本,我们只需要下面这么几句代码就能轻松的创建一个表情富文本:
- (NSAttributedString *)attributedStringWithImageName: (NSString *)imageName { NSTextAttachment * attachment = [[NSTextAttachment alloc] init]; attachment.image = [UIImage imageNamed: imageName]; attachment.bounds = CGRectMake(0, -5, 20, 20); NSAttributedString * attributed = [NSAttributedString attributedStringWithAttachment: attachment]; return attributed; } 上面CoreText中的那段富文本代码就能改成下面这样:
- (NSAttributedString *)attributedString: (NSMutableAttributedString *)attributedString replacingEmojiText: (NSString *)emojiText withImageName: (NSString *)imageName { NSRange range = [attributedString.string rangeOfString: emojiText]; while (range.location != NSNotFound) { [attributedString deleteCharactersInRange: range]; NSAttributedString * imageAttributed = [self attributedStringWithImageName: imageName]; [attributedString insertAttributedString: imageAttributed atIndex: range.location]; range = [attributedString.string rangeOfString: emojiText]; } return attributedString; } - (void)viewDidLoad { [super viewDidLoad]; NSAttributedString * attributed = [self attributedString: [[NSMutableAttributedString alloc] initWithString: content] replacingEmojiText: @"[emoji]" withImageName: @"emoji"]; UILabel * label = [[UILabel alloc] initWithFrame: CGRectMake(0, 0, 200, 250)]; label.attributedText = attributed; label.center = self.view.center; label.numberOfLines = 0; [self.view addSubview: label]; } 关心TextKit更多使用方式可以阅读这篇文章:认识TextKit
结尾
作为实现图文混编的两个框架,哪个功能更加强大,就只能见仁见智了。高级封装的TextKit带来了简洁性,CoreText则是更灵活。不过截至文章写完为止,我还没有找到通过TextKit实现超链接文本点击响应的功能。而对于开发者而言,这两个框架都应该都去了解,才能更好的开发。


![[HBLOG]公众号](http://www.liuhaihua.cn/img/qrcode_gzh.jpg)

