本文将分以下在步骤寻找android中事件的来源:
一、activity启动时 创建window以及windowManager的过程。
二、调用setContentView设置布局的过程
三、Activity在onResume之后创建ViewRootImp将window和DecorView关联的过程
四、创建InputChanel 发送给InputManagerService进行注册的过程
五、WindowInputEventReceiver 接受到点击事件传递到Actvity的过程。
六、Activity将事件传递给view的过程。
对于底层c++代码如何使用inputChannel来传递事件,目前小弟不懂,所有不敢胡诌邹。所以本文只分析java代码。
下面进入正文:
一、activity启动之后发生了什么?
activity启动将调用很多方法,本文我们着重看activity的 attach方法(即创建window,和windowManager的发法)。
我们直接从 ActivityThread的 handleLaunchActivity开始看吧。
private void handleLaunchActivity(ActivityClientRecord r, Intent customIntent) { ... Activity a = performLaunchActivity(r, customIntent); if (a != null) { r.createdConfig = new Configuration(mConfiguration); Bundle oldState = r.state; handleResumeActivity(r.token, false, r.isForward, !r.activity.mFinished && !r.startsNotResumed); 可以看到先调用了 performLaunchActivity,在这个方法之后会调用handleResumeActivity,从名字上可以大概猜出来handleResumeActivity 最终会执行activiyt的onResume方法。我们先分析第一个方法performLaunchActivity,看看它到底怎么启动。
private Activity performLaunchActivity(ActivityClientRecord r, Intent customIntent) { ... Activity activity = null; try { //使用反射创建activity java.lang.ClassLoader cl = r.packageInfo.getClassLoader(); activity = mInstrumentation.newActivity( cl, component.getClassName(), r.intent); StrictMode.incrementExpectedActivityCount(activity.getClass()); r.intent.setExtrasClassLoader(cl); r.intent.prepareToEnterProcess(); if (r.state != null) { r.state.setClassLoader(cl); } } catch (Exception e) { if (!mInstrumentation.onException(activity, e)) { throw new RuntimeException( "Unable to instantiate activity " + component + ": " + e.toString(), e); } } ... //调用activity 的attach方法 activity.attach(appContext, this, getInstrumentation(), r.token, r.ident, app, r.intent, r.activityInfo, title, r.parent, r.embeddedID, r.lastNonConfigurationInstances, config, r.voiceInteractor); if (customIntent != null) { activity.mIntent = customIntent; } r.lastNonConfigurationInstances = null; activity.mStartedActivity = false; int theme = r.activityInfo.getThemeResource(); if (theme != 0) { activity.setTheme(theme); } activity.mCalled = false; if (r.isPersistable()) { //最终会执行activity的 onCreate方法 mInstrumentation.callActivityOnCreate(activity, r.state, r.persistentState); } else { mInstrumentation.callActivityOnCreate(activity, r.state); } ok,这里只要有3块,第一块很容易看出来 是使用反射创建Activity的实例
第二块是调用 activity的attach我们一会着重看一下,第三块是使用Instrumentation执行一个犯法,这个方法最终会走activiy.onCreate(),
我们先看 第三块吧:
Instrumentation.java
public void callActivityOnCreate(Activity activity, Bundle icicle, PersistableBundle persistentState) { prePerformCreate(activity); activity.performCreate(icicle, persistentState); postPerformCreate(activity); } activity.java
final void performCreate(Bundle icicle, PersistableBundle persistentState) { restoreHasCurrentPermissionRequest(icicle); //调用activity的 onCreate onCreate(icicle, persistentState); mActivityTransitionState.readState(icicle); performCreateCommon(); } 好了,第三块就看完了。这下来看activity的attach方法
final void attach(Context context, ActivityThread aThread, Instrumentation instr, IBinder token, int ident, Application application, Intent intent, ActivityInfo info, CharSequence title, Activity parent, String id, NonConfigurationInstances lastNonConfigurationInstances, Configuration config, String referrer, IVoiceInteractor voiceInteractor) { attachBaseContext(context); mFragments.attachHost(null /*parent*/); //这里直接new PhoneWindow 我贴出的是6.0 的代码 //5.0 这块是 mWindow = PolicyManager.makeNewWindow(this); //实质是一样的。 mWindow = new PhoneWindow(this); //给window 设置callback ,最后分发事件的时候 会回调 //因为activity刚好实现了 callback接口,decorView最后会回调它,将事件传给activity mWindow.setCallback(this); mWindow.setOnWindowDismissedCallback(this); mWindow.getLayoutInflater().setPrivateFactory(this); if (info.softInputMode != WindowManager.LayoutParams.SOFT_INPUT_STATE_UNSPECIFIED) { mWindow.setSoftInputMode(info.softInputMode); } if (info.uiOptions != 0) { mWindow.setUiOptions(info.uiOptions); } mUiThread = Thread.currentThread(); mMainThread = aThread; mInstrumentation = instr; mToken = token; mIdent = ident; mApplication = application; mIntent = intent; mReferrer = referrer; mComponent = intent.getComponent(); mActivityInfo = info; mTitle = title; mParent = parent; mEmbeddedID = id; mLastNonConfigurationInstances = lastNonConfigurationInstances; if (voiceInteractor != null) { if (lastNonConfigurationInstances != null) { mVoiceInteractor = lastNonConfigurationInstances.voiceInteractor; } else { mVoiceInteractor = new VoiceInteractor(voiceInteractor, this, this, Looper.myLooper()); } } //设置windowManager,其实他的实现是windowManagerImpl mWindow.setWindowManager( (WindowManager)context.getSystemService(Context.WINDOW_SERVICE), mToken, mComponent.flattenToString(), (info.flags & ActivityInfo.FLAG_HARDWARE_ACCELERATED) != 0); if (mParent != null) { mWindow.setContainer(mParent.getWindow()); } mWindowManager = mWindow.getWindowManager(); mCurrentConfig = config; } 好了,这里主要有3个功能:
1、创建创建出window 它的实现是PhoneWindow
2、给window设置回调接口,这个接口的实现是activity自己
3、给window设置windowManager
下面先看看 Callback接口,然后继续分析activity的启动过程
// 它实现了 Callback接口 public class Activity extends ContextThemeWrapper implements LayoutInflater.Factory2, Window.Callback, KeyEvent.Callback, OnCreateContextMenuListener, ComponentCallbacks2, Window.OnWindowDismissedCallback { 接口的主要方法:
public interface Callback { /** * Called to process key events. At the very least your * implementation must call * {@link android.view.Window#superDispatchKeyEvent} to do the * standard key processing. * * @param event The key event. * * @return boolean Return true if this event was consumed. */ public boolean dispatchKeyEvent(KeyEvent event); /** * Called to process a key shortcut event. * At the very least your implementation must call * {@link android.view.Window#superDispatchKeyShortcutEvent} to do the * standard key shortcut processing. * * @param event The key shortcut event. * @return True if this event was consumed. */ public boolean dispatchKeyShortcutEvent(KeyEvent event); /** * Called to process touch screen events. At the very least your * implementation must call * {@link android.view.Window#superDispatchTouchEvent} to do the * standard touch screen processing. * * @param event The touch screen event. * * @return boolean Return true if this event was consumed. */ public boolean dispatchTouchEvent(MotionEvent event); ... 好了,到这里activity的创建、执行attach 、onCreate方法我们就已经分析了。
接下来我们就回过头来看handleLaunchAcitivity在调用handleResumeActivity之后发生了什么。
final void handleResumeActivity(IBinder token, boolean clearHide, boolean isForward, boolean reallyResume) { .... // 最终会调用activity.onResume()方法 // TODO Push resumeArgs into the activity for consideration ActivityClientRecord r = performResumeActivity(token, clearHide); ... if (r.window == null && !a.mFinished && willBeVisible) { r.window = r.activity.getWindow(); View decor = r.window.getDecorView(); decor.setVisibility(View.INVISIBLE); ViewManager wm = a.getWindowManager(); WindowManager.LayoutParams l = r.window.getAttributes(); a.mDecor = decor; l.type = WindowManager.LayoutParams.TYPE_BASE_APPLICATION; l.softInputMode |= forwardBit; if (a.mVisibleFromClient) { a.mWindowAdded = true; //调用windowManagerImp的 addView方法 wm.addView(decor, l); } 这里可以看到,在调用performResumeActivity(token, clearHide);
之后 会调用 wm.addView(decor, l);
performResumeActivity 这个方法将使得activity调用onResume方法,而wm.addView(decor,l)将使得创建一个viewRootImpl 将decorView和window关联起来,具体怎么关联?文章后面会继续讲解。现在先来看 执行performResumeActivity 发生了什么?
public final ActivityClientRecord performResumeActivity(IBinder token, boolean clearHide) { ... //调用 activity.perforResume() r.activity.performResume(); activity.java
final void performResume() { //最终会调用activity.onStart performRestart(); mFragments.execPendingActions(); mLastNonConfigurationInstances = null; mCalled = false; // mResumed is set by the instrumentation //使用mInstrumentation 来控制activity的 onResume执行新 mInstrumentation.callActivityOnResume(this); if (!mCalled) { throw new SuperNotCalledException( "Activity " + mComponent.toShortString() + " did not call through to super.onResume()"); } // invisible activities must be finished be Instrumentation.java
public void callActivityOnResume(Activity activity) { activity.mResumed = true; //调用onResume activity.onResume(); if (mActivityMonitors != null) { synchronized (mSync) { final int N = mActivityMonitors.size(); for (int i=0; i<N; i++) { final ActivityMonitor am = mActivityMonitors.get(i); am.match(activity, activity, activity.getIntent()); } } } } 至此,activity的启动就看的差不多了,主要还是开 activity.attach()的执行内容,因为创建PhoneWindow、WindowManagerImpl 、设置Callback才是本文继续分析的核心。
下面贴时序图:
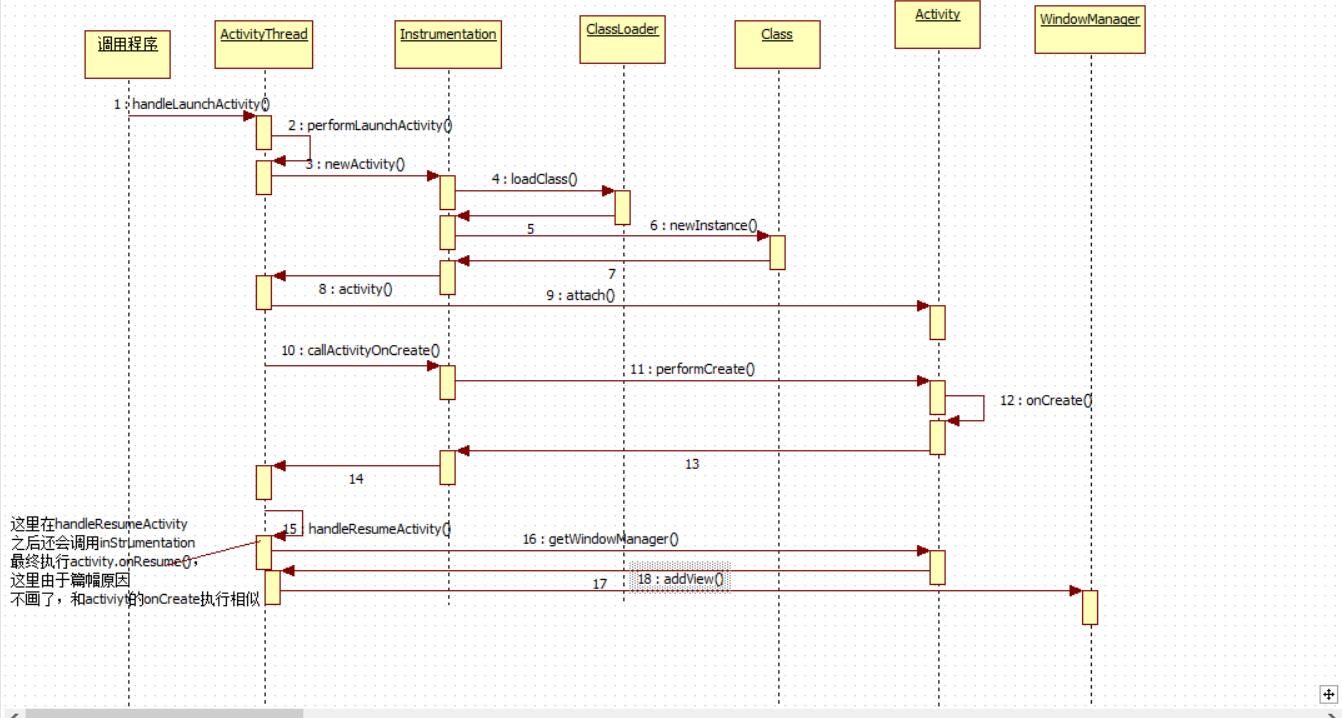
时序图有些不标准的大神勿喷~,好接着看我们分析 调用setContentView设置布局的过程。
二、调用setContentView之后发生了什么?
我们经常在activiy的onCreate方法执行时,调用setContentView,来设置布局。
我从网上搞来一张图,帮助大家理解一下:
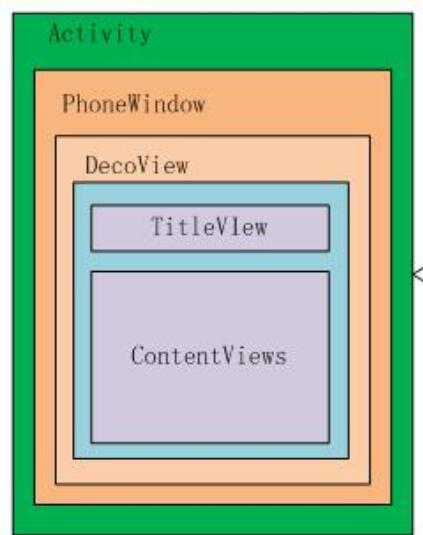
我们设置的其实就是那个 ContentView。
下面我门进入分析:
Activity#setContentView
public void setContentView(int layoutResID) { getWindow().setContentView(layoutResID); initWindowDecorActionBar(); } 可以看到 getWindow升级就是PhoneWindow ,也就是调用了 phoneWindow的 setContentView方法
PhoneWindow.java
@Override public void setContentView(int layoutResID) { // Note: FEATURE_CONTENT_TRANSITIONS may be set in the process of installing the window // decor, when theme attributes and the like are crystalized. Do not check the feature // before this happens. if (mContentParent == null) { installDecor(); } else if (!hasFeature(FEATURE_CONTENT_TRANSITIONS)) { mContentParent.removeAllViews(); } if (hasFeature(FEATURE_CONTENT_TRANSITIONS)) { final Scene newScene = Scene.getSceneForLayout(mContentParent, layoutResID, getContext()); transitionTo(newScene); } else { mLayoutInflater.inflate(layoutResID, mContentParent); } final Callback cb = getCallback(); if (cb != null && !isDestroyed()) { cb.onContentChanged(); } } 可以看到他调用了installDecor 初始化DecorView 并初始化 mContentParent
并将我们设置的layoutResId 加载到 mContentParent
private void installDecor() { if (mDecor == null) { mDecor = generateDecor(); mDecor.setDescendantFocusability(ViewGroup.FOCUS_AFTER_DESCENDANTS); mDecor.setIsRootNamespace(true); if (!mInvalidatePanelMenuPosted && mInvalidatePanelMenuFeatures != 0) { mDecor.postOnAnimation(mInvalidatePanelMenuRunnable); } } if (mContentParent == null) { mContentParent = generateLayout(mDecor); ... } 主要调用了generateDecor 、generateLayout(mDecor);
protected DecorView generateDecor() { return new DecorView(getContext(), -1); } protected ViewGroup generateLayout(DecorView decor) { // Apply data from current theme. TypedArray a = getWindowStyle(); ... 其实就主要功能就是 创建DecorView 并将我们自己设置的布局加载到DecorView中。这里我们就不着重分析了。
时序图:
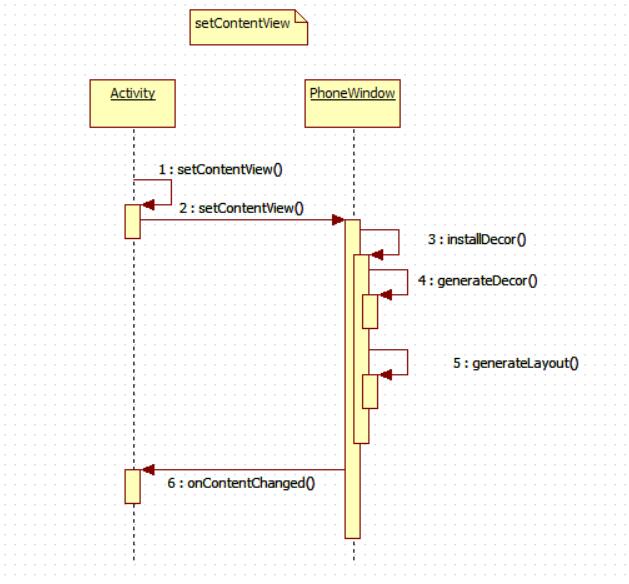
我们继续分析:
三、Activity在onResume之后创建ViewRootImp将window和DecorView关联的过程
我们在讲第一块的时候,我们讲过ActivityThead在 onResume()之后会调用windowManagerImpl的addView犯法。
ActivityThread#handleResumeActivity
a.mDecor = decor; l.type = WindowManager.LayoutParams.TYPE_BASE_APPLICATION; l.softInputMode |= forwardBit; if (a.mVisibleFromClient) { a.mWindowAdded = true; //这里 wm.addView(decor, l); } 这里可以看到,他调用 wm.addView(decor, l);将decorVIiew传递了进去。
我们进入windowManagerImp进行分析
@Override public void addView(View view, ViewGroup.LayoutParams params) { mGlobal.addView(view, params, mDisplay, mParentWindow); } 可以看到他调用了 mGlobal.addView(view, params, mDisplay, mParentWindow);
这里实际是个桥接模式
public final class WindowManagerImpl implements WindowManager { private final WindowManagerGlobal mGlobal = WindowManagerGlobal.getInstance(); 那我们继续查看。
WindowManagerGlobal#addView
public void addView(View view, ViewGroup.LayoutParams params, Display display, Window parentWindow) { ... ViewRootImpl root; View panelParentView = null; ... //创建viewRootImpl root = new ViewRootImpl(view.getContext(), display); view.setLayoutParams(wparams); mViews.add(view); mRoots.add(root); mParams.add(wparams); } // do this last because it fires off messages to start doing things try { //调用viewRootImpl的 setView root.setView(view, wparams, panelParentView); } catch (RuntimeException e) { // BadTokenException or InvalidDisplayException, clean up. synchronized (mLock) { final int index = findViewLocked(view, false); if (index >= 0) { removeViewLocked(index, true); } } throw e; } } 可以看到,这里创建了ViewRootImpl ,并通过root.setView将 docorVIew和window关联起来。
四、创建InputChanel 发送给InputManagerService进行注册的过程
我们接着上面的分析,查看VIewRootImpl的构造方法、以及setView里面发生了什么。
VIewRootImp:
public ViewRootImpl(Context context, Display display) { mContext = context; mWindowSession = WindowManagerGlobal.getWindowSession(); ... } 这里主要看他调用了WindowManagerGlobal.getWindowSession(); 获得了一个Session
我们点进去查看:
public static IWindowSession getWindowSession() { synchronized (WindowManagerGlobal.class) { if (sWindowSession == null) { try { InputMethodManager imm = InputMethodManager.getInstance(); IWindowManager windowManager = getWindowManagerService(); //这里实际调用了windowManagerService.openSession方法 sWindowSession = windowManager.openSession( new IWindowSessionCallback.Stub() { @Override public void onAnimatorScaleChanged(float scale) { ValueAnimator.setDurationScale(scale); } }, imm.getClient(), imm.getInputContext()); ValueAnimator.setDurationScale(windowManager.getCurrentAnimatorScale()); } catch (RemoteException e) { Log.e(TAG, "Failed to open window session", e); } } return sWindowSession; } } 这里使用windowManager.openSession() 实际是调用windowManagerService的openSession()方法,他是个夸进程的调用。这点从getWindowManagerService方法中可以看出:
public static IWindowManager getWindowManagerService() { synchronized (WindowManagerGlobal.class) { if (sWindowManagerService == null) { sWindowManagerService = IWindowManager.Stub.asInterface( ServiceManager.getService("window")); } return sWindowManagerService; } } 他实际就是aidl . 实际Session的实现也是aidl.
客户端这边的进程到时会用这个Session来远程调用 WindowManagerServices所在的进程。
好了,我们来看WindowManagerService的openSession方法。
WindowManagerService#openSession
@Override public IWindowSession openSession(IWindowSessionCallback callback, IInputMethodClient client, IInputContext inputContext) { if (client == null) throw new IllegalArgumentException("null client"); if (inputContext == null) throw new IllegalArgumentException("null inputContext"); Session session = new Session(this, callback, client, inputContext); return session; } 这里直接new 了一个Session进行返回,注意通过构造方法还把 windowManagerService自身传了进去。
好了ViewRootImpl的构造方法就看完了,接下来看他的setView方法。
/** * We have one child */ public void setView(View view, WindowManager.LayoutParams attrs, View panelParentView) { synchronized (this) { ... requestLayout(); if ((mWindowAttributes.inputFeatures & WindowManager.LayoutParams.INPUT_FEATURE_NO_INPUT_CHANNEL) == 0) { //创建出了InputChanel mInputChannel = new InputChannel(); } try { mOrigWindowType = mWindowAttributes.type; mAttachInfo.mRecomputeGlobalAttributes = true; collectViewAttributes(); //远程调用,出传递window 和 inputChannel res = mWindowSession.addToDisplay(mWindow, mSeq, mWindowAttributes, getHostVisibility(), mDisplay.getDisplayId(), mAttachInfo.mContentInsets, mInputChannel); ... //创建 WindowInputEventReceiver mInputEventReceiver = new WindowInputEventReceiver(mInputChannel, Looper.myLooper()); ... 好了,终于看到InputChannel了,这里通过mWindowSession.addToDisplay()
将它传递到了windowManagerService那个进程
并随后在这里创建了WindowInputEventReceiver 来接受事件。
我们先看mWindowSession.addToDisplay() 这个方法,这个方法发生在Session中
Session#addToDisplay
@Override public int addToDisplay(IWindow window, int seq, WindowManager.LayoutParams attrs, int viewVisibility, int displayId, Rect outContentInsets, Rect outStableInsets, Rect outOutsets, InputChannel outInputChannel) { return mService.addWindow(this, window, seq, attrs, viewVisibility, displayId, outContentInsets, outStableInsets, outOutsets, outInputChannel); } 可以看到这里又调用mService.addWindow() 这个方法,mService正是在 windowManagerService的openSeesion中通过构造方法传递过来的。
好了接着看 windowManagerService的addWindow()
public int addWindow(Session session, IWindow client, int seq, WindowManager.LayoutParams attrs, int viewVisibility, int displayId, Rect outContentInsets, Rect outStableInsets, Rect outOutsets, InputChannel outInputChannel) { ... //注册inputChannel mInputManager.registerInputChannel(win.mInputChannel, win.mInputWindowHandle); 可以看到调用了mInputManager.registerInputChannel()
他的实现在InputManagerService
InputManagerService#registerInputChannel
public void registerInputChannel(InputChannel inputChannel, InputWindowHandle inputWindowHandle) { if (inputChannel == null) { throw new IllegalArgumentException("inputChannel must not be null."); } nativeRegisterInputChannel(mPtr, inputChannel, inputWindowHandle, false); } 可以看到它用到了jni 将 inputChannel传递了进去。好了我们就只能分析到这里了。
我们回过头继续看 客户端进程,那边创建WindowInputEventReceiver的事吧
我们看它的构造方法:
public WindowInputEventReceiver(InputChannel inputChannel, Looper looper) { super(inputChannel, looper); } 它调用了父类的构造方法,它的父类是InputEventReceiver
我们来看它的父类:
public InputEventReceiver(InputChannel inputChannel, Looper looper) { if (inputChannel == null) { throw new IllegalArgumentException("inputChannel must not be null"); } if (looper == null) { throw new IllegalArgumentException("looper must not be null"); } mInputChannel = inputChannel; mMessageQueue = looper.getQueue(); mReceiverPtr = nativeInit(new WeakReference<InputEventReceiver>(this), inputChannel, mMessageQueue); mCloseGuard.open("dispose"); } 可以看到他在构造方法调用了 nativeInit将 InputChannel传递了下去。
我们来看他一个重要的方法:
// Called from native code. @SuppressWarnings("unused") private void dispatchInputEvent(int seq, InputEvent event) { mSeqMap.put(event.getSequenceNumber(), seq); onInputEvent(event); } 从注释中可以看出,底层的代码将调用这个方法,那么必然事件会从这里出来。
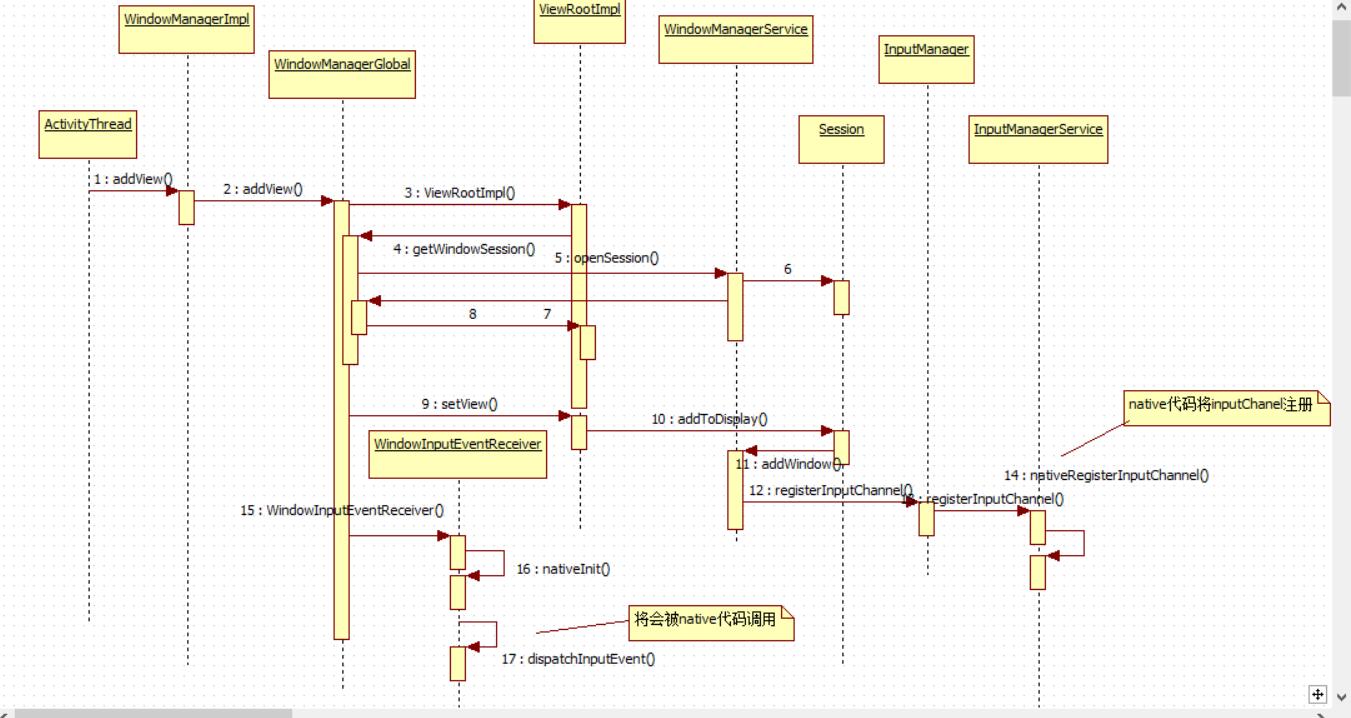
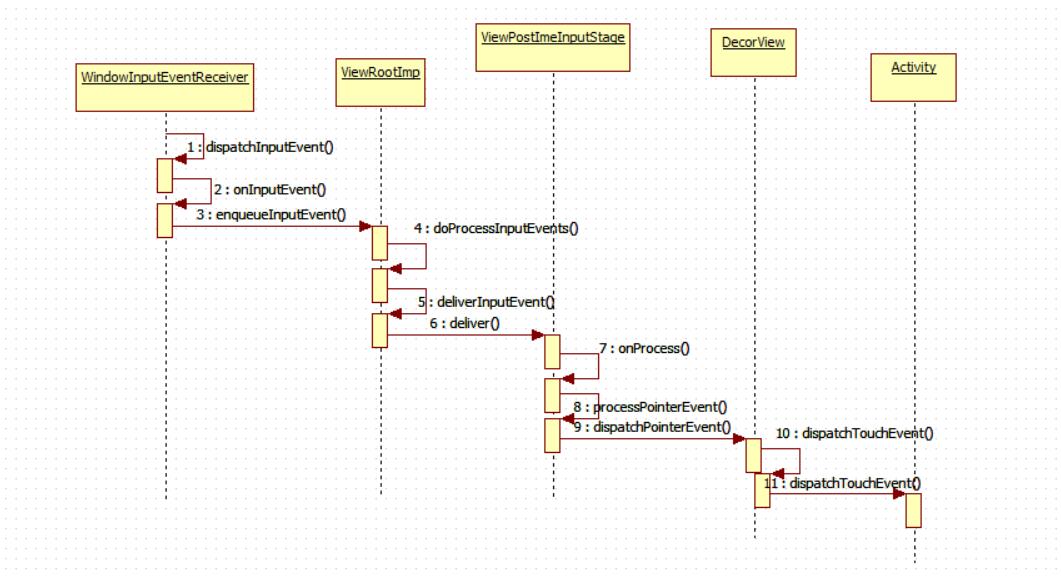
下面我们先附上这一部分的时序图,然后我们继续
五、WindowInputEventReceiver 接受到点击事件分发的过程。
最后一部分了,我们来看事件出来之后怎么分发。
我们继续上面的,从上文中可以看出,事件出来之后会先调用dispatchInputEvent
然后这个方法又会调用onInputEvent。
那我们来看onInputEvent在WindowInputEventReceiver中的实现
WindowInputEventReceiver#onInputEvent
@Override public void onInputEvent(InputEvent event) { enqueueInputEvent(event, this, 0, true); } 可以看到它调用了VIewRootImpl的enqueueInputEvent 方法
void enqueueInputEvent(InputEvent event, InputEventReceiver receiver, int flags, boolean processImmediately) { QueuedInputEvent q = obtainQueuedInputEvent(event, receiver, flags); // Always enqueue the input event in order, regardless of its time stamp. // We do this because the application or the IME may inject key events // in response to touch events and we want to ensure that the injected keys // are processed in the order they were received and we cannot trust that // the time stamp of injected events are monotonic. QueuedInputEvent last = mPendingInputEventTail; if (last == null) { mPendingInputEventHead = q; mPendingInputEventTail = q; } else { last.mNext = q; mPendingInputEventTail = q; } mPendingInputEventCount += 1; Trace.traceCounter(Trace.TRACE_TAG_INPUT, mPendingInputEventQueueLengthCounterName, mPendingInputEventCount); if (processImmediately) { //看这里 doProcessInputEvents(); } else { scheduleProcessInputEvents(); } } 接着调用doProcessInputEvents void doProcessInputEvents() { // Deliver all pending input events in the queue. while (mPendingInputEventHead != null) { QueuedInputEvent q = mPendingInputEventHead; mPendingInputEventHead = q.mNext; if (mPendingInputEventHead == null) { mPendingInputEventTail = null; } q.mNext = null; mPendingInputEventCount -= 1; Trace.traceCounter(Trace.TRACE_TAG_INPUT, mPendingInputEventQueueLengthCounterName, mPendingInputEventCount); deliverInputEvent(q); } // We are done processing all input events that we can process right now // so we can clear the pending flag immediately. if (mProcessInputEventsScheduled) { mProcessInputEventsScheduled = false; mHandler.removeMessages(MSG_PROCESS_INPUT_EVENTS); } } 继续调用deliverInputEvent
private void deliverInputEvent(QueuedInputEvent q) { Trace.asyncTraceBegin(Trace.TRACE_TAG_VIEW, "deliverInputEvent", q.mEvent.getSequenceNumber()); if (mInputEventConsistencyVerifier != null) { mInputEventConsistencyVerifier.onInputEvent(q.mEvent, 0); } InputStage stage; if (q.shouldSendToSynthesizer()) { stage = mSyntheticInputStage; } else { stage = q.shouldSkipIme() ? mFirstPostImeInputStage : mFirstInputStage; } if (stage != null) { stage.deliver(q); } else { finishInputEvent(q); } } 这里我们可以看到他出现一个InputStage,他是一个链表结构:
abstract class InputStage { private final InputStage mNext; protected static final int FORWARD = 0; protected static final int FINISH_HANDLED = 1; protected static final int FINISH_NOT_HANDLED = 2; /** 他的实现类有:AsyncInputStage、EarlyPostImeInputStage、SyntheticInputStage、ViewPreImeInputStage、ViewPostImeInputStage
对于我们的触摸事件来说他的实现就是 ViewPostImeInputStage 。
好了,我们接着看,上文看到它执行了stage.deliver(q);
那我们接着看:
public final void deliver(QueuedInputEvent q) { if ((q.mFlags & QueuedInputEvent.FLAG_FINISHED) != 0) { forward(q); } else if (shouldDropInputEvent(q)) { finish(q, false); } else { //调用了onProcess处理事件 apply(q, onProcess(q)); } } 我们来看onProcess在ViewPostImeInputStage的实现:
@Override protected int onProcess(QueuedInputEvent q) { if (q.mEvent instanceof KeyEvent) { return processKeyEvent(q); } else { // If delivering a new non-key event, make sure the window is // now allowed to start updating. handleDispatchDoneAnimating(); final int source = q.mEvent.getSource(); if ((source & InputDevice.SOURCE_CLASS_POINTER) != 0) { //看这里 return processPointerEvent(q); } else if ((source & InputDevice.SOURCE_CLASS_TRACKBALL) != 0) { return processTrackballEvent(q); } else { return processGenericMotionEvent(q); } } } 可以看到它掉用了processPointerEvent
private int processPointerEvent(QueuedInputEvent q) { final MotionEvent event = (MotionEvent)q.mEvent; mAttachInfo.mUnbufferedDispatchRequested = false; //这里的 mView 设置viewRootImp.setView时传进来的,即DecorView boolean handled = mView.dispatchPointerEvent(event); if (mAttachInfo.mUnbufferedDispatchRequested && !mUnbufferedInputDispatch) { mUnbufferedInputDispatch = true; if (mConsumeBatchedInputScheduled) { scheduleConsumeBatchedInputImmediately(); } } return handled ? FINISH_HANDLED : FORWARD; } dispatchPointerEvent 的实现在 View中
View#dispatchPointerEvent
public final boolean dispatchPointerEvent(MotionEvent event) { if (event.isTouchEvent()) { return dispatchTouchEvent(event); } else { return dispatchGenericMotionEvent(event); } } view 中的dispatchPointerEvent 又调用了dispatchTouchEvent
然而dispatchTouchEvent 在DecorView 中被重写了
@Override public boolean dispatchTouchEvent(MotionEvent ev) { //调用phoneWindow的 getCallback() final Callback cb = getCallback(); return cb != null && !isDestroyed() && mFeatureId < 0 ? cb.dispatchTouchEvent(ev) : super.dispatchTouchEvent(ev); } 因为DecorView是 PhoneWindow的内部类,所以调用的是 PhoneWindow的getCallback()
/** * Return the current Callback interface for this window. */ public final Callback getCallback() { return mCallback; } 那么还记得 第一部分讲的 activity 的attach中做了什么吗? 那么这个callback就是 activity.
到这里事件就传递到了Activity
好了,继续来看最后一节.
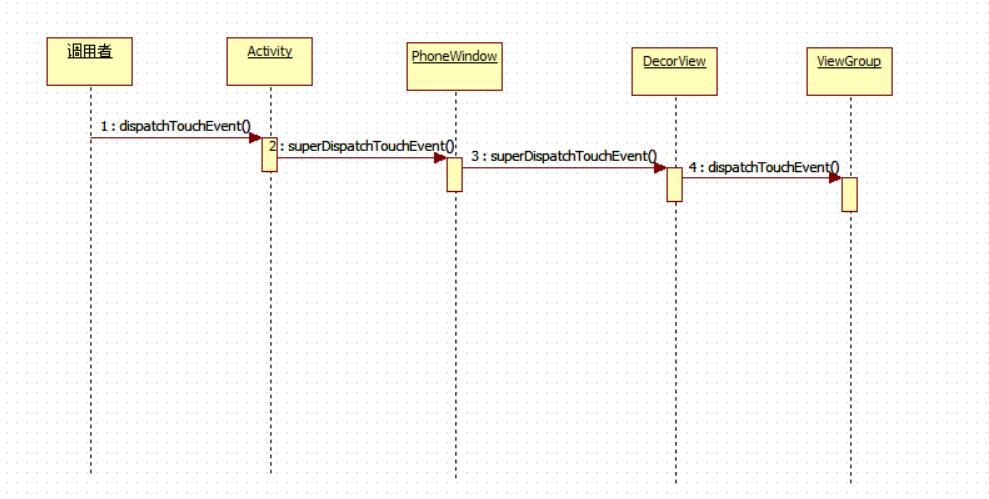
六、Activity将事件传递给view的过程。
继续上文的,它代用饿了callback的dispatchTouchEvent ,也就是调用了
activity的dispatchTouchEvent 方法
public boolean dispatchTouchEvent(MotionEvent ev) { if (ev.getAction() == MotionEvent.ACTION_DOWN) { onUserInteraction(); } //调用了 PhoneWindow的 superDispatchTouchEvent() if (getWindow().superDispatchTouchEvent(ev)) { return true; } return onTouchEvent(ev); } 可以看到它调用了PhoneWindow的superDispatchTouchEvent
PhoneWindow#superDispatchTouchEvent
@Override public boolean superDispatchTouchEvent(MotionEvent event) { return mDecor.superDispatchTouchEvent(event); } 又继续调用了DecorView的superDispatchTouchEvent 方法
public boolean superDispatchTouchEvent(MotionEvent event) { return super.dispatchTouchEvent(event); } 可以看到DecorView直接调用了父类的dispatchTouchEvent方法
也即是VIewGroup的dispatchTouchEvent方法
public boolean dispatchTouchEvent(MotionEvent ev) { if (mInputEventConsistencyVerifier != null) { mInputEventConsistencyVerifier.onTouchEvent(ev, 1); } ... for (int i = childrenCount - 1; i >= 0; i--) { final int childIndex = customOrder ... return handled; } 最终,ViewGroup会遍历自己的孩子进行事件传递。
至此,我们就分析完了。
本文只从java代码中分析了事件的来源,其中若是有不严密的地方还请谅解。
来自: http://blog.csdn.net/a992036795/article/details/51690303


![[HBLOG]公众号](http://www.liuhaihua.cn/img/qrcode_gzh.jpg)

