Java I/O 操作及优化建议
Java I/O
I/O,即 Input/Output(输入/输出) 的简称。就 I/O 而言,概念上有 5 种模型:blocking I/O,nonblocking I/O,I/O multiplexing (select and poll),signal driven I/O (SIGIO),asynchronous I/O (the POSIX aio_functions)。不同的操作系统对上述模型支持不同,UNIX 支持 IO 多路复用。不同系统叫法不同,freebsd 里面叫 kqueue,Linux 叫 epoll。而 Windows2000 的时候就诞生了 IOCP 用以支持 asynchronous I/O。
Java 是一种跨平台语言,为了支持异步 I/O,诞生了 NIO,Java1.4 引入的 NIO1.0 是基于 I/O 复用的,它在各个平台上会选择不同的复用方式。Linux 用的 epoll,BSD 上用 kqueue,Windows 上是重叠 I/O。
Java I/O 的相关方法如下所述:
同步并阻塞 (I/O 方法):服务器实现模式为一个连接启动一个线程,每个线程亲自处理 I/O 并且一直等待 I/O 直到完成,即客户端有连接请求时服务器端就需要启动一个线程进行处理。但是如果这个连接不做任何事情就会造成不必要的线程开销,当然可以通过线程池机制改善这个缺点。I/O 的局限是它是面向流的、阻塞式的、串行的一个过程。对每一个客户端的 Socket 连接 I/O 都需要一个线程来处理,而且在此期间,这个线程一直被占用,直到 Socket 关闭。在这期间,TCP 的连接、数据的读取、数据的返回都是被阻塞的。也就是说这期间大量浪费了 CPU 的时间片和线程占用的内存资源。此外,每建立一个 Socket 连接时,同时创建一个新线程对该 Socket 进行单独通信 (采用阻塞的方式通信)。这种方式具有很快的响应速度,并且控制起来也很简单。在连接数较少的时候非常有效,但是如果对每一个连接都产生一个线程无疑是对系统资源的一种浪费,如果连接数较多将会出现资源不足的情况;
同步非阻塞 (NIO 方法):服务器实现模式为一个请求启动一个线程,每个线程亲自处理 I/O,但是另外的线程轮询检查是否 I/O 准备完毕,不必等待 I/O 完成,即客户端发送的连接请求都会注册到多路复用器上,多路复用器轮询到连接有 I/O 请求时才启动一个线程进行处理。NIO 则是面向缓冲区,非阻塞式的,基于选择器的,用一个线程来轮询监控多个数据传输通道,哪个通道准备好了 (即有一组可以处理的数据) 就处理哪个通道。服务器端保存一个 Socket 连接列表,然后对这个列表进行轮询,如果发现某个 Socket 端口上有数据可读时,则调用该 Socket 连接的相应读操作;如果发现某个 Socket 端口上有数据可写时,则调用该 Socket 连接的相应写操作;如果某个端口的 Socket 连接已经中断,则调用相应的析构方法关闭该端口。这样能充分利用服务器资源,效率得到大幅度提高;
异步非阻塞 (AIO 方法,JDK7 发布):服务器实现模式为一个有效请求启动一个线程,客户端的 I/O 请求都是由操作系统先完成了再通知服务器应用去启动线程进行处理,每个线程不必亲自处理 I/O,而是委派操作系统来处理,并且也不需要等待 I/O 完成,如果完成了操作系统会另行通知的。该模式采用了 Linux 的 epoll 模型。
在连接数不多的情况下,传统 I/O 模式编写较为容易,使用上也较为简单。但是随着连接数的不断增多,传统 I/O 处理每个连接都需要消耗一个线程,而程序的效率,当线程数不多时是随着线程数的增加而增加,但是到一定的数量之后,是随着线程数的增加而减少的。所以传统阻塞式 I/O 的瓶颈在于不能处理过多的连接。非阻塞式 I/O 出现的目的就是为了解决这个瓶颈。非阻塞 IO 处理连接的线程数和连接数没有联系,例如系统处理 10000 个连接,非阻塞 I/O 不需要启动 10000 个线程,你可以用 1000 个,也可以用 2000 个线程来处理。因为非阻塞 IO 处理连接是异步的,当某个连接发送请求到服务器,服务器把这个连接请求当作一个请求“事件”,并把这个“事件”分配给相应的函数处理。我们可以把这个处理函数放到线程中去执行,执行完就把线程归还,这样一个线程就可以异步的处理多个事件。而阻塞式 I/O 的线程的大部分时间都被浪费在等待请求上了。
Java NIO
Java.nio 包是 Java 在 1.4 版本之后新增加的包,专门用来提高 I/O 操作的效率。
表 1 所示是 I/O 与 NIO 之间的对比内容。
表 1. I/O VS NIO
| I/O | NIO |
|---|---|
面向流 | 面向缓冲 |
阻塞 IO | 非阻塞 IO |
无 | 选择器 |
NIO 是基于块 (Block) 的,它以块为基本单位处理数据。在 NIO 中,最为重要的两个组件是缓冲 Buffer 和通道 Channel。缓冲是一块连续的内存块,是 NIO 读写数据的中转地。通道标识缓冲数据的源头或者目的地,它用于向缓冲读取或者写入数据,是访问缓冲的接口。Channel 是一个双向通道,即可读,也可写。Stream 是单向的。应用程序不能直接对 Channel 进行读写操作,而必须通过 Buffer 来进行,即 Channel 是通过 Buffer 来读写数据的。
使用 Buffer 读写数据一般遵循以下四个步骤:
写入数据到 Buffer;
调用 flip() 方法;
从 Buffer 中读取数据;
调用 clear() 方法或者 compact() 方法。
当向 Buffer 写入数据时,Buffer 会记录下写了多少数据。一旦要读取数据,需要通过 flip() 方法将 Buffer 从写模式切换到读模式。在读模式下,可以读取之前写入到 Buffer 的所有数据。
一旦读完了所有的数据,就需要清空缓冲区,让它可以再次被写入。有两种方式能清空缓冲区:调用 clear() 或 compact() 方法。clear() 方法会清空整个缓冲区。compact() 方法只会清除已经读过的数据。任何未读的数据都被移到缓冲区的起始处,新写入的数据将放到缓冲区未读数据的后面。
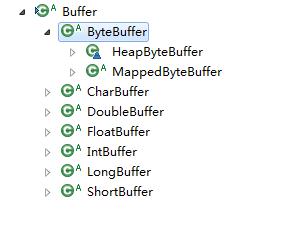
Buffer 有多种类型,不同的 Buffer 提供不同的方式操作 Buffer 中的数据。
图 1 Buffer 接口层次图
Buffer 写数据有两种情况:
从 Channel 写到 Buffer,如例子中 Channel 从文件中读取数据,写到 Channel;
直接调用 put 方法,往里面写数据。
从 Buffer 中读取数据有两种方式:
从 Buffer 读取数据到 Channel;
使用 get() 方法从 Buffer 中读取数据。
Buffer 的 rewin 方法将 position 设回 0,所以你可以重读 Buffer 中的所有数据。limit 保持不变,仍然表示能从 Buffer 中读取多少个元素(byte、char 等)。
clear() 和 compact() 方法
一旦读完 Buffer 中的数据,需要让 Buffer 准备好再次被写入。可以通过 clear() 或 compact() 方法来完成。
如果调用的是 clear() 方法,position 将被设回 0,limit 被设置成 capacity 的值。换句话说,Buffer 被清空了。Buffer 中的数据并未清除,只是这些标记告诉我们可以从哪里开始往 Buffer 里写数据。
如果 Buffer 中有一些未读的数据,调用 clear() 方法,数据将“被遗忘”,意味着不再有任何标记会告诉你哪些数据被读过,哪些还没有。如果 Buffer 中仍有未读的数据,且后续还需要这些数据,但是此时想要先写些数据,那么使用 compact() 方法。compact() 方法将所有未读的数据拷贝到 Buffer 起始处。然后将 position 设到最后一个未读元素正后面。limit 属性依然像 clear() 方法一样,设置成 capacity。现在 Buffer 准备好写数据了,但是不会覆盖未读的数据。
Buffer 参数
Buffer 有 3 个重要的参数:位置 (position)、容量 (capacity) 和上限 (limit)。
capacity 是指 Buffer 的大小,在 Buffer 建立的时候已经确定。
limit 当 Buffer 处于写模式,指还可以写入多少数据;处于读模式,指还有多少数据可以读。
position 当 Buffer 处于写模式,指下一个写数据的位置;处于读模式,当前将要读取的数据的位置。每读写一个数据,position+1,也就是 limit 和 position 在 Buffer 的读/写时的含义不一样。当调用 Buffer 的 flip 方法,由写模式变为读模式时,limit(读)=position(写),position(读) =0。
散射&聚集
NIO 提供了处理结构化数据的方法,称之为散射 (Scattering) 和聚集 (Gathering)。散射是指将数据读入一组 Buffer 中,而不仅仅是一个。聚集与之相反,指将数据写入一组 Buffer 中。散射和聚集的基本使用方法和对单个 Buffer 操作时的使用方法相当类似。在散射读取中,通道依次填充每个缓冲区。填满一个缓冲区后,它就开始填充下一个,在某种意义上,缓冲区数组就像一个大缓冲区。在已知文件具体结构的情况下,可以构造若干个符合文件结构的 Buffer,使得各个 Buffer 的大小恰好符合文件各段结构的大小。此时,通过散射读的方式可以一次将内容装配到各个对应的 Buffer 中,从而简化操作。如果需要创建指定格式的文件,只要先构造好大小合适的 Buffer 对象,使用聚集写的方式,便可以很快地创建出文件。清单 1 以 FileChannel 为例,展示如何使用散射和聚集读写结构化文件。
清单 1. 使用散射和聚集读写结构化文件
import java.io.File; import java.io.FileInputStream; import java.io.FileNotFoundException; import java.io.FileOutputStream; import java.io.IOException; import java.io.UnsupportedEncodingException; import java.nio.ByteBuffer; import java.nio.channels.FileChannel; public class NIOScatteringandGathering { public void createFiles(String TPATH){ try { ByteBuffer bookBuf = ByteBuffer.wrap("java 性能优化技巧".getBytes("utf-8")); ByteBuffer autBuf = ByteBuffer.wrap("test".getBytes("utf-8")); int booklen = bookBuf.limit(); int autlen = autBuf.limit(); ByteBuffer[] bufs = new ByteBuffer[]{bookBuf,autBuf}; File file = new File(TPATH); if(!file.exists()){ try { file.createNewFile(); } catch (IOException e) { // TODO Auto-generated catch block e.printStackTrace(); } } try { FileOutputStream fos = new FileOutputStream(file); FileChannel fc = fos.getChannel(); fc.write(bufs); fos.close(); } catch (FileNotFoundException e) { // TODO Auto-generated catch block e.printStackTrace(); } catch (IOException e) { // TODO Auto-generated catch block e.printStackTrace(); } ByteBuffer b1 = ByteBuffer.allocate(booklen); ByteBuffer b2 = ByteBuffer.allocate(autlen); ByteBuffer[] bufs1 = new ByteBuffer[]{b1,b2}; File file1 = new File(TPATH); try { FileInputStream fis = new FileInputStream(file); FileChannel fc = fis.getChannel(); fc.read(bufs1); String bookname = new String(bufs1[0].array(),"utf-8"); String autname = new String(bufs1[1].array(),"utf-8"); System.out.println(bookname+" "+autname); } catch (FileNotFoundException e) { // TODO Auto-generated catch block e.printStackTrace(); } catch (IOException e) { // TODO Auto-generated catch block e.printStackTrace(); } } catch (UnsupportedEncodingException e) { // TODO Auto-generated catch block e.printStackTrace(); } } public static void main(String[] args){ NIOScatteringandGathering nio = new NIOScatteringandGathering(); nio.createFiles("C://1.TXT"); } }输出如下清单 2 所示。
清单 2. 运行结果
java 性能优化技巧 test
清单 3 所示代码对传统 I/O、基于 Byte 的 NIO、基于内存映射的 NIO 三种方式进行了性能上的对比,使用一个有 400 万数据的文件的读、写操作耗时作为评测依据。
清单 3. I/O 的三种方式对比试验
import java.io.BufferedInputStream; import java.io.BufferedOutputStream; import java.io.DataInputStream; import java.io.DataOutputStream; import java.io.File; import java.io.FileInputStream; import java.io.FileNotFoundException; import java.io.FileOutputStream; import java.io.IOException; import java.io.RandomAccessFile; import java.nio.ByteBuffer; import java.nio.IntBuffer; import java.nio.MappedByteBuffer; import java.nio.channels.FileChannel; public class NIOComparator { public void IOMethod(String TPATH){ long start = System.currentTimeMillis(); try { DataOutputStream dos = new DataOutputStream( new BufferedOutputStream(new FileOutputStream(new File(TPATH)))); for(int i=0;i<4000000;i++){ dos.writeInt(i);//写入 4000000 个整数 } if(dos!=null){ dos.close(); } } catch (FileNotFoundException e) { // TODO Auto-generated catch block e.printStackTrace(); } catch (IOException e) { // TODO Auto-generated catch block e.printStackTrace(); } long end = System.currentTimeMillis(); System.out.println(end - start); start = System.currentTimeMillis(); try { DataInputStream dis = new DataInputStream( new BufferedInputStream(new FileInputStream(new File(TPATH)))); for(int i=0;i<4000000;i++){ dis.readInt(); } if(dis!=null){ dis.close(); } } catch (FileNotFoundException e) { // TODO Auto-generated catch block e.printStackTrace(); } catch (IOException e) { // TODO Auto-generated catch block e.printStackTrace(); } end = System.currentTimeMillis(); System.out.println(end - start); } public void ByteMethod(String TPATH){ long start = System.currentTimeMillis(); try { FileOutputStream fout = new FileOutputStream(new File(TPATH)); FileChannel fc = fout.getChannel();//得到文件通道 ByteBuffer byteBuffer = ByteBuffer.allocate(4000000*4);//分配 Buffer for(int i=0;i<4000000;i++){ byteBuffer.put(int2byte(i));//将整数转为数组 } byteBuffer.flip();//准备写 fc.write(byteBuffer); } catch (FileNotFoundException e) { // TODO Auto-generated catch block e.printStackTrace(); } catch (IOException e) { // TODO Auto-generated catch block e.printStackTrace(); } long end = System.currentTimeMillis(); System.out.println(end - start); start = System.currentTimeMillis(); FileInputStream fin; try { fin = new FileInputStream(new File(TPATH)); FileChannel fc = fin.getChannel();//取得文件通道 ByteBuffer byteBuffer = ByteBuffer.allocate(4000000*4);//分配 Buffer fc.read(byteBuffer);//读取文件数据 fc.close(); byteBuffer.flip();//准备读取数据 while(byteBuffer.hasRemaining()){ byte2int(byteBuffer.get(),byteBuffer.get(),byteBuffer.get(),byteBuffer.get());//将 byte 转为整数 } } catch (FileNotFoundException e) { // TODO Auto-generated catch block e.printStackTrace(); } catch (IOException e) { // TODO Auto-generated catch block e.printStackTrace(); } end = System.currentTimeMillis(); System.out.println(end - start); } public void mapMethod(String TPATH){ long start = System.currentTimeMillis(); //将文件直接映射到内存的方法 try { FileChannel fc = new RandomAccessFile(TPATH,"rw").getChannel(); IntBuffer ib = fc.map(FileChannel.MapMode.READ_WRITE, 0, 4000000*4).asIntBuffer(); for(int i=0;i<4000000;i++){ ib.put(i); } if(fc!=null){ fc.close(); } } catch (FileNotFoundException e) { // TODO Auto-generated catch block e.printStackTrace(); } catch (IOException e) { // TODO Auto-generated catch block e.printStackTrace(); } long end = System.currentTimeMillis(); System.out.println(end - start); start = System.currentTimeMillis(); try { FileChannel fc = new FileInputStream(TPATH).getChannel(); MappedByteBuffer lib = fc.map(FileChannel.MapMode.READ_ONLY, 0, fc.size()); lib.asIntBuffer(); while(lib.hasRemaining()){ lib.get(); } if(fc!=null){ fc.close(); } } catch (FileNotFoundException e) { // TODO Auto-generated catch block e.printStackTrace(); } catch (IOException e) { // TODO Auto-generated catch block e.printStackTrace(); } end = System.currentTimeMillis(); System.out.println(end - start); } public static byte[] int2byte(int res){ byte[] targets = new byte[4]; targets[3] = (byte)(res & 0xff);//最低位 targets[2] = (byte)((res>>8)&0xff);//次低位 targets[1] = (byte)((res>>16)&0xff);//次高位 targets[0] = (byte)((res>>>24));//最高位,无符号右移 return targets; } public static int byte2int(byte b1,byte b2,byte b3,byte b4){ return ((b1 & 0xff)<<24)|((b2 & 0xff)<<16)|((b3 & 0xff)<<8)|(b4 & 0xff); } public static void main(String[] args){ NIOComparator nio = new NIOComparator(); nio.IOMethod("c://1.txt"); nio.ByteMethod("c://2.txt"); nio.ByteMethod("c://3.txt"); } }清单 3 运行输出如清单 4 所示。
清单 4. 运行输出
1139 906 296 157 234 125
除上述描述及清单 3 所示代码以外,NIO 的 Buffer 还提供了一个可以直接访问系统物理内存的类 DirectBuffer。DirectBuffer 继承自 ByteBuffer,但和普通的 ByteBuffer 不同。普通的 ByteBuffer 仍然在 JVM 堆上分配空间,其最大内存受到最大堆的限制,而 DirectBuffer 直接分配在物理内存上,并不占用堆空间。在对普通的 ByteBuffer 访问时,系统总是会使用一个“内核缓冲区”进行间接的操作。而 DirectrBuffer 所处的位置,相当于这个“内核缓冲区”。因此,使用 DirectBuffer 是一种更加接近系统底层的方法,所以,它的速度比普通的 ByteBuffer 更快。DirectBuffer 相对于 ByteBuffer 而言,读写访问速度快很多,但是创建和销毁 DirectrBuffer 的花费却比 ByteBuffer 高。DirectBuffer 与 ByteBuffer 相比较的代码如清单 5 所示。
清单 5. DirectBuffer VS ByteBuffer
import java.nio.ByteBuffer; public class DirectBuffervsByteBuffer { public void DirectBufferPerform(){ long start = System.currentTimeMillis(); ByteBuffer bb = ByteBuffer.allocateDirect(500);//分配 DirectBuffer for(int i=0;i<100000;i++){ for(int j=0;j<99;j++){ bb.putInt(j); } bb.flip(); for(int j=0;j<99;j++){ bb.getInt(j); } } bb.clear(); long end = System.currentTimeMillis(); System.out.println(end-start); start = System.currentTimeMillis(); for(int i=0;i<20000;i++){ ByteBuffer b = ByteBuffer.allocateDirect(10000);//创建 DirectBuffer } end = System.currentTimeMillis(); System.out.println(end-start); } public void ByteBufferPerform(){ long start = System.currentTimeMillis(); ByteBuffer bb = ByteBuffer.allocate(500);//分配 DirectBuffer for(int i=0;i<100000;i++){ for(int j=0;j<99;j++){ bb.putInt(j); } bb.flip(); for(int j=0;j<99;j++){ bb.getInt(j); } } bb.clear(); long end = System.currentTimeMillis(); System.out.println(end-start); start = System.currentTimeMillis(); for(int i=0;i<20000;i++){ ByteBuffer b = ByteBuffer.allocate(10000);//创建 ByteBuffer } end = System.currentTimeMillis(); System.out.println(end-start); } public static void main(String[] args){ DirectBuffervsByteBuffer db = new DirectBuffervsByteBuffer(); db.ByteBufferPerform(); db.DirectBufferPerform(); } }运行输出如清单 6 所示。
清单 6. 运行输出
920 110 531 390
由清单 6 可知,频繁创建和销毁 DirectBuffer 的代价远远大于在堆上分配内存空间。使用参数-XX:MaxDirectMemorySize=200M –Xmx200M 在 VM Arguments 里面配置最大 DirectBuffer 和最大堆空间,代码中分别请求了 200M 的空间,如果设置的堆空间过小,例如设置 1M,会抛出错误如清单 7 所示。
清单 7. 运行错误
Error occurred during initialization of VM Too small initial heap for new size specified
DirectBuffer 的信息不会打印在 GC 里面,因为 GC 只记录了堆空间的内存回收。可以看到,由于 ByteBuffer 在堆上分配空间,因此其 GC 数组相对非常频繁,在需要频繁创建 Buffer 的场合,由于创建和销毁 DirectBuffer 的代码比较高昂,不宜使用 DirectBuffer。但是如果能将 DirectBuffer 进行复用,可以大幅改善系统性能。清单 8 是一段对 DirectBuffer 进行监控代码。
清单 8. 对 DirectBuffer 监控代码
import java.lang.reflect.Field; public class monDirectBuffer { public static void main(String[] args){ try { Class c = Class.forName("java.nio.Bits");//通过反射取得私有数据 Field maxMemory = c.getDeclaredField("maxMemory"); maxMemory.setAccessible(true); Field reservedMemory = c.getDeclaredField("reservedMemory"); reservedMemory.setAccessible(true); synchronized(c){ Long maxMemoryValue = (Long)maxMemory.get(null); Long reservedMemoryValue = (Long)reservedMemory.get(null); System.out.println("maxMemoryValue="+maxMemoryValue); System.out.println("reservedMemoryValue="+reservedMemoryValue); } } catch (ClassNotFoundException e) { // TODO Auto-generated catch block e.printStackTrace(); } catch (SecurityException e) { // TODO Auto-generated catch block e.printStackTrace(); } catch (NoSuchFieldException e) { // TODO Auto-generated catch block e.printStackTrace(); } catch (IllegalArgumentException e) { // TODO Auto-generated catch block e.printStackTrace(); } catch (IllegalAccessException e) { // TODO Auto-generated catch block e.printStackTrace(); } } }运行输出如清单 9 所示。
清单 9. 运行输出
maxMemoryValue=67108864 reservedMemoryValue=0
由于 NIO 使用起来较为困难,所以许多公司推出了自己封装 JDK NIO 的框架,例如 Apache 的 Mina,JBoss 的 Netty,Sun 的 Grizzly 等等,这些框架都直接封装了传输层的 TCP 或 UDP 协议,其中 Netty 只是一个 NIO 框架,它不需要 Web 容器的额外支持,也就是说不限定 Web 容器。
Java AIO
AIO 相关的类和接口:
java.nio.channels.AsynchronousChannel:标记一个 Channel 支持异步 IO 操作;
java.nio.channels.AsynchronousServerSocketChannel:ServerSocket 的 AIO 版本,创建 TCP 服务端,绑定地址,监听端口等;
java.nio.channels.AsynchronousSocketChannel:面向流的异步 Socket Channel,表示一个连接;
java.nio.channels.AsynchronousChannelGroup:异步 Channel 的分组管理,目的是为了资源共享。一个 AsynchronousChannelGroup 绑定一个线程池,这个线程池执行两个任务:处理 IO 事件和派发 CompletionHandler。AsynchronousServerSocketChannel 创建的时候可以传入一个 AsynchronousChannelGroup,那么通过 AsynchronousServerSocketChannel 创建的 AsynchronousSocketChannel 将同属于一个组,共享资源;
java.nio.channels.CompletionHandler:异步 IO 操作结果的回调接口,用于定义在 IO 操作完成后所作的回调工作。AIO 的 API 允许两种方式来处理异步操作的结果:返回的 Future 模式或者注册 CompletionHandler,推荐用 CompletionHandler 的方式,这些 handler 的调用是由 AsynchronousChannelGroup 的线程池派发的。这里线程池的大小是性能的关键因素。
这里举一个程序范例,简单介绍一下 AIO 如何运作。
清单 10. 服务端程序
import java.io.IOException; import java.net.InetSocketAddress; import java.nio.ByteBuffer; import java.nio.channels.AsynchronousServerSocketChannel; import java.nio.channels.AsynchronousSocketChannel; import java.nio.channels.CompletionHandler; import java.util.concurrent.ExecutionException; public class SimpleServer { public SimpleServer(int port) throws IOException { final AsynchronousServerSocketChannel listener = AsynchronousServerSocketChannel.open().bind(new InetSocketAddress(port)); //监听消息,收到后启动 Handle 处理模块 listener.accept(null, new CompletionHandler<AsynchronousSocketChannel, Void>() { public void completed(AsynchronousSocketChannel ch, Void att) { listener.accept(null, this);// 接受下一个连接 handle(ch);// 处理当前连接 } @Override public void failed(Throwable exc, Void attachment) { // TODO Auto-generated method stub } }); } public void handle(AsynchronousSocketChannel ch) { ByteBuffer byteBuffer = ByteBuffer.allocate(32);//开一个 Buffer try { ch.read(byteBuffer).get();//读取输入 } catch (InterruptedException e) { // TODO Auto-generated catch block e.printStackTrace(); } catch (ExecutionException e) { // TODO Auto-generated catch block e.printStackTrace(); } byteBuffer.flip(); System.out.println(byteBuffer.get()); // Do something } }清单 11. 客户端程序
import java.io.IOException; import java.net.InetSocketAddress; import java.nio.ByteBuffer; import java.nio.channels.AsynchronousSocketChannel; import java.util.concurrent.ExecutionException; import java.util.concurrent.Future; public class SimpleClientClass { private AsynchronousSocketChannel client; public SimpleClientClass(String host, int port) throws IOException, InterruptedException, ExecutionException { this.client = AsynchronousSocketChannel.open(); Future<?> future = client.connect(new InetSocketAddress(host, port)); future.get(); } public void write(byte b) { ByteBuffer byteBuffer = ByteBuffer.allocate(32); System.out.println("byteBuffer="+byteBuffer); byteBuffer.put(b);//向 buffer 写入读取到的字符 byteBuffer.flip(); System.out.println("byteBuffer="+byteBuffer); client.write(byteBuffer); } }清单 12.Main 函数
import java.io.IOException; import java.util.concurrent.ExecutionException; import org.junit.Test; public class AIODemoTest { @Test public void testServer() throws IOException, InterruptedException { SimpleServer server = new SimpleServer(9021); Thread.sleep(10000);//由于是异步操作,所以睡眠一定时间,以免程序很快结束 } @Test public void testClient() throws IOException, InterruptedException, ExecutionException { SimpleClientClass client = new SimpleClientClass("localhost", 9021); client.write((byte) 11); } public static void main(String[] args){ AIODemoTest demoTest = new AIODemoTest(); try { demoTest.testServer(); } catch (IOException e) { // TODO Auto-generated catch block e.printStackTrace(); } catch (InterruptedException e) { // TODO Auto-generated catch block e.printStackTrace(); } try { demoTest.testClient(); } catch (IOException e) { // TODO Auto-generated catch block e.printStackTrace(); } catch (InterruptedException e) { // TODO Auto-generated catch block e.printStackTrace(); } catch (ExecutionException e) { // TODO Auto-generated catch block e.printStackTrace(); } } }后续会专门出文章具体深入介绍 AIO 的源代码、设计理念、设计模式等等。
结束语
I/O 与 NIO 一个比较重要的区别是我们使用 I/O 的时候往往会引入多线程,每个连接使用一个单独的线程,而 NIO 则是使用单线程或者只使用少量的多线程,每个连接共用一个线程。而由于 NIO 的非阻塞需要一直轮询,比较消耗系统资源,所以异步非阻塞模式 AIO 就诞生了。本文对 I/O、NIO、AIO 等三种输入输出操作方式进行一一介绍,力求通过简单的描述和实例让读者能够掌握基本的操作、优化方法。
正文到此结束
- 本文标签: unix tar API 空间 快的 lib Security 协议 ip 管理 UDP list client queue 服务器 mina IDE TCP value schema 线程池 web db 数据 设计模式 XML Developer IOS apache 端口 配置 时间 实例 同步 文章 java windows map 代码 Select final ACE linux IBM cat 多线程 DOM 操作系统 http ORM tab 线程 Netty App 参数 src ioc
- 版权声明: 本文为互联网转载文章,出处已在文章中说明(部分除外)。如果侵权,请联系本站长删除,谢谢。
- 本文海报: 生成海报一 生成海报二
热门推荐


相关文章

近期评论
-
你这基本没有更新呀,最近文章显示还是2019年的文章。不符合要求哈
-
关键词:慕云博客 链接:https://www.lilun.me 描述:分享原创文字的个人博客
-
-
-
可以提供一下源码吗
-
不是商业站,鸡娃学习笔记
-
-
-
-
听他们说很厉害的样子
Loading...
![[HBLOG]公众号](http://www.liuhaihua.cn/img/qrcode_gzh.jpg)

