Qt学习之路(43): QDirModel
版权声明:此文章转载自豆子空间
原文链接: http://devbean.blog.51cto.com/448512/265658
作者声明:原创作品,允许转载,转载时请务必以超链接形式标明文章 原始出处 、作者信息和本声明。否则将追究法律责任。
如需转载请联系听云College团队成员小尹 邮箱:yinhy#tingyun.com
今天我们来看一个很有用的model:QDirModel。这个model允许我们在view中显示操作系统的目录结构。这次让我们先来看看运行结果:
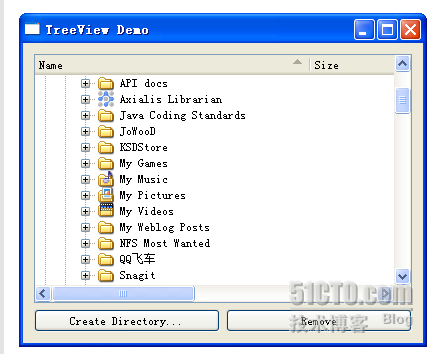
这个界面很熟悉吧?不过这可不是由QFileDialog打开的哦,这是我们自己实现的。而提供这种实现支持的,就是QDirModel和QTreeView。我们来看一下代码。
mytreeview.h #ifndef MYLISTVIEW_H #define MYLISTVIEW_H #include <QtGui> class MyTreeView : public QWidget { Q_OBJECT public: MyTreeView(); private: QDirModel *model; QTreeView *treeView; private slots: void mkdir(); void rm(); }; #endif // MYLISTVIEW_H mytreeview.cpp #include "mylistview.h" MyTreeView::MyTreeView() { model = new QDirModel; model->setReadOnly(false); model->setSorting(QDir::DirsFirst | QDir::IgnoreCase | QDir::Name); treeView = new QTreeView; treeView->setModel(model); treeView->header()->setStretchLastSection(true); treeView->header()->setSortIndicator(0, Qt::AscendingOrder); treeView->header()->setSortIndicatorShown(true); treeView->header()->setClickable(true); QModelIndex index = model->index(QDir::currentPath()); treeView->expand(index); treeView->scrollTo(index); treeView->resizeColumnToContents(0); QHBoxLayout *btnLayout = new QHBoxLayout; QPushButton *createBtn = new QPushButton(tr("Create Directory...")); QPushButton *delBtn = new QPushButton(tr("Remove")); btnLayout->addWidget(createBtn); btnLayout->addWidget(delBtn); QVBoxLayout *mainLayout = new QVBoxLayout(this); mainLayout->addWidget(treeView); mainLayout->addLayout(btnLayout); this->setLayout(mainLayout); connect(createBtn, SIGNAL(clicked()), this, SLOT(mkdir())); connect(delBtn, SIGNAL(clicked()), this, SLOT(rm())); } void MyTreeView::mkdir() { QModelIndex index = treeView->currentIndex(); if (!index.isValid()) { return; } QString dirName = QInputDialog::getText(this, tr("Create Directory"), tr("Directory name")); if (!dirName.isEmpty()) { if (!model->mkdir(index, dirName).isValid()) { QMessageBox::information(this, tr("Create Directory"), tr("Failed to create the directory")); } } } void MyTreeView::rm() { QModelIndex index = treeView->currentIndex(); if (!index.isValid()) { return; } bool ok; if (model->fileInfo(index).isDir()) { ok = model->rmdir(index); } else { ok = model->remove(index); } if (!ok) { QMessageBox::information(this, tr("Remove"), tr("Failed to remove %1").arg(model->fileName(index))); } } 构造函数中,首先我们创建了QDirModel的一个对象,并且设置ReadOnly为false,也就是说我们可以对其进行修改。而下一个setSorting()函数是对其进行排序,排序的依据也很清楚:文件夹优先(QDir::DirsFirst),忽略大小写(QDir::IgnoreCase),而且是根据名字排序(QDir::Name)。更多的规则组合可以参见 API 文档了。
然后我们创建一个QTreeView实例,并且把model设置为刚刚的QDirModel实例。然后我们开始设置QTreeView的相关属性。首先把stretchLastSection设置为true。如果把这个属性设置为true,就是说,当QTreeView的宽度大于所有列宽之和时,最后一列的宽度自动扩展以充满最后的边界;否则就让最后一列的宽度保持原始大小。第二个setSortIndicator()函数是设置哪一列进行排序。由于我们前面设置了model是按照名字排序,所以我们这个传递的第一个参数是0,也就是第1列。setSortIndicatorShown()函数设置显示列头上面的排序小箭头。setClickable(true)则允许鼠标点击列头。这样,我们的QTreeView就设置完毕了。最后,我们通过QDir::currentPath()获取当前exe文件运行时路径,并把这个路径当成程序启动时显示的路径。expand()函数即展开这一路径;scrollTo()函数是把视图的视口滚动到这个路径的位置;resizeColumnToContents()是要求把列头适应内容的宽度,也就是不产生...符号。这样,我们就通过一系列的参数设置好了QTreeView,让它能够为我们展示目录结构。
至于后面的两个slot,其实并不能理解。第一个mkdir()函数就是创建一个文件夹。
void MyTreeView::mkdir() { QModelIndex index = treeView->currentIndex(); if (!index.isValid()) { return; } QString dirName = QInputDialog::getText(this, tr("Create Directory"), tr("Directory name")); if (!dirName.isEmpty()) { if (!model->mkdir(index, dirName).isValid()) { QMessageBox::information(this, tr("Create Directory"), tr("Failed to create the directory")); } } } 正如它的代码所示,首先获取选择的目录。后面这个isValid()的判断很重要,因为默认情况下是没有目录被选择的,此时这个路径是非法的,为了避免程序出现异常,必须要有这一步判断。然后会弹出对话框询问新的文件夹名字,如果创建失败会有提示,否则就是创建成功。这时候你就可以到硬盘上的实际位置看看啦!
删除目录的代码也很类似:
void MyTreeView::rm() { QModelIndex index = treeView->currentIndex(); if (!index.isValid()) { return; } bool ok; if (model->fileInfo(index).isDir()) { ok = model->rmdir(index); } else { ok = model->remove(index); } if (!ok) { QMessageBox::information(this, tr("Remove"), tr("Failed to remove %1").arg(model->fileName(index))); } } 同样需要实现检测路径是否合法。另外需要注意的是,目录和文件的删除不是一个函数,需要调用isDir()函数检测。这一步在代码中有很清楚的描述,这里就不再赘述了。
注意,QDirModel 在最新版 Qt 中已经不建议使用了。文档中说使用 QFileSystemModel 代替。由于这两者的函数几乎一样,所以就没有对代码进行修改。与QDirModel不同的是,QFileSystemModel会启动自己的线程进行文件夹的扫描,因此不会发生因扫描文件夹而导致的主线程阻塞的现象。另外,无论 QDirModel还是QFileSystemModel都会对model结果进行缓存,如果你要立即刷新结果,前者提供了refresh()函数,而后者会通知QFileSystemWatcher类。
想阅读更多技术文章,请访问听云技术博客,访问听云官方网站感受更多应用性能优化魔力。
正文到此结束
热门推荐


相关文章

近期评论
-
你这基本没有更新呀,最近文章显示还是2019年的文章。不符合要求哈
-
关键词:慕云博客 链接:https://www.lilun.me 描述:分享原创文字的个人博客
-
-
-
可以提供一下源码吗
-
不是商业站,鸡娃学习笔记
-
-
-
-
听他们说很厉害的样子
Loading...
![[HBLOG]公众号](http://www.liuhaihua.cn/img/qrcode_gzh.jpg)

