Spring+Log4j+ActiveMQ实现远程记录日志——实战+分析
应用场景
随着项目的逐渐扩大,日志的增加也变得更快。Log4j是常用的日志记录工具,在有些时候,我们可能需要将Log4j的日志发送到专门用于记录日志的远程服务器,特别是对于稍微大一点的应用。这么做的优点有:
- 可以集中管理日志 :可以把多台服务器上的日志都发送到一台日志服务器上,方便管理、查看和分析
- 可以减轻服务器的开销 :日志不在服务器上了,因此服务器有更多可用的磁盘空间
- 可以提高服务器的性能 :通过异步方式,记录日志时服务器只负责发送消息,不关心日志记录的时间和位置,服务器甚至不关心日志到底有没有记录成功
远程打印日志的原理:项目A需要打印日志,而A调用Log4j来打印日志,Log4j的JMSAppender又给配置的地址(ActiveMQ地址)发送一条JMS消息,此时绑定在Queue上的项目B的监听器发现有消息到来,于是立即唤醒监听器的方法开始输出日志。
本文将使用两个Java项目Product和Logging,其中Product项目就是模拟线上的项目,而Logging项目模拟运行在专用的日志服务器上的项目。说明:本文的例子是在Windows平台下。
安装ActiveMQ
1. 下载: http://activemq.apache.org/download.html
2. 解压后不需要任何配置,进入到bin下对应的系统架构文件夹
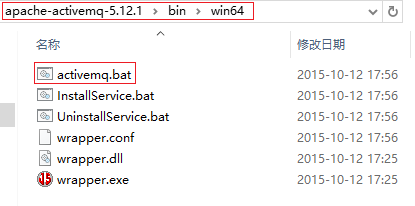
3. 双击activemq.bat启动,如果看到类似下面的页面,就代表activemq启动好了:

然后打开浏览器,输入地址:http://localhost:8161进入管理页面,用户名admin,密码admin:
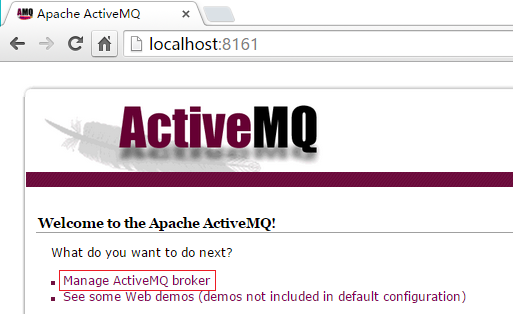
可以点击Manage ActiveMQ broker进入Queue的查看界面。
实战
我用Maven来管理项目,方便维护各种依赖的jar包。先看下项目结构:
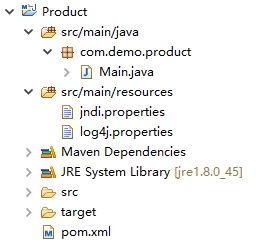
项目不复杂,主要是4个文件:pom.xml,Main.java,log4j.properties和jndi.properties
pom.xml中主要是声明项目的依赖包,其余没有什么东西了:
<!-- Use to call write log methods --> <dependency> <groupId>log4j</groupId> <artifactId>log4j</artifactId> <version>1.2.17</version> </dependency> <!-- Log4j uses this lib --> <dependency> <groupId>org.slf4j</groupId> <artifactId>slf4j-log4j12</artifactId> <version>1.7.13</version> </dependency> <!-- Spring jms lib --> <dependency> <groupId>org.springframework</groupId> <artifactId>spring-jms</artifactId> <version>4.0.0.RELEASE</version> </dependency> <!-- ActiveMQ lib --> <dependency> <groupId>org.apache.activemq</groupId> <artifactId>activemq-core</artifactId> <version>5.7.0</version> </dependency>
Main.java:
package com.demo.product; import javax.jms.Connection; import javax.jms.Destination; import javax.jms.Message; import javax.jms.MessageConsumer; import javax.jms.MessageListener; import javax.jms.Session; import org.apache.activemq.ActiveMQConnectionFactory; import org.apache.activemq.command.ActiveMQObjectMessage; import org.apache.log4j.Logger; import org.apache.log4j.spi.LoggingEvent; public class Main implements MessageListener { public Main() throws Exception { // create consumer and listen queue ActiveMQConnectionFactory factory = new ActiveMQConnectionFactory("tcp://localhost:61616"); Connection connection = factory.createConnection(); Session session = connection.createSession(false, Session.AUTO_ACKNOWLEDGE); connection.start(); //////////////注意这里JMSAppender只支持TopicDestination,下面会说到//////////////// Destination topicDestination = session.createTopic("logTopic"); MessageConsumer consumer = session.createConsumer(topicDestination); consumer.setMessageListener(this); // log a message Logger logger = Logger.getLogger(Main.class); logger.info("Info Log."); logger.warn("Warn Log"); logger.error("Error Log."); // clean up Thread.sleep(1000); consumer.close(); session.close(); connection.close(); System.exit(1); } public static void main(String[] args) throws Exception { new Main(); } public void onMessage(Message message) { try { // receive log event in your consumer LoggingEvent event = (LoggingEvent)((ActiveMQObjectMessage)message).getObject(); System.out.println("Received log [" + event.getLevel() + "]: "+ event.getMessage()); } catch (Exception e) { e.printStackTrace(); } } } 说明:然后是log4j.properties:
log4j.rootLogger=INFO, stdout, jms ## Be sure that ActiveMQ messages are not logged to 'jms' appender log4j.logger.org.apache.activemq=INFO, stdout log4j.appender.stdout=org.apache.log4j.ConsoleAppender log4j.appender.stdout.layout=org.apache.log4j.PatternLayout log4j.appender.stdout.layout.ConversionPattern=%d %-5p %c - %m%n ## Configure 'jms' appender. You'll also need jndi.properties file in order to make it work log4j.appender.jms=org.apache.log4j.net.JMSAppender log4j.appender.jms.InitialContextFactoryName=org.apache.activemq.jndi.ActiveMQInitialContextFactory log4j.appender.jms.ProviderURL=tcp://localhost:61616 log4j.appender.jms.TopicBindingName=logTopic log4j.appender.jms.TopicConnectionFactoryBindingName=ConnectionFactory
其实按理说只需要这么三个文件就可以了,但是这时候执行会报错:
javax.naming.NameNotFoundException: logTopic at org.apache.activemq.jndi.ReadOnlyContext.lookup(ReadOnlyContext.java:235) at javax.naming.InitialContext.lookup(Unknown Source) at org.apache.log4j.net.JMSAppender.lookup(JMSAppender.java:245) at org.apache.log4j.net.JMSAppender.activateOptions(JMSAppender.java:222) at org.apache.log4j.config.PropertySetter.activate(PropertySetter.java:307) ... at org.apache.activemq.ActiveMQPrefetchPolicy.<clinit>(ActiveMQPrefetchPolicy.java:39) at org.apache.activemq.ActiveMQConnectionFactory.<init>(ActiveMQConnectionFactory.java:84) at org.apache.activemq.ActiveMQConnectionFactory.<init>(ActiveMQConnectionFactory.java:137) at com.demo.product.Main.<init>(Main.java:20) at com.demo.product.Main.main(Main.java:43)
为什么会报错呢?来看看JMSAppender的javadoc文档,它是这么描述的:
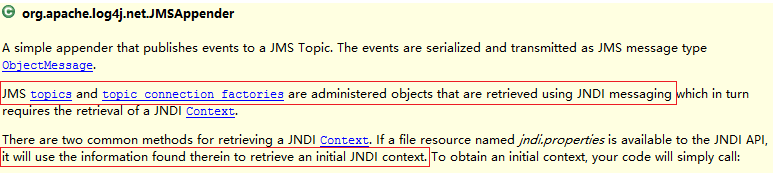
大意是说,JMSAppender需要一个jndi配置来初始化一个JNDI上下文(Context)。因为有了这个上下文才能管理JMS Topic和topic的连接。于是为项目配置一个叫jndi.properties的文件,其内容为:
topic.logTopic=logTopic
然后再运行就不会报错了。我们先来看看ActiveMQ(注意切换到Topic标签页下):
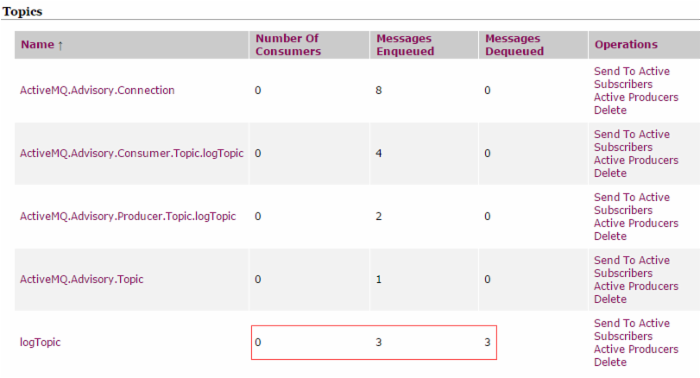
可以看到,主题为logTopic的消息,有3条进Queue,这3条也出Queue了。而出Queue的消息,已经被我们的监听器收到并打印出来了:

Spring整合
需要注意的是,本例只是一个很简单的例子,目的是阐明远程打印日志的原理。实际项目中,一般日志服务器上运行着的,不是项目,而是专用的日志记录器。下面,我们就把这个项目拆分成两个项目,并用Spring来管理这些用到的Bean
修改Product项目
修改后的Product的项目结构并没有改变,改变的只是Main类:
package com.demo.product; import org.apache.log4j.Logger; public class Main{ private static final Logger logger = Logger.getLogger(Main.class); public static void main(String[] args) throws Exception { // just log a message logger.info("Info Log."); logger.warn("Warn Log"); logger.error("Error Log."); System.exit(0); } } 这个Main类和普通的logger调用一样,仅仅负责打印日志。有没有觉得太简单了呢?
Logging项目
来看看项目结构图:
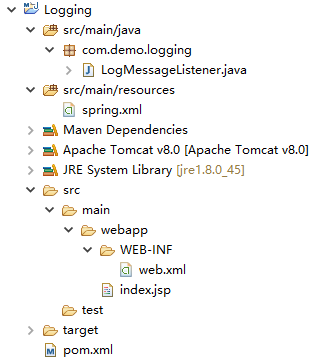
为了让监听器一直活着,我把Logging写成了一个Web项目,跑在Tomcat上。index.jsp就是个Hello World字符串而已,用来验证Logging活着。注意, 在Logging项目中,已没有Product项目中的log4j.properties和jndi.properties两个文件 。
来看看另外几个文件:
pom.xml(每个包的目的都写在注释里了):
<!-- Use to cast object to LogEvent when received a log --> <dependency> <groupId>log4j</groupId> <artifactId>log4j</artifactId> <version>1.2.17</version> </dependency> <!-- Use to receive jms message --> <dependency> <groupId>org.springframework</groupId> <artifactId>spring-jms</artifactId> <version>4.0.0.RELEASE</version> </dependency> <!-- Use to load spring.xml --> <dependency> <groupId>org.springframework</groupId> <artifactId>spring-web</artifactId> <version>4.0.0.RELEASE</version> </dependency> <!-- ActiveMQ lib --> <dependency> <groupId>org.apache.activemq</groupId> <artifactId>activemq-core</artifactId> <version>5.7.0</version> </dependency>
web.xml
<!DOCTYPE web-app PUBLIC "-//Sun Microsystems, Inc.//DTD Web Application 2.3//EN" "http://java.sun.com/dtd/web-app_2_3.dtd" > <web-app> <context-param> <param-name>contextConfigLocation</param-name> <param-value>classpath:spring.xml</param-value> </context-param> <!-- Use to load spring.xml --> <listener> <listener-class> org.springframework.web.context.ContextLoaderListener </listener-class> </listener> <welcome-file-list> <welcome-file>index.jsp</welcome-file> </welcome-file-list> </web-app>
spring.xml
<?xml version="1.0" encoding="UTF-8"?> <beans xmlns="http://www.springframework.org/schema/beans" xmlns:xsi="http://www.w3.org/2001/XMLSchema-instance" xsi:schemaLocation=" http://www.springframework.org/schema/beans http://www.springframework.org/schema/beans/spring-beans-4.0.xsd"> <bean id="jmsTemplate" class="org.springframework.jms.core.JmsTemplate"> <property name="connectionFactory" ref="connectionFactory"/> </bean> <bean id="connectionFactory" class="org.springframework.jms.connection.SingleConnectionFactory"> <property name="targetConnectionFactory" ref="targetConnectionFactory"/> </bean> <bean id="targetConnectionFactory" class="org.apache.activemq.ActiveMQConnectionFactory"> <property name="brokerURL" value="tcp://localhost:61616"/> </bean> <!-- As JMSAppender only support the topic way to send messages, thus queueDestination here is useless. <bean id="queueDestination" class="org.apache.activemq.command.ActiveMQQueue"> <constructor-arg name="name" value="queue" /> </bean> --> <bean id="topicDestination" class="org.apache.activemq.command.ActiveMQTopic"> <constructor-arg name="name" value="logTopic" /> </bean> <bean id="jmsContainer" class="org.springframework.jms.listener.DefaultMessageListenerContainer"> <property name="connectionFactory" ref="connectionFactory" /> <!-- <property name="destination" ref="queueDestination" /> --> <property name="destination" ref="topicDestination" /> <property name="messageListener" ref="logMessageListener" /> </bean> <bean id="logMessageListener" class="com.demo.logging.LogMessageListener"/> </beans>
logMessageListener指向我们自己实现的日志消息处理逻辑类,topicDestination则关注topic为“logTopic”的消息,而jmsContainer把这两个对象绑在一起,这样就能接收并处理消息了。
最后就是伟大的监听器了LogMessageListener了:
package com.demo.logging; import javax.jms.Message; import javax.jms.MessageListener; import org.apache.activemq.command.ActiveMQObjectMessage; import org.apache.log4j.spi.LoggingEvent; public class LogMessageListener implements MessageListener { public void onMessage(Message message) { try { // receive log event in your consumer LoggingEvent event = (LoggingEvent)((ActiveMQObjectMessage)message).getObject(); System.out.println("Logging project: [" + event.getLevel() + "]: "+ event.getMessage()); } catch (Exception e) { e.printStackTrace(); } } } 哈哈,说伟大,其实太简单了。但是可以看到,监听器里面就是之前Product项目中Main类里面移除的实现了MessageListener接口中的代码。
测试
在执行测试前,删掉ActiveMQ中所有的Queue,确保测试效果。
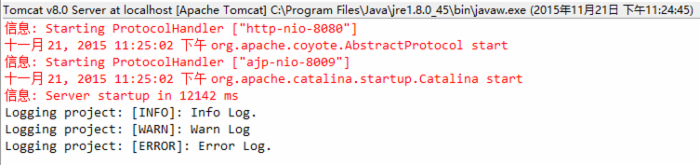
先运行Logging项目,开始Queue的监听。再运行Product的Main类的main函数,可以先看到Main类打印到控制台的日志:

接下来去看看Queue中的情况:
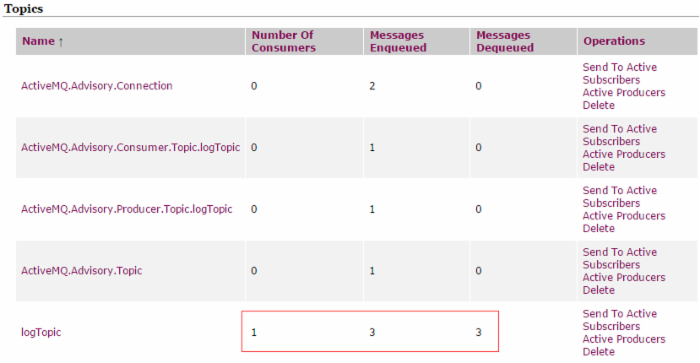
可以看到有个叫logTopic的主题的消息,进了3条,出了3条。不用想,出Queue的3条日志已经被Logging项目的Listener接收并打印出来了,现在去看看Tomcat的控制台:
还要注意Queue中的logTopic的Consumer数量为1而不是0,这与开始的截图不同。我们都知道这个Consumer是Logging项目中的LogMessageListener对象,它一直活着,是因为Tomcat一直活着;之前的Consumer数量为0,是因为在main函数执行完后,Queue的监听器(也是写日志的对象)就退出了。
通过把Product和Logging项目分别放在不同的机器上执行,在第三台机器上部署ActiveMQ(当然你可以把ActiveMQ搭建在任意可以访问的地方),再配置一下Product项目的log4j.properties文件和Logging项目的spring.xml文件就能用于生产环境啦。
JMSAppender类的分析
JMSAppender类将LoggingEvent实例序列化成ObjectMessage,并将其发送到JMS Server的一个指定Topic中, 因此,使用此种将日志发送到远程的方式只支持Topic方式发送,不支持Queue方式发送。 我们再log4j.properties中配置了这一句:
log4j.appender.jms=org.apache.log4j.net.JMSAppender
这一句指定了使用的Appender,打开这个Appender,在里面可以看到很多setter,比如:
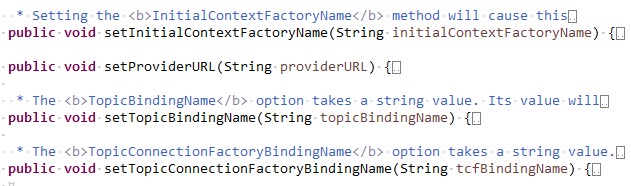
这些setter不是巧合,而正是对应了我们在log4j.properties中设置的其他几个选项:
log4j.appender.jms.InitialContextFactoryName=org.apache.activemq.jndi.ActiveMQInitialContextFactory log4j.appender.jms.ProviderURL=tcp://localhost:61616 log4j.appender.jms.TopicBindingName=logTopic log4j.appender.jms.TopicConnectionFactoryBindingName=ConnectionFactory
来看看JMSAppender的activeOptions方法,这个方法是用于使我们在log4j.properties中的配置生效的:
/** * Options are activated and become effective only after calling this method. */ public void activateOptions() { TopicConnectionFactory topicConnectionFactory; try { Context jndi; LogLog.debug("Getting initial context."); if (initialContextFactoryName != null) { Properties env = new Properties(); env.put(Context.INITIAL_CONTEXT_FACTORY, initialContextFactoryName); if (providerURL != null) { env.put(Context.PROVIDER_URL, providerURL); } else { LogLog.warn("You have set InitialContextFactoryName option but not the " + "ProviderURL. This is likely to cause problems."); } if (urlPkgPrefixes != null) { env.put(Context.URL_PKG_PREFIXES, urlPkgPrefixes); } if (securityPrincipalName != null) { env.put(Context.SECURITY_PRINCIPAL, securityPrincipalName); if (securityCredentials != null) { env.put(Context.SECURITY_CREDENTIALS, securityCredentials); } else { LogLog.warn("You have set SecurityPrincipalName option but not the " + "SecurityCredentials. This is likely to cause problems."); } } jndi = new InitialContext(env); } else { jndi = new InitialContext(); } LogLog.debug("Looking up [" + tcfBindingName + "]"); topicConnectionFactory = (TopicConnectionFactory) lookup(jndi, tcfBindingName); LogLog.debug("About to create TopicConnection."); ///////////////////////////////注意这里只会创建TopicConnection//////////////////////////// if (userName != null) { topicConnection = topicConnectionFactory.createTopicConnection(userName, password); } else { topicConnection = topicConnectionFactory.createTopicConnection(); } LogLog.debug("Creating TopicSession, non-transactional, " + "in AUTO_ACKNOWLEDGE mode."); topicSession = topicConnection.createTopicSession(false, Session.AUTO_ACKNOWLEDGE); LogLog.debug("Looking up topic name [" + topicBindingName + "]."); Topic topic = (Topic) lookup(jndi, topicBindingName); LogLog.debug("Creating TopicPublisher."); topicPublisher = topicSession.createPublisher(topic); LogLog.debug("Starting TopicConnection."); topicConnection.start(); jndi.close(); } catch (JMSException e) { errorHandler.error("Error while activating options for appender named [" + name + "].", e, ErrorCode.GENERIC_FAILURE); } catch (NamingException e) { errorHandler.error("Error while activating options for appender named [" + name + "].", e, ErrorCode.GENERIC_FAILURE); } catch (RuntimeException e) { errorHandler.error("Error while activating options for appender named [" + name + "].", e, ErrorCode.GENERIC_FAILURE); } } 上面初始化了一个TopicConnection,一个TopicSession,一个TopicPublisher。咱们再来看看这个Appender的append方法:
/** * This method called by {@link AppenderSkeleton#doAppend} method to do most * of the real appending work. */ public void append(LoggingEvent event) { if (!checkEntryConditions()) { return; } try { ObjectMessage msg = topicSession.createObjectMessage(); if (locationInfo) { event.getLocationInformation(); } msg.setObject(event); topicPublisher.publish(msg);///////////////注意这一句////////////// } catch (JMSException e) { errorHandler.error("Could not publish message in JMSAppender [" + name + "].", e, ErrorCode.GENERIC_FAILURE); } catch (RuntimeException e) { errorHandler.error("Could not publish message in JMSAppender [" + name + "].", e, ErrorCode.GENERIC_FAILURE); } } 这里使用TopicPublisher.publish()方法,把序列化的消息发布出去。可见这也证明了JMSAppender只支持以Topic方式发送消息。
样例下载:百度网盘
链接: http://pan.baidu.com/s/1pJF1ybx 密码: x5r6
参考:
http://activemq.apache.org/how-do-i-use-log4j-jms-appender-with-activemq.html
正文到此结束
- 本文标签: 实例 Connection 下载 Security java maven cat 代码 HTML consumer ACE connectionFactory spring windows tar 管理 App provider Word queue classpath NSA CTO 百度 http message 测试 js IDE 空间 final core ActiveMQ ORM 服务器 struct UI TCP list src JMS bean root ip 系统架构 注释 value lib 监听器 Action web tomcat 配置 XML schema Logging Property apache pom 安装 时间
- 版权声明: 本文为互联网转载文章,出处已在文章中说明(部分除外)。如果侵权,请联系本站长删除,谢谢。
- 本文海报: 生成海报一 生成海报二
热门推荐


相关文章

近期评论
-
你这基本没有更新呀,最近文章显示还是2019年的文章。不符合要求哈
-
关键词:慕云博客 链接:https://www.lilun.me 描述:分享原创文字的个人博客
-
-
-
可以提供一下源码吗
-
不是商业站,鸡娃学习笔记
-
-
-
-
听他们说很厉害的样子
Loading...
![[HBLOG]公众号](http://www.liuhaihua.cn/img/qrcode_gzh.jpg)

