Core Animation 3D 绘图(上)
这是关于 Core Animation 三维绘图的翻译文第一篇(共两篇),主要讲了 iOS 中做三维变换时所需要用到的一些基础知识,原文是 Think & Build 上的 Introduction to 3D drawing in core animation (Part 1) 。
想要把玩一下完整项目的话,可以去原文中的 Github 地址中看看,不过文中附带的代码已经是项目中最核心的部分了,组合起来也可以得到一样的效果。
因为翻译这篇文章的时间已经比较久远了,难免有一些错误的地方,欢迎大家指出来共同进步。
Core Animation 可以让我们在不直接使用 OpenGL 的情况下实现某些 3D 效果,但是相对的,使用 Core Animation 来写一个复杂的 3D 游戏就不是那么明智了。
这一部分的文章将会探讨一下简单的 3D 绘图的理论,并且构建一个简易的 3D 场景。下一部分的文章将会用 Core Animation 来创建一个更复杂一些的 3D 场景。
要是想把这些代码跑起来的话,首先要记得将 QuartzCore 框架添加到项目中。
3D 和 矩阵(外加一点点数学运算…)
在三维空间绘图,意味着我们需要在传统的二维空间坐标系中加入一个深度,也就是我们高中数学中的 Z 轴。
在这个全新的坐标系中,通过改变 X、Y 和 Z 坐标的数值,我们可以将物体水平、垂直和远近移动(想象你在看着手机屏幕,距离你的脸越近的物体 Z 值越大)。

无论在二维还是三维空间中,要让物体产生位移或形变,比如移位、缩放和旋转,都需要经过一点数学运算。使用矩阵是做这些运算最合理的方式。
简单来说,矩阵就相当于多维数组。举个例子,在三维空间中,我们会使用一个 4x4 的矩阵来表示坐标:
[X][0][0][0]
[0][Y][0][0]
[0][0][Z][0]
[0][0][0][1]
把这个矩阵跟对象每一点的坐标相乘,我们就可以让这个对象发生位移或形变。
再准确一些,这个矩阵是一组比例系数。通过它,按比例地改变每一条坐标轴上的数值,以达到缩放这个对象的目的。
同理,如果想要实现其他效果,例如旋转和位移,那么你只要改变一下上述矩阵中的数值就可以了。


莫慌!你不需要完全弄懂这些原理性的东西,而且你也基本不会直接用到。Core Animation 已经像一个黑盒一样帮你完成了这一切。
话说回来,了解一下代码底层到底在做些什么总归是好的。如果你想要更详细地学习一下关于矩阵的一切,可以参考 这篇文章 。
三维变换
现在你已经对三维空间和矩阵的作用有了一些概念,是时候用 Core Animation 创建一些东西了。下面有几个准备好了的方法,分别会做一些不同的事情,我们一个个来看。
A_singlePlane 实现了一个绕Y轴旋转了45度的圆角矩形。
首先,我们创建一个 CALayer 来作为接下来的一切操作的容器(虽然不是必须的,但是感觉要比直接在一个 view 的 layer 上面操作要好)。
- (void)A_singlePlane{
    // Create the container
    CALayer *container = [CALayer layer];
    container.frame = CGRectMake(0, 0, 640, 300);
    [self.view.layer addSublayer:container];
}
接下来我们创建另一个 CALayer ,一个圆角矩形。
//Create a Plane
CALayer *purplePlane =
 [self addPlaneToLayer:container
 size:CGSizeMake(100, 100)
 position:CGPointMake(100, 100)
 color:[UIColor purpleColor]];
这里用到了一个工具方法,只是单纯的创建一个 CALayer ,加到 container 当中,然后返回这个 CALayer 。代码非常简单:
- (CALayer *)addPlaneToLayer:(CALayer*)container size:(CGSize)size position:(CGPoint)point color:(UIColor*)color {
    //Initialize the layer
    CALayer *plane = [CALayer layer];

    //Define position,size and colors
    plane.backgroundColor = [color CGColor];
    plane.opacity = 0.6;
    plane.frame = CGRectMake(point.x, point.y, size.width, size.height);
    plane.borderColor = [[UIColor colorWithWhite:1.0 alpha:0.5]CGColor];
    plane.borderWidth = 3;
    plane.cornerRadius = 10;

    //Add the layer to the container layer
    [container addSublayer:plane];

    return plane;
}
最后我们用 CATransform3D 来完成这个变换。
什么是 CATransform3D ?Cmd + click 这个数据类型,你会发现这是一个结构体,代表着一个有点奇怪的矩阵:
struct CATransform3D
{
  CGFloat m11, m12, m13, m14;
  CGFloat m21, m22, m23, m24;
  CGFloat m31, m32, m33, m34;
  CGFloat m41, m42, m43, m44;
};

typedef struct CATransform3D CATransform3D;
真正产生变换作用的代码也是非常简单:
//Apply the transform to the PLANE
CATransform3D t = CATransform3DIdentity;
t = CATransform3DRotate(t, 45.0f * M_PI / 180.0f, 0, 1, 0);
purplePlane.transform = t;
首先用 CATransform3DIdentity 来初始化一个 CATransform3D ,这个 CATransform3DIdentity 相当于是一个空值。然后我们通过 CATransform3DRotate 这个方法来完成前面提到过的“与旋转矩阵相乘”这个步骤。
这个方法需要几个参数:一个初始矩阵、旋转角(弧度制)和三个坐标轴的影响系数(表示产生多少作用的一个比例系数)。在这个例子中,X 和 Z 轴没有被影响到,而 Y 轴是完全被影响…简而言之,这个对象最后是绕着Y轴旋转了 45 度。
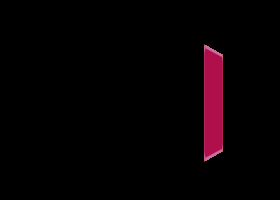
下图就是这个例子的最终效果:
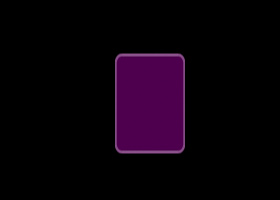

嗯…?它完全不像一个三维图啊!我们只看到了一个沿着 X 轴压缩了一点的矩形。
问题在于我们没有设置它的 透视数值( perspective value ) 。通常我们会用正面投影的方法来实现平面上的三维画面,但是这样产生的是一个变平了的三维图像。换句话说,用了正面投影之后,你就难以察觉 Z 轴变化带来的景深变化了。
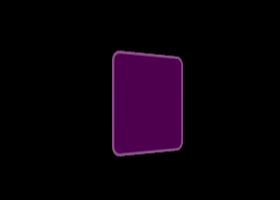
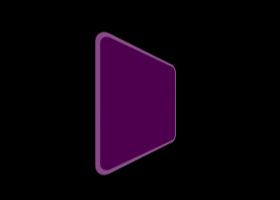
为了给我们的画面添加景深,我们要调整变换矩阵的 m34 数值,这个变量决定了视图的透视值。
代码跟前面的很像,只有变换的部分有些不同:
//Apply transformation to the PLANE
CATransform3D t = CATransform3DIdentity;
//Add the perspective!!!
t.m34 = 1.0/ -500;
t = CATransform3DRotate(t, 45.0f * M_PI / 180.0f, 0, 1, 0);
purplePlane.transform = t;
我们可以像这样直接改变 m34 属性的值。
就不继续深入研究这个值带来的数学上的影响了,但是要大概明确一点,这个值越接近于零,透视就越明显。
下面是不同 m34 值对应的不同结果:


三维变换链
为了给单一的对象套上不止一种变换,我们可以通过矩阵相乘的方式来实现。
举个例子,如果我们想同时把对象旋转一下并移开一点,我们可以这样构造我们的变换矩阵:
TransformMatrix = TranslateMtx * RotateMtx
在数学上,乘法是满足交换律的,但是矩阵相乘 不满足交换律 !也就是说,AxB 不等于 BxA。这一点必须要牢记在心!
下面这个例子中,我们会对两个不同的对象施以相同的变换,但是变换的顺序不一样。看看主要的代码:
//Apply transformation to the PLANES
CATransform3D t = CATransform3DIdentity;

//Purple plane: Perform a rotation and then a translation
t = CATransform3DRotate(t, 45.0f * M_PI / 180.0f, 0, 0, 1);
t = CATransform3DTranslate(t, 100, 0, 0);
purplePlane.transform = t;

//reset the transform matrix
t = CATransform3DIdentity;

//Red plane: Perform translation first and then the rotation
t = CATransform3DTranslate(t, 100, 0, 0);
t = CATransform3DRotate(t, 45.0f * M_PI / 180.0f, 0, 0, 1);
redPlane.transform = t;
看看结果:
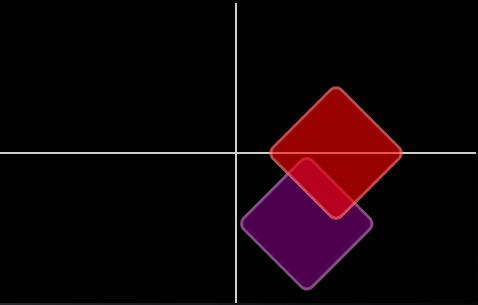

瞧瞧,不一样了吧。
来看看紫色的方块:我们先对它进行了一次旋转变换,这引起了它坐标系的旋转。下一步,我们改变了紫色方块的 X 坐标,这一改变是在新坐标系上进行的,所以结果就是跟红色方块不一样了。
下面的图片应该可以让你有一个更形象的概念:


图层层次(Layer Hierarchies)是个啥?
不知道你注意到了没,到现在为止,我们都是直接对这些方块对象实施变换的。在一个三维场景中,通常是创建一组对象,组成一个带有层次感的画面,然后对层次的根对象进行变换。
再举个栗子。
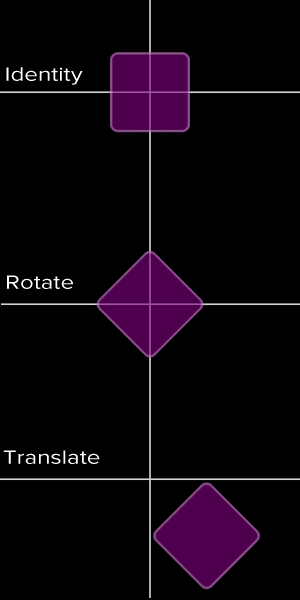
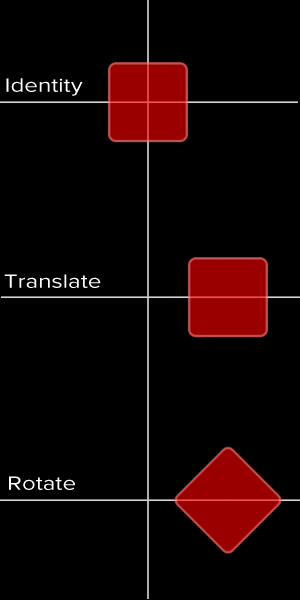
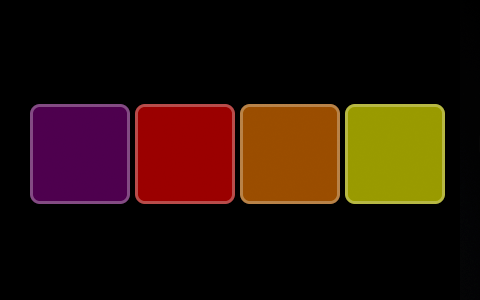
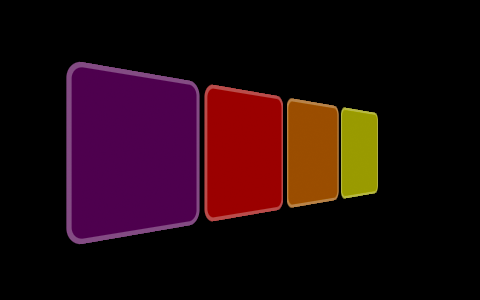
我们把 4 个方块加入到容器里面。
不进行任何变换,看起来就像这个样子:

接着,对每一个方块都进行一次绕 Y 轴的旋转,我们会看到如下画面:

然而,如果这个变换是直接作用在容器图层上的,景色又完全不同了:

我们可以把最后面这幅图看作是摄像机位置的改变。也就是说,我们没有移动这些方块,而是我们的视角改变了。
上述的两种变换对应下面的代码:
//Transformation
CATransform3D t = CATransform3DIdentity;

BOOL applyToContainer = NO;

//Apply the transformation to each PLANE
if(!applyToContainer){
    t.m34 = 1.0 / -500.0;
    t = CATransform3DRotate(t, degToRad(60.0), 0, 1, 0);
    purplePlane.transform = t;

    t = CATransform3DIdentity;
    t.m34 = 1.0 / -500.0;
    t = CATransform3DRotate(t, degToRad(60.0), 0, 1, 0);
    redPlane.transform = t;

    t = CATransform3DIdentity;
    t.m34 = 1.0 / -500.0;
    t = CATransform3DRotate(t, degToRad(60.0), 0, 1, 0);
    orangePlane.transform = t;

    t = CATransform3DIdentity;
    t.m34 = 1.0 / -500.0;
    t = CATransform3DRotate(t, degToRad(60.0), 0, 1, 0);
    yellowPlane.transform = t;
}

//Apply the transformation to the CONTAINER
else{
    CATransform3D t = CATransform3DIdentity;
    t.m34 = 1.0/-500;
    t = CATransform3DRotate(t, degToRad(60.0), 0, 1, 0);
    container.transform = t;
}
来认识一下 CATransformLayer
目前为止一切看起来都很顺利。不过,其实 CALayer 并不适合作为三维图层层次的根。
来看看为什么。
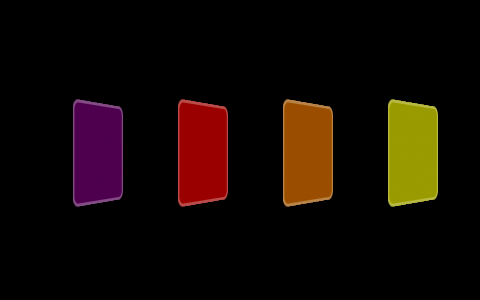
现在我们创建 4 个 X、Y 坐标都一样的方块,唯一不同的是它们的 Z 坐标。紫色方块是距离你最近的,黄色方块时距离你最远的。
//Apply transforms to the PLANES
t = CATransform3DIdentity;
t = CATransform3DTranslate(t, 0, 0, -10);
purplePlane.transform = t;

t = CATransform3DIdentity;
t = CATransform3DTranslate(t, 0, 0, -50);
redPlane.transform = t;

t = CATransform3DIdentity;
t = CATransform3DTranslate(t, 0, 0, -90);
orangePlane.transform = t;

t = CATransform3DIdentity;
t = CATransform3DTranslate(t, 0, 0, -130);
yellowPlane.transform = t;
然后,我们像之前那样让整个容器旋转一下。
//Apply transform to the CONTAINER
CATransform3D t = CATransform3DIdentity;
t.m34 = 1.0/-500;
t = CATransform3DRotate(t, 80.0f * M_PI / 180.0f, 0, 1, 0);
container.transform = t;
是不是觉得应该要看到这个场景:


但结果却是:

这是因为, CALayer 并不能处理三维图层层次的景深,所以它只是把所有的东西在同一个 Z 平面上压扁了。
为了达到预想的效果,我们要用 CATransformLayer 来作为根对象。
Bug fixed:
//Create the container as a CATransformLayer
CATransformLayer *container = [CATransformLayer layer];
container.frame = CGRectMake(0, 0, 640, 300);
[self.view.layer addSublayer:container];
要记住, CATransformLayer 是一个特殊的图层,与 CALayer 非常不同的是,它只会渲染自己的子图层,而 backgroundColor 、 contents 、 border 等等这些属性则会被完全忽略掉。
总结
那么第一部分的内容翻译就到此为止了,下半部分也会在整理好之后的第一时间放出来。建议大家去玩玩这些代码,最好试试看上面没有提到的 CATransform3DScale 咯。
再一次附上原文: Introduction to 3D drawing in core animation (Part 1)
正文到此结束
热门推荐


相关文章


Loading...
![[HBLOG]公众号](http://www.liuhaihua.cn/img/qrcode_gzh.jpg)

