基础 Swoole 及 Yaf 的开发框架
yaf项目快速开发(兼容php7):
yaf project rapid development, integration of the db action class support chain operation, support separate read and write, pdo, mysqli, mongo, upload operation, adding redis operations and weixin sharing, will then join weixin pay 集成了db操作类支持链式操作,支持读写分离,pdo,mysqli,mongo,upload操作, 加入redis操作以及微信分享,加入微信支付,加入swoole的支持, 已支持swoole_http_server,swoole_websocket_server,高并发抢购、秒杀,数组算法处理等,添加了后台admin模块,集成表格树!添加基于swoole的数据库连接池,支持自定义加载目录类文件和函数文件(通过插件的形式实现的) 在/application/controllers/Index.php里添加了yac、yaconf的使用,通过yac实现高并发计数器,加入swoole实现简单的视频直播
swoole实现简单的视频直播
需要php以cli模式运行/server/swoole/SwooleLiveServer.php 录制视频页面 http://localhost/index/swoolelivecamera 接受视频页面 http://localhost/index/swoolelive

composer 安装
{ "require": { "yaffastdemo/yaf": "dev-master" } }
数据库连接池使用方法
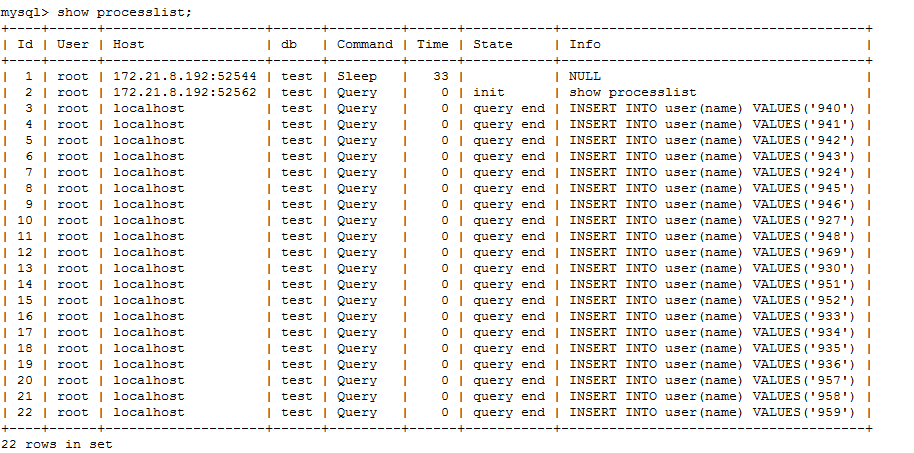
服务文件在/server/mysql/DbServer.php 简单地封装文件在/application/library/mysql/dbclient.php 配置在conf/application.ini中 ;数据库连接池配置 DbServer.async=true //配置是同步执行还是异步执行,默认不配置代表异步执行,同步执行设置为false DbServer.multiprocess=false //配置是否启用多进程,默认不配置代表单进程阻塞模式,多进程模式要设置为true DbServer.pool_num=20 //配置连接池mysql的数量 DbServer.port=9501 DbServer.logfile="/server/log/DbServer.log" DbServer.localip="192.168.2.13" 使用方法: $dbclient=new mysql_dbclient; //print_r($data); for ($i=0; $i <100 ; $i++) { $dbclient->query("INSERT INTO user(name) VALUES('$i')"); //echo "INSERT INTO user(name) VALUES('$i')"; } $data=$dbclient->query("select * from user"); $dbclient->close(); print_r($data); exit; 数据库连接池多进程执行如下:
后台访问:http://localhost/admin/user/index
添加了红包生成算法(拼手气红包和普通红包),详情见: https://github.com/qieangel2013/php_ext_zqf
需要安装php扩展zqf $obj=new zqf(); 第一个参数是红包总额,第二个人参数红包数量,第三个参数默认代表拼手气红包,设置为1的话为普通红包 拼手气红包 $hongb= $obj->hongbao(10,8);或者$hongb= $obj->hongbao(10,8,0);返回数组为Array ( [0] => 1.33 [1] => 1.02 [2] => 1.28 [3] => 0.44 [4] => 1.37 [5] => 0.81 [6] => 1.81 [7] => 1.94 ) 普通红包,每个人数额一样设置第三个参数 $hongb= $obj->hongbao(10,8,1);返回数组为Array ( [0] => 1.25 [1] => 1.25 [2] => 1.25 [3] => 1.25 [4] => 1.25 [5] => 1.25 [6] => 1.25 [7] => 1.25 ) var_dump($hongb);
添加了全局变量适用于高并发抢购、秒杀,数组算法处理等详情见: https://github.com/qieangel2013/php_ext_zqf
需要安装php扩展zqf 首先安装php扩展zqf.so phpize来安装 然后在php文件调用 dl('zqf.so');或者phpini里加载 $obj=new zqf(); $counter= $obj->autoadd(0,1,0);(声明只针对多线程) echo $counter; 添加了分页类
$Page = new Page($count,$pageoffset); $show = $Page->show();
添加了swoole的task服务器,并实现拆包处理任务算法
$task=new swoole_taskclient(); //拆分数据算法 $count_num_pre=$data['prenum']; $count_num=$data['appendnum']; $count_size=10000;//拆分数据算法 if($count_num>$count_size){ $z_str=floor($count_num/$count_size); $y_str=fmod($count_num,$count_size); $data['explodenum']=$y_str==0?$z_str:$z_str+1; for ($i=1; $i <$z_str+1 ; $i++) { $data['appendnum']=$count_size; $data['explodecount']=$i; $task->connect(json_encode($data)); $data['prenum'] +=$count_size; } if($y_str){ $data['appendnum']=$y_str; $data['explodecount']=$z_str+1; $task->connect(json_encode($data)); }}else{ $task->connect(json_encode($data)); } 添加了验证码类
$config = array( 'fontSize' => 30, // 验证码字体大小 'length' => 4, // 验证码位数 'useNoise' => true, // 关闭验证码杂点 ); $Verify = new Verify($config); $Verify->entry();
添加了生成二维码功能,详情见: https://github.com/qieangel2013/php_ext_zqf
需要安装php扩展zqf $obj=new zqf(); $obj->savefile('https://www.baidu.com/s?wd=昌平香堂','./test.png',500);第一个参数是url,第二参数是保存路径,第三个参数是二维码长或者宽 生成透明二维码,详情见: https://github.com/qieangel2013/php_ext_zqf
$obj=new zqf(); $obj->savefile('https://www.baidu.com/s?wd=昌平香堂','./test.png',500,1);第一个参数是url,第二参数是保存路径,第三个参数是二维码长或者宽,第四个参数是决定是否透明,默认是不透明的 自定义自动加载配置如下:
;可以任意加载多个目录类和目录函数用,隔开 例如:application.autolibrary='job,common';application.autofunction='pro,function' 支持深度查找目录,如果不想开启可以不用配置 application.autolibrary='common' application.autofunction='function' ;如果不想开启可以不用配置
db操作类读写分离配置如下:
;数据库驱动类型 database.config.type='mysql' ;服务器地址 database.config.host='192.168.0.1,192.168.0.2' ;数据库名 database.config.name='root' ;用户名 database.config.user='user1,user2' ;密码 database.config.pwd='pwd1,pwd2' ;端口 database.config.port= '3306' ;启用字段缓存 database.config.fields_cache=false ;数据库编码默认采用utf8 database.config.charset='utf8' ;数据库部署方式:0 集中式(单一服务器),1 分布式(主从服务器) database.config.deploy_type=1 ;数据库读写是否分离 主从式有效 database.config.rw_separate=true ;读写分离后 主服务器数量 database.config.master_num=1 ;指定从服务器序号 database.config.slave_no=''
db操作类使用方法如下:
$where=array('id' =>37936); $user=new HbModel('hb_users');//直接实例化给表名就行了,其他跟操作thinkphp一样 $result=$user->where($where)->select();//支持链式操作,支持pdo,mysqli,mongo echo $user->getlastsql(); print_r($result); exit; redis操作使用方法如下:
$this->_redis=new phpredis();//需要安装redis扩展 $this->_redis->set('token',1); upload操作使用方法如下:
$config=Yaf_Application::app()->getConfig()->upload->config->toArray(); $ftpconfig=Yaf_Application::app()->getConfig()->ftp->config->toArray(); $upload=new Upload($config, 'Ftp',$ftpconfig); $info=$upload->upload(); if (!$info) {// 上传错误提示错误信息 echo $upload->getError(); } else {// 上传成功 if (!empty($info["UpLoadFile"])) $pic=array("cate_pic" => $info["UpLoadFile"]['savepath'] . $info["UpLoadFile"]['savename']); print_r($pic); } 微信分享操作使用方法如下:
//微信分享 $jssdk=new wx_share_wxshare("你的appId", "你的appSecret"); $signPackage=$jssdk->GetSignPackage();; $data['appId']=$signPackage['appId']; $data['nonceStr']=$signPackage['nonceStr']; $data['timestamp']=$signPackage['timestamp']; $data['signature']=$signPackage['signature']; $this->getView()->assign("token", json_encode($data)); 微信支付操作使用方法如下:(具体操作在weixin控制器里)
$jsApi = new wx_pay_JsApi(); $oid=123;//订单id $userid=456;//用户id $wx_openid='';//微信授权id if(empty($wx_openid)){ if (!isset($_GET['code'])) { $url = wx_pay_config::JS_API_CALL_URL; $url = str_replace('%oid%', $oid, $url); $url = str_replace('%uid%', $userid, $url); $url = $jsApi->createOauthUrlForCode($url); Header("Location: $url"); } else { $code = $_GET['code']; $jsApi->setCode($code); $openid = $jsApi->getOpenId(); } }else{ $openid = $wx_openid; } $unifiedOrder = new wx_pay_UnifiedOrder(); $unifiedOrder->setParameter("body", "test"); //商品描述 $unifiedOrder->setParameter("out_trade_no", "1111111111"); //商户订单号 $unifiedOrder->setParameter("total_fee", "0101"); //总金额 $total $unifiedOrder->setParameter("notify_url", wx_pay_config::NOTIFY_URL); //通知地址 $unifiedOrder->setParameter("trade_type", "JSAPI"); //交易类型 $unifiedOrder->setParameter("openid", $openid); //用户标识 $prepay_id = $unifiedOrder->getPrepayId(); $jsApi->setPrepayId($prepay_id); $jsApiParameters = $jsApi->getParameters(); swoole作为http_server操作使用方法如下:
根目录下有server集成了swoole服务端 (后台运行直接php执行) HttpServer.php (linux环境下直接执行php HttpServer.php) http_server实现原理是把swoole作为底层处理请求,然后通过php-cli把url交给 yaf来处理,yaf只是作为一个框架使用
swoole作为http_server的调用如下:
在浏览器里输入http://www.xxx.com:9501/index/swoolehttp,生产环境可以把监听端口改为80 public function swoolehttpAction(){ Yaf_Dispatcher::getInstance()->autoRender(FALSE); $where=array('id' =>37936); $user=new HbModel('hb_users');//直接实例化给表名就行了,其他跟操作thinkphp一样 $result = $user->where($where)->select(); //echo $user->getlastsql(); // echo json_encode( $result); echo json_encode( $where);//通过swoole返回给浏览器结果{"id":37936} } swoole作为websocket_server操作使用方法如下:
根目录下有server集成了swoole服务端 (后台运行直接php执行) WebSocketServer.php (linux环境下直接执行php WebSocketServer.php) websocket_server实现原理是把swoole作为websocket服务器,然后通过php-cli把参数传给 yaf来处理,yaf来处理逻辑
swoole作为websocket_server的调用如下:
在浏览器里输入http://www.xxx.com/index/swoolesocket public function swoolesocketAction(){ Yaf_Dispatcher::getInstance()->autoRender(FALSE); $this->getView()->display("index/swoolesocket.html"); } html请求websocket
<!DOCTYPE html> <html> <head> <title></title> <script type="text/javascript" src="/public/js/jquery-1.8.0.min.js"></script> <style> #chatLog {width:440px; height:200px; border:1px solid #7F9DB9; overflow:auto;margin-bottom: 20px} </style> <meta charset="UTF-8"> <script type="text/javascript"> var exampleSocket = new WebSocket("ws://192.168.1.46:9503");//设为相应的监听ip及端口号 exampleSocket.onopen = function (event) { exampleSocket.send("亲!我连上啦!"); }; exampleSocket.onmessage = function (event) { console.log(event.data); $('#chatLog').append('<br/>'+event.data); } exampleSocket.onclose = function(event) { console.log('Client notified socket has closed',event); }; </script> </head> <body> <div id="chatLog" ></div> <input type="text" id="content"> <button onclick="exampleSocket.send( document.getElementById('content').value )">发送</button> <button onclick="exampleSocket.send('smes_closed')">关闭</button> </body> </html> 如果你对我的辛勤劳动给予肯定,请给我捐赠,你的捐赠是我最大的动力

正文到此结束
- 本文标签: Select 开发 http cache mysql 端口 线程 数据 Document 参数 ask Action linux tab 数据库 UI HTML 分页 src JavaScript 服务器 jquery 插件 lib message root js 配置 App 二维码 client Job PHP https 安装 GitHub value example 1111 web git sql 多线程 json ftp 红包 java ip cat API 实例 同步 ACE 目录 db 进程 redis
- 版权声明: 本文为互联网转载文章,出处已在文章中说明(部分除外)。如果侵权,请联系本站长删除,谢谢。
- 本文海报: 生成海报一 生成海报二
热门推荐


相关文章


Loading...
![[HBLOG]公众号](http://www.liuhaihua.cn/img/qrcode_gzh.jpg)

