从零开始开发一款H5小游戏(四) 撞击吧粒子,炫酷技能的实现
本系列文章对应游戏代码已开源 Sinuous game 。
本游戏有五种技能粒子,分别是 "护盾","重力场","时间变慢","使敌人变小","增加生命"。Player粒子吃了技能粒子后就能表现各种特殊效果。
碰撞检测
游戏中Player粒子可能会撞击到Enemy粒子,也可能吃到Skill粒子。我们怎么来判断呢?画布中两个粒子的碰撞检测其实很简单,如果是圆形粒子,只需要判断两个粒子圆心的距离是否小于两个圆半径之和就行了。
//index.js function collision(enemy, player) { const disX = player.x - enemy.x; const disY = player.y - enemy.y; return Math.hypot(disX, disY) < (player.radius + enemy.radius); } 撞击敌人
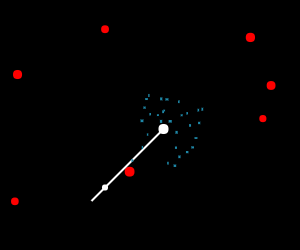
撞击后Enemy粒子尾巴上的生命点会减一,并且Player身体出现闪烁,接着会有蓝色粒子爆炸的效果。
前面我们已经讲过尾巴上的生命点如何实现,这时候只需要将生命点值 livesPoint 减一就可以了。
Player的闪烁怎么实现呢?如果将这个过程拆解一下,其实闪烁效果就是在一段时间内,Player的颜色不断随机地做蓝白变化。这里只要控制两个变量,闪烁时间和闪烁颜色。
在 collision 检测到碰撞的时候,会调用一个flash方法。这个方法有两个作用,一是控制闪烁的时间,通过flashing, 判断是否渲染闪烁效果。二是当时间结束后,我们需要重置Player的颜色为默认的蓝色。
//Player.js flash() { let self = this; self.flashing = true; let timeout = setTimeout(function() { self.flashing = false; self.color = BODYCOLOR; clearTimeout(timeout); }, 500); } 在整个Player的 render 方法中, 如果 flashing 标记为 true ,则控制Player的颜色在两个随机值间切换。这样每次render调用所产生的颜色就有所不同,实现随机闪烁的效果。
render() { //闪烁效果 if (this.flashing) { this.color = ["#fff", BODYCOLOR][Math.round(Math.random())]; } } 爆炸的实现其实也很简单。同样的方法,我们将这个过程分解一下:多个粒子以撞击点为原点,向随机方向做速度不同的运动,到达某个边界距离时,粒子消失。
这里我们要确定哪些变量呢?粒子的数量和颜色大小、爆炸原点位置、粒子的运动方向和速度,粒子消失的边界值。由于这些属性比较多,所以还是独立出来一个爆炸粒子的类 Particle.js
//Particle.js /** * 爆炸粒子 */ import map from './Map'; const rand = Math.random; export default class Particle { constructor(options) { this.x = options.x; this.y = options.y; this.vx = -2 + 4 * rand(); //速度随机 this.vy = -2 + 4 * rand(); //速度随机 this.destroy = false; this.speed = 0.04; //粒子消失的速度 this.size = options.size || 2; this.color = options.color || "rgb(30,136,168)"; this.width = this.size + rand() * 2; //粒子大小 this.height = this.size + rand() * 2; //粒子大小 } update() { //向x轴和y轴的运动 this.x += this.vx; this.y += this.vy; //粒子不断变小 this.width -= this.speed; this.height -= this.speed; //粒子消失时,将状态至为destroy,不再渲染 if (this.width < 0) { this.destroy = true; } } render() { map.ctx.fillStyle = this.color; map.ctx.fillRect(this.x, this.y, this.width, this.height); } } 同样,在检测到碰撞时,会调用boom方法, 该方法初始化所有爆炸粒子,由于爆炸需要一个过渡的过程,所以不能像闪烁一样用简单的时间控制,这样会照成爆炸到一半突然所有粒子消失的情况。
//Player.js boom(x, y, color, size) { let self = this; let eachPartical = []; for (let i = 0; i < self.particleCount; i++) { eachPartical.push(new Particle({x, y, color, size})); } self.particles.push(eachPartical); } 在整个大render方法中,调用renderBoom方法,当某个爆炸粒子达到边界值时,就将其从数组中剔除。达到粒子渐渐消失,不断变少的效果。
//Player.js renderBoom() { for (let i = 0; i < this.particles.length; i++) { let eachPartical = this.particles[i]; for (let j = 0; j < eachPartical.length; j++) { //爆炸粒子消失时,从数组中排除 if (eachPartical[j].destroy) { eachPartical.splice(j, 1); } else { eachPartical[j].render(); eachPartical[j].update(); } } } } render() { //爆炸 if (self.particles.length) self.renderBoom(); } 最后还要做一件事,就是将撞击的Enemy粒子从数组中除去,并重新随机生成一个。
护盾

知道了Enemy撞击效果的实现,护盾效果实现起来就简单很多了。试着分解一下护盾撞击的整个动作,就能清晰地用代码描述出来,这里就不细讲了。
有所不同的就是护盾撞击的判断,他的撞击点变成了外圈,而不是粒子本身。所以需要对 collosion 做点修改。
function collision(enemy, player) { const disX = player.x - enemy.x; const disY = player.y - enemy.y; if (player.hasShield) { return Math.hypot(disX, disY) < (player.shieldRadius + enemy.radius); } return Math.hypot(disX, disY) < (player.radius + enemy.radius); } 细心的话会注意到护盾撞击粒子后右上角有分数增加,这些数字会出现并渐隐。他的实现原理跟爆炸粒子相似,我们用一个数组来存储撞击位置,并在render将数组渲染出来,每个粒子达到边界值时将其删除,same thing。
重力场
重力场这个效果其实是最难的,它需要找到一条公式来完美描述粒子的运动轨迹。尝试了很多种方法还是没能达到很好的效果。这里主要讲一下我的实现思路。
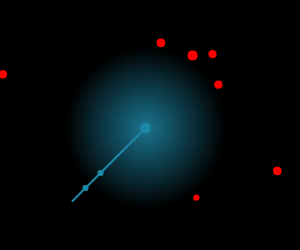
首先重力场的渲染原理跟护盾差不多,都是画圆,不过这里用到了颜色过渡的API createRadialGradient 。
renderGravity() { map.ctx.beginPath(); map.ctx.globalCompositeOperation="source-over"; var gradient = map.ctx.createRadialGradient(this.x, this.y, this.radius, this.x, this.y, this.gravityRadius); gradient.addColorStop(0, "rgba(30,136,168,0.8)"); gradient.addColorStop(1, "rgba(30,136,168,0)"); map.ctx.fillStyle = gradient; map.ctx.arc(this.x, this.y, this.gravityRadius, 0, Math.PI*2, false); map.ctx.fill(); } 重力技能有别于其他技能的点在于,他会影响Enemy粒子的运动轨迹,所以还要在Enemy中做点手脚。
index.js中,发动机animate方法通过一个循环来渲染Enemy粒子。
//index.js function animate() { for (let i = 0; i < enemys.length; i++) { enemys[i].render(); enemys[i].update(); if (!player.dead && collision(enemys[i], player)) { if (player.hasGravity) { enemys[i].escape(player); } } } } 这里加入了一个判断,当粒子撞击的时候,判断Player是否有重力技能,如果有的话调用Enemy的escape方法,传入player为引用。为什么要传入player?因为Enemy粒子要根据Player的位置实时做出反馈。来看escape方法怎么实现的,这里讲两种思路:
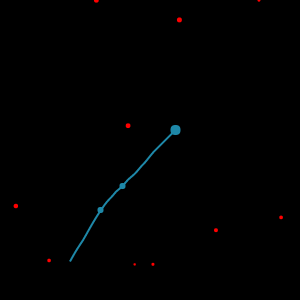
第一种,计算Enemy粒子和Player粒子之间的角度,并通过Player重力场的半径算出在x轴方向和y轴方向的运动速度,主要是想得到两个方向运动速度的比例,从而也就确定运动的方向。再将两个速度乘以某个比率 ratio ,从而达到想要的速度。这个效果会导致Enemy粒子朝Player相反的方向运动,有种排斥的效果。
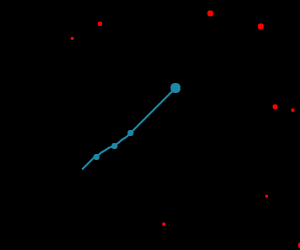
//Enemy.js escape(player) { let ratio = 1/30; let angle = Math.atan2(this.y - player.y, this.x - player.x); let ax = Math.abs(player.gravityRadius * Math.cos(angle)); ax = this.x > player.x ? ax : -ax; let ay = Math.abs(player.gravityRadius * Math.sin(angle)); ay = this.y > player.y ? ay : -ay; this.vx += ax * ratio; this.vy += ay * ratio; this.x += this.vx * ratio; this.y += this.vy * ratio; } 第二种,同样计算出两个撞击粒子之间的角度,并计算出x轴和y轴的投射距离。当两个粒子碰撞时,粒子还会继续前进,然后Enemy粒子就会进入Player粒子的重力场,这时候马上改变各轴上的位置。使Enemy粒子运动到重力场外,这样达到的效果就是Enemy粒子会沿着重力场的边界运动,直到逃离重力场。
escape(player) { let angle = Math.atan(Math.abs(player.y - this.y) / Math.abs(player.x - this.x)); let addX = (player.gravityRadius) * Math.cos(angle); let addY = (player.gravityRadius) * Math.sin(angle); if (this.x > player.x && this.x < player.x + addX) { this.x += this.speed * 2; } else if (this.x < player.x && this.x > player.x - addX) { this.x -= this.speed * 2; } if (this.y > player.y && this.y < player.y + addY) { this.y += this.speed; } else if (this.y < player.y && this.y > player.y - addY) { this.y -= this.speed; } } 这两种方法都还不够完美,没法表现出顺滑的逃逸效果。自认功力尚浅,需要继续研究一些物理运动的方法才行。
粒子变小&时间变慢
粒子变小的操作就很简单了。只需改变Enemy粒子的半径就可以了。而时间变慢也仅仅是改变Enemy粒子的运动速度,这两个就不拿出来讲了。
增加生命
还有一个功能是增加生命,没错,上面提到了减少生命直接改变 livesPoint 的值,而增加生命我们还需要改变尾巴的长度。尾巴的长度怎么变长?读了上一篇文章你应该知道了吧。
关于粒子撞击和技能的实现就讲到这了,这部分是游戏的精华,也是游戏能不能吸引人的根本。然而一个游戏要完整,肯定少不了一些游戏的策略还有一些附属场景,下一节要讲的是《从零开始开发一款H5小游戏(五) 必要的包装,游戏规则和场景设计》
正文到此结束
热门推荐


相关文章

近期评论
-
你这基本没有更新呀,最近文章显示还是2019年的文章。不符合要求哈
-
关键词:慕云博客 链接:https://www.lilun.me 描述:分享原创文字的个人博客
-
-
-
可以提供一下源码吗
-
不是商业站,鸡娃学习笔记
-
-
-
-
听他们说很厉害的样子
Loading...
![[HBLOG]公众号](http://www.liuhaihua.cn/img/qrcode_gzh.jpg)

