Android Flux架构初探
序言
之前写过一篇关于Android项目如何架构的,有MVC和MCVP,前几天又看到了新的一种架构,当然并不是新出的,出了有一段时间,当前被应用的并不是很普遍,接下来从其特点和使用上来介绍Flux架构。本文主要目的是让你对Flux的一个架构大体面貌有个了解。
Flux 架构介绍
Flux 架构 被Facebook使用来构建他们的客户端web应用。跟Clean Architecture一样,它不是为移动应用设计的,但是它的特性和简单可以让我们很好的在安卓项目中采用。
要理解Flux,有两个关键的特点
-
数据流总是单向的
一个单向的数据流 是 Flux 架构的核心,也是它简单易学的原因。就如下面讨论的,在进行应用测试的时候,它提供了非常大的帮助。
-
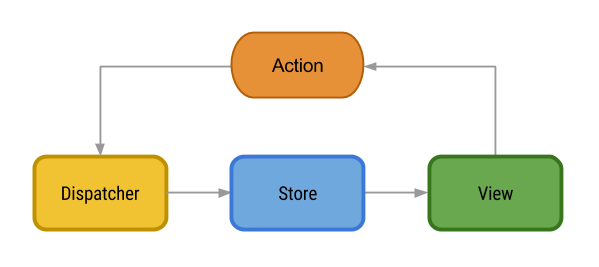
应用被分成三个主要部分:
-
View:应用的界面。这里创建响应用户操作的action。
-
Dispatcher:中心枢纽,传递所有的action,负责把它们运达每个Store。
-
Store:维护一个特定application domain的状态。它们根据当前状态响应action,执行业务逻辑,同时在完成的时候发出一个change事件。这个事件用于view更新其界面。
-
这三个部分都是通过Action来通信的:一个简单的基本对象,以类型来区分,包含了和操作相关的数据。
-
Flux Android 架构
在安卓开发中使用Flux设计规范的目的是建立一个在简单性与易扩展易测试之间都比较平衡的架构。
第一步是找到Flux元素和安卓app组件之间的映射。
其中两个元素非常容易找到与实现。
View:Activity o或者Fragment
Dispatcher:一个事件总线( event bus),在我的例子中将使用Otto,但是其它任何实现都应该是ok的。
Actions
Actions也不复杂。它们的实现和POJO一样简单,有两个主要属性:
Type: 一个String,定义了事件的类型。
Data: 一个map,装载了本次操作。
Store是Flux理论中最难的部分。
Stores响应Dispatcher发出的Action,执行业务逻辑并发送change事件。Stores的唯一输出是这单一的事件:change。其它对Store内部状态感兴趣的组件必须监听这个事件,同时使用它获取需要的数据。最后,stores必须对外公开一个获取application状态的接口。这样,view元素可以查询Stores然后相应的更新UI。
这里通过一个简单的小demo来讲述整个流程。我们的界面上有一个Button和一个TextView,点击Button后让TextView显示出文字。常规的实现,直接在Activity中完成逻辑,MVP模式,在Presenter层来进行,对于Flux架构,我们要怎么实现呢。通过上图我们可以看到,View会产生Action,然后被Dispatcher进行调度,经过Store相应处理,将数据显示出来。
-
如何产生Action
首先要知道Action是什么样
public class Action {

    private final String type;
    private final HashMap<String, Object> data;

    public Action(String type, HashMap<String, Object> data) {
        this.type = type;
        this.data = data;
    }

    public static Builder type(String type) {
        return  new Builder().with(type);
    }

    public String getType() {
        return type;
    }

    public HashMap getData() {
        return data;
    }

    public static class Builder {
        private String type;
        private HashMap<String, Object> data;

        Builder with(String type) {
            if(type == null) {
                throw  new IllegalArgumentException("Type may not be null.");
            }
            this.type = type;
            this.data = new HashMap<>();
            return this;
        }

        public Builder bundle(String key, Object value) {
            if (key == null) {
                throw  new IllegalArgumentException("Key may not be null.");
            }
            if(value == null) {
                throw new IllegalArgumentException("Value may not be null.");
            }
            data.put(key, value);
            return this;
        }

        public Action build() {
            if (TextUtils.isEmpty(type)) {
                throw  new IllegalArgumentException("At least one key is required.");
            }
            return new Action(type, data);
        }
    }
}
每一个Action有两个属性,一个来标记Type,另一个字段来存储传送的数据,通过Map来存放。
对于Action Type,我们可以通过一个接口或者类来进行记录,将所有的类型保存在其中。方便我们的调用。
public interface ShowActions {
    String TODO_SHOW = "todo-show";
    String GET_TEXT = "get-text";
}
如何创建Action,定义一个类,专门用来根据我们可能会出现的各种View的事件,定义出来各种Action。
public class ActionsCreator {

    private  static ActionsCreator instance;

    final Dispatcher mDispatcher;

    ActionsCreator(Dispatcher dispatcher){
        mDispatcher = dispatcher;
    }

    public static ActionsCreator get(Dispatcher dispatcher) {
        if (instance == null) {
            instance = new ActionsCreator(dispatcher);
        }
        return instance;
    }

    public void create(String text) {
        mDispatcher.dispatch(ShowActions.TODO_SHOW, ShowActions.GET_TEXT, text);
    }
在我们准备用ActionsCreator来创建Action的时候,我们并没有直接new Action这种方式来做,而是将其通过调度器,对其进行了分发。这里的事件分发,我们使用的是Otto的Bus来进行事件的分发。
public class Dispatcher {

    private final Bus bus;
    private static Dispatcher instance;

    Dispatcher(Bus bus){
        this.bus = bus;
    }

    public static  Dispatcher get(Bus bus) {
        if (instance == null) {
            instance = new Dispatcher(bus);
        }
        return instance;
    }

    public void register(final Object cls) {
        bus.register(cls);
    }

    public void unRegister(final Object cls) {
        bus.unregister(cls);
    }

    public void emitChange(Store.StoreChangeEvent o) {post(o);}

    public void dispatch(String type, Object... data) {
        if(TextUtils.isEmpty(type)) {
            throw new IllegalArgumentException("Type must not be empty");
        }

        if (data.length % 2 != 0) {
            throw  new IllegalArgumentException("Data must be a valid list of key");
        }

        Action.Builder actionBuilder = Action.type(type);
        for (int i = 0; i < data.length; i++) {
            String key = (String) data[i++];
            Object value = data[i++];
            actionBuilder.bundle(key, value);
        }
        post(actionBuilder.build());
    }

    private boolean isEmpty(String type) {
        return TextUtils.isEmpty(type);
    }

    private void post(final Object event) {
        bus.post(event);
    }
}
在调度的过程中,我们将传递进来的数据进行一个解析,然后根据数据创建出相应的Action,然后对Action进行分发,这个时候关注了相应的Action的Store就会开始根据相应的Action开始执行相应的操作。在Store中,声明了一个抽象方法onAction来负责进行对于Action的判断和分发,然后定义了StoreChangeEvent接口作为事件变化,当有变化的时候,通过这个进行传递,我们可以自己实现这个接口,然后在里面添加一些方法和字段用来携带数据。
public abstract class Store {
    final Dispatcher mDispatcher;

    protected Store(Dispatcher dispatcher) {
        this.mDispatcher = dispatcher;
    }

    void emitStoreChange() {
        mDispatcher.emitChange(changeEvent());
    }

    abstract StoreChangeEvent changeEvent();

    public abstract void onAction(Action action);

    public interface StoreChangeEvent {}

}
我们自定义的Store类
public class ShowStore extends Store {

    private static ShowStore instance;
    private String showText;

    public ShowStore(Dispatcher dispatcher){
        super(dispatcher);
    }

    public static ShowStore get(Dispatcher dispatcher) {
        if (instance == null) {
            instance = new ShowStore(dispatcher);
        }
        return instance;
    }

    @Subscribe
    public void onAction(Action action) {
        switch (action.getType()) {
            case ShowActions.TODO_SHOW :
                showText = ((String)action.getData().get(ShowActions.GET_TEXT));
                Log.i("showText", showText);
                emitStoreChange();
                break;
            default:
                break;
        }
    }

    public String getShowText(){
        return showText;
    }

    @Override
    StoreChangeEvent changeEvent() {
        return new ShowChangeEvent();
    }

    public class ShowChangeEvent implements StoreChangeEvent {

    }
}
然后我们在View也就是Activity中订阅了变化时间的方法,这个时候就可以实现对于View中的数据的一个动态更新。
@Subscribe
    public void showText (ShowStore.ShowChangeEvent event){
        mTextView.setText(mShowStore.getShowText());
    }
总结
通过Flux架构,使用的流程是,我们的View的事件会携带数据,通过一个ActionsCreate创建一个Type的Action,实际完成过程是在Dispatcher的dispatch中,然后再将这个Action丢给订阅了该Action的Store方法中,在这里完成各种逻辑,处理,甚至是可以发起网络请求获取数据,处理完成,可以将结果封装成一个事件,然后这个事件会再次通过调度器中的emitChangeEvent将事件传递给订阅了该事件的函数,而这个接收响应事件的函数被我们定义在我们View中,从而实现对于我们View的更新。
正文到此结束
热门推荐


相关文章


Loading...
![[HBLOG]公众号](http://www.liuhaihua.cn/img/qrcode_gzh.jpg)

