布局万花筒:UIColletionview
UICollectionView是iOS6的时候引入的,它同UITableView共享一套API设计,都是基于datasource和delegate,都继承自UIScrollView。但它又与UITableView有很大不同,它进行了进一步的抽象,将它的所有子视图的位置、大小、transform委托给了一个单独的布局对象:UICollectionViewLayout。这是一个抽象类,我们可以继承它来实现任何想要的布局,系统也为我们提供了一个开箱即食的实现UICollectionViewFlowLayout。在我看来,没有任何排列布局是UICollectionViewLayout不能实现的,如果有那就自定义一个。
UITableView只能提供竖直滑动的布局,而且默认情况下cell的宽度和tableView的宽度一致,而且cell的排列顺序也是挨次排列。UICollectionView则为我们提供了另一种可能:它能提供竖直滑动的布局也能提供水平滑动的布局,而且cell的位置、大小等完全由你自己决定。所以我们在遇到水平滑动的布局时,不要忙着用UIScrollView去实现,可以先考虑UICollectionView能不能满足要求,还有一个好处是你不要自己考虑滑动视图(cell)重用的问题。
这篇文章会讲解如何自定义UICollectionViewLayout来实现任意布局,默认你已经会使用系统提供的UICollectionViewFlowLayout来进行标准的Grid View布局了。
1、UICollectionViewFlowLayout
系统为我们提供了一个自定义的布局实现:UICollectionViewFlowLayout,通过它我们可以实现Grid View类型的布局,也就是像一个一个格了挨次排列的布局,对于大多数的情况,使用它就能满足我们的要求了。系统为我们提供了布局所需的参数,我们在使用的时候只需要去确定这些参数就行:
NS_CLASS_AVAILABLE_IOS(6_0) @interface UICollectionViewFlowLayout : UICollectionViewLayout

@property (nonatomic) CGFloat minimumLineSpacing;
@property (nonatomic) CGFloat minimumInteritemSpacing;
@property (nonatomic) CGSize itemSize;
@property (nonatomic) CGSize estimatedItemSize NS_AVAILABLE_IOS(8_0); // defaults to CGSizeZero - setting a non-zero size enables cells that self-size via -preferredLayoutAttributesFittingAttributes:
@property (nonatomic) UICollectionViewScrollDirection scrollDirection; // default is UICollectionViewScrollDirectionVertical
@property (nonatomic) CGSize headerReferenceSize;
@property (nonatomic) CGSize footerReferenceSize;
@property (nonatomic) UIEdgeInsets sectionInset;

// Set these properties to YES to get headers that pin to the top of the screen and footers that pin to the bottom while scrolling (similar to UITableView).
@property (nonatomic) BOOL sectionHeadersPinToVisibleBounds NS_AVAILABLE_IOS(9_0);
@property (nonatomic) BOOL sectionFootersPinToVisibleBounds NS_AVAILABLE_IOS(9_0);

@end
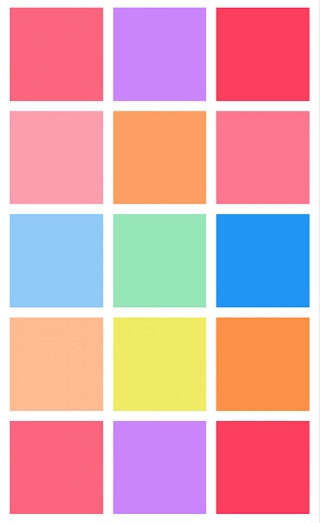
Grid View样式的UICollectionView如下所示:
如果上面所说的Grid View类型的布局不能满足我们的需求,这时就需要自定义一个Layout。
2、UICollectionViewLayout VS UICollectionViewFlowLayout
UICollectionViewFlowLayout继承自UICollectionViewLayout,我们可以直接使用它,我们只需要提供cell的大小,以及行间距、列间距,它就会自己计算出每个cell的位置以及UICollectionView的滑动范围contentSize。但它只能提供一个方向的滑动,也就是说我们自定义的类如果继承自UICollectionViewFlowLayout,则只能是在一个方向上滑动的布局,要么水平方向要么竖直方向。 反之,则需要继承自UICollectionViewLayout,UICollectionViewLayout是一个抽象类,不能直接使用。
3、自定义布局需要实现的方法
UICollectionViewLayout文档 为我们列出了需要实现的方法:

以上列出的这六个方法不是都需要我们自己实现的,而是根据需要,选择其中的某些方法实现。
collectionViewContentSize
UICollection继承自UIScrollView,我们都知道UIScrollView的一个重要参数:contentSize,如果这个参数不对,那么你布局的内容就不能完全展示,而collectionViewContentSize就是为了得到这个参数,UICollection就像一个画板,而collectionViewContentSize则规定了画板的大小,如果是继承自UICollectionViewFlowLayout,而且每个section里面的cell大小是通过UICollectionViewFlowLayout的参数设定的,大小和位置也不在自定义的过程中随意更改,那么collectionViewContentSize是可以不自己重写的,系统会自己计算contentSize,如果是继承自UICollectionViewLayout,那就需要根据你自己的展示布局去提供合适的CGSize给collectionViewContentSize。
layoutAttributesForElementsInRect
这个方法的参数是UICollectionView当前的bounds,也就是视图当前的可见区域,返回值是一个包含对象为UICollectionViewLayoutAttributes的数组,UICollectionView的可见区域内包含cell、supplementary view、decoration view(这里统称cell,因为它们都是collectionView的一个子视图),它们的位置、大小等信息都由对应的UICollectionViewLayoutAttributes控制。默认情况下这个LayoutAttributes包含indexPath、frame、center、size、transform3D、alpha以及hidden属性。如果你还需要控制其他的属性,你可以自己自定义一个UICollectionViewLayoutAttributes的子类,加上任意你想要的属性。
布局属性对象(UICollectionViewLayoutAttributes)通过indexPath和cell关联起来,当collectionView展示cell时,会通过这些布局属性对象拿到布局信息。
返回原话题,layoutAttributesForElementsInRect方法的返回值是一个数组,这个数组里面是传递进来的可见区域内的cell所对应的UICollectionViewLayoutAttributes。
要拿到可见区域内的布局属性,通常的做法如下:
-
如果你是继承自UICollectionViewFlowLayout,并且设置好了itemSize、行间距、列间距等信息,那么你通过[super layoutAttributesForElementsInRect:rect]就能拿到可见区域内的布局属性,反之,则进入步奏2。
-
创建一个空数组,用于存放可见区域内的布局属性。
-
从UICollectionView的数据源中取出你需要展示的数据,然后根据你想要的布局计算出哪些indexPath在当前可见区域内,通过CGRectIntersectsRect函数可以判断两个CGRect是否有交集来确定。然后循环调用layoutAttributesForItemAtIndexPath:来确定每一个布局属性的frame等数据。同样,如果当前区域内有supplementary view或者decoration view,你也需要调用:layoutAttributesForSupplementaryViewOfKind:atIndexPath或者layoutAttributesForDecorationViewOfKind:atIndexPath,最后将这些布局属性添加到数组中返回。这里需要多说一点的是,有些布局属性在UICollectionViewLayout的prepareLayout就根据数据源全部计算了出来,比如瀑布流样式的布局,这个时候你就只需要返回布局属性的frame和当前可见区域有交集的对象就行。
layoutAttributesFor…IndexPath
这里用三个点,是因为有三个类似的方法:
-
layoutAttributesForItemAtIndexPath:
-
layoutAttributesForSupplementaryViewOfKind:atIndexPath:
-
layoutAttributesForDecorationViewOfKind:atIndexPath:
它们分别为cell、supplementaryView、decorationView返回布局属性,它们的实现不是必须的,它们只是为对应的IndexPath返回布局属性,如果你能通过其他方法拿到对应indexPath处的布局属性,那就没必要非要实现这几个方法。
以layoutAttributesForItemAtIndexPath:为例,你可以通过+[UICollectionViewLayoutAttributes layoutAttributesForCellWithIndexPath:]方法拿到一个布局属性对象,然后你可能需要访问你的数据源去算出该indexPath处的布局属性的frame等信息,然后赋值给它。
shouldInvalidateLayoutForBoundsChange
这个是用来告诉collectionView是否需要根据bounds的改变而重新计算布局属性,比如横竖屏的旋转。通常的写法如下:
  - (BOOL)shouldInvalidateLayoutForBoundsChange:(CGRect)newBounds
{
    CGRect oldBounds = self.collectionView.bounds;
    if (CGRectGetWidth(newBounds) != CGRectGetWidth(oldBounds)) {
        return YES;
    }
        return NO;
}
需要注意的是,当在滑动的过程中,需要对某些cell的布局进行更改,那么就需要在这个方法里面返回YES,告诉UICollectionView重新计算布局。因为一个cell的改变会引起整个UICollectionView布局的改变。
4、示例一:瀑布流实现
瀑布流的排列一般用于图片或者商品的展示,它的布局特点是等宽变高,cell的排列是找到最短的那一列,然后把cell放到那个位置,效果如下:

下面我们来看看具体的实现,这里的布局行间距和列间距都定位10,列数固定为3列,如上图所示。
系统提供给我们的UICollectionViewFlowLayout显然不能实现瀑布流的布局,因为它的默认实现是一行一列整齐对齐的,所以我们需要新建一个继承自UICollectionViewFlowLayout的类,然后来讲解一下这个类的实现。
prepareLayout
在讲解如何布局瀑布流之前需要先说明一下UICollectionViewFlowLayout的prepareLayout方法,他会在UICollectionView布局之前调用,调用[self.collectionView reloadData]和[self.collectionView.collectionViewLayout invalidateLayout]的时候prepareLayout也会进行调用,如果shouldInvalidateLayoutForBoundsChange返回YES,prepareLayout方法同样也会调用。所以这个函数是提前进行数据布局计算的绝佳地方。
在进行瀑布流布局的时候我们可以在prepareLayout里面根据数据源,计算出所有的布局属性并缓存起来:
  - (void)prepareLayout {
    [super prepareLayout];
    //记录布局需要的contentSize的高度
    self.contentHeight = 0;
    //columnHeights数组会记录各列的当前布局高度
    [self.columnHeights removeAllObjects];

    //默认高度是sectionEdge.top
    for (NSInteger i = 0; i < self.columnCount; i++) {
        [self.columnHeights addObject:@(self.edgeInsets.top)];
    }
    //清除之前所以的布局属性数据
    [self.attrsArray removeAllObjects];
    //通过数据源拿到需要展示的cell数量
    NSInteger count = [self.collectionView numberOfItemsInSection:0];
    //开始创建每一个cell对应的布局属性
    for (NSInteger index = 0; index < count; index++) {
        //创建indexPath
        NSIndexPath *indexPath = [NSIndexPath indexPathForItem:index inSection:0];
        //获取cell布局属性,在layoutAttributesForItemAtIndexPath里面计算具体的布局信息
        UICollectionViewLayoutAttributes *attrs = [self layoutAttributesForItemAtIndexPath:indexPath];
        [self.attrsArray addObject:attrs];
    }
}
在layoutAttributesForItemAtIndexPath方法里面去根据参数indexPath拿到数据源里面对应位置的展示数据,根据等宽的前提,等比例的获得布局属性的高度,然后根据记录每列当前布局到的高度的数组columnHeights来找到当前布局最短的那一列,从而获取到布局属性的origin信息,这样在等宽的前提下就获取到了当前indexPath处的布局属性的frame信息。然后更新columnHeights里面的数据,并且让记录布局所需高度的变量contentHeight等于当前列高度数组里面的最大值。
  -(UICollectionViewLayoutAttributes *)layoutAttributesForItemAtIndexPath:(NSIndexPath *)indexPath {
    //获取一个UICollectionViewLayoutAttributes对象
    UICollectionViewLayoutAttributes *attrs = [super layoutAttributesForItemAtIndexPath:indexPath];
    //列数是3,布局属性的宽度是固定的
    CGFloat collectionViewW = self.collectionView.frame.size.width;
    CGFloat width = (collectionViewW - self.edgeInsets.left - self.edgeInsets.right - (self.columnCount - 1) * self.columnMargin) / self.columnCount;
    CGFloat height = 通过数据源以及宽度信息,获取对应位置的布局属性高度;
    //找到数组内目前高度最小的那一列
    NSInteger destColumn = 0;
    CGFloat minColumnHeight = [self.columnHeights[0] doubleValue];
    for (NSInteger index = 1; index < self.columnCount; index++) {
          CGFloat columnHeight = [self.columnHeights[index] doubleValue];
        if (minColumnHeight > columnHeight) {
            minColumnHeight = columnHeight;
            destColumn = index;
            break;
        }
    }
    //根据列信息,计算出origin的x
    CGFloat x = self.edgeInsets.left + destColumn * (width +self.columnMargin);
    CGFloat y = minColumnHeight;
    if (y != self.edgeInsets.top) {//不是第一行就加上行间距
        y += self.rowMargin;
    }
    //得到布局属性的frame信息
    attrs.frame = CGRectMake(x, y, width, height);
    //更新最短那列的高度
    self.columnHeights[destColumn] = @(CGRectGetMaxY(attrs.frame));
    //更新记录展示布局所需的高度
    CGFloat columnHeight = [self.columnHeights[destColumn] doubleValue];
    if (self.contentHeight < columnHeight) {
        self.contentHeight = columnHeight;
    }

    return attrs;
}
滑动的过程在,cell会不断重用,系统会调用layoutAttributesForElementsInRect方法来获取当前可见区域内的布局属性,由于所有的布局属性都缓存了起来,则只需返回布局属性的frame和当前可见区域有交集的布局属性就行。
  -(NSArray *)layoutAttributesForElementsInRect:(CGRect)rect {
    NSMutableArray *rArray = [NSMutableArray array];
    for (UICollectionViewLayoutAttributes *cacheAttr in _attrsArray) {
        if (CGRectIntersectsRect(cacheAttr.frame, rect)) {
            [rArray addObject:cacheAttr];
        }
    }

    return rArray;
}
最后由于我们自定义了每个cell的高度及布局,所以系统是不知道UICollectionView当前的contentSize的大小,所以我们需要在collectionViewContentSize方法里返回正确的size以确保所以cell都能正常滑动到可见区域里来。
  -(CGSize)collectionViewContentSize {
    return CGSizeMake(CGRectGetWidth(self.collectionView.frame), self.contentHeight + self.edgeInsets.bottom);
}
至此,瀑布流的布局就完成了,实现起来非常简单,最关键的地方就是计算布局属性的frame信息。
5、示例二:卡片吸顶布局
卡片吸顶布局的效果如下:
可以看到滑到顶部的cell本应该移出当前可见区域,但我们实现的效果是移到顶部后就悬停,并且可以被后来的cell覆盖。
实现的原理非常简单,cell的布局使用UICollectionViewFlowLayout就能实现,我们新建一个继承自UICollectionViewFlowLayout的子类,利用这个子类创建布局,可以利用UICollectionViewFlowLayout提供的参数来构建一个不吸顶展示的collectionView:
只需要提供给UICollectionViewFlowLayoutitemSize和minimumLineSpacing就行,行间距minimumLineSpacing设置为一个负数就能建立起互相叠加的效果。
要建立吸顶的效果,只需要在原来的布局基础上,判断布局属性frame小于布局顶部的y值,就将布局属性的frame的y值设置为顶部的y值就行,这样滑动到顶部的cell都会在顶部悬停下来。
@implementation CardCollectionViewFlowLayout

- (NSArray *)layoutAttributesForElementsInRect:(CGRect)rect
{
    //拿到当前可见区域内的布局属性
    NSArray *oldItems = [super layoutAttributesForElementsInRect:rect];
    //处理当前可见区域内的布局属性吸顶
    [oldItems enumerateObjectsUsingBlock:^(UICollectionViewLayoutAttributes *attributes, NSUInteger idx, BOOL *stop) {
        [self recomputeCellAttributesFrame:attributes];
    }];

    return oldItems;
}

- (void)recomputeCellAttributesFrame:(UICollectionViewLayoutAttributes *)attributes
{
    //获取悬停处的y值
    CGFloat minY = CGRectGetMinY(self.collectionView.bounds) + self.collectionView.contentInset.top;
    //拿到布局属性应该出现的位置
    CGFloat finalY = MAX(minY, attributes.frame.origin.y);

    CGPoint origin = attributes.frame.origin;
    origin.y = finalY;
    attributes.frame = (CGRect){origin, attributes.frame.size};
    //根据IndexPath设置zIndex能确立顶部悬停的cell被后来的cell覆盖的层级关系
    attributes.zIndex = attributes.indexPath.row;
}

- (BOOL)shouldInvalidateLayoutForBoundsChange:(CGRect)newBounds
{
    //由于cell在滑动过程中会不断修改cell的位置,所以需要不断重新计算所有布局属性的信息
    return YES;
}

@end
在实现里面不需要-(CGSize)collectionViewContentSize方法的原因是,对于利用UICollectionViewFlowLayout来进行布局,而不是自定义的布局,系统会自动根据你设置的itemSize等信息计算出contentSize。
6、总结
通过上面的例子我们可以看到,UICollectionView相到于一个画板,而UICollectionViewLayout则可以帮我们组织画板的大小,以及画板内容的组织形态。在日常开发需求中,我们也需要重视UICollectionView,利用好它可以达到事半功倍的效果。
正文到此结束
热门推荐


相关文章

近期评论
-
你这基本没有更新呀,最近文章显示还是2019年的文章。不符合要求哈
-
关键词:慕云博客 链接:https://www.lilun.me 描述:分享原创文字的个人博客
-
-
-
可以提供一下源码吗
-
不是商业站,鸡娃学习笔记
-
-
-
-
听他们说很厉害的样子
Loading...
![[HBLOG]公众号](http://www.liuhaihua.cn/img/qrcode_gzh.jpg)

