MultiDex工作原理分析和优化
动态加载技术(插件化)系列已经坑了有一段时间了,不过UP主我并没有放弃治疗哈,相信在不就的未来就可以看到“系统Api Hook模式”和插件化框架Frontia的更新了。今天要讲的是动态加载技术的亲戚 —— MultiDex。他们的核心原理之一都是dex文件的加载。
MultiDex是Google为了解决“65535方法数超标”以及“INSTALL_FAILED_DEXOPT”问题而开发的一个Support库,具体如何使用MultiDex现在市面已经有一大堆教程(可以参考给 App 启用 MultiDex 功能),这里不再赘述。这篇日志主要是配合源码分析MultiDex的工作原理,以及提供一些MultiDex优化的方案。
Dex的工作机制
等等,这个章节讲的不是MultiDex吗,怎么变成Dex了?没错哈,没有Dex,哪来的MultiDex。在Android中,对Dex文件操作对应的类叫做DexFile。在CLASSLOADER 的工作机制中,我们说到:
对于 Java 程序来说,编写程序就是编写类,运行程序也就是运行类(编译得到的class文件),其中起到关键作用的就是类加载器 ClassLoader。
Android程序的每一个Class都是由ClassLoader#loadClass方法加载进内存的,更准确来说,一个ClassLoader实例会有一个或者多个DexFile实例,调用了ClassLoader#loadClass之后,ClassLoader会通过类名,在自己的DexFile数组里面查找有没有那个DexFile对象里面存在这个类,如果都没有就抛ClassNotFound异常。ClassLoader通过调用DexFile的一个叫defineClass的Native方法去加载指定的类,这点与JVM略有不同,后者是直接调用ClassLoader#defineCLass方法,反正最后实际加载类的方法都叫defineClass就没错了。
创建DexFile对象
首先来看看造DexFile对象的构方法。
public final class DexFile {
    private int mCookie;
    private final String mFileName;
    ...

    public DexFile(File file) throws IOException {
        this(file.getPath());
    }

    public DexFile(String fileName) throws IOException {
        mCookie = openDexFile(fileName, null, 0);
        mFileName = fileName;
        guard.open("close");
    }

    private DexFile(String sourceName, String outputName, int flags) throws IOException {
        mCookie = openDexFile(sourceName, outputName, flags);
        mFileName = sourceName;
        guard.open("close");
    }

    static public DexFile loadDex(String sourcePathName, String outputPathName,
        int flags) throws IOException {
        return new DexFile(sourcePathName, outputPathName, flags);
    }

    public Class loadClass(String name, ClassLoader loader) {
        String slashName = name.replace('.', '/');
        return loadClassBinaryName(slashName, loader);
    }

    public Class loadClassBinaryName(String name, ClassLoader loader) {
        return defineClass(name, loader, mCookie);
    }
    private native static Class defineClass(String name, ClassLoader loader, int cookie);

    native private static int openDexFile(String sourceName, String outputName,
        int flags) throws IOException;

    native private static int openDexFile(byte[] fileContents)
    ...
}
通过以前分析过的源码,我们知道ClassLoader主要是通过DexFile.loadDex这个静态方法来创建它需要的DexFile实例的,这里创建DexFile的时候,保存了Dex文件的文件路径mFileName,同时调用了openDexFile的Native方法打开Dex文件并返回了一个mCookie的整型变量(我不知道这个干啥用的,我猜它是一个C++用的资源句柄,用于Native层访问具体的Dex文件)。在Native层的openDexFile方法里,主要做了检查当前创建来的Dex文件是否是有效的Dex文件,还是是一个带有Dex文件的压缩包,还是一个无效的Dex文件。
加载Dex文件里的类
加载类的时候,ClassLoader又是通过DexFile#loadClass这个方法来完成的,这个方法里调用了defineClass这个Native方法,看来DexFile才是加载Class的具体API,加载Dex文件和加载具体Class都是通过Native方法完成,ClassLoader有点名不副实啊。
MultiDex的工作机制 当一个Dex文件太肥的时候(方法数目太多、文件太大),在打包Apk文件的时候就会出问题,就算打包的时候不出问题,在Android 5.0以下设备上安装或运行Apk也会出问题(具体原因可以参考给 App 启用 MultiDex 功能)。既然一个Dex文件不行的话,那就把这个硕大的Dex文件拆分成若干个小的Dex文件,刚好一个ClassLoader可以有多个DexFile,这就是MultiDex的基本设计思路。
工作流程
MultiDex的工作流程具体分为两个部分,一个部分是打包构建Apk的时候,将Dex文件拆分成若干个小的Dex文件,这个Android Studio已经帮我们做了(设置 “multiDexEnabled true”),另一部分就是在启动Apk的时候,同时加载多个Dex文件(具体是加载Dex文件优化后的Odex文件,不过文件名还是.dex),这一部分工作从Android 5.0开始系统已经帮我们做了,但是在Android 5.0以前还是需要通过MultiDex Support库来支持(MultiDex.install(Context))。
所以我们需要关心的是第二部分,这个过程的简单示意流程图如下。
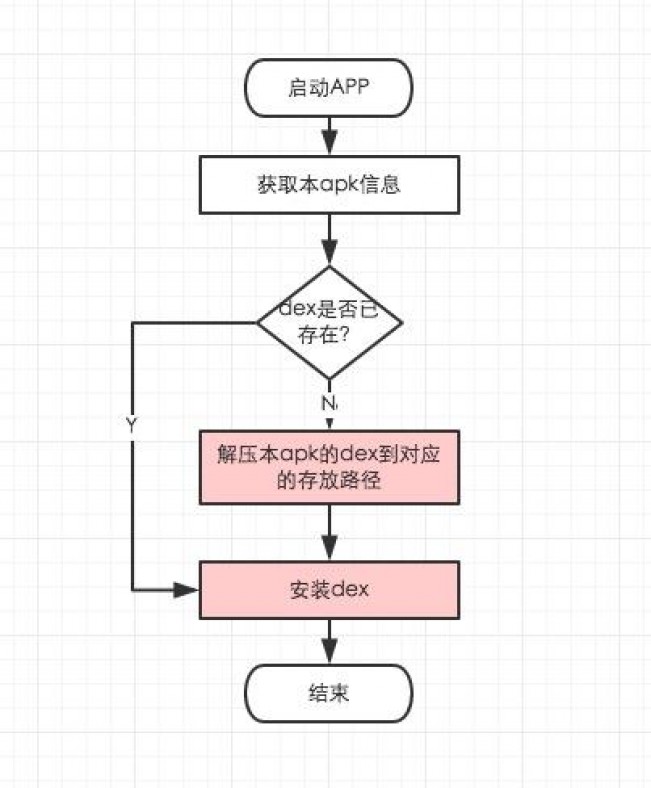
(图中红色部分为耗时比较大的地方) 源码分析 现在官方已经部署的MultiDex Support版本是com.android.support:multidex:1.0.1,但是现在仓库的master分支已经有了许多新的提交(其中最明显的区别是加入了FileLock来控制多进程同步问题),所以这里分析的源码都是最新的master分支上的。
MultiDex Support的入口是MultiDex.install(Context),先从这里入手吧。(这次我把具体的分析都写在代码的注释了,这样看是不是更简洁明了些?)
public static void install(Context context) {
        Log.i(TAG, "install");

        // 1. 判读是否需要执行MultiDex。
        if (IS_VM_MULTIDEX_CAPABLE) {
            Log.i(TAG, "VM has multidex support, MultiDex support library is disabled.");
            return;
        }
        if (Build.VERSION.SDK_INT < MIN_SDK_VERSION) {
            throw new RuntimeException("Multi dex installation failed. SDK " + Build.VERSION.SDK_INT
                    + " is unsupported. Min SDK version is " + MIN_SDK_VERSION + ".");
        }
        try {
            ApplicationInfo applicationInfo = getApplicationInfo(context);
            if (applicationInfo == null) {
                // Looks like running on a test Context, so just return without patching.
                return;
            }

            // 2. 如果这个方法已经调用过一次,就不能再调用了。
            synchronized (installedApk) {
                String apkPath = applicationInfo.sourceDir;
                if (installedApk.contains(apkPath)) {
                    return;
                }
                installedApk.add(apkPath);

                // 3. 如果当前Android版本已经自身支持了MultiDex,依然可以执行MultiDex操作,
                // 但是会有警告。
                if (Build.VERSION.SDK_INT > MAX_SUPPORTED_SDK_VERSION) {
                    Log.w(TAG, "MultiDex is not guaranteed to work in SDK version "
                            + Build.VERSION.SDK_INT + ": SDK version higher than "
                            + MAX_SUPPORTED_SDK_VERSION + " should be backed by "
                            + "runtime with built-in multidex capabilty but it's not the "
                            + "case here: java.vm.version=/""
                            + System.getProperty("java.vm.version") + "/"");
                }

                // 4. 获取当前的ClassLoader实例,后面要做的工作,就是把其他dex文件加载后,
                // 把其DexFile对象添加到这个ClassLoader实例里就完事了。
                ClassLoader loader;
                try {
                    loader = context.getClassLoader();
                } catch (RuntimeException e) {
                    Log.w(TAG, "Failure while trying to obtain Context class loader. " +
                            "Must be running in test mode. Skip patching.", e);
                    return;
                }
                if (loader == null) {
                    Log.e(TAG,
                            "Context class loader is null. Must be running in test mode. "
                            + "Skip patching.");
                    return;
                }
                try {
                  // 5. 清除旧的dex文件,注意这里不是清除上次加载的dex文件缓存。
                  // 获取dex缓存目录是,会优先获取/data/data/<package>/code-cache作为缓存目录。
                  // 如果获取失败,则使用/data/data/<package>/files/code-cache目录。
                  // 这里清除的是第二个目录。
                  clearOldDexDir(context);
                } catch (Throwable t) {
                  Log.w(TAG, "Something went wrong when trying to clear old MultiDex extraction, "
                      + "continuing without cleaning.", t);
                }

                // 6. 获取缓存目录(/data/data/<package>/code-cache)。
                File dexDir = getDexDir(context, applicationInfo);

                // 7. 加载缓存文件(如果有)。
                List<File> files = MultiDexExtractor.load(context, applicationInfo, dexDir, false);

                // 8. 检查缓存的dex是否安全
                if (checkValidZipFiles(files)) {
                    // 9. 安装缓存的dex
                    installSecondaryDexes(loader, dexDir, files);
                } else {
                    // 9. 从apk压缩包里面提取dex文件
                    Log.w(TAG, "Files were not valid zip files.  Forcing a reload.");
                    files = MultiDexExtractor.load(context, applicationInfo, dexDir, true);
                    if (checkValidZipFiles(files)) {
                        // 10. 安装提取的dex
                        installSecondaryDexes(loader, dexDir, files);
                    } else {
                        throw new RuntimeException("Zip files were not valid.");
                    }
                }
            }
        } catch (Exception e) {
            Log.e(TAG, "Multidex installation failure", e);
            throw new RuntimeException("Multi dex installation failed (" + e.getMessage() + ").");
        }
        Log.i(TAG, "install done");
    }
具体代码的分析已经在上面代码的注释里给出了,从这里我们也可以看出,整个MultiDex.install(Context)的过程中,关键的步骤就是MultiDexExtractor#load方法和MultiDex#installSecondaryDexes方法。
(这部分是题外话)其中有个MultiDex#clearOldDexDir(Context)方法,这个方法的作用是删除/data/data/<package>/files/code-cache,一开始我以为这个方法是删除上一次执行MultiDex后的缓存文件,不过这明显不对,不可能每次MultiDex都重新解压dex文件一边,这样每次启动会很耗时,只有第一次冷启动的时候才需要解压dex文件。后来我又想是不是以前旧版的MultiDex曾经把缓存文件放在这个目录里,现在新版本只是清除以前旧版的遗留文件?但是我找遍了整个MultiDex Repo的提交也没有见过类似的旧版本代码。后面我仔细看MultiDex#getDexDir这个方法才发现,原来MultiDex在获取dex缓存目录是,会优先获取/data/data/<package>/code-cache作为缓存目录,如果获取失败,则使用/data/data/<package>/files/code-cache目录,而后者的缓存文件会在每次App重新启动的时候被清除。感觉MultiDex获取缓存目录的逻辑不是很严谨,而获取缓存目录失败也是MultiDex工作工程中少数有重试机制的地方,看来MultiDex真的是一个临时的兼容方案,Google也许并不打算认真处理这些历史的黑锅。
接下来再看看MultiDexExtractor#load这个方法。
static List<File> load(Context context, ApplicationInfo applicationInfo, File dexDir,
            boolean forceReload) throws IOException {
        Log.i(TAG, "MultiDexExtractor.load(" + applicationInfo.sourceDir + ", " + forceReload + ")");
        final File sourceApk = new File(applicationInfo.sourceDir);

        // 1. 获取当前Apk文件的crc值。
        long currentCrc = getZipCrc(sourceApk);
        // Validity check and extraction must be done only while the lock file has been taken.
        File lockFile = new File(dexDir, LOCK_FILENAME);
        RandomAccessFile lockRaf = new RandomAccessFile(lockFile, "rw");
        FileChannel lockChannel = null;
        FileLock cacheLock = null;
        List<File> files;
        IOException releaseLockException = null;
        try {
            lockChannel = lockRaf.getChannel();
            Log.i(TAG, "Blocking on lock " + lockFile.getPath());

            // 2. 加上文件锁,防止多进程冲突。
            cacheLock = lockChannel.lock();
            Log.i(TAG, lockFile.getPath() + " locked");

            // 3. 先判断是否强制重新解压,这里第一次会优先使用已解压过的dex文件,如果加载失败就强制重新解压。
            // 此外,通过crc和文件修改时间,判断如果Apk文件已经被修改(覆盖安装),就会跳过缓存重新解压dex文件。
            if (!forceReload && !isModified(context, sourceApk, currentCrc)) {
                try {

                    // 4. 加载缓存的dex文件
                    files = loadExistingExtractions(context, sourceApk, dexDir);
                } catch (IOException ioe) {
                    Log.w(TAG, "Failed to reload existing extracted secondary dex files,"
                            + " falling back to fresh extraction", ioe);

                    // 5. 加载失败的话重新解压,并保存解压出来的dex文件的信息。
                    files = performExtractions(sourceApk, dexDir);
                    putStoredApkInfo(context,
                            getTimeStamp(sourceApk), currentCrc, files.size() + 1);
                }
            } else {
                // 4. 重新解压,并保存解压出来的dex文件的信息。
                Log.i(TAG, "Detected that extraction must be performed.");
                files = performExtractions(sourceApk, dexDir);
                putStoredApkInfo(context, getTimeStamp(sourceApk), currentCrc, files.size() + 1);
            }
        } finally {
            if (cacheLock != null) {
                try {
                    cacheLock.release();
                } catch (IOException e) {
                    Log.e(TAG, "Failed to release lock on " + lockFile.getPath());
                    // Exception while releasing the lock is bad, we want to report it, but not at
                    // the price of overriding any already pending exception.
                    releaseLockException = e;
                }
            }
            if (lockChannel != null) {
                closeQuietly(lockChannel);
            }
            closeQuietly(lockRaf);
        }
        if (releaseLockException != null) {
            throw releaseLockException;
        }
        Log.i(TAG, "load found " + files.size() + " secondary dex files");
        return files;
    }
这个过程主要是获取可以安装的dex文件列表,可以是上次解压出来的缓存文件,也可以是重新从Apk包里面提取出来的。需要注意的时,如果是重新解压,这里会有明显的耗时,而且解压出来的dex文件,会被压缩成.zip压缩包,压缩的过程也会有明显的耗时(这里压缩dex文件可能是问了节省空间)。
如果dex文件是重新解压出来的,则会保存dex文件的信息,包括解压的apk文件的crc值、修改时间以及dex文件的数目,以便下一次启动直接使用已经解压过的dex缓存文件,而不是每一次都重新解压。
需要特别提到的是,里面的FileLock是最新的master分支里面新加进去的功能,现在最新的1.0.1版本里面是没有的。
无论是通过使用缓存的dex文件,还是重新从apk中解压dex文件,获取dex文件列表后,下一步就是安装(或者说加载)这些dex文件了。最后的工作在MultiDex#installSecondaryDexes这个方法里面。
private static void installSecondaryDexes(ClassLoader loader, File dexDir, List<File> files)
            throws IllegalArgumentException, IllegalAccessException, NoSuchFieldException,
            InvocationTargetException, NoSuchMethodException, IOException {
        if (!files.isEmpty()) {
            if (Build.VERSION.SDK_INT >= 19) {
                V19.install(loader, files, dexDir);
            } else if (Build.VERSION.SDK_INT >= 14) {
                V14.install(loader, files, dexDir);
            } else {
                V4.install(loader, files);
            }
        }
    }
因为在不同的SDK版本上,ClassLoader(更准确来说是DexClassLoader)加载dex文件的方式有所不同,所以这里做了V4/V14/V19的兼容(Magic Code)。
Build.VERSION.SDK_INT < 14
/**
     * Installer for platform versions 4 to 13.
     */
    private static final class V4 {
        private static void install(ClassLoader loader, List<File> additionalClassPathEntries)
                        throws IllegalArgumentException, IllegalAccessException,
                        NoSuchFieldException, IOException {

            int extraSize = additionalClassPathEntries.size();
            Field pathField = findField(loader, "path");
            StringBuilder path = new StringBuilder((String) pathField.get(loader));
            String[] extraPaths = new String[extraSize];
            File[] extraFiles = new File[extraSize];
            ZipFile[] extraZips = new ZipFile[extraSize];
            DexFile[] extraDexs = new DexFile[extraSize];
            for (ListIterator<File> iterator = additionalClassPathEntries.listIterator();
                    iterator.hasNext();) {
                File additionalEntry = iterator.next();
                String entryPath = additionalEntry.getAbsolutePath();
                path.append(':').append(entryPath);
                int index = iterator.previousIndex();
                extraPaths[index] = entryPath;
                extraFiles[index] = additionalEntry;
                extraZips[index] = new ZipFile(additionalEntry);
                extraDexs[index] = DexFile.loadDex(entryPath, entryPath + ".dex", 0);
            }

            // 这个版本是最简单的。
            // 只需要创建DexFile对象后,使用反射的方法分别扩展ClassLoader实例的以下字段即可。
            pathField.set(loader, path.toString());
            expandFieldArray(loader, "mPaths", extraPaths);
            expandFieldArray(loader, "mFiles", extraFiles);
            expandFieldArray(loader, "mZips", extraZips);
            expandFieldArray(loader, "mDexs", extraDexs);
        }
    }
14 <= Build.VERSION.SDK_INT < 19
/**
     * Installer for platform versions 14, 15, 16, 17 and 18.
     */
    private static final class V14 {
        private static void install(ClassLoader loader, List<File> additionalClassPathEntries,
                File optimizedDirectory)
                        throws IllegalArgumentException, IllegalAccessException,
                        NoSuchFieldException, InvocationTargetException, NoSuchMethodException {

            // 扩展ClassLoader实例的"pathList"字段。
            Field pathListField = findField(loader, "pathList");
            Object dexPathList = pathListField.get(loader);
            expandFieldArray(dexPathList, "dexElements", makeDexElements(dexPathList,
                    new ArrayList<File>(additionalClassPathEntries), optimizedDirectory));
        }

        private static Object[] makeDexElements(
                Object dexPathList, ArrayList<File> files, File optimizedDirectory)
                        throws IllegalAccessException, InvocationTargetException,
                        NoSuchMethodException {
            Method makeDexElements =
                    findMethod(dexPathList, "makeDexElements", ArrayList.class, File.class);
            return (Object[]) makeDexElements.invoke(dexPathList, files, optimizedDirectory);
        }
    }
从API14开始,DexClassLoader会使用一个DexpDexPathList类来封装DexFile数组。
final class DexPathList {
    private static final String DEX_SUFFIX = ".dex";
    private static final String JAR_SUFFIX = ".jar";
    private static final String ZIP_SUFFIX = ".zip";
    private static final String APK_SUFFIX = ".apk";

    private static Element[] makeDexElements(ArrayList<File> files,
            File optimizedDirectory) {
        ArrayList<Element> elements = new ArrayList<Element>();
        for (File file : files) {
            ZipFile zip = null;
            DexFile dex = null;
            String name = file.getName();
            if (name.endsWith(DEX_SUFFIX)) {
                // Raw dex file (not inside a zip/jar).
                try {
                    dex = loadDexFile(file, optimizedDirectory);
                } catch (IOException ex) {
                    System.logE("Unable to load dex file: " + file, ex);
                }
            } else if (name.endsWith(APK_SUFFIX) || name.endsWith(JAR_SUFFIX)
                    || name.endsWith(ZIP_SUFFIX)) {
                try {
                    zip = new ZipFile(file);
                } catch (IOException ex) {
                    System.logE("Unable to open zip file: " + file, ex);
                }
                try {
                    dex = loadDexFile(file, optimizedDirectory);
                } catch (IOException ignored) {

                }
            } else {
                System.logW("Unknown file type for: " + file);
            }
            if ((zip != null) || (dex != null)) {
                elements.add(new Element(file, zip, dex));
            }
        }
        return elements.toArray(new Element[elements.size()]);
    }

    private static DexFile loadDexFile(File file, File optimizedDirectory)
            throws IOException {
        if (optimizedDirectory == null) {
            return new DexFile(file);
        } else {
            String optimizedPath = optimizedPathFor(file, optimizedDirectory);
            return DexFile.loadDex(file.getPath(), optimizedPath, 0);
        }
    }
}
通过调用DexPathList#makeDexElements方法,可以加载我们上面解压得到的dex文件,从代码也可以看出,DexPathList#makeDexElements其实也是通过调用DexFile#loadDex来加载dex文件并创建DexFile对象的。V14中,通过反射调用DexPathList#makeDexElements方法加载我们需要的dex文件,在把加载得到的数组扩展到ClassLoader实例的"pathList"字段,从而完成dex文件的安装
从DexPathList的代码中我们也可以看出,ClassLoader是支持直接加载.dex/.zip/.jar/.apk的dex文件包的(我记得以前在哪篇日志中好像提到过类似的问题…)。
19 <= Build.VERSION.SDK_INT
/**
    * Installer for platform versions 19.
    */
   private static final class V19 {
       private static void install(ClassLoader loader, List<File> additionalClassPathEntries,
               File optimizedDirectory)
                       throws IllegalArgumentException, IllegalAccessException,
                       NoSuchFieldException, InvocationTargetException, NoSuchMethodException {

           Field pathListField = findField(loader, "pathList");
           Object dexPathList = pathListField.get(loader);
           ArrayList<IOException> suppressedExceptions = new ArrayList<IOException>();
           expandFieldArray(dexPathList, "dexElements", makeDexElements(dexPathList,
                   new ArrayList<File>(additionalClassPathEntries), optimizedDirectory,
                   suppressedExceptions));

           if (suppressedExceptions.size() > 0) {
               for (IOException e : suppressedExceptions) {
                   Log.w(TAG, "Exception in makeDexElement", e);
               }
               Field suppressedExceptionsField =
                       findField(dexPathList, "dexElementsSuppressedExceptions");
               IOException[] dexElementsSuppressedExceptions =
                       (IOException[]) suppressedExceptionsField.get(dexPathList);
               if (dexElementsSuppressedExceptions == null) {
                   dexElementsSuppressedExceptions =
                           suppressedExceptions.toArray(
                                   new IOException[suppressedExceptions.size()]);
               } else {
                   IOException[] combined =
                           new IOException[suppressedExceptions.size() +
                                           dexElementsSuppressedExceptions.length];
                   suppressedExceptions.toArray(combined);
                   System.arraycopy(dexElementsSuppressedExceptions, 0, combined,
                           suppressedExceptions.size(), dexElementsSuppressedExceptions.length);
                   dexElementsSuppressedExceptions = combined;
               }
               suppressedExceptionsField.set(dexPathList, dexElementsSuppressedExceptions);
           }
       }

       private static Object[] makeDexElements(
               Object dexPathList, ArrayList<File> files, File optimizedDirectory,
               ArrayList<IOException> suppressedExceptions)
                       throws IllegalAccessException, InvocationTargetException,
                       NoSuchMethodException {
           Method makeDexElements =
                   findMethod(dexPathList, "makeDexElements", ArrayList.class, File.class,
                           ArrayList.class);
           return (Object[]) makeDexElements.invoke(dexPathList, files, optimizedDirectory,
                   suppressedExceptions);
       }
   }
V19与V14差别不大,只不过DexPathList#makeDexElements方法多了一个ArrayList<IOException>参数,如果在执行DexPathList#makeDexElements方法的过程中出现异常,后面使用反射的方式把这些异常记录进DexPathList的dexElementsSuppressedExceptions字段里面。
无论是V4/V14还是V19,在创建DexFile对象的时候,都需要通过DexFile的Native方法openDexFile来打开dex文件,其具体细节暂不讨论(涉及到dex的文件结构,很烦,有兴趣请阅读dalvik_system_DexFile.cpp),这个过程的主要目的是给当前的dex文件做Optimize优化处理并生成相同文件名的odex文件,App实际加载类的时候,都是通过odex文件进行的。因为每个设备对odex格式的要求都不一样,所以这个优化的操作只能放在安装Apk的时候处理,主dex的优化我们已经在安装apk的时候搞定了,其余的dex就是在MultiDex#installSecondaryDexes里面优化的,而后者也是MultiDex过程中,另外一个耗时比较多的操作。(在MultiDex中,提取出来的dex文件被压缩成.zip文件,又优化后的odex文件则被保存为.dex文件。)
到这里,MultiDex的工作流程就结束了。怎么样,是不是觉得和以前谈到动态加载技术(插件化)的时候说的很像?没错,谁叫它们的核心都是dex文件呢。Java老师第一节课就说“类就是编程”,搞定类你就能搞定整个世界啊!
优化方案
MultiDex有个比较蛋疼的问题,就是会产生明显的卡顿现象,通过上面的分析,我们知道具体的卡顿产生在解压dex文件以及优化dex两个步骤。不过好在,在Application#attachBaseContext(Context)中,UI线程的阻塞是不会引发ANR的,只不过这段长时间的卡顿(白屏)还是会影响用户体验。
目前,优化方案能想到的有两种。
PreMultiDex方案
大致思路是,在安装一个新的apk的时候,先在Worker线程里做好MultiDex的解压和Optimize工作,安装apk并启动后,直接使用之前Optimize产生的odex文件,这样就可以避免第一次启动时候的Optimize工作。
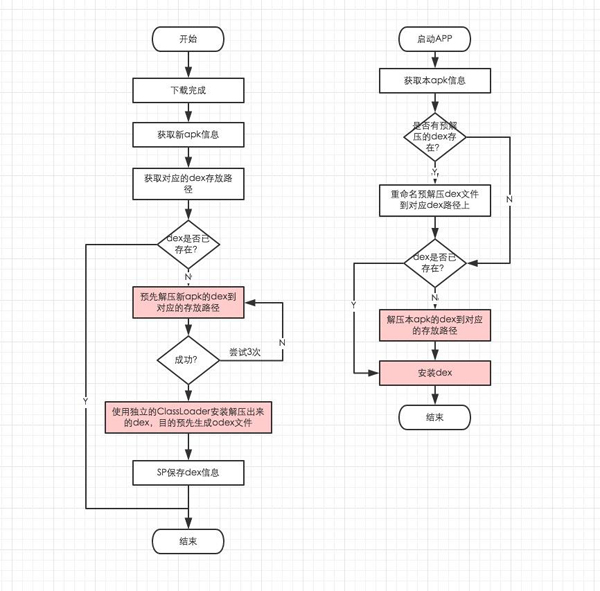
安装dex的时候,核心是创建DexFile对象并使用其Native方法对dex文件进行opt处理,同时生产一个与dex文件(.zip)同名的已经opt过的dex文件(.dex)。如果安装dex的时候,这个opt过的dex文件已经存在,则跳过这个过程,这会节省许多耗时。所以优化的思路就是,下载Apk完成的时候,预先解压dex文件,并预先触发安装dex文件以生产opt过的dex文件。这样覆盖安装Apk并启动的时候,如果MultiDex能命中解压好的dex和odex文件,则能避开耗时最大的两个操作。
不过这个方案的缺点也是明显的,第一次安装的apk没有作用,而且事先需要使用内置的apk更新功能把新版本的apk文件下载下来后,才能做PreMultiDex工作。
异步MultiDex方案
这种方案也是目前比较流行的Dex手动分包方案,启动App的时候,先显示一个简单的Splash闪屏界面,然后启动Worker线程执行MultiDex#install(Context)工作,就可以避免UI线程阻塞。不过要确保启动以及启动MultiDex#install(Context)所需要的类都在主dex里面(手动分包),而且需要处理好进程同步问题。
正文到此结束
- 本文标签: final 下载 Master 源码 cat Google Android ACE 工作原理 classpath 进程 API App 锁 删除 IO 编译 线程 IDE CTO 开发 http cache ssl find UI 空间 参数 src ORM zip tar 安装 注释 插件 lib Action XEN HBase 时间 list build Property java ip 安全 代码 实例 同步 message id 目录 tab expat Android 5.0 DOM
- 版权声明: 本文为互联网转载文章,出处已在文章中说明(部分除外)。如果侵权,请联系本站长删除,谢谢。
- 本文海报: 生成海报一 生成海报二
热门推荐


相关文章


Loading...
![[HBLOG]公众号](http://www.liuhaihua.cn/img/qrcode_gzh.jpg)

