理解 React 中的前端路由
学习前端很久了,最近被真阿当那篇总结给吓到了,好多人都在批判阿当,虽然也有几个人挺阿当,微博知乎上都是一片骂声。前端现在这么火,有时候也会反思自己是不是踏进了一条浑水河,越趟越浑。

前端很火,既然我选择了这条路,就应该放下心来,认真的学习基础,2016 就快结束了,迎接崭新的 2017,毕竟我还没实现我的小目标呢!
前面已经写过一篇关于webpack 的入门,以官方和阮大大为参考,干货不是很多,或者说就没干货。这篇文章干货应该也不是很多,也是以官方的教程为参考,唯一的干货可能就是 react-router 的例子吧。
gulp 还是 webpack ?
到底是 gulp 还是 webpack,现在网上帖子对于这方面的疑问也很多,这两个工具在某些功能上是有重合的,甚至有人还提出了这样的问题:“有哪些功能是 webpack 取代不了 gulp 的”。我觉得,要真正的理解这两者的取舍,还是要实际地去用,因为只有你使用了,才能做出正确的判断。
gulp 是一个任务化工具,擅长流程化的一切事情,webpack 更像是一个模块化管理工具,擅长模块化资源的打包。但是 gulp 也可以弄模块,webpack 也可以搞流程,甚至还有人推荐 gulp-webpack 这样的 task。
这里面的林林总总,还是你自己去体会吧。今天撇开 gulp,来用 webpack 打造一个 react 的开发流程。
理解 react 路由
这篇文章要做到的是实现一个基本的前端路由 react-router,大概的页面如下
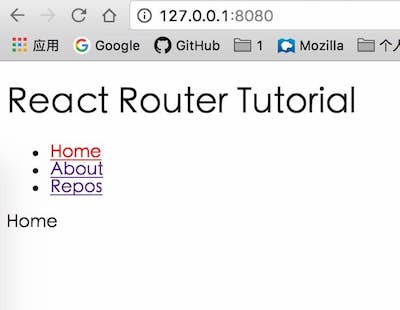
这是一个多页 app,Home 是首页,导航栏另外有两个页面分别是 About 页面和 Repos 页面,点开之后 URL 会从 / 变到 /about 和 /repos 。
webpack-dev-server
webpack-dev-server 是 webpack 轻量级服务器, npm i webpack-dev-server --save 安装,可以通过命令行直接来运行,也可以把它写到 package.json 的 script 里,这样子比较方便,有如下的配置参数 webpack-dev-server --devtool eval --progress --colors --hot ,分别表示:
- –devtool eval 当程序运行出错的时候,方便查找到出错的位置和原因
- –progress 打包应用的进度
- –colors 命令行日志变的有颜色
- –hot 热更新
把它写到 package.json 里面:
"script": {
  "start": "webpack-dev-server --devtool eval --progress --colors --hot"
}
webpack.config.js 的配置
基本的文件结构目录如下:
public // 生成文件夹 - index.html - index.css - bundle.js modules // 路由文件夹 - App.js - Home.js - ... webpack.config.js index.js // webpack 入口文件 package.json |
然后就是最重要的 webpack 配置文件:
var webpack = require('webpack')
module.exports = {
  // 入口文件
  entry: './index.js',
  // 输出文件
  output: {
    filename: 'bundle.js',
    path: 'public',
    publicPath: '/'
  },
  // babel 的加载,react 必须
  module: {
    loaders: [
      { test: //.js$/, exclude: /node_modules/, loader: 'babel-loader?presets[]=es2015&presets[]=react' }
    ]
  },
  // 设置 product 环境变量,用于压缩文件
  plugins: process.env.NODE_ENV = 'production'?[
    new webpack.optimize.DedupePlugin(),
    new webpack.optimize.OccurrenceOrderPlugin(),
    new webpack.optimize.UglifyJsPlugin({
      minimize: true,
      compress: {
        warnings: false,
      },
    })
  ]:[]
} |
在配置文件中设置了 product 环境变量,开启的话需要使用 NODE_ENV=production npm start ,window 用户需要设置 SET "NODE_ENV=production" && npm start 。
什么是前端路由
对于路由,其实并不陌生,如果对 url 解析,就是 pathname,我们所要访问那个资源文件。写过 nodejs 服务器的同学都知道,后端路由的实现,就是解析 pathname,找到那个资源,简单点的,直接把 html 文件 res.send 给请求者,复杂点的,是通过模版进行 html 构造来返回,如果找不到或权限其他原因,返回 404/error 码。
前端路由和后端路由实现技术不一样(可能前端文件只有一个 index.html),但是原理是一样的,而且前端路由往往都是通过 hash 来实现了。比如要访问 about 页面,可能是这样一个 url: 127.0.0.1:8080/#/about ,因为对于浏览器来说,# 后面的内容是不会被解析到,而前端 JS 可以通过 window.location.hash 读取到,并通过一系列前端路由规则,对不同的路径进行不同的处理。
到了 H5 之后,事情出现了变化。H5 对于 history 有了新的 api,会话历史是可以操作的,不用 # 也可以通过 JS 操作前端路由。比如还是访问 about 页面,它实际上: 127.0.0.1:8080/about 。
首先从体验上来说,前端控制路由,不用向服务器发送请求,访问速度肯定会有非常大的提升,延迟就是前端处理的延迟。虽然有时候新打开的页面会向服务器请求一些 ajax,但页面的响应速度真的是非常的快,我只想说,这种感觉棒棒的。
但是有一个问题,前端路由控制的 about 页面,其实后端是不存在的,如果我们要直接访问这个页面,或者在这个页面刷新一下,会出现 404 的情况。这个问题也很好解决,服务器后端让 /about 资源请求返回的资源是 / 资源即可,前端路由通过 url 判断 /about 在前端跳转到这个页面。即无论你访问哪个页面,只要是我前端路由的范围之内,我都给你返回 index.html 。
如果用的是 express 服务器,可以这样:
import { match, RouterContext } from 'react-router'

var app = express()

app.get('*', (req, res) => {
  match({ routes: routes, location: req.url }, (err, redirect, props) => {
    // in here we can make some decisions all at once
    if (err) {
      // there was an error somewhere during route matching
      res.status(500).send(err.message)
    } else if (redirect) {
      // we haven't talked about `onEnter` hooks on routes, but before a
      // route is entered, it can redirect. Here we handle on the server.
      res.redirect(redirect.pathname + redirect.search)
    } else if (props) {
      // if we got props then we matched a route and can render
      const appHtml = renderToString(<RouterContext {...props}/>)
      res.send(renderPage(appHtml))
    } else {
      // no errors, no redirect, we just didn't match anything
      res.status(404).send('Not Found')
    }
  })
})

function renderPage(appHtml) {
  return `
    <!doctype html public="storage">
    <html>
    <meta charset=utf-8/>
    <title>My First React Router App</title>
    <link rel=stylesheet href=/index.css>
    <div id=app>${appHtml}</div>
    <script src="/bundle.js"></script>
   `
} |
全是 ES6 的写法。
hash 路由
先来介绍一下 hash 路由,现在还能看到很多 hash 路由的页面,速度很快。
在根目录下的 index.js 中,建立一个基本的 render 组件:
import App from './modules/App'
import About from './modules/About'
import Repos from './modules/Repos'
import { Router, Route, hashHistory } from 'react-router'

render((
  <Router history={hashHistory}>
    <Route path="/" component={App}>
      <Route path="/repos" component={Repos}/>
      <Route path="/about" component={About}/>
    </Route>
  </Router>
), document.getElementById('app')) |
在 App.js 中,从 react-router 引入 Link
import React from 'react'
import { Link } from 'react-router'

export default React.createClass({
  render() {
    return (
      <div>
        <h1>React Router Tutorial</h1>
        <ul role="nav">
          <li><Link to="/about">About</Link></li>
          <li><Link to="/repos">Repos</Link></li>
        </ul>
      </div>
    )
  }
}) |
About 和 Repos 页面返回一个 React Component ,这样子可以访问通过主页访问这两个页面。可以参考 reactjs 的 github 源文件 。
浏览器历史记录
前面配置的路由是 hash,使用的是 react-router 的 hashHistory,而并非 H5 的浏览器历史记录。
那么,如何使用浏览器的历史记录呢。万能的 react-router 提供了 browserHistory ,把 hashHistory 替换成 browserHistory 即可:
import { Router, Route, browserHistory, IndexRoute } from 'react-router'

render((
  <Router history={browserHistory}>
    {/* ... */}
  </Router>
), document.getElementById('app')) |
在 webpack-dev-server 中需要添加参数 --history-api-fallback ,但因为 webpack-dev-server 是一个轻量级的服务器,如果使用可能还需要用 Express 这样的服务器,前面也介绍了如何配置。配置好之后,就可以直接通过 url: 127.0.0.1:8080/about 来访问这个关于页面。
为这个前端路由添加功能
现在路由的功能是有了,要达到效果,还是需要进一步美化的,在美化的过程中,还是可以学到一些知识的。
目前这个路由很乱,我们需要重新建立一个 Routes 文件,用来作为路由文件,以后修改的时候,也方便一些,毕竟我们是用 webpack 打包,文件多,不用怕!
修改根目录下 index.js 文件:
import routes from './modules/routes'

render(
  <Router routes={routes} history={browserHistory}/>,
  document.getElementById('app')
) |
在 modules 目录下添加 routes.js 文件,其实就是把之前 index.js 少的东西复制过去:
module.exports = (
<Route path="/" component={App}>
<IndexRoute component={Home}/>
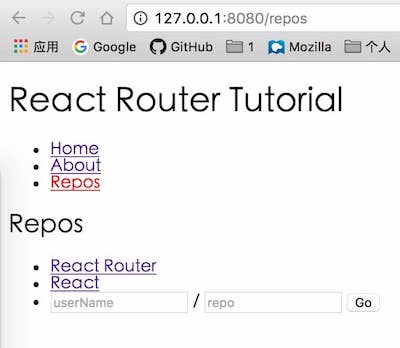
<Route path="/repos" component={Repos}>
<Route path="/repos/:userName/:repoName" component={Repo}/>
</Route>
<Route path="/about" component={About}/>
</Route>
) |
这里呢,我们在 repos 下又添加了一个 repo 文件,用来读取 pathname,算是一个小扩展吧,使用上需要对路径名前加个冒号,表示调用,然后在 repo.js 文件:
import React from 'react'

export default React.createClass({
  render(){
    return (
      <div>
        // 这里通过 params 获取定义的路径名
        <h2>{this.props.params.repoName}</h2>
      </div>
    )
  }
}) |
还可以向路由中动态添加 router,
React.createClass({
  contextTypes:{
    router: React.PropTypes.object
  },

  handSubmit(event){
    event.preventDefault();
    const userName = event.target.elements[0].value
    const repo = event.target.elements[1].value
    const path = `/repos/${userName}/${repo}`
    console.log(path)
    this.context.router.push(path)
  },
  render(){
    <form onSubmit={this.handSubmit}>
      <input type="text" placeholder="userName"/> / {' '}
      <input type="text" placeholder="repo"/>{' '}
      <button type="submit">Go</button>
    </form>
  }
}) |
正文到此结束
热门推荐


相关文章


Loading...
![[HBLOG]公众号](http://www.liuhaihua.cn/img/qrcode_gzh.jpg)

