React Native 核心渲染流程分析(1) - 初始组件系统
本文基于源码: 0.40.0
最近把yoga源码看了一遍,它是一个按照 Flexbox 规范, 利用Web熟悉的API做高效measure 的库。本来想做个它在React Native for Android (以下简称RN4A)中的应用与分析,但是在这之前应该先将RN渲染流程搞懂,我们才能去进一步分析如何应用yoga去辅助测量。
前置知识
在理解本章内容之前,需要有一定React的基础。在初识React时,它的JSX语法令人惊艳,但是这个语法编写的代码是怎么被运行的呢?我们需要明白它,才能更好地理解React/ReactNative源码。
如果只是开发Web应用,都要给babel添加 React preset ,如果是开发RN,那么它都内置做好了,使用者体会不到。这个preset的作用,就是将JSX语法转化为纯js的代码。转码的结果可以参考 React Without JSX 。
我拿了一个最普通的文件来做转码示例,原始的React代码如下:
export default classSampleextendsComponent{
  render() {
    return (
      <Viewstyle={styles.container}>
        <Textstyle={styles.welcome}>
          Welcome to React Native!
        </Text>
      </View>
    );
  }
}
转码后:(经过部分精简)
var _react = require('react');
var _react2 = _interopRequireDefault(_react);
var _reactNative = require('react-native');
function_interopRequireDefault(obj){
  return obj && obj.__esModule ? obj : {default: obj};
}
// 省略部分代码
Sample = function(_Component){
  // 省略部分代码
  _createClass(Sample, [{
    key: 'render', value: functionrender(){
      return (
        _react2.default.createElement(_reactNative.View, {style: styles.container},
          _react2.default.createElement(_reactNative.Text, {style: styles.welcome}, 'Welcome to React Native!')));
    }
  }]);
  return Sample;
}(_react.Component);
以上代码比较简单, _createClass 方法构建是一个辅助定义property的方法,它向Sample对象中定义了传入的 render 方法,并让他继承于 React.Component 。我们可以看到,原先JSX的控件都被转换为通过 React.createElement 构建的对象。
这里面的 View / Text 都是React Native内置的 React Component 。大家如果想读懂React的源码,需要明白 JSX仅是一个语法糖 ,实际上他们都是一堆js类。
在理解ReactNative渲染机制之前,必须对React的渲染机制有一定了解
在React早先的一个版本中,将代码拆分为React与ReactDOM(见 Two Packages: React and React DOM )。
核心的React包中包含了基础的createElement/createClass/声明周期等React相关、平台无关的代码。在Web中,通过ReactDOM内的API可以进行DOM渲染/server端渲染。在ReactNative中也是类似,可以通过它进行Native组件的渲染、操作。
从一定角度上来说,React的组件可以分为两种:
- 元组件 框架内置的,可以直接用的组件。在Web上就是
<div>/<img>这种,在RN上就是ListView/Image这种。 - 复合组件 用户封装之后的组件,一般可以通过
React.createClass(ES6中可以继承React.Component)。
对应上面转码的例子中, Sample 是复合组件, View 是元组件。复合组件是自定义Class,通过 render() 方法返回渲染对象。但是不同平台有 不同的元组件实现 ,在Web上的组件实现可以参考 深入理解react(源码分析) ,在RN上见后续分析。但是在转码之后,他们就被 React.createElment 转化成了一个平台无关的 ReactElement ,我们可以看一下相关代码:
// ReactElement.js
// 转码后调用的createElement函数
ReactElement.createElement = function(type, config, children){
  var props = {};

  var key = null;
  var ref = null;
  var self = null;
  var source = null;

  if (config != null) {
    // 省略部分Debug代码

    if (hasValidRef(config)) {
      ref = config.ref;
    }
    if (hasValidKey(config)) {
      key = '' + config.key;
    }

    self = config.__self === undefined ? null : config.__self;
    source = config.__source === undefined ? null : config.__source;

    // 从config中复制值至props中
    for (propName in config) {
      if (hasOwnProperty.call(config, propName) && !RESERVED_PROPS.hasOwnProperty(propName)) {
        props[propName] = config[propName];
      }
    }
  }

  // 赋值children
  var childrenLength = arguments.length - 2;
  if (childrenLength === 1) {
    props.children = children;
  } else if (childrenLength > 1) {
    var childArray = Array(childrenLength);
    for (var i = 0; i < childrenLength; i++) {
      childArray[i] = arguments[i + 2];
    }
    props.children = childArray;
  }

  // 为默认属性赋值
  if (type && type.defaultProps) {
    var defaultProps = type.defaultProps;
    for (propName in defaultProps) {
      if (props[propName] === undefined) {
        props[propName] = defaultProps[propName];
      }
    }
  }
  // 省略部分Debug代码
  return ReactElement(type, key, ref, self, source, ReactCurrentOwner.current, props);
};

var ReactElement = function(type, key, ref, self, source, owner, props){
  var element = {
    // 标识这是一个ReactElement
    $$typeof: REACT_ELEMENT_TYPE,

    type: type, // 具体组件Object
    key: key,
    ref: ref, // 获取对象引用的回调
    props: props, // 传入属性

    _owner: owner
  };
  // 省略部分Debug代码
  return element;
}
在React核心库中提供了 instantiateReactComponent.js ,它会对 ReactElement 进行一些处理,它提供的逻辑如下:

这段代码的逻辑可以在 instantiateReactComponent.js 中看到,它是这样一个流程:当对象是 ReactElement 时,如果是元组件,就直接根据之前传入 ReactElement 的type生成实例;否则就生成一个 ReactCompositeComponent (即复合组件)。
判断ReactElement是否 元组件 ,它的type需要提供以下三个API:
-
mountComponent在首次渲染组件时调用; -
receiveComponent更新组件内容、属性时调用; -
unmountComponent移除组件时调用。
这三个API是React核心库中约定好的API,他们在 ReactReconciler 中被使用,在这其中会处理Mount/Diff的逻辑。对于 复合组件 ,即 ReactCompositeComponent ,也提供了这三个API。它对应type是一个用户自定义Class,提供了 render 方法来渲染出自定义视图。 ReactCompositeComponent 就会在对应的API内,递归对所有的child进行 instantiateReactComponent.js ,并且对实例进行mount/update。
此处更多代码细节可以参考 深入理解react(源码分析) 。这个过程可能绕了点,在后面中我会举例辅助理解。
React Native的js启动流程
上面说到 ReactReconciler / instantiateReactComponent ,可能没看过的人会觉得有点懵逼。之前说明过,React应用分两块:React核心层与渲染层。它们都是在核心层中提供的API,但是调用却是在渲染层用的。我们先以ReactNative为例,讲述一下它是怎么调用React核心层来进行渲染。
渲染是一个流程,它不会平白无故发生,总是有触发时机。第一次渲染在启动的时候,也是最容易把控到痕迹的时候,我们可以通过它去一步步剖析这个流程:
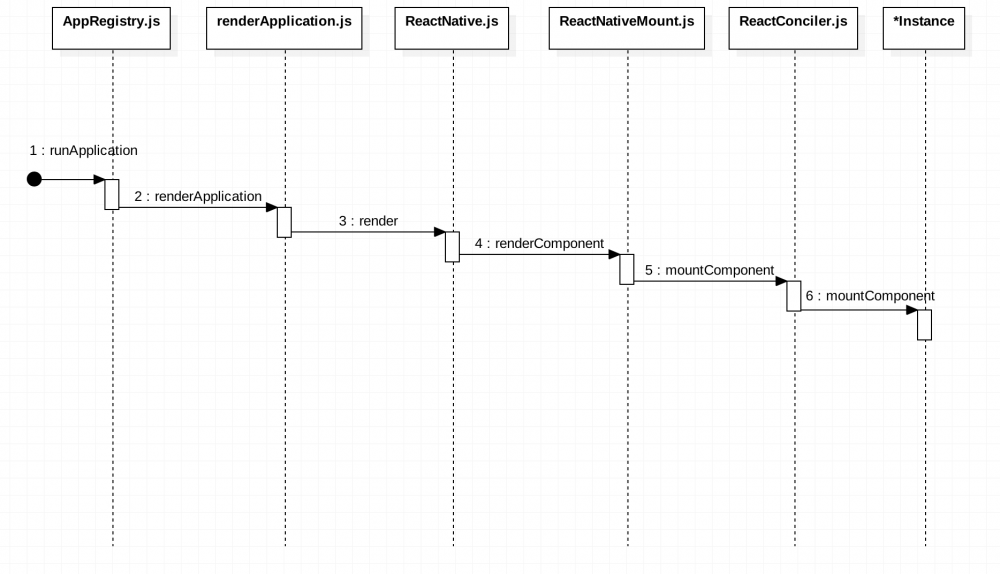
首先,ReactNative的js代码都需要通过 AppRegistry.registerComponent 注册React Component,我们看看它干了啥:
//AppRegistry.js

registerComponent: function(appKey: string, getComponentFunc: ComponentProvider):string{
  runnables[appKey] = {
    run: (appParameters) =>
      renderApplication(getComponentFunc(), appParameters.initialProps, appParameters.rootTag)
  };
  return appKey;
}
这段代码里很简洁,注册了一个对应输入key的回调到runnables里面。RN4A中,生命周期的启动是由Android带起来的,这个 AppRegistry 是一个js module,在Java中会通过jsbridge调用 AppRegistry.runApplication 启动js渲染流程,在js中会调用对应runnable,由上面的代码可以看出,它调用了 renderApplication 。(关于RN4A启动流程与jsBridge初始化可以参考: 【ReactNative For Android】框架启动核心路径剖析 与 【React Native for Android】jsBridge实现原理 ) 。
在这之后如上述流程图中一步步走了下去,没什么其他分支,走到 ReactNativeMount 中就会有料出现了,我们来看看:
//ReactNativeMount.js

renderComponent: function(
  nextElement: ReactElement<*>,
  containerTag: number,
  callback?: ?(() => void)
): ?ReactComponent<any, any, any> {
  // 将Element使用相同顶层Wrapper包裹,render方法返回child(即nextElement)
  var nextWrappedElement = React.createElement(
    TopLevelWrapper,
    { child: nextElement }
  );

  // 检查之前是否有节点已mount到目标节点上,若有则进行比较处理

  var instance = instantiateReactComponent(nextWrappedElement, false);

  // 将mount任务提交入回调Queue
  ReactUpdates.batchedUpdates(
    batchedMountComponentIntoNode,
    instance,
    containerTag
  );
  // ...
  return component;
}
这里我们可以看到它对直接调用了 instantiateReactComponent ,它首先碰见 TopLevelWrapper 会认为它是一个复合组件,所以直接生成了一个 ReactCompositeComponent 。之后将 batchedMountComponentIntoNode() 方法提交入回调Queue,它里面最终会走到 ReactNativeMount.mountComponentIntoNode ,我们看一下它做了什么:
//ReactNativeMount.js

functionmountComponentIntoNode(
    componentInstance,
    containerTag,
    transaction) {
  var markup = ReactReconciler.mountComponent(
    componentInstance,
    transaction,
    null,
    ReactNativeContainerInfo(containerTag),
    emptyObject,
    0 /* parentDebugID */
  );
  componentInstance._renderedComponent._topLevelWrapper = componentInstance;
  ReactNativeMount._mountImageIntoNode(markup, containerTag);
}
而 ReactReconciler.mountComponent 里面做的事情也很简单,就是对 componentInstance 调用 mountComponent 方法。在此处,就是调用了 ReactCompositeComponent.mountComponent 。它会对 render() 返回的组件调用 instantiateReactComponent / mountComponent ,即会 递归调用 mountComponent 直到为元组件为止。
不同平台有 不同的元组件实现 ,我们就先看看ReactNative的元组件是怎么实现的?
找到元组件真身
要找到这个答案比较简单,我们可以拿任意一个UI控件来看,就拿最简单的 View 来看一下,它的代码在Libraries/Components/View/View.js下,其实是一个复合组件,但是它的 render 方法返回的是一个元组件,看一下相关代码:
// View.js

const View = React.createClass({
  // 属性声明...

  render: function(){
    return <RCTView{...this.props} />;
  },
});

const RCTView = requireNativeComponent('RCTView', View, {
  nativeOnly: {
    nativeBackgroundAndroid: true,
    nativeForegroundAndroid: true,
  }
});
那这个 requireNativeComponent 做的什么呢?紧接着来看看:
// requireNativeComponent.js

functionrequireNativeComponent(
  viewName: string,
  componentInterface?: ?ComponentInterface,
  extraConfig?: ?{nativeOnly?: Object},
): Function {
  const viewConfig = UIManager[viewName]; // 由Native传入的对应ViewModule配置
  viewConfig.uiViewClassName = viewName;
  viewConfig.validAttributes = {};
  viewConfig.propTypes = componentInterface && componentInterface.propTypes;
  // 所有React视图控件的prop都继承View的prop
  const nativeProps = {
    ...UIManager.RCTView.NativeProps,
    ...viewConfig.NativeProps,
  };
  return createReactNativeComponentClass(viewConfig);
}
在 createReactNativeComponentClass.js 中,我们可以看到它是返回了一个构造 ReactNativeBaseComponent 的 构造函数 。为什么是一个构造函数而不是直接生成实例呢?这就要回到上一个话题了。这些组件在babel转码后会被作为type放在 ReactElement 中, instantiateReactComponent 调用的时候,如果type为函数,并且是元组件,它就会用new一个这个函数实例。
过程示例
上面说得稍微绕了点,我们用之前的的生成来描述一下。
用户自定义了 Sample 类,它渲染的节点是一个 View ,内嵌 Text 。记住他们转码后都会变成普通的 ReactElement ,当渲染引擎碰见 Sample 时,它会走这样一个流程:
-
instantiateReactComponent.js判断到Sample是一个函数,但是它不具备元组件API,则生成一个复合组件ReactCompositeComponent; - 当
Sample被ReactReconcilermount时,调用自身的mountComponent。在这里面调用render获得渲染节点,并对它调用instantiateReactComponent与ReactReconciler.mountComponent。这时候发现被渲染的节点是一个View,它仍然算是一个复合组件(它的render节点返回的才是元组件ReactNativeBaseComponent); - 对
View执行流程2,最终走入ReactNativeBaseComponent.mountComponent。
总结
React有核心层和渲染层,其中核心层提供一些基础的组件创造、生命周期、Mount/Diff(入口 ReactReconciler )、复合组件( ReactCompositeComponent )等API,渲染层通过实现不同的元组件来实现不同平台上的渲染。
在ReactNative上,所有的原生视图的添加、修改都在 ReactNativeBaseComponent 中处理,这块的逻辑,请听之后分解。
正文到此结束
热门推荐


相关文章

近期评论
-
你这基本没有更新呀,最近文章显示还是2019年的文章。不符合要求哈
-
关键词:慕云博客 链接:https://www.lilun.me 描述:分享原创文字的个人博客
-
-
-
可以提供一下源码吗
-
不是商业站,鸡娃学习笔记
-
-
-
-
听他们说很厉害的样子
Loading...
![[HBLOG]公众号](http://www.liuhaihua.cn/img/qrcode_gzh.jpg)

