使用 Angular 2 实现单页应用程序
由于具有实现更高性能的浏览器和智能电话应用程序的潜力,单页应用程序 (SPA) 技术在软件行业引起了广泛的兴趣。在过去 5 年多的时间里,开发人员对 Angular (一个开源 SPA 框架)的兴趣远超他们对其他 Web 框架(React、Backbone、Meteor 和 Ember)的兴趣,这从 StackOverflow 网站上针对每种 Web 框架的问题数量上可以判断出:

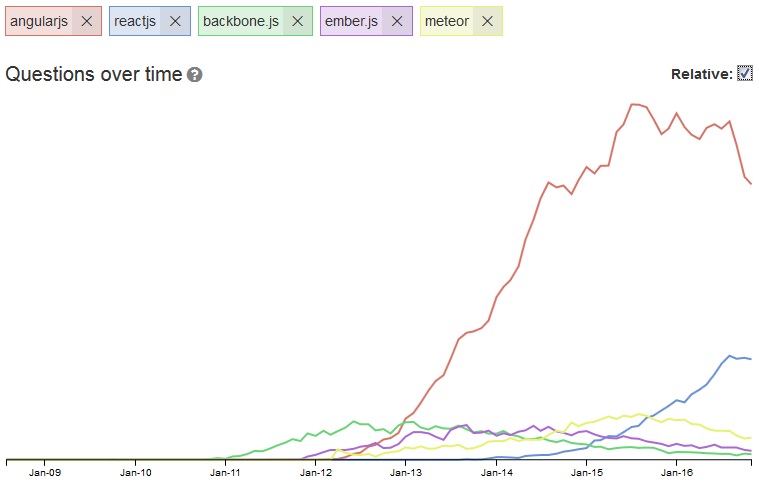
(图像来源: tag-trends )
Web 和移动开发人员非常喜欢 Angular 2(2016 年 9 月发布)。Angular 2 不是 Angular 1 的一次升级,而是一个全新的、不同的、更高级的框架。精通 Angular 2 已成为构建高性能、可扩展、稳健、现代的跨平台应用程序的一种很吃香的技能。
TypeScript
Angular 2 支持 JavaScript、Dart 和 TypeScript。您将使用 TypeScript 作为本教程的项目的开发语言。该框架构建于 TypeScript 之上,大多数有关 Angular 的文档、图书和教程都侧重于将 TypeScript 作为开发语言。
本教程将介绍 Angular 2 的重要构建基块,演示如何在开发计算机和沙箱服务器中使用 Angular 2 编写和运行 SPA。要充分掌握本教程,您需要具有一定的 Web 编程经验,包括 JavaScript、TypeScript 和 HTML 的各方面知识。无需提前拥有 Angular 经验。练习完示例项目后,您就会为使用 Angular 2 创建自己的 SPA 做好充足的准备。
可以从教程末尾的 “可下载资源” 部分下载针对沙箱应用程序的完整示例代码。
为什么使用 SPA 和 Angular 2?
在用户启动 SPA 时,该应用程序仅呈现来自服务器的一个 HTML 页面。除了这个 HTML 页面,服务器还会向客户端发送一个应用程序引擎。该引擎控制整个应用程序,包括HTML 页面的处理、输入、输出、绘制和加载。通常,90–95% 的应用程序代码是在浏览器中运行;当用户需要新数据时或必须执行身份验证等安全操作时,就会在服务器中运行剩余代码。由于几乎消除了对服务器的依赖,所以 SPA 能在 Angular 2 环境中自动扩展:无论有多少用户同时访问服务器,在 90–95% 的时间里,应用程序的性能绝不会受到影响。
另外,因为大部分负载都在客户端上运行,所以服务器在大部分时间里都处于空闲状态。对服务器资源的低需求显著减少了服务器上的压力,也潜在地降低了服务器成本。
Angular 2 的另一个优势是,它可以帮助 SPA 有效地使用微服务。
“ 通常,90–95% 的 SPA 代码在浏览器中运行;当用户需要新数据或必须执行身份验证等安全操作时,就会在服务器中运行剩余代码。 ”
Angular 2 概念
Angular 2 中的关键概念包括:
- 模块
- 组件
- 服务
- 路由
从现在开始,我将 Angular 2 简称为 Angular。
模块
Angular 应用程序是模块化的。每个 Angular 应用程序拥有至少一个 模块 ,即根模块,传统上将其命名为 AppModule 。根模块可以是小型应用程序中唯一的模块,但大多数应用程序都拥有更多的模块。作为开发人员,您需要决定如何使用模块概念。通常,会将主要功能或特性映射到一个模块。假设您的系统中有 5 个主要区域。除了根模块之外,每个区域都将拥有自己的模块,总计 6 个模块。
组件
组件 控制页面的一片区域,该区域被称为 视图 。您定义组件的应用程序逻辑 — 它如何支持类中的视图。类通过属性和方法的 API 与视图交互。一个组件包含一个类、一个模板和元数据。模板是一个 HTML 表单,用于告诉 Angular 如何呈现组件。一个组件只能属于一个模块。
服务
服务 提供应用程序所需的任何值、功能或特性。服务通常是一个具有明确定义的较小用途的类;它应高效地执行具体的操作。组件大量使用服务。服务大量使用微服务。
路由
路由 支持在用户执行应用程序任务时,从一个视图导航到下一个视图。路由等效于用于控制菜单和子菜单的机制。
了解 SPA 的优势并掌握 Angular 概念后,是时候在示例项目上开始实践了。
需要做的准备工作
要完成示例项目,您需要在开发 PC 上安装 Node.js 和 Angular CLI (一个用于 Angular 的命令行接口):
- 安装 Node.js:
- 下载 适合您的系统的版本,选择默认选项来完成安装。
- 从操作系统命令行运行
node -v来验证版本号 — 在我的情况下,版本为v6.9.1。
npm -v来查看它的版本号。当您安装来自公共 NPM 存储库的包时,会在后台运行 NPM。一个常见的 NPM 命令是npm install,它用于下载您的 Angular 项目的文件中列出的包版本。 - 安装 Angular CLI:
- 运行
npm install -g angular-cli@1.0.0-beta.21来安装我用于示例应用程序的版本(在编写本文时,仍处于公测阶段)。(如果您想尝试一个不同的编译版,可访问 CLI 站点 。)需要花约 10 分钟才能完成安装。 - 成功完成安装后,在操作系统命令行上键入
ng -v,以查看您的 CLI 版本号 — 在我的操作系统下:angular-cli: 1.0.0-beta.21 node: 6.9.1 os: win32 x64
如果您需要获得有关ng语法的帮助,可在操作系统命令行上键入ng help。
- 运行
package.json 文件
package.json 文件(Angular 应用程序中一个关键的元数据文件)包含应用程序和它的依赖包的细节。此文件是 Angular 应用程序中最重要的文件,尤其是在将代码从一台计算机迁移到另一台时,或者是在升级期间。package.json 文件包含需要安装的包版本。
您无需为适合本教程练习的 package.json 感到担心。但在开发生产级应用程序时,必须多多留意此文件中列出的版本号。
以下是来自一个 package.json 文件的一些有效语句:
{ "dependencies" :
  { "foo" : "1.0.0 - 2.9999.9999"
  , "bar" : ">=1.0.2 <2.1.2"
  , "baz" : ">1.0.2 <=2.3.4"
  , "boo" : "2.0.1"
  , "qux" : "<1.0.0 || >=2.3.1 <2.4.5 || >=2.5.2 <3.0.0"
  , "til" : "^1.2"
  , "elf" : "~1.2.3"
  , "two" : "2.x"
  , "thr" : "3.3.x"
  , "lat" : "latest"
  }
}
npm install 命令对冒号右侧的部分语句的解释如下(其中 版本 表示所使用的版本号):
- " 版本 ":必须与 版本 准确匹配
- "> 版本 ":必须大于 版本
- "~ 版本 ":约等于 版本
- "^ 版本 ":兼容 版本
- "1.2.x":1.2.0、1.2.1 等,但不能是 1.3.0
- "*" :匹配任何 版本
- ""(空字符串)":与
*相同 - " 版本 1 - 版本 2 ":与 ">= 版本 1 <= 版本 2 " 相同
要进一步了解 package.json,可在操作系统命令行上键入 npm help package.json ,以便在浏览器中查看帮助内容。
示例项目概述
示例项目包含一个开箱即用的 Angular 应用程序,以及您将在开箱即用的应用程序上开发的一个自定义应用程序。当您完成上述操作后,您将拥有一个包含 3 个微型应用程序的 Angular 应用程序,每个微型应用程序中的特性使用了 3 个 Web 服务 API:
- 来自雅虎的天气组件
- 货币兑换
- 电影细节
所有应用程序逻辑都将在您的浏览器中运行。仅在浏览器需要新数据时,才需要服务器。事实上,您可以关闭服务器进程,它仍会在您的应用程序中工作,因为它是一个 SPA。
下图显示了应用程序拓扑结构:

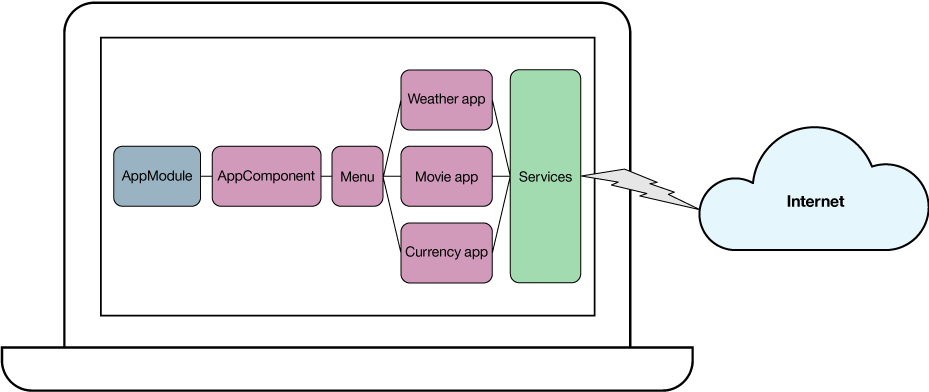
您将使用 Angular CLI 创建您的项目(该项目默认情况下会包含 AppModule 和 AppComponent )和 4 个自定义组件:
- 菜单组件
- 天气组件
- 电影组件
- 货币组件
您将创建用于菜单导航的路由,并将以下服务注入到天气、电影和货币组件中:
- 来自使用微服务的 HTTP 的数据
- 在使用这些服务时跨组件的资源共享
创建基础应用程序和模块
准备好开始了吗?首先在操作系统命令行上转到您想放置项目目录的位置。
创建一个 Angular 项目
运行下面的命令来生成一个新 Angular 项目(其中 dw_ng2_app 是项目名称):
ng new dw_ng2_app --skip-git
安装所有需要的包和 Angular 基础应用程序(这将花费大约 10 分钟时间)后,您将返回到操作系统命令提示符上。如果您随后列出 /dw_ng2_app 目录的内容,就可以看到项目结构:
|— e2e
|— node_modules
|— src
angular-cli.json
karma.conf.js
package.json
protractor.conf.js
README.md
tslint.json
../dw_ng2_app/src 目录的内容包括:
|— app
|— assets
|— environments
favicon.ico
index.html
main.ts
polyfills.ts
styles.css
test.ts
tsconfig.json
typings.d.ts
../dw_ng2_app/src/app 目录( 根模块文件夹 )包含以下文件:
app.component.css
app.component.html
app.component.spec.ts
app.component.ts
app.module.ts
index.ts
运行开箱即用的 Angular 应用程序
更改到项目目录,运行 ng serve 来启动开箱即用的 Angular 应用程序。
默认情况下,该进程在端口 4200 上启动。如果您的 port 系统环境变量的值不是 4200,该进程将在此端口上启动。您可以运行 ng serve --port 4200 命令来覆盖默认端口号,这是一项可选操作。
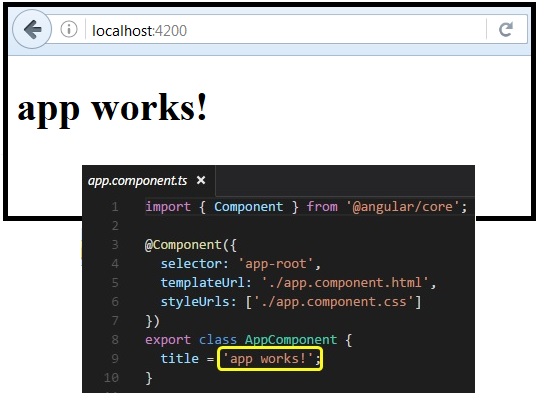
打开您的浏览器并输入 URL http://localhost:4200/ 。您的 Angular 应用程序会显示 app works! ,这表明应用程序已启动、运行并准备就绪:

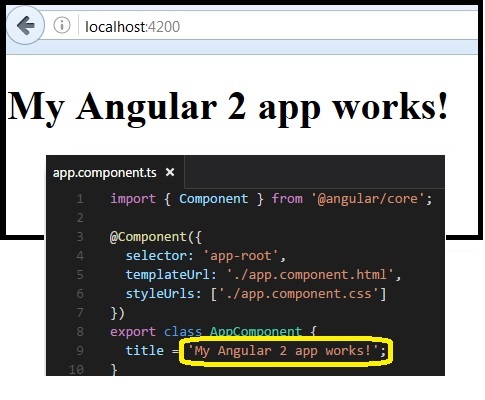
如果在应用程序运行过程中更改代码,Angular 会非常智能地监视并自动重新启动应用程序。尝试编辑 app.component.ts 文件,更改 title 的值。您可以看到,您的浏览器页面反映了这一更改:

如何将模块链接到组件
在清单 1 中,第 20 行显示了 AppModule 模块的声明。
清单 1. app.module.ts
import { BrowserModule } from '@angular/platform-browser';
import { NgModule } from '@angular/core';
import { FormsModule } from '@angular/forms';
import { HttpModule } from '@angular/http';

import { AppComponent } from './app.component';

@NgModule({
  declarations: [
    AppComponent
  ],
  imports: [
    BrowserModule,
    FormsModule,
    HttpModule
  ],
  providers: [],
  bootstrap: [AppComponent]
})
export class AppModule { }
此模块仅包含一个组件 — AppComponent — 如上第 10 行所示。第 18 行表明,在引导进程下启动的第一个组件是 AppComponent 。
组件内部结构
清单 2 给出了 app.component.ts 文件中的主要应用程序组件的内容。
清单 2. app.component.ts
import { Component } from '@angular/core';

@Component({
  selector: 'app-root',
  templateUrl: './app.component.html',
  styleUrls: ['./app.component.css']
})
export class AppComponent {
  title = 'My Angular 2 app works!';
}
这是 app.component.html 文件中的主要应用程序组件的内容:
<h1>
  {{title}}
</h1>
元数据位置
元数据告诉 Angular 如何处理类。事实上,在您通过向 AppComponent 附加元数据给类时,告诉 Angular 它还不是组件。
可以使用 @Component 修饰器附加元数据,这会将类标识为组件。 @Component 修饰器接受一个必需的配置对象,该对象包含 Angular 创建和呈现该组件和它的视图所需的信息。
中的代码使用可用的 @Component 配置选项中的 3 个选项:
-
selector:一个 CSS 选择器,告诉 Angular 在父 HTML 文件中找到selector标记的地方创建和插入此组件的一个实例 -
templateUrl:组件的 HTML 文件 -
styleUrls:组件的样式表,比如 .css 文件
组件内的模板位置
模板是一个 HTML 表单,用于告诉 Angular 如何呈现组件。在的第 5 行上, templateUrl 指向一个名为 app.component.html 的视图。
组件内的数据绑定
数据绑定是一个 HTML 表单,用于告诉 Angular 如何呈现组件。在 app.component.ts 文件中, title 的值在类内设置,在 app.component.html 文件中使用。数据绑定可以是单向或双向的。在本例中,如果您在双花括号 {{ }} 内提及该变量,则该映射是单向的。值从类传递到 HTML 文件。
创建自定义组件和路由
此刻,您的 Angular 应用程序已准备就绪并能工作正常。这个基础应用程序有一个模块、一个组件、一个类、一个模板、元数据和数据绑定 — 但它仍缺少 4 个其他的重要部分:
- 多个组件
- 路由
- 服务
- 微服务的使用
接下来,您将创建这些自定义组件。
创建自定义组件
按 Ctrl-C 停止 Angular 进程(确保您在 Angular 项目的目录中,在本例中为 dw_ng2_app)。在命令提示符下,运行以下命令:
-
ng g c Menu -is --spec false --flat:在AppModule根模块(同一个文件夹中)内创建Menu组件。 -
ng g c Weather -is --spec false:在AppModule根模块内名为 weather 的子文件夹中创建Weather组件。 -
ng g c Currency -is --spec false:在AppModule根模块内名为 currency 的子文件夹中创建Currency组件。 -
ng g c Movie -is --spec false:在AppModule根模块内名为 movie 的子文件夹中创建Movie组件。
现在,有了创建的新组件 — 包括类、元数据和模板 — 您可以看到 AppModule 如何链接到这些组件。在清单 3 中,第 28 行包含 AppModule 模块的声明。此模块包含 5 个组件,包括根组件和其他 4 个组件,如第 14–18 行所示。
清单 3. app.module.ts
import { BrowserModule } from '@angular/platform-browser';
import { NgModule } from '@angular/core';
import { FormsModule } from '@angular/forms';
import { HttpModule } from '@angular/http';

import { AppComponent } from './app.component';
import { MenuComponent } from './menu.component';
import { WeatherComponent } from './weather/weather.component';
import { CurrencyComponent } from './currency/currency.component';
import { MovieComponent } from './movie/movie.component';

@NgModule({
  declarations: [
    AppComponent,
    MenuComponent,
    WeatherComponent,
    CurrencyComponent,
    MovieComponent
  ],
  imports: [
    BrowserModule,
    FormsModule,
    HttpModule
  ],
  providers: [],
  bootstrap: [AppComponent]
})
export class AppModule { }
创建路由
路由创建命令
我在这里提供了手动创建路由的操作说明。截至编写本文时,创建路由的 CLI 命令正在开发之中。您可以查阅 CLI 网站 ,看看它现在是否可用。
要让 Angular 能在组件之间导航,需要创建 路由 。使用清单 4 的内容覆盖 menu.component.html 文件,以便 HTML 包含所有组件的正确菜单。
清单 4. menu.component.html
<div class="row">
   <div class="col-xs-12">
    <ul class="nav nav-pills">
     <li routerLinkActive="active"> <a [routerLink]="['/weather']" >Weather</a></li>
     <li routerLinkActive="active"> <a [routerLink]="['/movie']" >Movie Details</a></li>
     <li routerLinkActive="active"> <a [routerLink]="['/currency']" >Currency Rates</a></li>
    </ul>
  </div>
 </div>
清单 4 中的代码提供了 GUI 与 URL 路径之间的映射。例如,当用户单击 GUI 中的 Movie Details 按钮时,Angular 知道它需要像 URL 路径为 http://localhost:4200/movie 一样运行。
接下来,将 URL 路径映射到组件。在根模块的相同文件夹中,创建一个名为 app.routing.ts 的配置文件,使用清单 5 中的代码作为其内容。
清单 5. app.routing.ts
import { Routes, RouterModule } from '@angular/router';
import { CurrencyComponent } from "./currency/currency.component";
import { WeatherComponent } from "./weather/weather.component";
import { MovieComponent } from "./movie/movie.component";
const MAINMENU_ROUTES: Routes = [
    //full : makes sure the path is absolute path
    { path: '', redirectTo: '/weather', pathMatch: 'full' },
    { path: 'weather', component: WeatherComponent },
    { path: 'movie', component: MovieComponent },
    { path: 'currency', component: CurrencyComponent }
];
export const CONST_ROUTING = RouterModule.forRoot(MAINMENU_ROUTES);
在本例中,如果您的 URL 相对路径是 movie ,则会告诉 Angular 调用 MovieComponent 组件。换句话说,相对路径 movie 映射到 URL http://localhost:4200/movie 。
现在,您需要将此视图链接到它的父组件。使用以下代码覆盖 app.component.html 文件内容:
<div class="container">
 <app-menu></app-menu>
 <hr>
 <router-outlet></router-outlet>
</div>
<app-menu></app-menu> 选择器会包含菜单。 <router-outlet></router-outlet> 选择器是当前组件的占位符。根据 URL 路径,该值可以是以下 3 个组件中的任意一个:天气、电影或货币。
您还必须向该模块告知此路由。在 app.module.ts 文件中添加两项,如清单 6 中的第 11 和 25 行所示。
清单 6. app.module.ts
import { BrowserModule } from '@angular/platform-browser';
import { NgModule } from '@angular/core';
import { FormsModule } from '@angular/forms';
import { HttpModule } from '@angular/http';

import { AppComponent } from './app.component';
import { MenuComponent } from './menu.component';
import { WeatherComponent } from './weather/weather.component';
import { CurrencyComponent } from './currency/currency.component';
import { MovieComponent } from './movie/movie.component';
import { CONST_ROUTING } from './app.routing';

@NgModule({
  declarations: [
    AppComponent,
    MenuComponent,
    WeatherComponent,
    CurrencyComponent,
    MovieComponent
  ],
  imports: [
    BrowserModule,
    FormsModule,
    HttpModule,
    CONST_ROUTING
  ],
  providers: [],
  bootstrap: [AppComponent]
})
export class AppModule { }
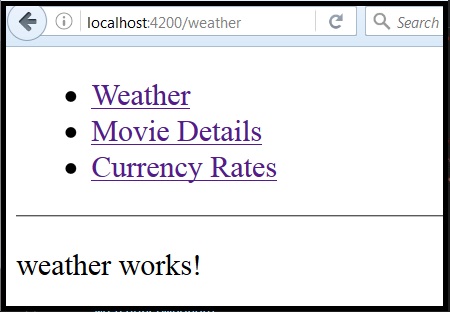
现在,如果您运行应用程序并单击 Weather 链接,应用程序将会显示 weather works! :

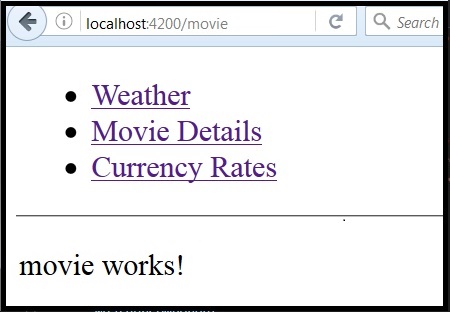
如果单击 Movie Details 链接,应用程序会显示 movie works! :

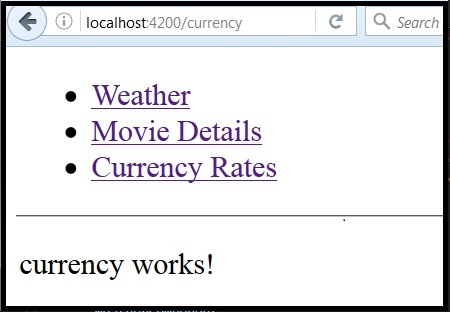
如果单击 Currency Rates 链接,应用程序将会显示 currency works! :

您已成功修改了您的 Angular 应用程序,以便包含多个自定义组件和路由。现在您已经准备好执行最后两个重要操作:
- 创建和配置服务
- 使用微服务
创建服务
按下 Ctrl-C 停止 Angular 进程。运行下面的命令:
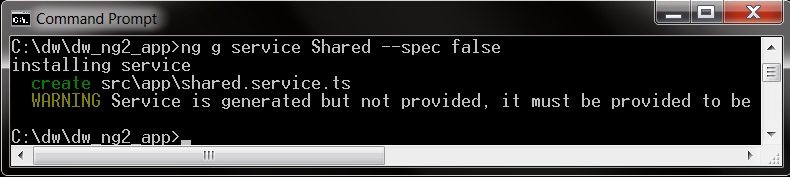
ng g service Shared --spec false
此命令在根模块文件夹中的 shared.service.ts 文件中创建该服务:

将 shared.service.ts 的内容替换为清单 7 中的代码。
清单 7. shared.service.ts
import { Injectable } from '@angular/core';
import { Http, Headers, Response } from "@angular/http";
import 'rxjs/Rx';
import { Observable } from "rxjs";

@Injectable()
export class SharedService {
    weatherURL1 = "https://query.yahooapis.com/v1/public/yql?q=select%20*%20from%20weather.forecast%20where%20woeid%20in%20(select%20woeid%20from%20geo.places(1)%20where%20text%3D%22";
    weatherURL2 = "%2C%20";
    weatherURL3 = "%22)&format=json&env=store%3A%2F%2Fdatatables.org%2Falltableswithkeys";
    findMovieURL1 = "http://www.omdbapi.com/?t=";
    findMovieURL2 = "&y=&plot=short&r=json";
    currencyURL = "http://api.fixer.io/latest?symbols=";
    totReqsMade: number = 0;
    constructor(private _http: Http) { }

    findWeather(city, state) {
        this.totReqsMade = this.totReqsMade + 1;
        return this._http.get(this.weatherURL1 + city + this.weatherURL2+ state + this.weatherURL3)
            .map(response => {
                { return response.json() };
            })
            .catch(error => Observable.throw(error.json()));
    }

    findMovie(movie) {
        this.totReqsMade = this.totReqsMade + 1;
        return this._http.get(this.findMovieURL1 + movie + this.findMovieURL2)
            .map(response => {
                { return response.json() };
            })
            .catch(error => Observable.throw(error.json().error));
    }

    getCurrencyExchRate(currency) {
        this.totReqsMade = this.totReqsMade + 1;
        return this._http.get(this.currencyURL + currency)
            .map(response => {
                { return response.json() };
            })
            .catch(error => Observable.throw(error.json()));
    }
}
清单 7 中的 import ... 语句是任何服务正常运行所必不可少的。 @Injectable() 语句特别重要;它表明此 service 可注入到其他组件中 — 该技术通常被称为 依赖注入 。
totReqsMade 变量在这里声明,将用于在 3 个组件之间传递它的值。这将跟踪为获得微服务结果而发出的服务请求总数。
您有 3 个方法,它们的名称表明了自己的功能: findWeather() 、 findMovie() 和 getCurrencyExchRate() 。在方法执行期间,您的 Angular 应用程序将让浏览器访问网络来使用微服务。现在您将把组件链接到所创建的服务。
将 movie.component.ts 文件内容替换为清单 8 中的代码。
清单 8. movie.component.ts
import { Component, OnInit } from '@angular/core';
import { SharedService } from "./../shared.service";

@Component({
  selector: 'app-movie',
  templateUrl: './movie.component.html',
  styles: []
})
export class MovieComponent implements OnInit {
    id_movie: string = "";
    mv_Title: string = "";
    mv_Rated: string = "";
    mv_Released: string = "";
    mv_Director: string = "";
    mv_Actors: string = "";
    mv_Plot: string = "";
    constructor(private _sharedService: SharedService) {
    }

    ngOnInit() {
    }

    callMovieService() {
        this._sharedService.findMovie(this.id_movie)
            .subscribe(
            lstresult => {
                this.mv_Title = lstresult["Title"];
                this.mv_Rated = lstresult["Rated"];

                this.mv_Released = lstresult["Released"];
                this.mv_Director = lstresult["Director"];
                this.mv_Actors = lstresult["Actors"];
                this.mv_Plot = lstresult["Plot"];
            },
            error => {
                console.log("Error. The findMovie result JSON value is as follows:");
                console.log(error);
            }
            );
    }
}
这个重要的代码端调用服务方法来获取新数据。在本例中,它调用 callMovieService() ,然后调用 this._sharedService.findMovie() 方法。
类似地,将 currency.component.ts 文件内容替换为清单 9 中的代码。
清单 9. currency.component.ts
import { Component, OnInit } from '@angular/core';
import { SharedService } from "./../shared.service";

@Component({
  selector: 'app-currency',
  templateUrl: './currency.component.html',
  styles: []
})
export class CurrencyComponent implements OnInit {

  id_currency: string = "";
  my_result: any;
  constructor(private _sharedService: SharedService) {
  }

  ngOnInit() {
  }

  callCurrencyService() {
    this._sharedService.getCurrencyExchRate(this.id_currency.toUpperCase())
      .subscribe(
      lstresult => {
                this.my_result = JSON.stringify(lstresult);
      },
      error => {
        console.log("Error. The callCurrencyService result JSON value is as follows:");
        console.log(error);
      }
      );
  }
}
将 weather.component.ts 文件内容替换为清单 10 中的代码。
清单 10. weather.component.ts
import { Component, OnInit } from '@angular/core';
import { SharedService } from "./../shared.service";

@Component({
  selector: 'app-weather',
  templateUrl: './weather.component.html',
  styles: []

})
export class WeatherComponent implements OnInit {
  id_city: string = "";
  id_state: string = "";
  op_city: string = "";
  op_region: string = "";
  op_country: string = "";
  op_date: string = "";
  op_text: string = "";
  op_temp: string = "";
  constructor(private _sharedService: SharedService) {
  }

  ngOnInit() {
  }

  callWeatherService() {
    this._sharedService.findWeather(this.id_city, this.id_state)
      .subscribe(
      lstresult => {
        this.op_city = lstresult["query"]["results"]["channel"]["location"]["city"];
        this.op_region = lstresult["query"]["results"]["channel"]["location"]["region"];
        this.op_country = lstresult["query"]["results"]["channel"]["location"]["country"];
        this.op_date = lstresult["query"]["results"]["channel"]["item"]["condition"]["date"];
        this.op_text = lstresult["query"]["results"]["channel"]["item"]["condition"]["text"];
        this.op_temp = lstresult["query"]["results"]["channel"]["item"]["condition"]["temp"];
      },
      error => {
        console.log("Error. The findWeather result JSON value is as follows:");
        console.log(error);
      }
      );
  }
}
现在,更新该模块以包含这些服务。编辑 app.module.ts 文件,以包含清单 11 的第 12 和 28 行的两条语句。
清单 11. app.module.ts
import { BrowserModule } from '@angular/platform-browser';
import { NgModule } from '@angular/core';
import { FormsModule } from '@angular/forms';
import { HttpModule } from '@angular/http';

import { AppComponent } from './app.component';
import { MenuComponent } from './menu.component';
import { WeatherComponent } from './weather/weather.component';
import { CurrencyComponent } from './currency/currency.component';
import { MovieComponent } from './movie/movie.component';
import { CONST_ROUTING } from './app.routing';
import { SharedService } from "./shared.service";

@NgModule({
  declarations: [
    AppComponent,
    MenuComponent,
    WeatherComponent,
    CurrencyComponent,
    MovieComponent
  ],
  imports: [
    BrowserModule,
    FormsModule,
    HttpModule,
    CONST_ROUTING
  ],
  providers: [SharedService],
  bootstrap: [AppComponent]
})
export class AppModule { }
修改组件视图
现在还剩难题的最后一部分。您需要告诉 HTML 文件调用正确的服务方法。为此,请将 movie.component.html 文件的内容替换为清单 12 中的代码。
清单 12. movie.component.html
<h2>Open Movie Database</h2>
<div class="col-md-8 col-md-offset-2">
 <div class="form-group">
  <input type="text" required [(ngModel)]="id_movie" (change)="callMovieService()" class="form-control" placeholder="Enter Movie name ...">
  <br><br>
  <h3>Movie Details</h3>
  <br>
  <p class="well lead">
      <i> Title :</i> {{ this.mv_Title }} <br>
      <i> Plot :</i> {{ this.mv_Plot }} <br>
      <i> Actors :</i> {{ this.mv_Actors }} <br>
      <i> Directed by :</i> {{ this.mv_Director }} <br>
      <i> Rated :</i> {{ this.mv_Rated }} <br>
      <i> Release Date :</i> {{ this.mv_Released }} <br>
  </p>
  <p class="text-info">Total # of all the service requests including Weather, Movie, and Currency is :
      <span class="badge">{{this._sharedService.totReqsMade}}</span>
  </p>
 </div>
</div>
movie.component.html 中编码了一些重要的信息:
-
{{ this._sharedService.totReqsMade }}:这是在服务级别上跟踪的值,它会在所有 3 个应用程序组件之间共享。 -
[(ngModel)]="id_movie":用户输入的 GUI 输入被传递到调用此 HTML 的类。在本例中,该类为MovieComponent。 -
(change)="callMovieService()":当此字段值更改时,就会告诉系统调用 movie.component.ts 文件中包含的callMovieService()方法。 -
{{ this.mv_Title }}, {{ this.mv_Plot }}, {{ this.mv_Actors }}, {{ this.mv_Director }}, {{ this.mv_Rated }}, {{ this.mv_Released }}:显示从callMovieService() -> this._sharedService.findMovie(this.id_movie)执行的服务调用的结果。
将 weather.component.html 文件的内容替换为清单 13 中的代码。
清单 13. weather.component.html
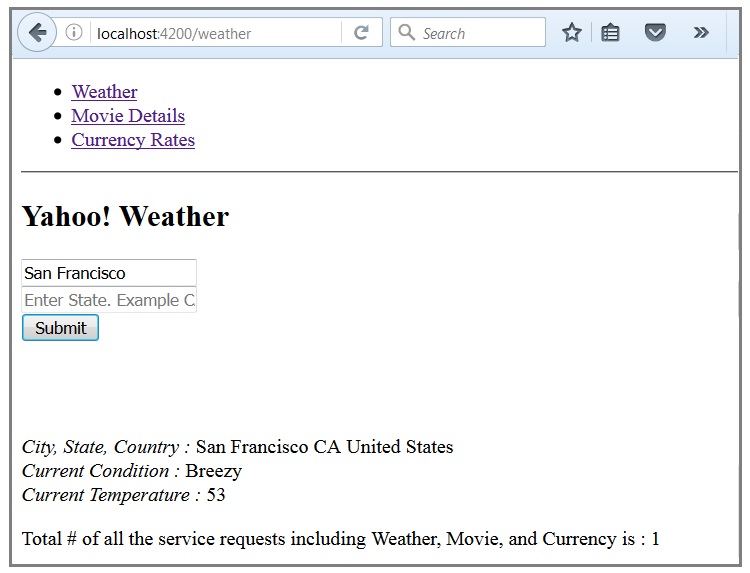
<h2>Yahoo! Weather </h2>
<div class="col-md-8 col-md-offset-2">
 <div class="form-group">
  <input type="text" [(ngModel)]="id_city" class="form-control" placeholder="Enter City name ..."><br>
  <input type="text" [(ngModel)]="id_state" class="form-control" placeholder="Enter State. Example CA for California ..."><br>
  <button type="button" class="btn btn-primary" (click)="callWeatherService()">Submit</button>
  <br><br><br>
  <br>
  <p class="well lead">
    <i>City, State, Country :</i> {{ this.op_city }} {{ this.op_region }} {{ this.op_country }} <br>
    <i>Current Condition :</i> {{ this.op_text }} <br>
    <i>Current Temperature :</i> {{ this.op_temp }} <br>
  </p>
  <p class="text-info">Total # of all the service requests including Weather, Movie, and Currency is :
    <span class="badge">{{this._sharedService.totReqsMade}}</span>
  </p>
 </div>
</div>
最后,将 currency.component.html 文件的内容替换为清单 14 中的内容。
清单 14. currency.component.html
<h2>Currency Exchange Rates</h2>
<div class="col-md-8 col-md-offset-2">
 <div class="form-group">
  <input type="text" [(ngModel)]="id_currency" (change)="callCurrencyService()" class="form-control" placeholder="Enter Currency Symbol. Example: GBP(,AUD,INR)...">
  <br><br>
  <h3>Rate Details</h3>
  <br>
  <p class="well lead">Exchange rate relative to Euro in a JSON format: : {{ this.my_result }} </p>
  <p class="text-info">Total # of all the service requests including Weather, Movie, and Currency is :
    <span class="badge">{{this._sharedService.totReqsMade}}</span>
  </p>
 </div>
</div>
现在,如果各部分均按预期运行,应用程序可接受浏览器中的用户输入。
运行应用程序并改进 UI
现在运行应用程序,输入一些值,然后查看结果。例如,单击 Weather 链接,输入 San Francisco 来查看该城市的天气条件:

测试您的新 Angular 技能
目前,您的应用程序的输入字段没有实现验证或错误处理。您可以自行尝试添加这些功能。提示:在服务中添加方法 validateMovie(movie-name) 、 validateCurrency(currency-name) 、 validateCity(city-name) 和 validateState(state-name) 。然后从相应的组件调用这些方法。
一切正常,但还可以让 UI 更具吸引力。改进 GUI 的一种方法是使用 Bootstrap 。( Angular 2 资料 是理想的选择,但截至编写本文时,它尚未正式发布)。
转到 Bootstrap 入门页面 ,将该页的以下两行复制到剪贴板:
<!-- Latest compiled and minified CSS -->
<link rel="stylesheet" href="https://maxcdn.bootstrapcdn.com/bootstrap/3.3.7/css/bootstrap.min.css" integrity="sha384-BVYiiSIFeK1dGmJRAkycuHAHRg32OmUcww7on3RYdg4Va+PmSTsz/K68vbdEjh4u" crossorigin="anonymous">
打开 index.html 文件,将刚复制的语句粘贴到第 8 行下。
清单 15. index.html
<!doctype html>
<html>

<head>
  <meta charset="utf-8">
  <title>DwNg2App</title>
  <base href="/">

  <!-- Latest compiled and minified CSS -->
  <link rel="stylesheet" href="https://maxcdn.bootstrapcdn.com/bootstrap/3.3.7/css/bootstrap.min.css" integrity="sha384-BVYiiSIFeK1dGmJRAkycuHAHRg32OmUcww7on3RYdg4Va+PmSTsz/K68vbdEjh4u"
    crossorigin="anonymous">

  <meta name="viewport" content="width=device-width, initial-scale=1">
  <link rel="icon" type="image/x-icon" href="favicon.ico">
</head>

<body>
  <app-root>Loading...</app-root>
</body>

</html>
现在该应用程序在浏览器中看起来更加美观,拥有更容易理解的样式和菜单按钮,而不是 Weather、Movie Details 和 Currency Rates 链接:


嵌套的 index.html
现在花一分钟时间体会一下您刚完成的应用程序为什么被称为 SPA。
当 Angular 应用程序启动时,服务器将 index.html 文件发送到浏览器,而且 index.html 是浏览器显示的唯一文件。Angular 对该页面执行的任何操作都会插入到此视图中:


index.html 末尾的 <app-root> 选择器被 app.component.html 的内容所取代。app.component.html 包含两个选择器: <app-menu> 和 <router-outlet> 。 <app-menu> 选择器中填入 menu.component.html 的内容, <router-outlet> 依据菜单选项而动态填充 — 也就是说,填入 weather.component.html、currency.component.html 或 movie.component.html 的内容。
除了 Angular 保留选择器 <router-outlet></router-outlet> 外,所有选择器都是静态的。此选择器在运行时期间依据路由器值而填充。仅显示 index.html,您编码的其他所有 HTML 文件都嵌套在 index.html 文件内。
模拟服务器
您的 Angular 项目已成功在开发计算机中运行。如果您能访问远程沙箱服务器,那么可以将代码迁移到那里,看看应用程序在被用户运行时的行为。(否则,可以跳到教程的部分。)
确保 Node.js 和 Angular CLI 已安装在远程沙箱中。压缩本地项目文件夹中的所有内容,node_modules 目录及其内容除外。将压缩后的项目文件复制到沙箱服务器并解压。转到包含 package.json 的服务器目录并运行 npm install 命令。package.json 文件使 npm install 命令能转到 NPM 公共存储库,安装所有需要的包版本。运行此命令也会自动在服务器上创建 node_modules 目录和它的内容。
运行 ng serve 命令,以便在沙箱服务器中启动该应用程序,就像在开发计算机中所做的一样。按下 Ctrl-C 停止该进程。同样地,如果您想了解 ng serve 的其他选项,可以运行 ng help 命令。
使用 ng serve --port sandbox-port# --host sandbox-hostname 命令运行该应用程序。
现在 Angular 应用程序可在 URL http:// sandbox-hostname : sandbox-port# 上访问。在开发计算机浏览器中运行该 URL 上的应用程序时,在沙箱服务器上按下 Ctrl-C 停止服务器 Angular 进程。请注意,整个应用程序都在开发计算机的浏览器中运行,尽管服务器 Angular 进程已关闭。这会告诉您,SPA 技术正在运行。该应用程序加载到浏览器中后,除非应用程序需要新数据,否则控制权绝不会转交给服务器。
在 SPA 领域,浏览器就是新型的服务器。如果 10 个用户在运行该应用程序,就会有 10 个浏览器处理该负载。如果 1,000 个用户在运行该应用程序,则有 1,000 个浏览器处理该负载。整个 Angular 应用程序都在浏览器的控制之下,除了在服务器中运行的任何逻辑,比如身份验证和数据库操作。
更高的性能和服务器压力的减轻,最终会提高用户体验和用户满意度 — 这是任何企业获得成功的关键。
“ 在 SPA 领域,浏览器就是新型的服务器。 ”
结束语
您学习了如何使用 Angular 2 编写一个 SPA,并在开发计算机和沙箱服务器中运行它。对于生产需求,请与您的 IT 部门协商。大多数生产应用程序拥有的一项主要功能是身份验证和授权,应在服务器中运行该功能(主要出于安全原因)。您可能需要一个专用服务器来处理这些操作。对于该服务器,可以使用 Node.js,在 Angular 2 在前端运行时,它可以充当在后端运行的服务器。(Node 和 Angular 都起源于 Google,所以它们能有效地协同运行。)
您可以考虑的用来提高应用程序性能的其他技术包括:
- 捆绑:该进程将您的许多程序组合到一个文件中。
- 微型化:压缩捆绑的文件,以便尽可能地减小项目大小。
- 提前 (AoT) 编译:服务器复杂在构建过程中提前编译,而不是浏览器在运行时期间执行即时 (JIT) 编译。
致谢
感谢 IBM 的优秀员工 Guy Huinen、Dean P Cummings、Don Turner 和 Mark Shade 的评审工作和支持。
下载资源
- 沙箱示例应用程序 (dw_ng2_app_for_sandbox.zip | 18KB)
正文到此结束
- 本文标签: value TypeScript JavaScript 站点 db find 安装 Menu 智能 key Developer 下载 root node map CSS CTO json provider ACE web 端口 CDN 安全 Bootstrap 时间 实例 开源 http zip IBM js 网站 IDE 需求 URLs 开发 core id java tab https cat 数据 代码 操作系统 src IO 目录 测试 git 压力 UI Node.js Select dependencies example ORM 编译 struct 进程 Region Google HTML 软件 企业 Service 服务器 ip 数据库 配置 API App
- 版权声明: 本文为互联网转载文章,出处已在文章中说明(部分除外)。如果侵权,请联系本站长删除,谢谢。
- 本文海报: 生成海报一 生成海报二
热门推荐


相关文章


Loading...
![[HBLOG]公众号](http://www.liuhaihua.cn/img/qrcode_gzh.jpg)

