从源码角度深入理解LayoutInflater.Factory
LayoutInflater在开发中使用的场合非常多,常见的如在Adapter中getView()方法中,或者在Fragment中onCreateView()中等等。开发中使用的多数场景都是通过使用LayoutInflater的inflate()方法来生成一个View的实例,但是LayoutInflater.Factory开发中还是比较少见的,除非是开发多主题模式的应用,如包含了日间模式和夜间模式的应用。
简单示例
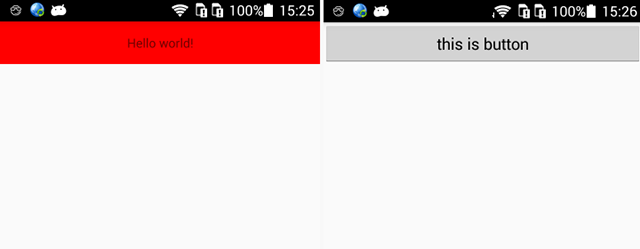
在介绍LayoutInflater.Factory之前先看一下它的一个简单示例,在布局文件中只设置一个TextView,内容如下:
<TextViewxmlns:android="http://schemas.android.com/apk/res/android"
    android:layout_width="match_parent"
    android:layout_height="48dp"
    android:background="#f00"
    android:gravity="center"
    android:text="@string/hello_world"/>
在Activity的onCreate方法中我们重新设置一下Factory,代码如下:
protected void onCreate(BundlesavedInstanceState) {
 LayoutInflaterCompat.setFactory(LayoutInflater.from(this), new LayoutInflaterFactory() {
 @Override
 public ViewonCreateView(Viewparent, String name, Contextcontext, AttributeSetattrs) {
 Buttonbtn=null;
 switch (name) {
 case "TextView":
 int count = attrs.getAttributeCount();
 for (int i = 0; i < count; i++) {
 Log.d("MainActivity",attrs.getAttributeName(i) + ":" + attrs.getAttributeValue(i));
 }
 btn=new Button(context);
 btn.setText("this is button");
 break;

 default:
 break;
 }
 return btn;
 }
 });

 super.onCreate(savedInstanceState);
 setContentView(R.layout.activity_main);
}
Log输出的日志如下:
gravity:0x11
background:#ffff0000
layout_width:-1
layout_height:48.0dip
text:@2131361814
日志信息将布局中间中TextView的所有属性名称和属性值都打印出来了,在该示例中我们将TextView替换成了一个Button,更不用说在该方法中替换部分属性了,所以如果想要更改主题资源属性,关键就在该方法中,下面我们通过Factory的源码看一下Factory的定义。
源码分析
public interface Factory {
 /**
* Hook you can supply that is called when inflating from a LayoutInflater.
* You can use this to customize the tag names available in your XML
* layout files.
*
* <p>
* Note that it is good practice to prefix these custom names with your
* package (i.e., com.coolcompany.apps) to avoid conflicts with system
* names.
*
* @param name Tag name to be inflated.
* @param context The context the view is being created in.
* @param attrs Inflation attributes as specified in XML file.
*
* @return View Newly created view. Return null for the default
*         behavior.
*/
 public ViewonCreateView(String name, Contextcontext, AttributeSetattrs);
}

public interface Factory2 extends Factory {
 /**
* Version of {@link #onCreateView(String, Context, AttributeSet)}
* that also supplies the parent that the view created view will be
* placed in.
*
* @param parent The parent that the created view will be placed
* in; <em>note that this may be null</em>.
* @param name Tag name to be inflated.
* @param context The context the view is being created in.
* @param attrs Inflation attributes as specified in XML file.
*
* @return View Newly created view. Return null for the default
*         behavior.
*/
 public ViewonCreateView(Viewparent, String name, Contextcontext, AttributeSetattrs);
}
主要看一下Factory的如下介绍:
Hook you can supply that is called when inflating from a LayoutInflater.You can use this to customize the tag names available in your XML layout files.
当我们使用LayoutInflater渲染View的时候便会回调该Hook方法,Hook可能不太好理解,实际上就是callback方法。我们可以在xml布局文件中使用自定义标签,需要注意的是不要使用系统命名空间。
Factory是一个接口,Factory2继承自Factory,是对Factory的扩展补充。Factory2是从API11开始引入的,一般在应用开发的时候不必考虑这些差异,可以直接使用support包中的LayoutInflaterCompat设置LayoutInflaterFactory。
我们通过布局文件来构建View的时候都会使用LayoutInflater的inflate方法,上面我们通过Activity中的onCreate方法中使用setContentView方法设置布局,该方法是调用的父类Activity的方法。
public void setContentView(@LayoutRes int layoutResID) {
 getWindow().setContentView(layoutResID);
 initWindowDecorActionBar();
}
getWindow()方法获取的是Window实例,然后我们进入Window方法看到setContentView()方法是一个抽象方法,PhoneWindow作为Window的唯一子类肯定实现了该方法,在PhoneWidnow中setContentView方法实现如下:
@Override
public void setContentView(int layoutResID) {
 if (mContentParent == null) {
 installDecor();
 } else if (!hasFeature(FEATURE_CONTENT_TRANSITIONS)) {
 mContentParent.removeAllViews();
 }

 mLayoutInflater.inflate(layoutResID, mContentParent);

 final Callbackcb = getCallback();
 if (cb != null && !isDestroyed()) {
 cb.onContentChanged();
 }

 //...
}
直接进入LayoutInflater的inflate方法内:
public Viewinflate(@LayoutRes int resource, @Nullable ViewGrouproot) {
 return inflate(resource, root, root != null);
}
inflate调用了一个重载方法,然后又返回一个重载方法。
public Viewinflate(@LayoutRes int resource, @Nullable ViewGrouproot, boolean attachToRoot) {
 final Resourcesres = getContext().getResources();
 if (DEBUG) {
 Log.d(TAG, "INFLATING from resource: /"" + res.getResourceName(resource) + "/" ("
 + Integer.toHexString(resource) + ")");
 }

 final XmlResourceParserparser = res.getLayout(resource);
 try {
 return inflate(parser, root, attachToRoot);
 } finally {
 parser.close();
 }
}
返回重载方法可以简写如下:
public Viewinflate(XmlPullParserparser, @Nullable ViewGrouproot, boolean attachToRoot) {
 Viewresult = root;
 // Temp is the root view that was found in the xml
 //创建View
 final Viewtemp = createViewFromTag(root, name, inflaterContext, attrs);
 ViewGroup.LayoutParamsparams = null;

 if (root != null) {
 // Create layout params that match root, if supplied
 params = root.generateLayoutParams(attrs);
 if (!attachToRoot) {
 // Set the layout params for temp if we are not
 // attaching. (If we are, we use addView, below)
 temp.setLayoutParams(params);
 }
 }

 if (root == null || !attachToRoot) {
 result = temp;
 }
 return result;
}
在inflate方法中先通过createViewFromTag方法创建一个临时View,然后将创建成功的LayoutParams设置给临时View,createViewFromTag的执行流程如下:
ViewcreateViewFromTag(Viewparent, String name, Contextcontext, AttributeSetattrs,
 boolean ignoreThemeAttr) {
 //...
 Viewview;
 if (mFactory2 != null) {
 view = mFactory2.onCreateView(parent, name, context, attrs);
 } else if (mFactory != null) {
 view = mFactory.onCreateView(name, context, attrs);
 } else {
 view = null;
 }

 if (view == null && mPrivateFactory != null) {
 view = mPrivateFactory.onCreateView(parent, name, context, attrs);
 }

 if (view == null) {
 final Object lastContext = mConstructorArgs[0];
 mConstructorArgs[0] = context;
 try {
 if (-1 == name.indexOf('.')) {
 view = onCreateView(parent, name, attrs);
 } else {
 view = createView(name, null, attrs);
 }
 } finally {
 mConstructorArgs[0] = lastContext;
 }
 }
 return view;
}
当我们使用LayoutInflater进行对XML文件解析渲染View的时候最终会进入createViewFromTag()方法创建View,如果设置了Factory2,则会回调Factory2的回调方法onCreateView()进行创建View,如果未设置Factory2则判断是否设置了Factory,执行Factory创建View的回调方法。如果未设置Factory2和Factory,则执行默认的View创建流程。
通过上面就可以知道文章开始处的示例执行机制了,因为我们通过LayoutInflaterCompat设置了Factory,所以返回的View是通过Factory回调方法onCreateVeiw()创建的View,但是我们通过View的名称进行了判断,如果是TextView就创建一个Button,所以呈现出来的是一个Button。
使用Factory需要注意的点
LayoutInflater设置Factory只可以设置一次
LayoutInflater设置Factory只可以设置一次,因为LayoutInflater有一个 私有属性mFactorySet ,一旦设置过之后mFactorySet的值就会置true,在setFactory中会对mFactorySet的值进行判断,一旦重复设置就会抛出异常 A factory has already been set on this LayoutInflater 。
public void setFactory(Factoryfactory) {
 if (mFactorySet) {
 throw new IllegalStateException("A factory has already been set on this LayoutInflater");
 }
 if (factory == null) {
 throw new NullPointerException("Given factory can not be null");
 }
 mFactorySet = true;
 if (mFactory == null) {
 mFactory = factory;
 } else {
 mFactory = new FactoryMerger(factory, null, mFactory, mFactory2);
 }
}
在support包AppCompatActivity类中就默认设置了Factory,有关AppCompatActivity类Factory更多内容可以参看 Android tint着色器初探 ,因此如果继承了AppCompatActivity在使用Factory的时候必须谨慎,因为不同版本的support包对Factory的处理逻辑还是有细微差别的,下面就是support v22和support v23中实现的代码。
//support v22
public void installViewFactory() {
 LayoutInflaterlayoutInflater = LayoutInflater.from(mContext);
 if (layoutInflater.getFactory() == null) {
 LayoutInflaterCompat.setFactory(layoutInflater, this);
 } else {//未进行判断直接抛出异常
 Log.i(TAG, "The Activity's LayoutInflater already has a Factory installed"
 + " so we can not install AppCompat's");
 }
}

//support v23
public void installViewFactory() {
 LayoutInflaterlayoutInflater = LayoutInflater.from(mContext);
 if (layoutInflater.getFactory() == null) {
 LayoutInflaterCompat.setFactory(layoutInflater, this);
 } else {//此处进行了从属类型判断
 if (!(LayoutInflaterCompat.getFactory(layoutInflater)
 instanceof AppCompatDelegateImplV7)) {
 Log.i(TAG, "The Activity's LayoutInflater already has a Factory installed"
 + " so we can not install AppCompat's");
 }
 }
}
因此如果我们导入的是support v23包,在使用LayoutInflaterCompat设置Factory的时候是不会抛出异常的,因为设置Factory的类就是AppCompatDelegateImplV7,但是在support v22中就不同了,它会直接抛出异常。但是上面已经说了 mFactorySet是私有属性 ,如果我们又必须再次使用Factory该怎么办呢?只能使用反射将该属性重新设置为false,代码如下:
Fieldfield = LayoutInflater.class.getDeclaredField("mFactorySet");
field.setAccessible(true);
field.setBoolean(getLayoutInflater(), false);
生成LayoutInflater实例的Context是同一个
必须使生成LayoutInflater实例的Context是同一个,一般情况下获取LayoutInflater有如下三种方式:
- context.getLayoutInflater();
- LayoutInflater.from(context);
- (LayoutInflater)context.getSystemService(Context.LAYOUT_INFLATER_SERVICE);
实际上前面两种方式最总也是使用context.getSystemService获取的,因此只要Context相同通过getSystemService获取的LayoutInflater实例也是相同的,否则在最后执行createViewFromTag()方法的时候Factory回调函数不会被调用,因为不同的Context生成的LayoutInflater实例不同。
小结
本篇介绍的LayoutInflater.Factory就是为后面设置多主题模式做铺垫的,我们知道在AppCompatActivity中就是通过Factory然后将系统的View全部替换为了support兼容包中的AppCompatView,因此我们也可以使用Factory来实现主题的切换逻辑,只需要在不影响系统创建View的情况下,将需要切换主题的View设置为相应主题提供的资源文件就可以了,更为详细的介绍会在后续文章中继续…
正文到此结束
热门推荐


相关文章

近期评论
-
Your article is a perfect article without a hitch. Thank you. My site:
horse racing betting game -
I found this post very interesting and informative. Thank you for sharing your special thoughts with us. My site:
horse racing betting -
你这基本没有更新呀,最近文章显示还是2019年的文章。不符合要求哈
-
关键词:慕云博客 链接:https://www.lilun.me 描述:分享原创文字的个人博客
-
-
-
可以提供一下源码吗
-
不是商业站,鸡娃学习笔记
-
-
Loading...
![[HBLOG]公众号](http://www.liuhaihua.cn/img/qrcode_gzh.jpg)

