SpringCloud微服务系列(2): 创建一个基于Springboot的RESTFul服务
SpringCloud微服务系列(2): 创建一个基于Springboot的RESTFul服务
作者:家辉,日期:2017-07-31 CSDN博客: http://blog.csdn.net/gobitan
摘要: 在前一篇系列(1)中创建了一个Eureka微服务注册中心。本文将创建一个基于Springboot的RESTFul服务,它可以注册到Eureka Server中。
第一步: 创建支持Web和Eureka Discovery的Spring Boot工程
通过 http://start.spring.io/ 创建一个Spring Boot工程,具体参数如下:
Generate a "Maven Project" with "Java" and Spring Boot"1.5.6",
ProjectMetadata Group: cn.dennishucd
Artifact: springboot
Dependencies: Web和Eureka Discovery
然后点击"Generate Project"即可得到一个包含Web和Eureka Discovery的Spring boot工程。
[1] 在生成的工程中,pom.xml中包含了如下核心依赖:
<dependency>
            <groupId>org.springframework.cloud</groupId>
            <artifactId>spring-cloud-starter-eureka</artifactId>
        </dependency>
        <dependency>
            <groupId>org.springframework.boot</groupId>
            <artifactId>spring-boot-starter-web</artifactId>
        </dependency>
[2] 在主类SpringBootApplication中包含了,表示开启Eureka注册功能。注解@ EnableDiscoveryClient
第二步:添加HelloController类,如下:
package cn.dennishucd.springboot;

import org.apache.log4j.Logger;
import org.springframework.beans.factory.annotation.Autowired;
import org.springframework.cloud.client.ServiceInstance;
import org.springframework.cloud.client.discovery.DiscoveryClient;
import org.springframework.web.bind.annotation.RequestMapping;
import org.springframework.web.bind.annotation.RestController;

@RestController
public class HelloController {

    private final Logger logger = Logger.getLogger(getClass());

    @Autowired
    private DiscoveryClient client;

    @RequestMapping("/hello")
    public String hello() {
        ServiceInstance instance = client.getLocalServiceInstance();
        logger.info("/hello, host:"+instance.getHost()+", service_id:"+instance.getServiceId());

        return "Hello World!";
    }
}
本类创建了一个hello服务,返回“Hello World!”
第三步:修改 SpringbootApplication主类
在SpringbootApplication类中添加注解@EnableDiscoveryClient,开启服务注册功能。
第四步: 修改application.properties配置文件
在application.properties配置文件中添加如下两行,设置服务名称和服务注册中心地址。
spring.application.name=hello-service
eureka.client.serviceUrl.defaultZone=http://localhost:1111/eureka
注意:这里的eureka注册地址是“SpringCloud微服务系列(1): 创建Eureka服务注册中心”中建好的。
第五步:启动基于Springboot的Hello服务
注意:启动这一步之前,如果前面的注册中心未启动,需要先启动注册中心。
[1]启动Springboot工程,注册成功会返回打印类似日志:DiscoveryClient_HELLO-SERVICE/PC-20170620QIZK:hello-service - registration status: 204
[2] 在eureka-server的控制台也可以看到类似日志:Registered instance HELLO-SERVICE/PC-20170620QIZK:hello-service with status UP (replication=false)
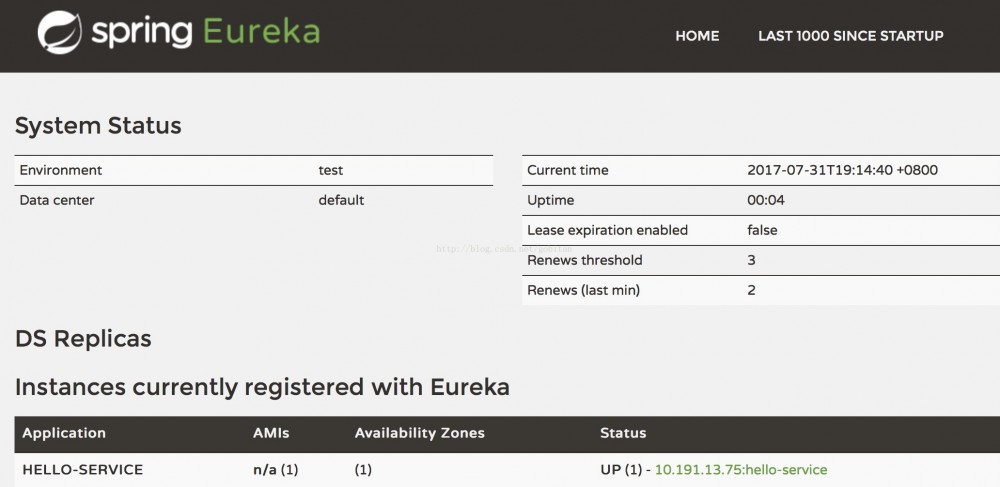
[3] 然后在http://localhost:1111/的Web上也可以看到当前注册成功的服务。如下所示:
第六步:请求hello服务
访问http://localhost:8080/hello服务,可以在springboot工程中看到类似输出:/hello, host:PC-20170620QIZK, service_id:hello-service。这是之前在HelloController中注入的DiscoveryClient接口对象从服务器注册中心获取的服务相关信息。
参考资料:
[1] http://start.spring.io/
[2] http://projects.spring.io/spring-cloud/
正文到此结束
热门推荐


相关文章


Loading...
![[HBLOG]公众号](http://www.liuhaihua.cn/img/qrcode_gzh.jpg)

