边做边学,基于Spring Cloud的微服务架构最佳实践
本文节选自开源无服务器PaaS Rainbond 文档,原文请戳 链接
概述
微服务是可以独立部署、水平扩展、独立访问(或者有独立的数据库)的服务单元,Spring Cloud则是用来管理微服务的一系列框架的有序集合。利用Spring Boot的开发便利性,Spring Cloud巧妙简化了分布式系统基础设施的开发,例如服务发现注册、配置中心、消息总线、负载均衡、断路器等,都可以用Spring Boot的开发风格做到一键启动和部署。
Spring Cloud并没有重复造轮子,而是将目前各家公司开发的比较成熟、经得起实际考验的服务框架组合起来,通过Spring Boot风格进行再封装,屏蔽掉了复杂的配置和实现原理,最终为开发者提供了一套简单易懂、易部署、易维护的分布式系统开发工具包。
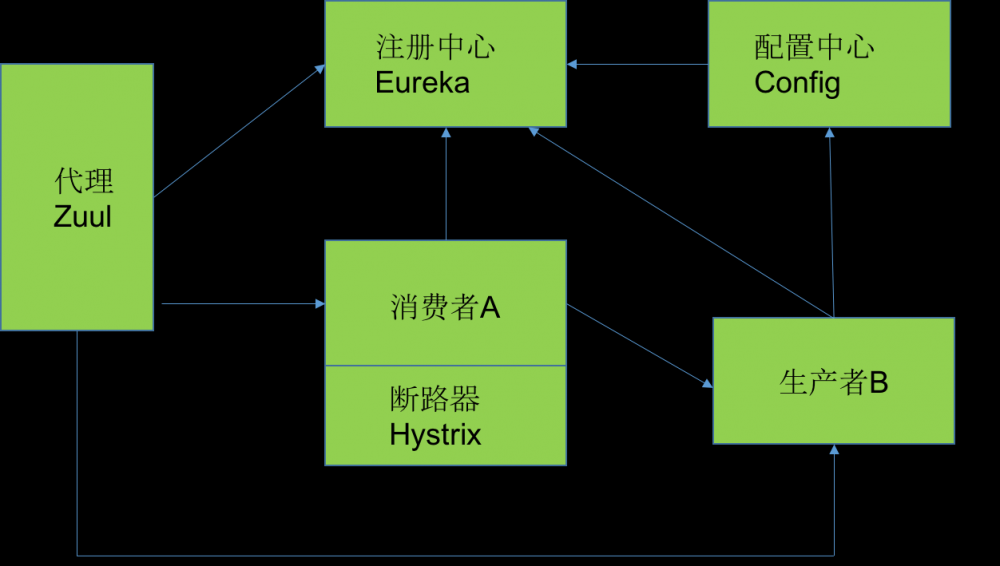
Spring Cloud有很多组件,其中最核心的组件有:Eureka(注册中心)、Hystrix(断路器)、Config(配置中心)、Zuul(代理、网关)等等。
接下来,我们不妨通过几个demo来了解Spring Cloud是如何一步步构建起来的。
示例源码请戳 源码
- 如何搭建Eureka
- 如何搭建Hystrix
- 如何搭建Config
- 如何搭建Zuul
如何搭建Eureka
组件介绍
注册中心Eureka是一个基于REST的服务,用于各个服务之间的互相发现。任何服务需要其它服务的支持都需要通过它获取;同样的,所有的服务都需要来这里注册,方便以后其它服务来调用。Eureka的好处是你不需要知道找什么服务,只需要到注册中心来获取,也不需要知道提供支持的服务在哪里、是几个服务来支持的,直接来这里获取就可以了。如此一来,便提升了稳定性,也降低了微服务架构搭建的难度。
项目描述
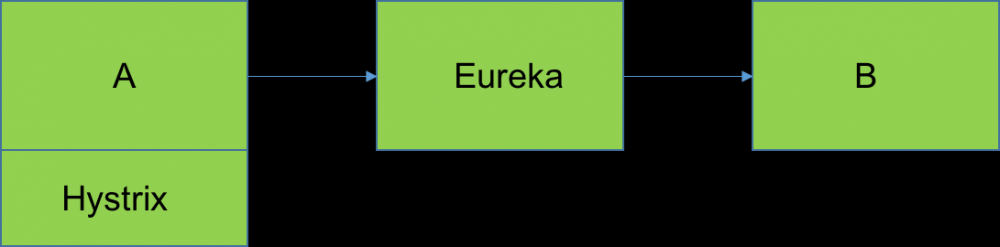
正常调用服务A请求服务B:
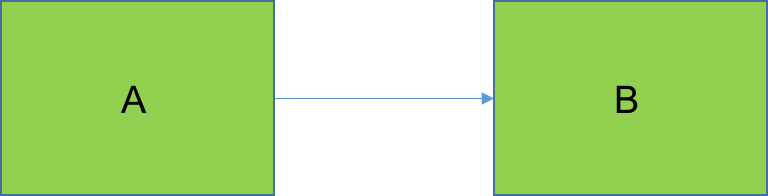
有了服务中心之后,服务A不能直接调用服务B,而是A,B通过在注册中心中注册服务,然后互相发现,服务A通过注册中心来调用服务B:

以上只是2个服务之间的相互调用,如果有十几个甚至几十个服务,其中任何的一个项目改动,就可能牵连到好几个项目的重启,很麻烦而且容易出错。通过注册中心来获取服务,你不需要关注你调用的项目IP地址,由几台服务器组成,每次直接去注册中心获取可以使用的服务去调用既可。
部署到云帮
注册服务
1、pom中添加依赖
<dependencies>
    <dependency>
        <groupId>org.springframework.cloud</groupId>
        <artifactId>spring-cloud-starter</artifactId>
    </dependency>
    <dependency>
        <groupId>org.springframework.cloud</groupId>
        <artifactId>spring-cloud-starter-eureka-server</artifactId>
    </dependency>
    <dependency>
        <groupId>org.springframework.boot</groupId>
        <artifactId>spring-boot-starter-test</artifactId>
        <scope>test</scope>
    </dependency>
</dependencies>
2、添加启动代码中添加 @EnableEurekaServer 注解
@SpringBootApplication
@EnableEurekaServer
public class SpringCloudEurekaApplication {

    public static void main(String[] args) {
        SpringApplication.run(SpringCloudEurekaApplication.class, args);
    }
}
3、配置文件
在默认设置下,该服务注册中心也会将自己作为客户端来尝试注册它自己,所以我们需要禁用它的客户端注册行为,在 application.properties 添加以下配置:
spring.application.name=spring-cloud-eureka

server.port=8000
eureka.client.register-with-eureka=false
eureka.client.fetch-registry=false

eureka.client.serviceUrl.defaultZone=http://localhost:${server.port}/eureka/
-
eureka.client.register-with-eureka:表示是否将自己注册到Eureka Server,默认为true。 -
eureka.client.fetch-registry:表示是否从Eureka Server获取注册信息,默认为true。 -
eureka.client.serviceUrl.defaultZone:设置与Eureka Server交互的地址,查询服务和注册服务都需要依赖这个地址。默认是 http://localhost:8761/eureka ;多个地址可使用 , 分隔。
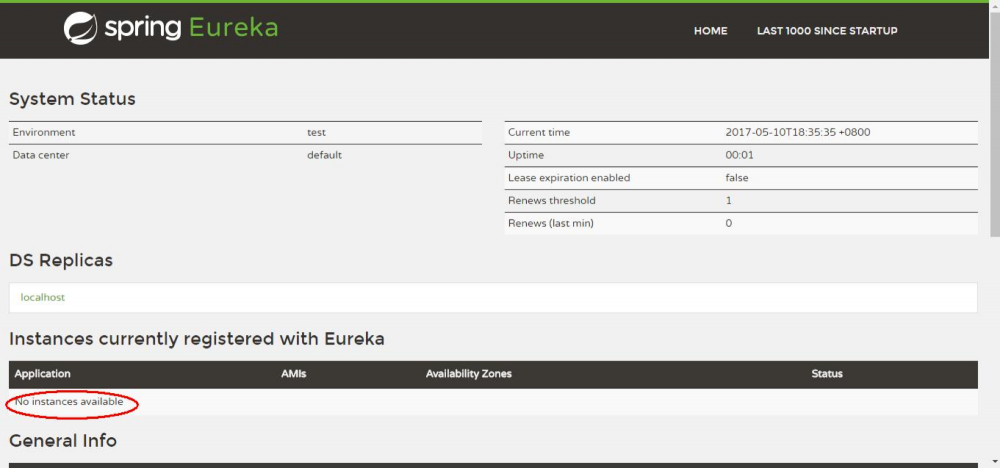
启动工程后,访问: http://localhost:8000/,可以看到下面的页面,其中还没有发现任何服务
服务提供者(B)
1、pom包配置
创建一个springboot项目,pom.xml中添加如下配置:
<dependencies>
    <dependency>
        <groupId>org.springframework.cloud</groupId>
        <artifactId>spring-cloud-starter-eureka</artifactId>
    </dependency>
    <dependency>
        <groupId>org.springframework.boot</groupId>
        <artifactId>spring-boot-starter-test</artifactId>
        <scope>test</scope>
    </dependency>
</dependencies>
2、配置文件
application.properties配置如下:
spring.application.name=spring-cloud-producer
server.port=9000
eureka.client.serviceUrl.defaultZone=http://localhost:8000/eureka/
3、启动类
启动类中添加 @EnableDiscoveryClient 注解
@SpringBootApplication
@EnableDiscoveryClient
public class ProducerApplication {

    public static void main(String[] args) {
        SpringApplication.run(ProducerApplication.class, args);
    }
}
4、服务提供
提供hello服务:
@RestController
public class HelloController {

    @RequestMapping("/hello")
    public String index(@RequestParam String name) {
        return "hello "+name+",this is first messge";
    }
}
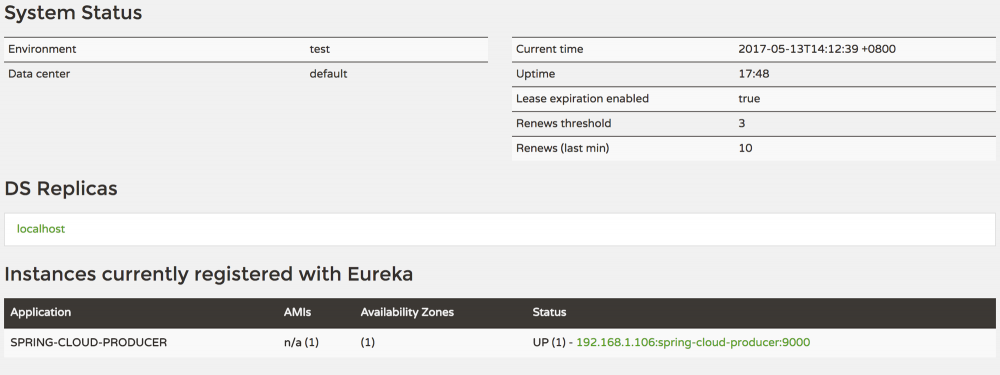
添加 @EnableDiscoveryClient 注解后,项目就具有了服务注册的功能。启动工程后,就可以在注册中心的页面看到SPRING-CLOUD-PRODUCER服务。
到此服务提供者配置就完成了。
服务消费者(A)
1、pom包配置
和服务提供者一致
<dependencies>
    <dependency>
        <groupId>org.springframework.cloud</groupId>
        <artifactId>spring-cloud-starter-eureka</artifactId>
    </dependency>
    <dependency>
        <groupId>org.springframework.boot</groupId>
        <artifactId>spring-boot-starter-test</artifactId>
        <scope>test</scope>
    </dependency>
</dependencies>
2、配置文件
application.properties配置如下:
spring.application.name=spring-cloud-consumer
server.port=9001
eureka.client.serviceUrl.defaultZone=http://localhost:8000/eureka/
3、启动类
启动类添加 @EnableDiscoveryClient 和 @EnableFeignClients 注解:
@SpringBootApplication
@EnableDiscoveryClient
@EnableFeignClients
public class ConsumerApplication {

    public static void main(String[] args) {
        SpringApplication.run(ConsumerApplication.class, args);
    }

}
-
@EnableDiscoveryClient:启用服务注册与发现 -
@EnableFeignClients:启用feign进行远程调用
Feign是一个声明式Web Service客户端。使用Feign能让编写Web Service客户端更加简单, 它的使用方法是定义一个接口,然后在上面添加注解,同时也支持JAX-RS标准的注解。Feign也支持可拔插式的编码器和解码器。Spring Cloud对Feign进行了封装,使其支持了Spring MVC标准注解和HttpMessageConverters。Feign可以与Eureka和Ribbon组合使用以支持负载均衡。
4、feign调用实现
@FeignClient(name= "spring-cloud-producer")
public interface HelloRemote {
    @RequestMapping(value = "/hello")
    public String hello(@RequestParam(value = "name") String name);
}
- name:远程服务名,及spring.application.name配置的名称
此类中的方法和远程服务中contoller中的方法名和参数需保持一致。
5、web层调用远程服务
将HelloRemote注入到controller层,像普通方法一样去调用即可。
@RestController
public class ConsumerController {

    @Autowired
    HelloRemote HelloRemote;

    @RequestMapping("/hello/{name}")
    public String index(@PathVariable("name") String name) {
        return HelloRemote.hello(name);
    }

}
到此,最简单的一个服务注册与调用的例子就完成了。
测试
依次启动spring-cloud-eureka、spring-cloud-producer、spring-cloud-consumer三个项目。
先输入: http://localhost:9000/hello?name=neo 检查spring-cloud-producer服务是否正常
返回: hello neo,this is first messge
说明spring-cloud-producer正常启动,提供的服务也正常。
浏览器中输入: http://localhost:9001/hello/neo
返回: hello neo,this is first messge
说明客户端已经成功的通过feign调用了远程服务hello,并且将结果返回到了浏览器。
{{site.data.alerts.callout_danger}} 部署在云帮,需要验证必须保证一下3点:
1. 端口开启了 外部访问 功能
2. consumer关联了producer
3. hello?name=neo 和 hello/neo 添加在 访问 所产生的url后
之后组件的验证同理。
如何搭建Hystrix
组件介绍
在微服务架构中通常会有多个服务层调用,基础服务的故障可能会导致级联故障,进而造成整个系统不可用的情况,这种现象被称为服务雪崩效应。而使用Hystrix(熔断器)就可以避免这种问题。
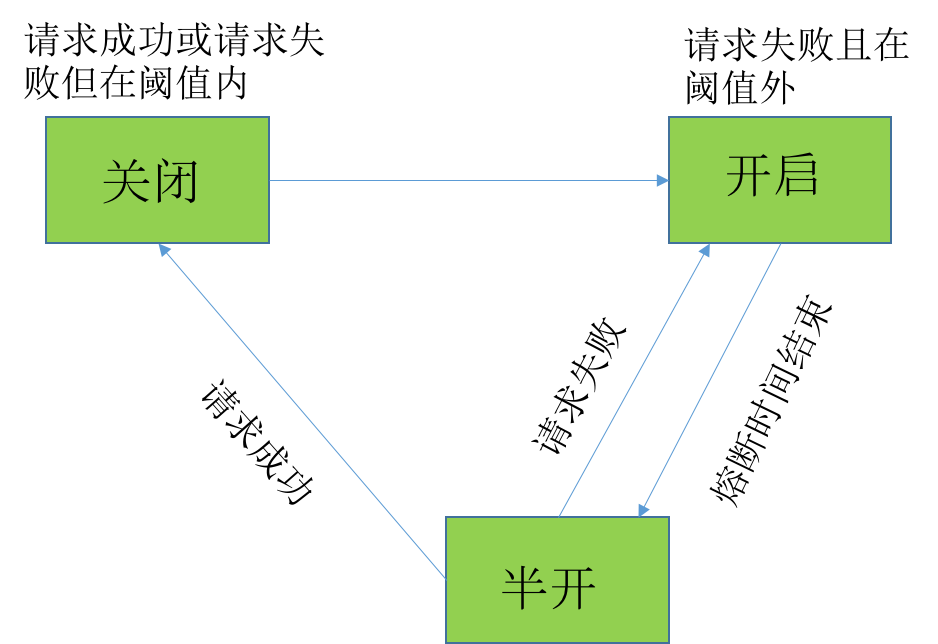
熔断器的原理很简单,如同电力过载保护器。它可以实现快速失败,如果它在一段时间内侦测到许多类似的错误,会强迫其以后的多个调用快速失败,不再访问远程服务器,从而防止应用程序不断地尝试执行可能会失败的操作,使得应用程序继续执行而不用等待修正错误,或者浪费CPU时间去等到长时间的超时产生。熔断器也可以使应用程序能够诊断错误是否已经修正,如果已经修正,应用程序会再次尝试调用操作。
当Hystrix Command请求后端服务失败数量超过一定比例(默认50%), 断路器会切换到开路状态(Open). 这时所有请求会直接失败而不会发送到后端服务. 断路器保持在开路状态一段时间后(默认5秒), 自动切换到半开路状态(HALF-OPEN). 这时会判断下一次请求的返回情况, 如果请求成功, 断路器切回闭路状态(CLOSED), 否则重新切换到开路状态(OPEN). Hystrix的断路器就像我们家庭电路中的保险丝, 一旦后端服务不可用, 断路器会直接切断请求链, 避免发送大量无效请求影响系统吞吐量, 并且断路器有自我检测并恢复的能力。
项目描述
通过将Hystrix组件添加到服务消费者,实现熔断效果,只需要在Eureka的demo基础加入Hystrix即可。
Hystrix是作用在服务调用端的,因此需要添加在A上。
部署到Rainbond
Hystrix服务
因为熔断只是作用在服务调用这一端,因此我们根据上一篇的示例代码只需要改动消费者(A)服务相关代码就可以。因为,Feign中已经依赖了Hystrix所以在maven配置上不用做任何改动。
1、配置文件
application.properties添加这一条:
feign.hystrix.enabled=true
2、创建回调类
创建HelloRemoteHystrix类继承与HelloRemote实现回调的方法:
@Component
public class HelloRemoteHystrix implements HelloRemote{

    @Override
    public String hello(@RequestParam(value = "name") String name) {
        return "hello" +name+", this messge send failed ";
    }
}
3、添加fallback属性
在 HelloRemote 类添加指定fallback类,在服务熔断的时候返回fallback类中的内容:
@FeignClient(name= "spring-cloud-producer",fallback = HelloRemoteHystrix.class)
public interface HelloRemote {

    @RequestMapping(value = "/hello")
    public String hello(@RequestParam(value = "name") String name);

}
4、测试
那我们就来测试一下看看效果吧。
依次启动spring-cloud-eureka、spring-cloud-producer、spring-cloud-consumer三个项目。
浏览器中输入: http://localhost:9001/hello/neo
返回: hello neo,this is first messge
说明加入熔断相关信息后,不影响正常的访问。接下来我们手动停止spring-cloud-producer项目再次测试:
浏览器中输入: http://localhost:9001/hello/neo
返回: hello neo, this messge send failed
根据返回结果说明熔断成功。
如何搭建Config
组件介绍
随着线上项目变的日益庞大,每个项目都散落着各种配置文件,如果采用分布式的开发模式,需要的配置文件随着服务增加而不断增多。某一个基础服务信息变更,都会引起一系列的更新和重启,不便于项目的维护,而Spring Cloud Config就是解决这个问题的。
业务描述
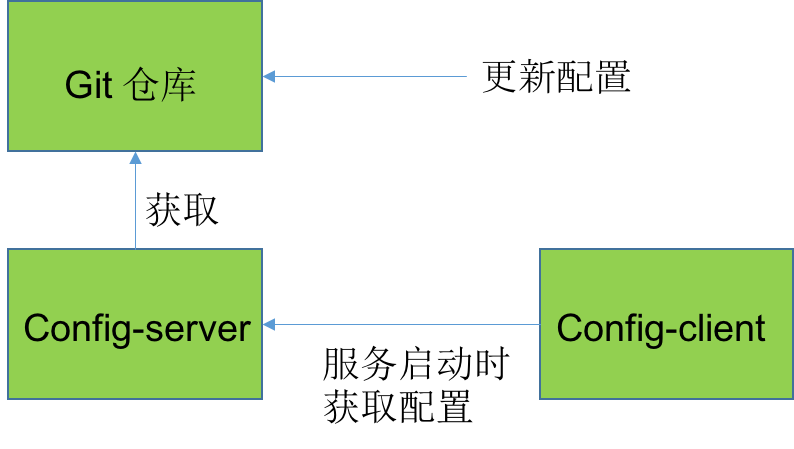
目前Config支持git和svn作为存放配置文件的仓库,本次示例使用git仓库来存放配置文件。这里的Config-client 就相当于服务A和服务B,他们的配置文件都集中存放,通过Config-server来获取各自的配置文件。
部署到Rainbond
git仓库
首先在github上面创建了一个文件夹config-repo用来存放配置文件,为了模拟生产环境,我们创建以下三个配置文件:
// 开发环境
neo-config-dev.properties
// 测试环境
neo-config-test.properties
// 生产环境
neo-config-pro.properties
每个配置文件中都写一个属性neo.hello,属性值分别是 hello im dev/test/pro 。下面我们开始配置server端
config-server端
1、添加依赖
<dependencies>
    <dependency>
        <groupId>org.springframework.cloud</groupId>
        <artifactId>spring-cloud-config-server</artifactId>
    </dependency>
</dependencies>
只需要加入spring-cloud-config-server包引用既可。
2、配置文件
server:
  port: 8040
spring:
  application:
    name: spring-cloud-config-server
  cloud:
    config:
      server:
        git:
          uri: https://github.com/xxx                             # 配置git仓库的地址
          search-paths: config-repo                             # git仓库地址下的相对地址,可以配置多个,用,分割。
          username:                                             # git仓库的账号
          password:                                             # git仓库的密码
Spring Cloud Config也提供本地存储配置的方式。我们只需要设置属性 spring.profiles.active=native ,Config Server会默认从应用的 src/main/resource 目录下检索配置文件。也可以通过 spring.cloud.config.server.native.searchLocations=file:E:/properties/ 属性来指定配置文件的位置。虽然Spring Cloud Config提供了这样的功能,但是为了支持更好的管理内容和版本控制的功能,还是推荐使用git的方式。
3、启动类
启动类添加 @EnableConfigServer ,激活对配置中心的支持
@EnableConfigServer
@SpringBootApplication
public class ConfigServerApplication {

    public static void main(String[] args) {
        SpringApplication.run(ConfigServerApplication.class, args);
    }
}
到此server端相关配置已经完成
4、测试server端
首先我们先要测试server端是否可以读取到github上面的配置信息,直接访问: http://localhost:8001/neo-config/dev
返回信息如下:
{
    "name": "neo-config",
    "profiles": [
        "dev"
    ],
    "label": null,
    "version": null,
    "state": null,
    "propertySources": [
        {
            "name": "https://github.com/goodrain-apps/spring-cloud-demo/config-repo/neo-config-dev.properties",
            "source": {
                "neo.hello": "hello im dev update"
            }
        }
    ]
}
上述的返回的信息包含了配置文件的位置、版本、配置文件的名称以及配置文件中的具体内容,说明server端已经成功获取了git仓库的配置信息。
如果直接查看配置文件中的配置信息可访问: http://localhost:8001/neo-config-dev.properties ,返回: neo.hello: hello im dev
修改配置文件 neo-config-dev.properties 中配置信息为: neo.hello=hello im dev update ,再次在浏览器访问 http://localhost:8001/neo-config-dev.properties ,返回: neo.hello: hello im dev update 。说明server端会自动读取最新提交的内容
仓库中的配置文件会被转换成web接口,访问可以参照以下的规则:
- /{application}/{profile}[/{label}]
- /{application}-{profile}.yml
- /{label}/{application}-{profile}.yml
- /{application}-{profile}.properties
- /{label}/{application}-{profile}.properties
以neo-config-dev.properties为例子,它的application是neo-config,profile是dev。client会根据填写的参数来选择读取对应的配置。
Config-client端
主要展示如何在业务项目中去获取server端的配置信息
1、添加依赖
<dependencies>
    <dependency>
        <groupId>org.springframework.cloud</groupId>
        <artifactId>spring-cloud-starter-config</artifactId>
    </dependency>
    <dependency>
        <groupId>org.springframework.boot</groupId>
        <artifactId>spring-boot-starter-web</artifactId>
    </dependency>
    <dependency>
        <groupId>org.springframework.boot</groupId>
        <artifactId>spring-boot-starter-test</artifactId>
        <scope>test</scope>
    </dependency>
</dependencies>
引入spring-boot-starter-web包方便web测试
2、配置文件
需要配置两个配置文件,application.properties和bootstrap.properties
application.properties如下:
spring.application.name=spring-cloud-config-client
server.port=8002
bootstrap.properties如下:
spring.cloud.config.name=neo-config
spring.cloud.config.profile=dev
spring.cloud.config.uri=http://localhost:8001/
spring.cloud.config.label=master
- spring.application.name:对应{application}部分
- spring.cloud.config.profile:对应{profile}部分
- spring.cloud.config.label:对应git的分支。如果配置中心使用的是本地存储,则该参数无用
- spring.cloud.config.uri:配置中心的具体地址
- spring.cloud.config.discovery.service-id:指定配置中心的service-id,便于扩展为高可用配置集群。
上面这些与spring-cloud相关的属性必须配置在bootstrap.properties中,config部分内容才能被正确加载。因为config的相关配置会先于application.properties,而bootstrap.properties的加载也是先于application.properties。
3、启动类
启动类添加 @EnableConfigServer ,激活对配置中心的支持
@SpringBootApplication
public class ConfigClientApplication {

    public static void main(String[] args) {
        SpringApplication.run(ConfigClientApplication.class, args);
    }
}
启动类只需要 @SpringBootApplication 注解就可以
4、web测试
使用 @Value 注解来获取server端参数的值
@RestController
class HelloController {
    @Value("${neo.hello}")
    private String hello;

    @RequestMapping("/hello")
    public String from() {
        return this.hello;
    }
}
启动项目后访问: http://localhost:8002/hello ,返回: hello im dev update 说明已经正确的从server端获取到了参数。到此一个完整的服务端提供配置服务,客户端获取配置参数的例子就完成了。
如何搭建Zuul
组件介绍
在微服务架构中,后端服务往往不直接开放给调用端,而是通过一个API网关根据请求的url,路由到相应的服务。当添加API网关后,在第三方调用端和服务提供方之间就创建了一面墙,这面墙直接与调用方通信进行权限控制,后将请求均衡分发给后台服务端。而用来进行代理调度的组件就是Zuul。
项目描述
在项目中,只有Zuul提供对外访问,Gateway通过请求的url的不同,将请求调度到不同的后端服务
部署到Rainbond
Gateway
1、添加依赖
<dependency>
    <groupId>org.springframework.cloud</groupId>
    <artifactId>spring-cloud-starter-zuul</artifactId>
</dependency>
引入 spring-cloud-starter-zuul 包
2、配置文件
spring.application.name=gateway-service-zuul
server.port=8888

#这里的配置表示,访问/producer/** 直接重定向到http://域名/**
zuul.routes.baidu.path=/producer/**
zuul.routes.baidu.url=http://域名/
3、启动类
@SpringBootApplication
@EnableZuulProxy
public class GatewayServiceZuulApplication {

    public static void main(String[] args) {
        SpringApplication.run(GatewayServiceZuulApplication.class, args);
    }
}
启动类添加 @EnableZuulProxy ,支持网关路由。
4、测试
启动 gateway-service-zuul-simple 项目,先输入: http://localhost:8888/producer/hello?name=neo
返回: hello neo,this is first messge
说明调度成功。
小结
至此,我们就完成了Eureka、Hystrix、Config、Zuul等几个Spring Cloud最核心组件的搭建,更多内容敬请关注 Rainbond文档 。
或参考云框架项目, [云框架]基于Spring Cloud的微服务架构 。
正文到此结束
- 本文标签: Spring Boot 服务器 SVN 数据库 PaaS 域名 开发 message id web tar 数据 时间 dependencies ACE 服务端 权限控制 update pom 开发者 代码 参数 Word Master Hystrix spring maven 负载均衡 UI GitHub REST http IO 分布式系统 目录 remote 家庭 配置 API Eureka src Service springboot 云 端口 https map 管理 value client Property 高可用 源码 git 集群 Bootstrap XML consumer producer 分布式 测试 ip cat IDE App 开源
- 版权声明: 本文为互联网转载文章,出处已在文章中说明(部分除外)。如果侵权,请联系本站长删除,谢谢。
- 本文海报: 生成海报一 生成海报二
热门推荐


相关文章

近期评论
-
你这基本没有更新呀,最近文章显示还是2019年的文章。不符合要求哈
-
关键词:慕云博客 链接:https://www.lilun.me 描述:分享原创文字的个人博客
-
-
-
可以提供一下源码吗
-
不是商业站,鸡娃学习笔记
-
-
-
-
听他们说很厉害的样子
Loading...
![[HBLOG]公众号](http://www.liuhaihua.cn/img/qrcode_gzh.jpg)

