SpringMVC 开发 — 使用Swagger搭建接口请求页面
Swagger是一款RESTful接口的文档在线自动生成模板和页面,使用和平台以及语言无关。目前在很多公司以及实际项目中大量用到。可以把Swagger理解为接口文档,后台写好的代码可以直接生成前端接口文档页面,接口调用这可以通过这个页面发送接口请求,进行接口测试或调用。使用起来非常方便。使用了Swagger之后,就不需要再去维护其他的接口文档了,节省了很多的成本。本文使用的项目案例上传至 https://github.com/chenyufeng1991/StartSpringMVC.git 。本文将会来介绍如何搭建一个完整的Swagger框架。Swagger的官方地址为: http://swagger.io/ 。一个简答的Swagger页面如下图所示:
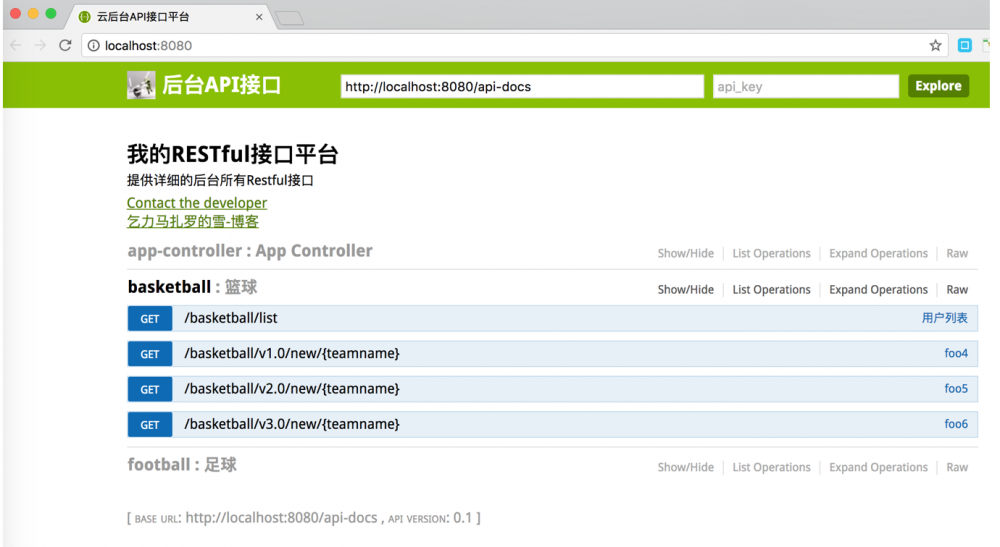
(1)Swagger在Github上的地址为: https://github.com/swagger-api/swagger-ui 。大家可以下载该项目,然后把dist目录下的所有内容都加入到自己项目的webapp目录下。大家也可以下载我的StartSpringMVC项目,把webapp目录下的css、images、lib、index.html和swagger-ui.js导入到自己的项目中即可。其中显示的前端页面就是index.html.

(2)然后需要在项目中新加一个类,作为swagger的配置文件,我在StartSpringMVC中的类是“CustomJavaPluginConfig”,该类的实现如下:
@Configuration
@EnableWebMvc
@EnableSwagger
public class CustomJavaPluginConfig extends WebMvcConfigurerAdapter {

    private SpringSwaggerConfig springSwaggerConfig;

    @Autowired
    public void setSpringSwaggerConfig(SpringSwaggerConfig springSwaggerConfig) {
        this.springSwaggerConfig = springSwaggerConfig;
    }

    @Bean
    public SwaggerSpringMvcPlugin customImplementation() {
        return new SwaggerSpringMvcPlugin(this.springSwaggerConfig)
                .apiInfo(apiInfo()).includePatterns(".*")
                .useDefaultResponseMessages(false)
                // .pathProvider(new GtPaths())
                .apiVersion("0.1").swaggerGroup("user");

    }

    private ApiInfo apiInfo() {
        ApiInfo apiInfo = new ApiInfo("我的RESTful接口平台",
                "提供详细的后台所有Restful接口", "http://blog.csdn.net/chenyufeng1991",
                "yufengcode@gmail.com", "乞力马扎罗的雪-博客", "http://blog.csdn.net/chenyufeng1991");
        return apiInfo;
    }

    @Override
    public void configureDefaultServletHandling(
            DefaultServletHandlerConfigurer configurer) {
        configurer.enable();
    }

    class GtPaths extends SwaggerPathProvider {

        @Override
        protected String applicationPath() {
            return "/restapi";
        }

        @Override
        protected String getDocumentationPath() {
            return "/restapi";
        }
    }
}
(3)对于一个实体模型,需要使用swagger去标识。如下面的Student模型,其中的@ApiModel、@ApiModelProperty都是属于Swagger的注解。如果需要在接口中返回模型对象,则需要使用以下的方式去注解。
@ApiModel(value = "学生对象", description = "student")
public class Student {

    @ApiModelProperty(value = "姓名", required = true)
    String name;
    @ApiModelProperty(value = "年龄", required = true)
    String age;

    public Student(String name, String age) {
        this.name = name;
        this.age = age;
    }

    public String getName() {
        return name;
    }

    public void setName(String name) {
        this.name = name;
    }

    public String getAge() {
        return age;
    }

    public void setAge(String age) {
        this.age = age;
    }
}
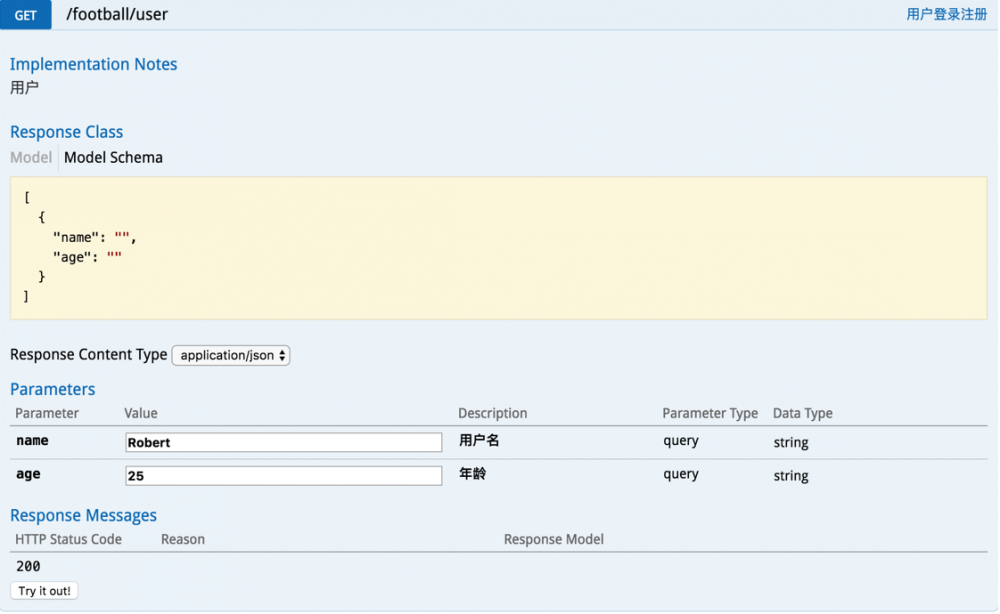
(4)在进行接口设计的Controller中,同样需要使用Swagger注解。其中下面的@Api、@ApiOperaction、@Apiparam都是Swagger注解,其中@Api表示这是一个需要Swagger表示的类;@ApiOperaction表示这是一个需要Swagger修饰的接口,其中表明了请求方式、说明等信息。@ApiParam表示该接口输入的参数,value是参数的值说明,required表示该参数是否是必须的。
@Api(value = "football", description = "足球", produces = MediaType.APPLICATION_JSON_VALUE)
@Controller
@RequestMapping("football")
public class FootballController {
@ApiOperation(value = "用户登录注册", notes = "用户", httpMethod = "GET", produces = MediaType.APPLICATION_JSON_VALUE)
@ResponseBody
@RequestMapping(value = "user", method = RequestMethod.GET)
public List<Student> foo(
@ApiParam(value = "用户名", required = true) @RequestParam String name,
@ApiParam(value = "年龄", required = true) @RequestParam String age
) {
//获取请求的参数,需要和链接中的参数名一致
//推荐使用HttpServletRequest的方式来获取参数,GET、POST的参数都可以接收
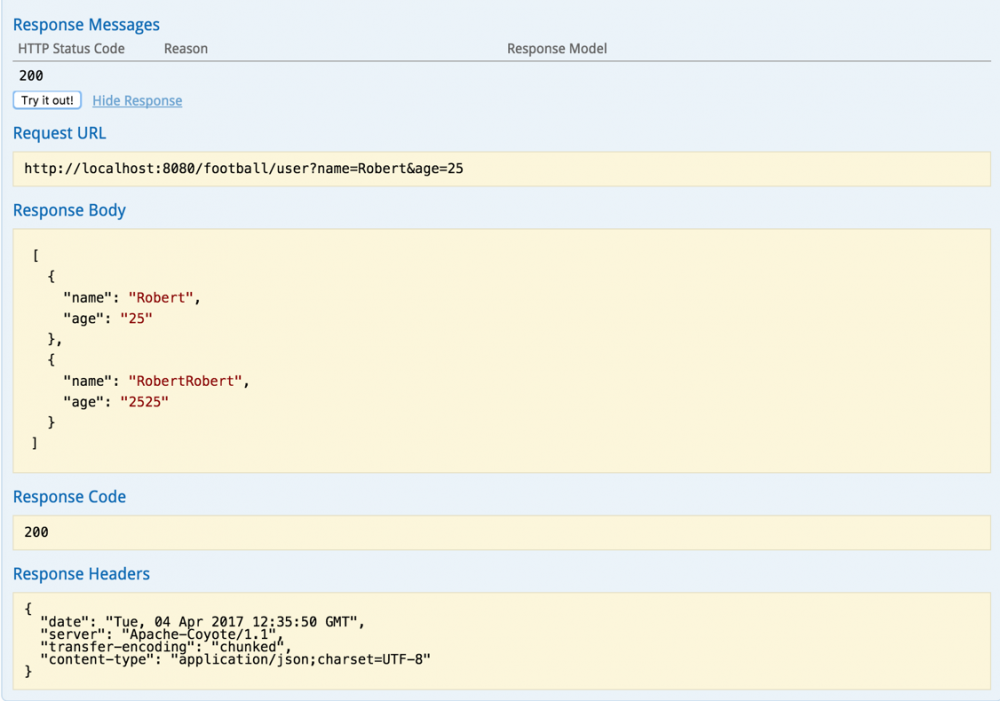
List<Student> list = new ArrayList<Student>();
Student student = new Student(name, age);
Student student1 = new Student(name + name, age + age);
list.add(student);
list.add(student1);
return list;
}
@ApiOperation(value = "用户登录注册2", notes = "用户2", httpMethod = "POST", produces = MediaType.APPLICATION_JSON_VALUE)
@ResponseBody
@RequestMapping(value = "customer/login", method = RequestMethod.POST)
public String foo2(
@ApiParam(value = "用户名", required = true) @RequestParam String name
) {
return name;
}
}
(5)重要的是,要在pom.xml中加入swagger的依赖:
<!-- Swagger-mvc -->
<dependency>
    <groupId>com.mangofactory</groupId>
    <artifactId>swagger-springmvc</artifactId>
    <version>1.0.2</version>
</dependency>
(6)完成后的运行界面如下图所示。大家可以根据自己的实际需求自定义页面元素。
正文到此结束
- 本文标签: RESTful HTML 参数 下载 id description CSS App REST 博客 IO mail tar IDE CTO SpringMVC http 自动生成 pom 需求 list src plugin 测试 js UI 代码 value lib bean web https 配置 GitHub XML dist Action java git map SDN json provider Property spring ip cat API Document 开发 message 模型 目录 servlet 学生
- 版权声明: 本文为互联网转载文章,出处已在文章中说明(部分除外)。如果侵权,请联系本站长删除,谢谢。
- 本文海报: 生成海报一 生成海报二
热门推荐


相关文章

近期评论
-
你这基本没有更新呀,最近文章显示还是2019年的文章。不符合要求哈
-
关键词:慕云博客 链接:https://www.lilun.me 描述:分享原创文字的个人博客
-
-
-
可以提供一下源码吗
-
不是商业站,鸡娃学习笔记
-
-
-
-
听他们说很厉害的样子
Loading...
![[HBLOG]公众号](http://www.liuhaihua.cn/img/qrcode_gzh.jpg)

