SpringCloud教程八:消息总线(SpringCloud Bus)
SpringCloud Bus 将分布式的节点用轻量的消息代理连接起来。它可以用于广播配置文件的更改或者服务之间的通讯,也可以用于监控。本文要讲述的是用Spring Cloud Bus实现通知微服务架构的配置文件的更改。
1:首先安装rabbitmq,可自行去官网下载相关版本进行安装;
2:修改config-client工程,添加相关依赖:
<dependency>
            <groupId>org.springframework.cloud</groupId>
            <artifactId>spring-cloud-starter-bus-amqp</artifactId>
        </dependency>

        <dependency>
            <groupId>org.springframework.boot</groupId>
            <artifactId>spring-boot-starter-actuator</artifactId>
        </dependency>
修改配置文件夹,加入mq相关的配置,完整配置如下:
#服务名称
spring.application.name=config-client
#仓库分支
spring.cloud.config.label=master
#dev开发环境配置文件
#test测试环境
#pro正式环境
spring.cloud.config.profile=dev
#使用eureka server的时候需要注释掉
#spring.cloud.config.uri= http://localhost:8888/

#服务注册地址
eureka.client.service-url.defaultZone=http://localhost:8889/eureka/
#从远程获取配置文件
spring.cloud.config.discovery.enabled=true
#订阅的服务名称
spring.cloud.config.discovery.service-id=config-server
server.port=8881


#使用总线时
management.security.enabled=false

#rabbitmq
spring.rabbitmq.host=localhost
spring.rabbitmq.port=5672
# spring.rabbitmq.username=
# spring.rabbitmq.password=
然后复制config-client工程,重命名为config-client2,修改配置文件的端口号为:8882
依次启动config-eureka-server,config-server,config-client,config-client2。然后通过浏览器访问 http://localhost:8881/hi ,和 http://localhost:8882/hi 可以看到相同的返回值,和我们Git远程仓库的配置文件值相同。
然后,我们修改git仓库中的foo的值,然后通过postman工具,请求 http://localhost:8881/bus/refresh 或 http://localhost:8882/bus/refresh ,记住只需要请求其中一个即可,当我们请求完后,可以看到config-client,config-client2的控制台有重新拉去git仓库配置文件中的日志。然后我们重新请求 http://localhost:8881/hi ,和 http://localhost:8882/hi ,可以看到返回值已经改成了我们在git远程仓库的配置。通过总线技术,我们就实现了在更改了配置文件以后,不需要重新启动工程,即可重新加载配置文件的功能。
另外,/bus/refresh接口可以指定服务,即使用”destination”参数,比如 “/bus/refresh?destination=a:**” 即刷新服务名为a的所有服务,不管ip。
此时的系统架构图如下;
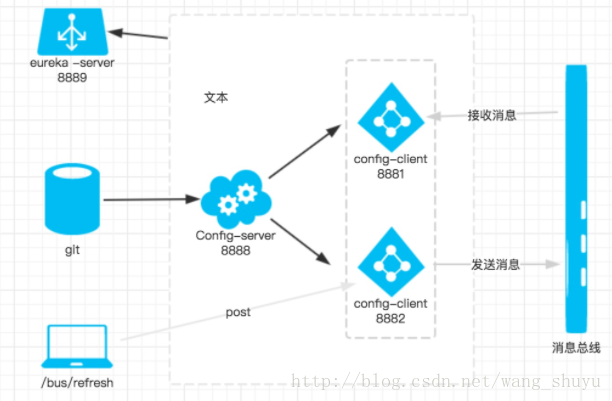
当git文件更改的时候,通过pc端用post 向端口为8882的config-client发送请求/bus/refresh/;此时8882端口会发送一个消息,由消息总线向其他服务传递,从而使整个微服务集群都达到更新配置文件。
正文到此结束
热门推荐


相关文章


Loading...
![[HBLOG]公众号](http://www.liuhaihua.cn/img/qrcode_gzh.jpg)

