Spring Boot 2.0系列文章(七):SpringApplication 深入探索

关注我

转载请务必注明原创地址为: http://www.54tianzhisheng.cn/2018/04/30/springboot_SpringApplication/
前言
在 Spring Boot 项目的启动类中常见代码如下:
@SpringBootApplication
public class SpringbotApplication {
	public static void main(String[] args) {
		SpringApplication.run(SpringbotApplication.class, args);
	}
}
其中也就两个比较引人注意的地方:
-
@SpringBootApplication -
SpringApplication.run()
对于第一个注解 @SpringBootApplication ,我已经在博客 Spring Boot 2.0系列文章(六):Spring Boot 2.0中SpringBootApplication注解详解 中详细的讲解了。接下来就是深入探究第二个了 SpringApplication.run() 。
换个姿势
上面的姿势太简单了,只一行代码就完事了。
SpringApplication.run(SpringbotApplication.class, args);
其实是支持做一些个性化的设置,接下来我们换个姿势瞧瞧:
@SpringBootApplication
public class SpringbotApplication {
	public static void main(String[] args) {
		SpringApplication app = new SpringApplication(SpringbotApplication.class);
 		// 自定义应用程序的配置
 		//app.setXxx()
 		app.run(args)
	}
}
没错,就是通过一个构造函数,然后设置相关的属性,从而达到定制化服务。有哪些属性呢?
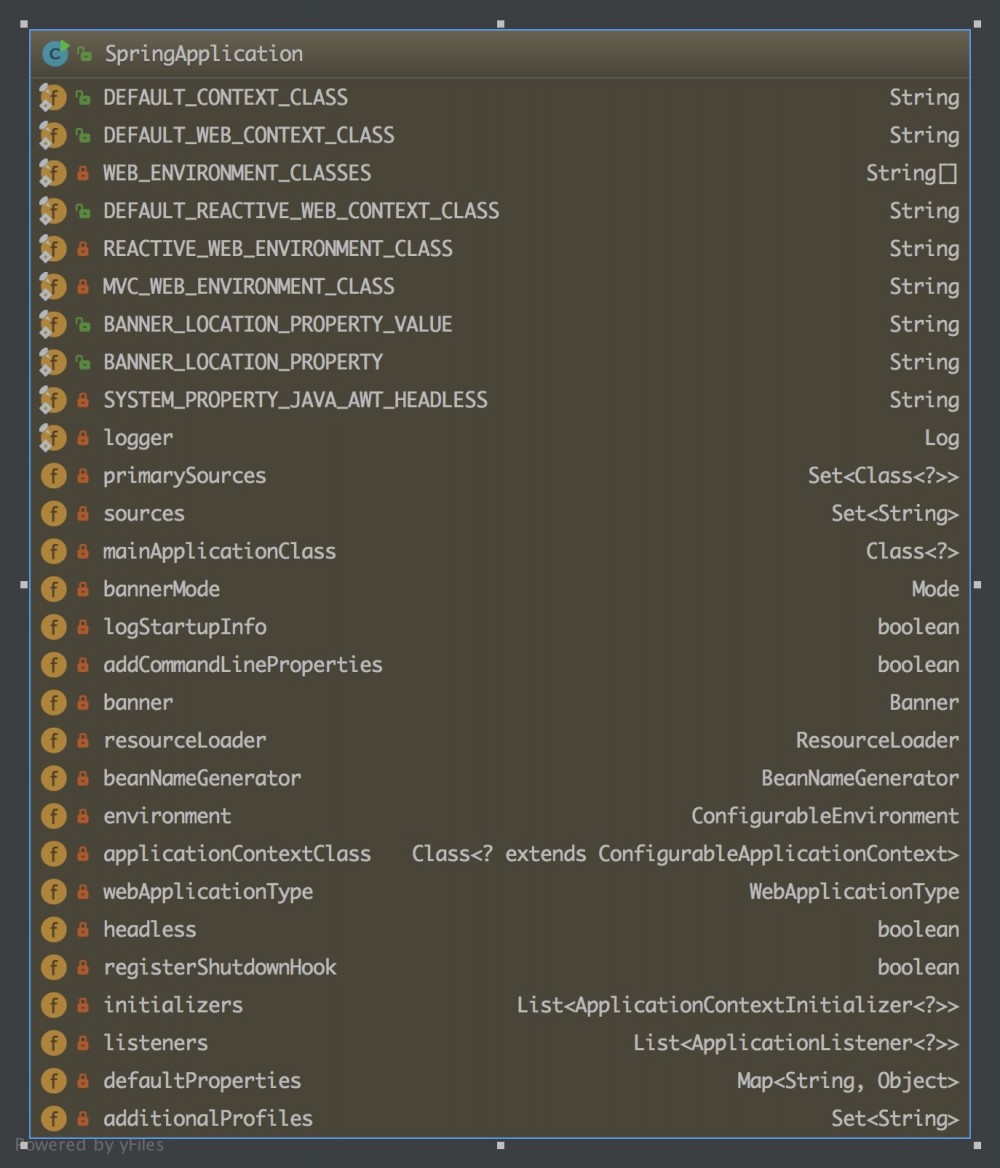
属性对应的 get/set 方法
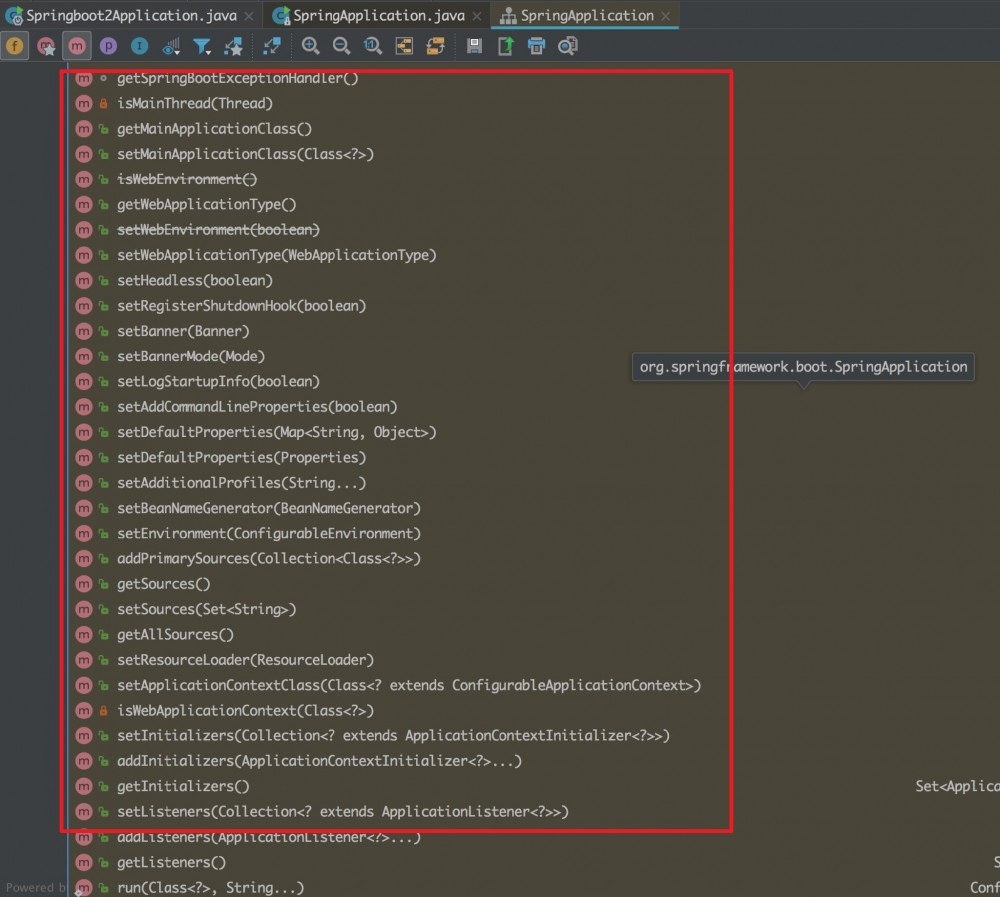
看到没,还很多呢!
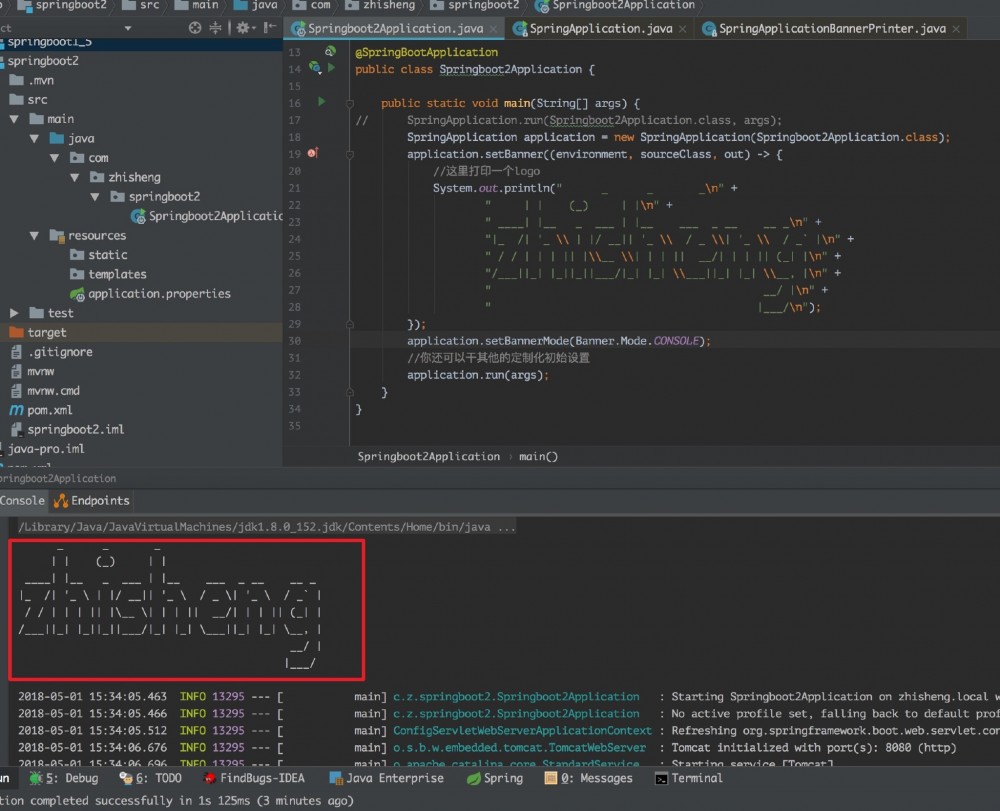
举个例子:你想把 Spring Boot 项目的默认 Banner 换成你自己的,就需要在这里如下:
public static void main(String[] args) {
//		SpringApplication.run(Springboot2Application.class, args);
  SpringApplication application = new SpringApplication(Springboot2Application.class);
  application.setBanner((environment, sourceClass, out) -> {
    //这里打印一个logo
    System.out.println("      _      _       _/n" +
                       "     | |    (_)     | |/n" +
                       " ____| |__   _  ___ | |__    ___  _ __    __ _/n" +
                       "|_  /| '_ // | |/ __|| '_ //  / _ //| '_ //  / _` |/n" +
                       " / / | | | || |//__ //| | | ||  __/| | | || (_| |/n" +
                       "/___||_| |_||_||___/|_| |_| //___||_| |_| //__, |/n" +
                       "                                          __/ |/n" +
                       "                                         |___//n");
  });
  application.setBannerMode(Banner.Mode.CONSOLE);
  //你还可以干其他的定制化初始设置
  application.run(args);
}
现在重启项目,你就会发现,控制台的 logo 已经换成你自己的了。
当然了,你可能会觉得这样写有点复杂,嗯嗯,确实,这样硬编码在代码里确实不太友好。你还可以在 src/main/resources 路径下新建一个 banner.txt 文件, banner.txt 中填写好需要打印的字符串内容即可。
从该类中可以看到在 Spring Boot 2 中引入了个新的 WebApplicationType 和 WebEnvironment。
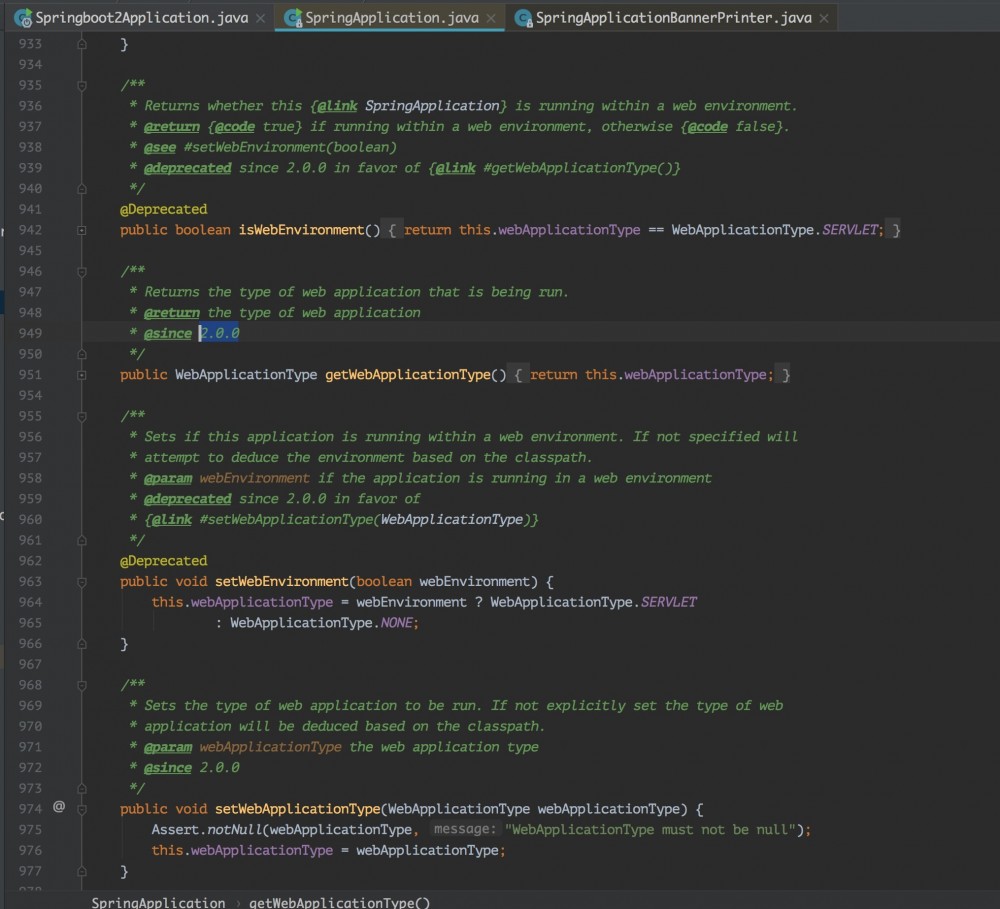
确实,这也是 Spring Boot 2 中比较大的特性,它是支持响应式编程的。我之前在文章 Spring Boot 2.0系列文章(二):Spring Boot 2.0 新特性详解 中也介绍过,以后有机会会介绍它的,这里我先卖个关子。
SpringApplication 初始化
SpringApplication.run() 的实现才是我们要深入探究的主角,该方法代码如下:
//静态方法,可用于使用默认配置运行 SpringApplication
public static ConfigurableApplicationContext run(Class<?> primarySource,
      String... args) {
  return run(new Class<?>[] { primarySource }, args);
}
public static ConfigurableApplicationContext run(Class<?>[] primarySources,
			String[] args) {
  return new SpringApplication(primarySources).run(args);
}
在这个静态方法中,创建 SpringApplication 对象,并调用该对象的 run 方法。
public SpringApplication(Class<?>... primarySources) {
  this(null, primarySources);
}
//创建一个 SpringApplication 实例,应用上下文会根据指定的主要资源加载 beans ,实例在调用 run 方法之前可以定制化
@SuppressWarnings({ "unchecked", "rawtypes" })
public SpringApplication(ResourceLoader resourceLoader, Class<?>... primarySources) {
  this.resourceLoader = resourceLoader;
  Assert.notNull(primarySources, "PrimarySources must not be null");
  this.primarySources = new LinkedHashSet<>(Arrays.asList(primarySources));
  this.webApplicationType = deduceWebApplicationType();
  setInitializers((Collection) getSpringFactoriesInstances(
    ApplicationContextInitializer.class));
  setListeners((Collection) getSpringFactoriesInstances(ApplicationListener.class));
  this.mainApplicationClass = deduceMainApplicationClass();
}
首先是进入单个参数的构造方法,然后进入两参数的构造方法(ResourceLoader 为 null),然后进行初始化。
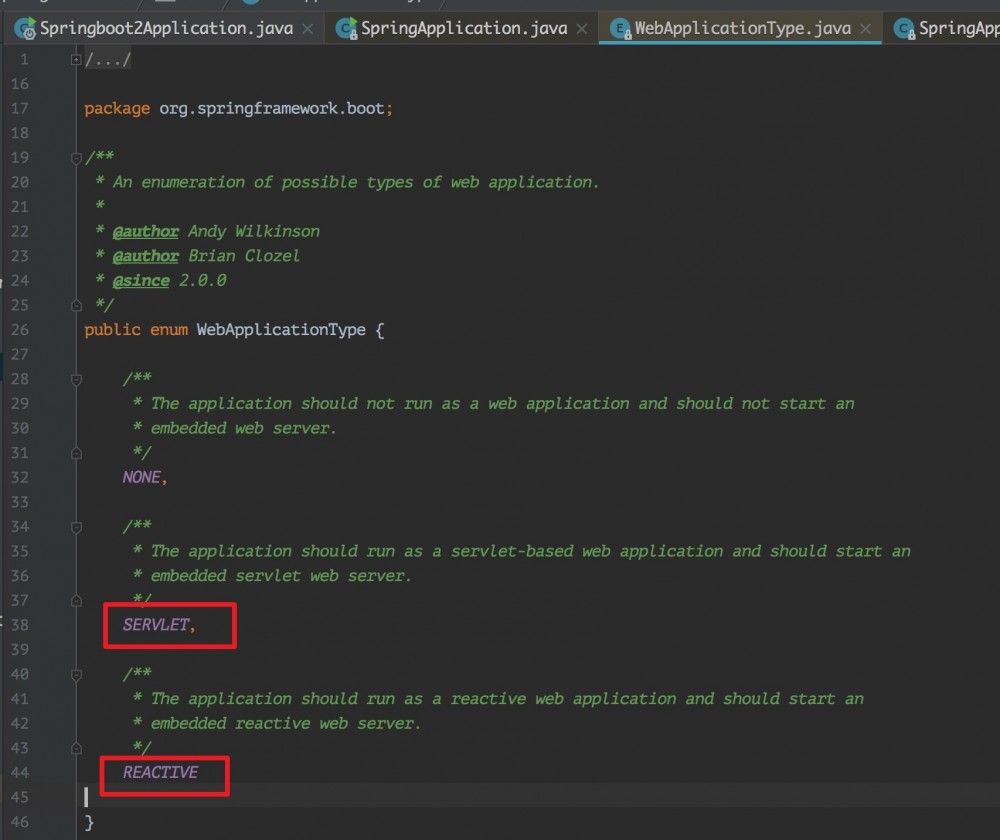
1、deduceWebApplicationType(): 推断应用的类型 ,创建的是一个 SERVLET 应用还是 REACTIVE应用或者是 NONE
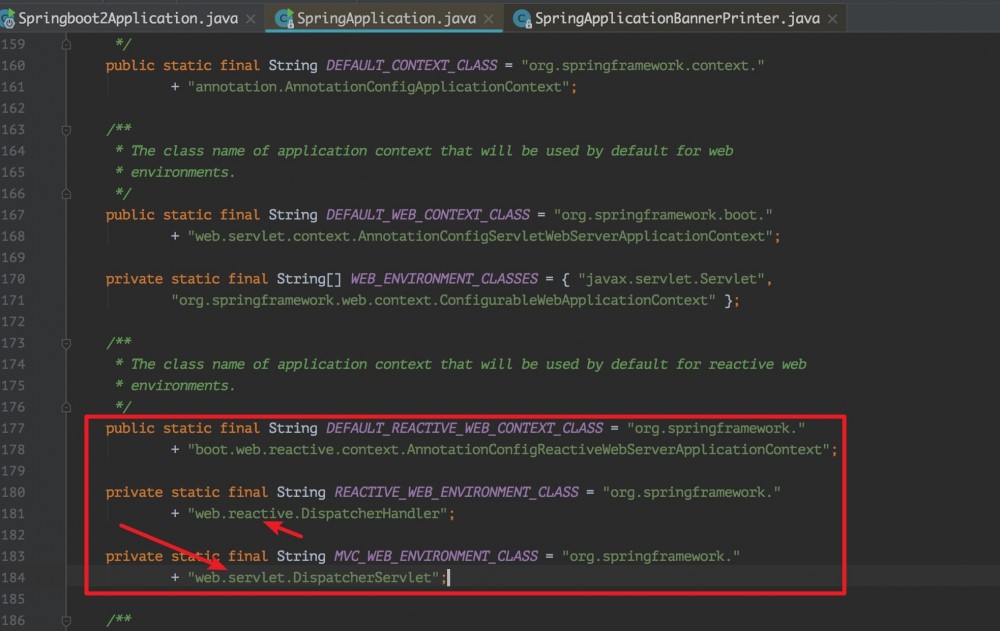
private static final String REACTIVE_WEB_ENVIRONMENT_CLASS = "org.springframework.web.reactive.DispatcherHandler";
private static final String MVC_WEB_ENVIRONMENT_CLASS = "org.springframework.web.servlet.DispatcherServlet";
private static final String[] WEB_ENVIRONMENT_CLASSES = { "javax.servlet.Servlet",
			"org.springframework.web.context.ConfigurableWebApplicationContext" };

private WebApplicationType deduceWebApplicationType() {
  if (ClassUtils.isPresent(REACTIVE_WEB_ENVIRONMENT_CLASS, null)
      && !ClassUtils.isPresent(MVC_WEB_ENVIRONMENT_CLASS, null)) {
    return WebApplicationType.REACTIVE;	//该程序是 REACTIVE 程序
  }
  for (String className : WEB_ENVIRONMENT_CLASSES) {
    if (!ClassUtils.isPresent(className, null)) {
      return WebApplicationType.NONE;	//该程序为 NONE
    }
  }
  return WebApplicationType.SERVLET;	//默认返回是 SERVLET 程序
}
2、setInitializers((Collection) getSpringFactoriesInstances(ApplicationContextInitializer.class)):初始化 classpath 下的所有的可用的 ApplicationContextInitializer。
1)、getSpringFactoriesInstances()
private <T> Collection<T> getSpringFactoriesInstances(Class<T> type) {
  return getSpringFactoriesInstances(type, new Class<?>[] {});
}
//获取所有的 Spring 工厂实例
private <T> Collection<T> getSpringFactoriesInstances(Class<T> type,
Class<?>[] parameterTypes, Object... args) {
  ClassLoader classLoader = Thread.currentThread().getContextClassLoader();
  // Use names and ensure unique to protect against duplicates
  Set<String> names = new LinkedHashSet<>(SpringFactoriesLoader.loadFactoryNames(type, classLoader)); //获取所有 Spring Factories 的名字
  List<T> instances = createSpringFactoriesInstances(type, parameterTypes,
                                                     classLoader, args, names);
  AnnotationAwareOrderComparator.sort(instances); //Spring 工厂实例排序
  return instances;
}
//根据读取到的名字创建对象(Spring 工厂实例)
private <T> List<T> createSpringFactoriesInstances(Class<T> type,
 Class<?>[] parameterTypes, ClassLoader classLoader, Object[] args, Set<String> names) {
  List<T> instances = new ArrayList<>(names.size());
  for (String name : names) {
    try {
      Class<?> instanceClass = ClassUtils.forName(name, classLoader);
      Assert.isAssignable(type, instanceClass);
      Constructor<?> constructor = instanceClass.getDeclaredConstructor(parameterTypes);
      T instance = (T) BeanUtils.instantiateClass(constructor, args);
      instances.add(instance);
    }
    catch (Throwable ex) {
      throw new IllegalArgumentException(
        "Cannot instantiate " + type + " : " + name, ex);
    }
  }
  return instances;
}
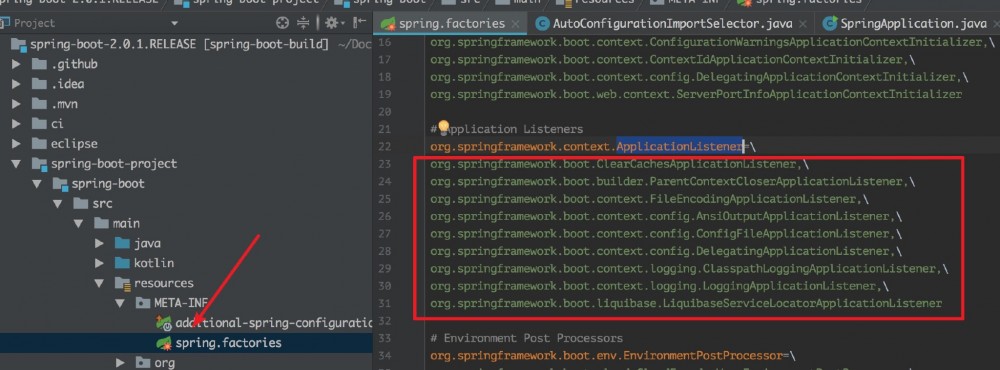
上面的 SpringFactoriesLoader.loadFactoryNames() ,是从 META-INF/spring.factories 的资源文件中,读取 key 为org.springframework.context.ApplicationContextInitializer 的 value。
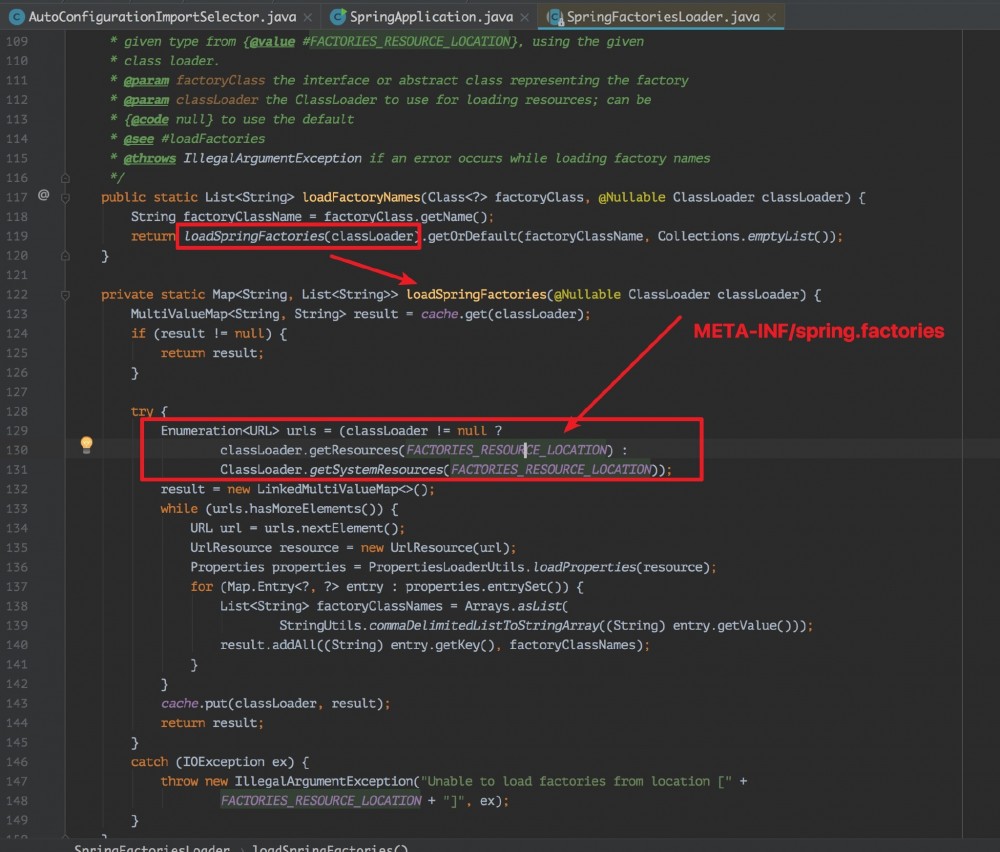
而 spring.factories 的部分内容如下:
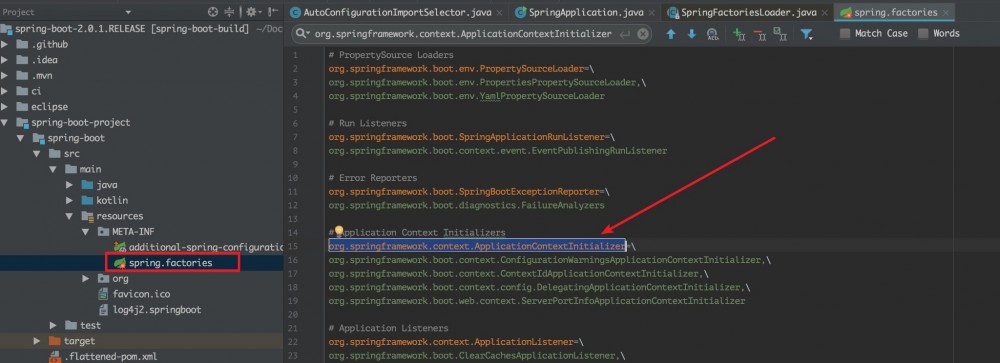
可以看到,最近的得到的,是 ConfigurationWarningsApplicationContextInitializer,ContextIdApplicationContextInitializer,DelegatingApplicationContextInitializer,ServerPortInfoApplicationContextInitializer 这四个类的名字。
2)、setInitializers():
public void setInitializers(
			Collection<? extends ApplicationContextInitializer<?>> initializers) {
  this.initializers = new ArrayList<>();
  this.initializers.addAll(initializers);
}
所以,这里 setInitializers() 所得到的成员变量 initializers 就被初始化为ConfigurationWarningsApplicationContextInitializer,ContextIdApplicationContextInitializer,DelegatingApplicationContextInitializer,ServerPortInfoApplicationContextInitializer 这四个类的对象组成的 list。
3、setListeners((Collection) getSpringFactoriesInstances(ApplicationListener.class)):初始化 classpath 下的所有的可用的 ApplicationListener。
1)、getSpringFactoriesInstances() 和上面的类似,但是它是从 META-INF/spring.factories 的资源文件中,获取到 key 为 org.springframework.context.ApplicationListener 的 value。
2)、setListeners():
public void setListeners(Collection<? extends ApplicationListener<?>> listeners) {
  this.listeners = new ArrayList<>();
  this.listeners.addAll(listeners);
}
所以,这里 setListeners() 所得到的成员变量 listeners 就被初始化为 ClearCachesApplicationListener,ParentContextCloserApplicationListener,FileEncodingApplicationListener,AnsiOutputApplicationListener ,ConfigFileApplicationListener,DelegatingApplicationListener,ClasspathLoggingApplicationListener,LoggingApplicationListener,LiquibaseServiceLocatorApplicationListener 这九个类的对象组成的 list。
4、deduceMainApplicationClass():根据调用栈,推断出 main 方法的类名
private Class<?> deduceMainApplicationClass() {
  try {
    StackTraceElement[] stackTrace = new RuntimeException().getStackTrace();
    for (StackTraceElement stackTraceElement : stackTrace) {
      if ("main".equals(stackTraceElement.getMethodName())) {
        return Class.forName(stackTraceElement.getClassName());
      }
    }
  }
  catch (ClassNotFoundException ex) {
    // Swallow and continue
  }
  return null;
}
run 方法背后的秘密
上面看完了构造方法后,已经初始化了一个 SpringApplication 对象,接下来调用其 run 方法,代码如下:
//运行 Spring 应用程序,创建并刷新一个新的 ApplicationContext
public ConfigurableApplicationContext run(String... args) {
		StopWatch stopWatch = new StopWatch();
		stopWatch.start();
		ConfigurableApplicationContext context = null;
		Collection<SpringBootExceptionReporter> exceptionReporters = new ArrayList<>();
		configureHeadlessProperty();
		SpringApplicationRunListeners listeners = getRunListeners(args);
		listeners.starting();
		try {
			ApplicationArguments applicationArguments = new DefaultApplicationArguments(
					args);
			ConfigurableEnvironment environment = prepareEnvironment(listeners,
					applicationArguments);
			configureIgnoreBeanInfo(environment);
			Banner printedBanner = printBanner(environment);
			context = createApplicationContext();
			exceptionReporters = getSpringFactoriesInstances(
					SpringBootExceptionReporter.class,
					new Class[] { ConfigurableApplicationContext.class }, context);
			prepareContext(context, environment, listeners, applicationArguments,
					printedBanner);
			refreshContext(context);
			afterRefresh(context, applicationArguments);
			stopWatch.stop();
			if (this.logStartupInfo) {
				new StartupInfoLogger(this.mainApplicationClass)
						.logStarted(getApplicationLog(), stopWatch);
			}
			listeners.started(context);
			callRunners(context, applicationArguments);
		}
		catch (Throwable ex) {
			handleRunFailure(context, ex, exceptionReporters, listeners);
			throw new IllegalStateException(ex);
		}
		try {
			listeners.running(context);
		}
		catch (Throwable ex) {
			handleRunFailure(context, ex, exceptionReporters, null);
			throw new IllegalStateException(ex);
		}
		return context;
	}
可变个数参数 args 即是我们整个应用程序的入口 main 方法的参数。StopWatch 是来自 org.springframework.util 的工具类,可以用来方便的记录程序的运行时间。
再来看看 1.5.12 与 2.0.1 版本的 run 方法 有什么不一样的地方?
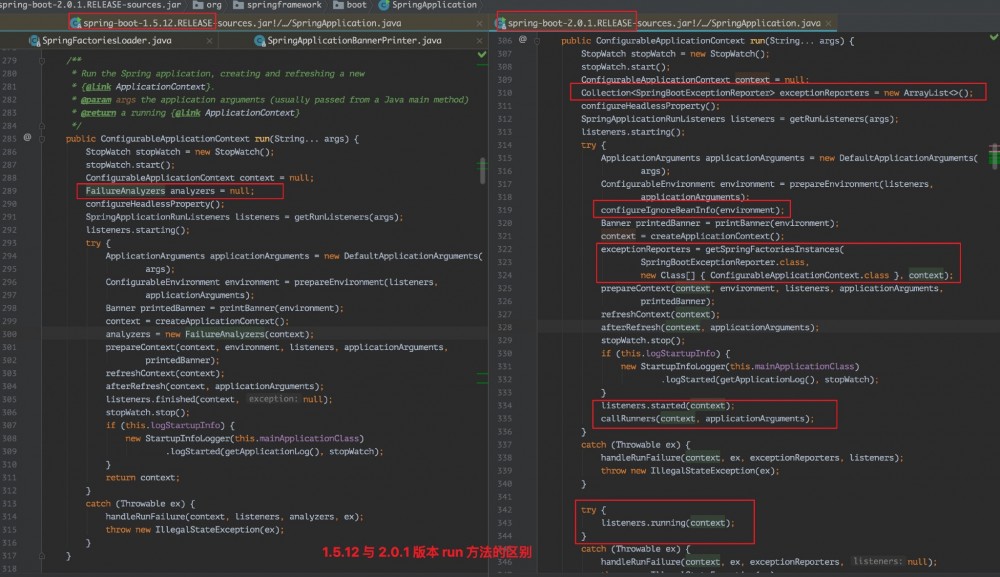
接下来好好分析上面新版本(2.0.1)的 run 方法的代码并配合比较旧版本(1.5.12)。
1、configureHeadlessProperty():设置 headless 模式
private static final String SYSTEM_PROPERTY_JAVA_AWT_HEADLESS = "java.awt.headless";
private boolean headless = true;

private void configureHeadlessProperty() {
  System.setProperty(SYSTEM_PROPERTY_JAVA_AWT_HEADLESS, System.getProperty(
    SYSTEM_PROPERTY_JAVA_AWT_HEADLESS, Boolean.toString(this.headless)));
}
实际上是就是设置系统属性 java.awt.headless,该属性会被设置为 true。
2、getRunListeners():加载 SpringApplicationRunListener 对象
 //TODO:  xxx
SpringApplicationRunListeners listeners = getRunListeners(args);//初始化监听器
listeners.starting();
try {
  prepareContext(context, environment, listeners, applicationArguments, printedBanner);
  refreshContext(context);
  afterRefresh(context, applicationArguments);
  listeners.started(context);
  callRunners(context, applicationArguments);
}
try {
  listeners.running(context);
}

private SpringApplicationRunListeners getRunListeners(String[] args) {
  Class<?>[] types = new Class<?>[] { SpringApplication.class, String[].class };
  return new SpringApplicationRunListeners(logger, getSpringFactoriesInstances(
    SpringApplicationRunListener.class, types, this, args));
}
3、new DefaultApplicationArguments(args):获取启动时传入参数 args(main 方法传进来的参数) 并初始化为 ApplicationArguments 对象。
public DefaultApplicationArguments(String[] args) {
  Assert.notNull(args, "Args must not be null");
  this.source = new Source(args);
  this.args = args;
}
4、prepareEnvironment(listeners, applicationArguments):根据 listeners 和 applicationArguments 配置SpringBoot 应用的环境。
private ConfigurableEnvironment prepareEnvironment(
  SpringApplicationRunListeners listeners, ApplicationArguments applicationArguments) {
  // Create and configure the environment
  ConfigurableEnvironment environment = getOrCreateEnvironment();
  configureEnvironment(environment, applicationArguments.getSourceArgs());
  listeners.environmentPrepared(environment);
  bindToSpringApplication(environment);
  if (this.webApplicationType == WebApplicationType.NONE) {
    environment = new EnvironmentConverter(getClassLoader())
      .convertToStandardEnvironmentIfNecessary(environment);
  }
  ConfigurationPropertySources.attach(environment);
  return environment;
}
//如果 environment 不为空,直接 get 到,否则创建
private ConfigurableEnvironment getOrCreateEnvironment() {
  if (this.environment != null) {
    return this.environment;
  }
  if (this.webApplicationType == WebApplicationType.SERVLET) {
    return new StandardServletEnvironment();
  }
  return new StandardEnvironment();
}
//配置环境
protected void configureEnvironment(ConfigurableEnvironment environment,String[] args) {
  configurePropertySources(environment, args);//配置要使用的PropertySources
  configureProfiles(environment, args);//配置要使用的Profiles
}
//将环境绑定到 SpringApplication
protected void bindToSpringApplication(ConfigurableEnvironment environment) {
  try {
    Binder.get(environment).bind("spring.main", Bindable.ofInstance(this));
  }
  catch (Exception ex) {
    throw new IllegalStateException("Cannot bind to SpringApplication", ex);
  }
}
5、configureIgnoreBeanInfo(environment):根据环境信息配置要忽略的 bean 信息
public static final String IGNORE_BEANINFO_PROPERTY_NAME = "spring.beaninfo.ignore";

private void configureIgnoreBeanInfo(ConfigurableEnvironment environment) {
  if (System.getProperty(
    CachedIntrospectionResults.IGNORE_BEANINFO_PROPERTY_NAME) == null) {
    Boolean ignore = environment.getProperty("spring.beaninfo.ignore",
                                             Boolean.class, Boolean.TRUE);
    System.setProperty(CachedIntrospectionResults.IGNORE_BEANINFO_PROPERTY_NAME,
                       ignore.toString());
  }
}
6、printBanner(environment):打印标志,上面我已经说过了。
private Banner printBanner(ConfigurableEnvironment environment) {
  if (this.bannerMode == Banner.Mode.OFF) {	//如果设置为 off,不打印 Banner
    return null;
  }
  ResourceLoader resourceLoader = this.resourceLoader != null ? this.resourceLoader
    : new DefaultResourceLoader(getClassLoader());
  SpringApplicationBannerPrinter bannerPrinter = new SpringApplicationBannerPrinter(
    resourceLoader, this.banner);
  if (this.bannerMode == Mode.LOG) {
    return bannerPrinter.print(environment, this.mainApplicationClass, logger);
  }
  return bannerPrinter.print(environment, this.mainApplicationClass, System.out);
}
7、createApplicationContext():根据应用类型来确定该 Spring Boot 项目应该创建什么类型的 ApplicationContext ,默认情况下,如果没有明确设置的应用程序上下文或应用程序上下文类,该方法会在返回合适的默认值。
public static final String DEFAULT_WEB_CONTEXT_CLASS = "org.springframework.boot.web.servlet.context.AnnotationConfigServletWebServerApplicationContext";
public static final String DEFAULT_REACTIVE_WEB_CONTEXT_CLASS = "org.springframework.boot.web.reactive.context.AnnotationConfigReactiveWebServerApplicationContext";
public static final String DEFAULT_CONTEXT_CLASS = "org.springframework.context.annotation.AnnotationConfigApplicationContext";

protected ConfigurableApplicationContext createApplicationContext() {
  Class<?> contextClass = this.applicationContextClass;
  if (contextClass == null) {
    try {
      switch (this.webApplicationType) {	//根据应用程序的类型来初始化容器
        case SERVLET:	//servlet 应用程序
          contextClass = Class.forName(DEFAULT_WEB_CONTEXT_CLASS);
          break;
        case REACTIVE:	//reactive 应用程序
          contextClass = Class.forName(DEFAULT_REACTIVE_WEB_CONTEXT_CLASS);
          break;
        default:		//默认
          contextClass = Class.forName(DEFAULT_CONTEXT_CLASS);
      }
    } catch (ClassNotFoundException ex) {
  throw new IllegalStateException(
    "Unable create a default ApplicationContext,please specify an 		    ApplicationContextClass",ex);
    }
  }
  //最后通过Spring的工具类 BeanUtils 初始化容器类 bean
  return (ConfigurableApplicationContext) BeanUtils.instantiateClass(contextClass);
}
来看看在 1.5.12 中是怎么样的?

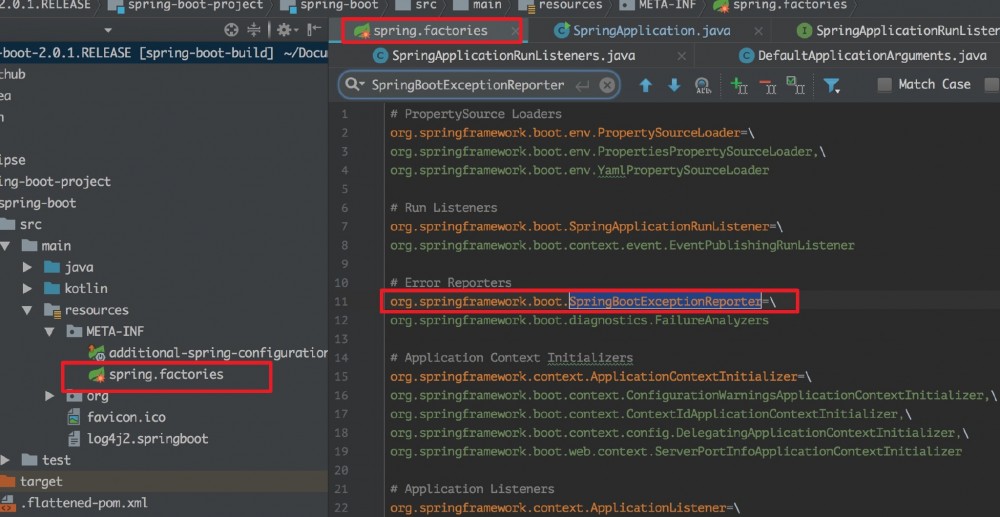
8、exceptionReporters = getSpringFactoriesInstances( SpringBootExceptionReporter.class, new Class[] { ConfigurableApplicationContext.class }, context)
private <T> Collection<T> getSpringFactoriesInstances(Class<T> type,
            Class<?>[] parameterTypes, Object... args) {
  ClassLoader classLoader = Thread.currentThread().getContextClassLoader();
  // Use names and ensure unique to protect against duplicates
  Set<String> names = new LinkedHashSet<>(
    SpringFactoriesLoader.loadFactoryNames(type, classLoader));
  List<T> instances = createSpringFactoriesInstances(type, parameterTypes,
       classLoader, args, names);//根据类型 key 为 SpringBootExceptionReporter 去加载
  AnnotationAwareOrderComparator.sort(instances);//对实例排序
  return instances;
}
这里也是通过 SpringFactoriesLoader 加载 META-INF/spring.factories 中 key 为 SpringBootExceptionReporter 的。
9、prepareContext(context, environment, listeners, applicationArguments, printedBanner):完成整个容器的创建与启动以及 bean 的注入功能。
//装配 Context
private void prepareContext(ConfigurableApplicationContext context,
   ConfigurableEnvironment environment, SpringApplicationRunListeners listeners,
   ApplicationArguments applicationArguments, Banner printedBanner) {
  //将之前准备好的 environment 设置给创建好的 ApplicationContext 使用
  context.setEnvironment(environment);
  //1、
  postProcessApplicationContext(context);
  //2、
  applyInitializers(context);
  listeners.contextPrepared(context);
  if (this.logStartupInfo) {//启动日志
    logStartupInfo(context.getParent() == null);
    logStartupProfileInfo(context);
  }
  // Add boot specific singleton beans
  context.getBeanFactory().registerSingleton("springApplicationArguments",
                                             applicationArguments);
  if (printedBanner != null) {
    context.getBeanFactory().registerSingleton("springBootBanner", printedBanner);
  }
  // Load the sources
  Set<Object> sources = getAllSources();
  Assert.notEmpty(sources, "Sources must not be empty");
  //3、
  load(context, sources.toArray(new Object[0]));
  listeners.contextLoaded(context);
}
1)、postProcessApplicationContext(context)
public static final String CONFIGURATION_BEAN_NAME_GENERATOR = "org.springframework.context.annotation.internalConfigurationBeanNameGenerator";

protected void postProcessApplicationContext(ConfigurableApplicationContext context) {
  if (this.beanNameGenerator != null) {
    context.getBeanFactory().registerSingleton(
      AnnotationConfigUtils.CONFIGURATION_BEAN_NAME_GENERATOR,
      this.beanNameGenerator);
  }
  if (this.resourceLoader != null) {
    if (context instanceof GenericApplicationContext) {
      ((GenericApplicationContext) context)
      .setResourceLoader(this.resourceLoader);
    }
    if (context instanceof DefaultResourceLoader) {
      ((DefaultResourceLoader) context)
      .setClassLoader(this.resourceLoader.getClassLoader());
    }
  }
}
该方法对 context 进行了预设置,设置了 ResourceLoader 和 ClassLoader,并向 bean 工厂中添加了一个beanNameGenerator 。
2)、applyInitializers(context)
protected void applyInitializers(ConfigurableApplicationContext context) {
  for (ApplicationContextInitializer initializer : getInitializers()) {
    Class<?> requiredType = GenericTypeResolver.resolveTypeArgument(
      initializer.getClass(), ApplicationContextInitializer.class);
    Assert.isInstanceOf(requiredType, context, "Unable to call initializer.");
    initializer.initialize(context);
  }
}
在刷新之前将任何 ApplicationContextInitializer 应用于上下文
3)、load(context, sources.toArray(new Object[0]))
主要是加载各种 beans 到 ApplicationContext 对象中。
protected void load(ApplicationContext context, Object[] sources) {
  BeanDefinitionLoader loader = createBeanDefinitionLoader( //2
    getBeanDefinitionRegistry(context), sources);// 1
  if (this.beanNameGenerator != null) {
    loader.setBeanNameGenerator(this.beanNameGenerator);
  }
  if (this.resourceLoader != null) {
    loader.setResourceLoader(this.resourceLoader);
  }
  if (this.environment != null) {
    loader.setEnvironment(this.environment);
  }
  loader.load();//3
}
(1)、getBeanDefinitionRegistry(context)
获取 bean 定义注册表
private BeanDefinitionRegistry getBeanDefinitionRegistry(ApplicationContext context) {
  if (context instanceof BeanDefinitionRegistry) {
    return (BeanDefinitionRegistry) context;
  }
  if (context instanceof AbstractApplicationContext) {
    return (BeanDefinitionRegistry) ((AbstractApplicationContext) context)
      .getBeanFactory();
  }
  throw new IllegalStateException("Could not locate BeanDefinitionRegistry");
}
(2)、createBeanDefinitionLoader()
通过 BeanDefinitionLoader 的构造方法把参数(注册表、资源)传进去,然后创建 BeanDefinitionLoader。
(3)、load()
把资源全部加载。
10、refreshContext(context)
private void refreshContext(ConfigurableApplicationContext context) {
  refresh(context);//1
  if (this.registerShutdownHook) {
    try {
      context.registerShutdownHook();
    }
    catch (AccessControlException ex) {
      // Not allowed in some environments.
    }
  }
}
//刷新底层的 ApplicationContext
protected void refresh(ApplicationContext applicationContext) {
  Assert.isInstanceOf(AbstractApplicationContext.class, applicationContext);
  ((AbstractApplicationContext) applicationContext).refresh();
}
refreshContext(context) 方法又调用了 refresh(context)。在调用了 refresh(context) 方法之后,调用了 registerShutdownHook 方法。继续看它的 refresh 方法:
public void refresh() throws BeansException, IllegalStateException {
  synchronized (this.startupShutdownMonitor) {
    // Prepare this context for refreshing.
    prepareRefresh();
    // Tell the subclass to refresh the internal bean factory.
    ConfigurableListableBeanFactory beanFactory = obtainFreshBeanFactory();
    // Prepare the bean factory for use in this context.
    prepareBeanFactory(beanFactory);
    try {
      // Allows post-processing of the bean factory in context subclasses.
      postProcessBeanFactory(beanFactory);
      // Invoke factory processors registered as beans in the context.
      invokeBeanFactoryPostProcessors(beanFactory);
      // Register bean processors that intercept bean creation.
      registerBeanPostProcessors(beanFactory);
      // Initialize message source for this context.
      initMessageSource();
      // Initialize event multicaster for this context.
      initApplicationEventMulticaster();
      // Initialize other special beans in specific context subclasses.
      onRefresh();
      // Check for listener beans and register them.
      registerListeners();
      // Instantiate all remaining (non-lazy-init) singletons.
      finishBeanFactoryInitialization(beanFactory); //1
      // Last step: publish corresponding event.
      finishRefresh();
    } catch (BeansException ex) {
      。。。
        // Destroy already created singletons to avoid dangling resources.
        destroyBeans();
      // Reset 'active' flag.
      cancelRefresh(ex);
      // Propagate exception to caller.
      throw ex;
    } finally {
      // Reset common introspection caches in Spring's core, since we
      // might not ever need metadata for singleton beans anymore...
      resetCommonCaches();
    }
  }
}
到这里,我们就看见重点了,仔细看上的注释,正在做各种初始化工作,而今天我们关注的重点就是方法 finishBeanFactoryInitialization(beanFactory)。该方法进行了非懒加载 beans 的初始化工作。现在我们进入该方法内部,一探究竟。
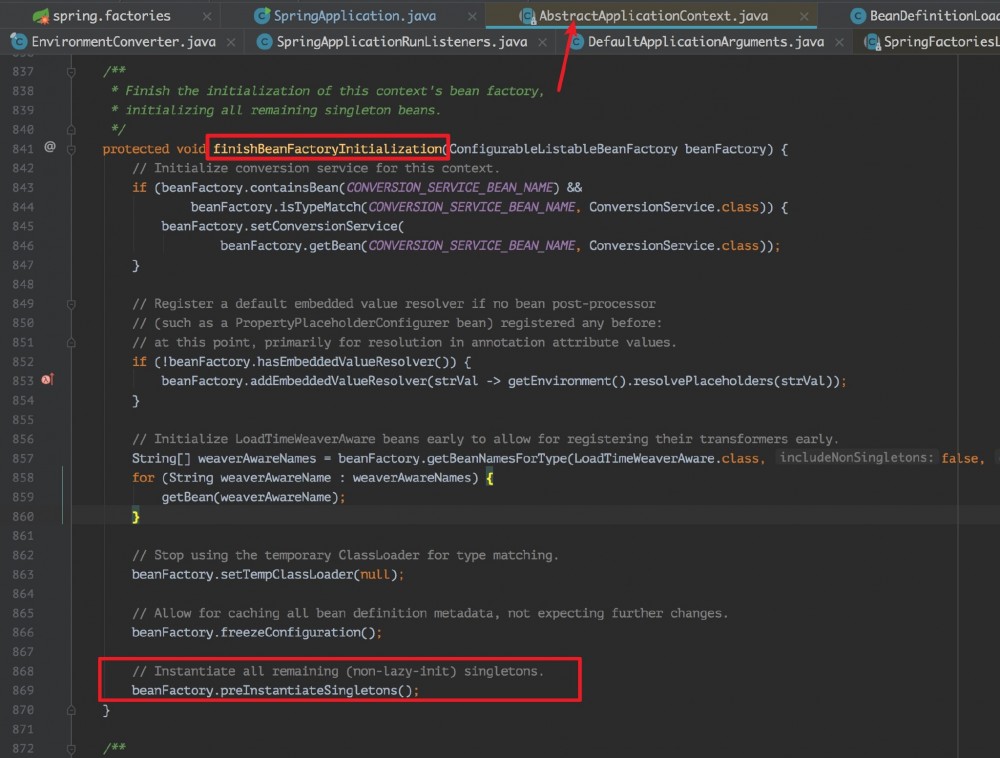
看上图方法中的最后一步,调用了 beanFactory 的 preInstantiateSingletons() 方法。此处的 beanFactory 是哪个类的实例对象呢?
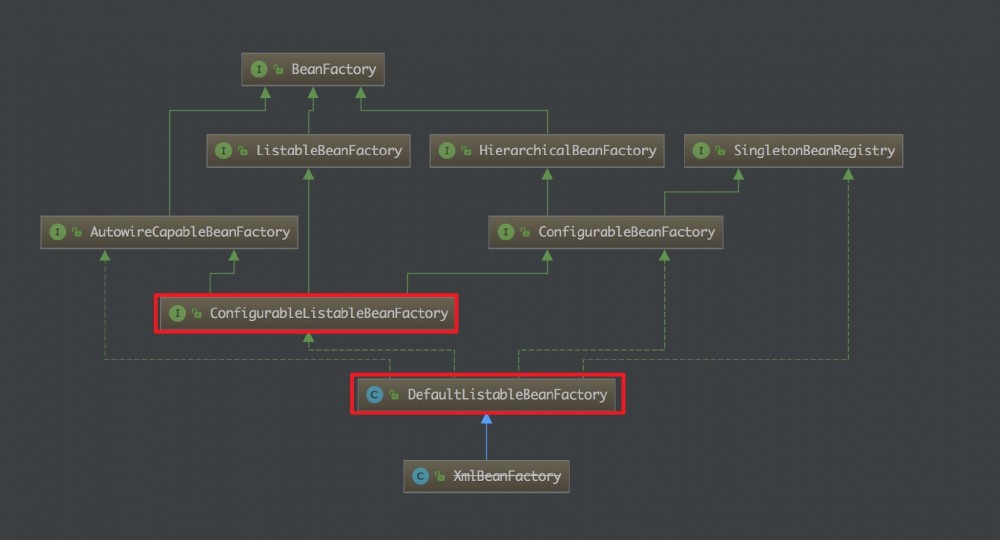
可以看到 ConfigurableListableBeanFactory 接口的实现类只有 DefaultListableBeanFactory,我们看下实现类中的 preInstantiateSingletons 方法是怎么做的。
public void preInstantiateSingletons() throws BeansException {
  // Iterate over a copy to allow for init methods which in turn register new bean definitions.
  // While this may not be part of the regular factory bootstrap, it does otherwise work fine.
  List<String> beanNames = new ArrayList<>(this.beanDefinitionNames);

  // Trigger initialization of all non-lazy singleton beans...
  for (String beanName : beanNames) {
    RootBeanDefinition bd = getMergedLocalBeanDefinition(beanName);
    if (!bd.isAbstract() && bd.isSingleton() && !bd.isLazyInit()) {
      if (isFactoryBean(beanName)) {
        Object bean = getBean(FACTORY_BEAN_PREFIX + beanName);
        if (bean instanceof FactoryBean) {
          final FactoryBean<?> factory = (FactoryBean<?>) bean;
          boolean isEagerInit;
         if (System.getSecurityManager() != null && factory instanceof SmartFactoryBean){
            isEagerInit = AccessController.doPrivileged((PrivilegedAction<Boolean>)
             ((SmartFactoryBean<?>) factory)::isEagerInit, getAccessControlContext());
          } else {
            isEagerInit = (factory instanceof SmartFactoryBean &&
                           ((SmartFactoryBean<?>) factory).isEagerInit());
          }
          if (isEagerInit) {
            getBean(beanName);
          }
        }
      } else {
        getBean(beanName);
      }
    }
  }

  // Trigger post-initialization callback for all applicable beans...
  for (String beanName : beanNames) {
    Object singletonInstance = getSingleton(beanName);
    if (singletonInstance instanceof SmartInitializingSingleton) {
      final SmartInitializingSingleton smartSingleton = (SmartInitializingSingleton) singletonInstance;
      if (System.getSecurityManager() != null) {
        AccessController.doPrivileged((PrivilegedAction<Object>) () -> {
          smartSingleton.afterSingletonsInstantiated();
          return null;
        }, getAccessControlContext());
      } else {
        smartSingleton.afterSingletonsInstantiated();
      }
    }
  }
}
从上面的代码中可以看到很多调用了 getBean(beanName) 方法,跟踪此方法进去后,最终发现 getBean 调用了AbstractBeanFactory 类的 doGetBean(xxx) 方法,doGetBean(xxx) 方法中有这么一段代码:
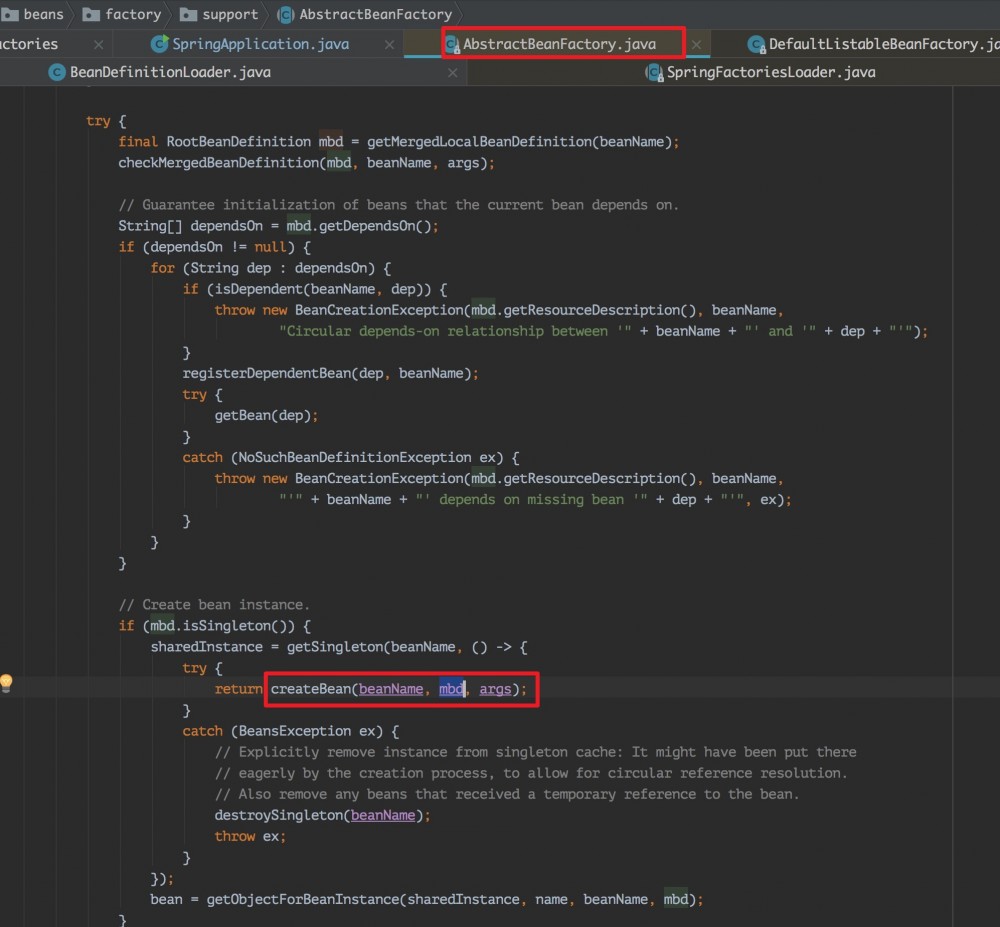
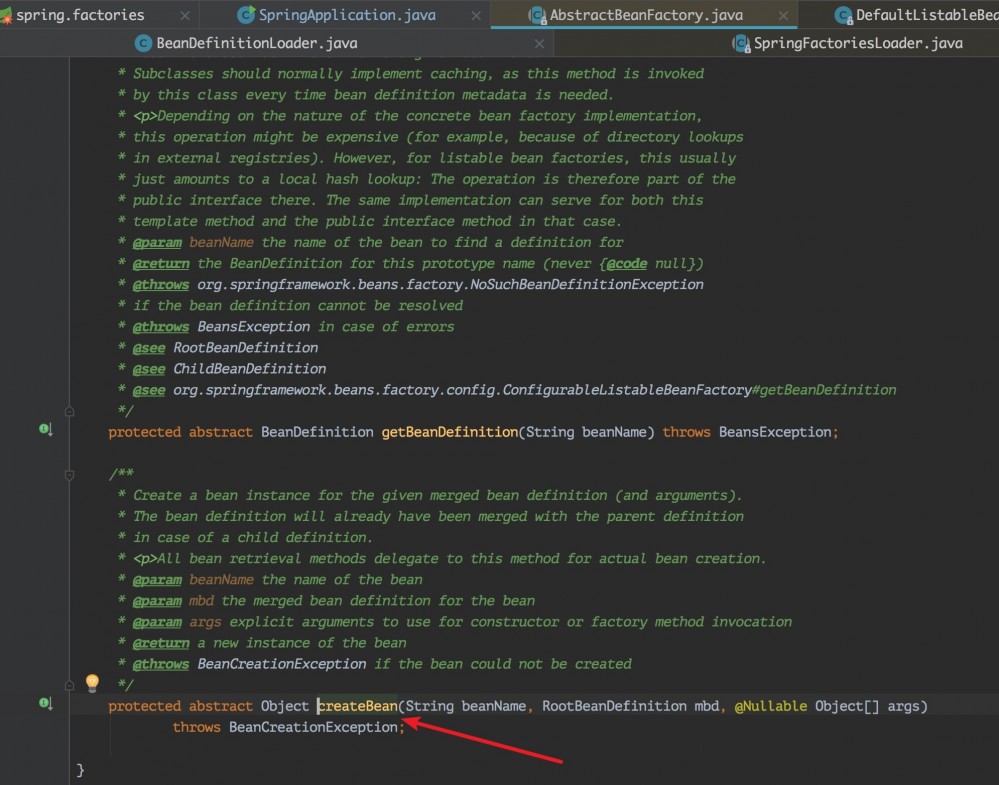
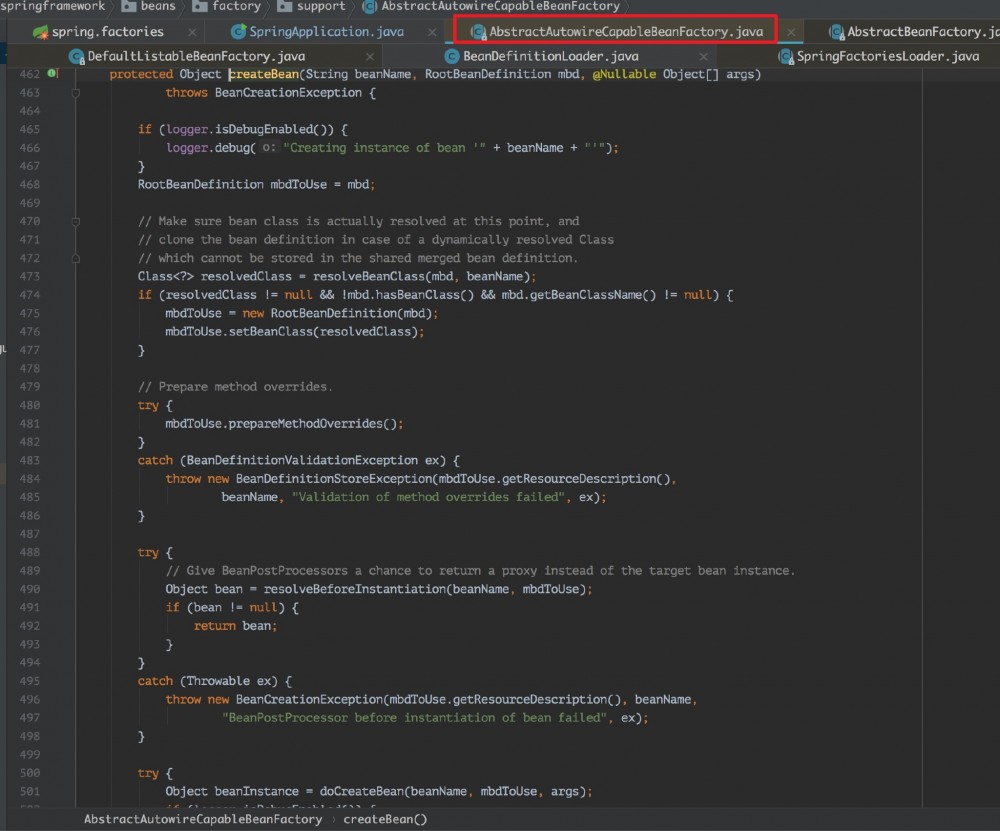
但是 createBean() 方法并没有得到实现,实现类在 AbstractAutowireCapableBeanFactory 中。这才是创建 bean 的核心方法。
不知不觉,代码看的越来越深,感觉思维都差点回不去 run 方法了,切回大脑的上下文线程到 run 方法去。
11、afterRefresh(context, applicationArguments):在上下文刷新后调用该方法,其内部没有做任何操作。
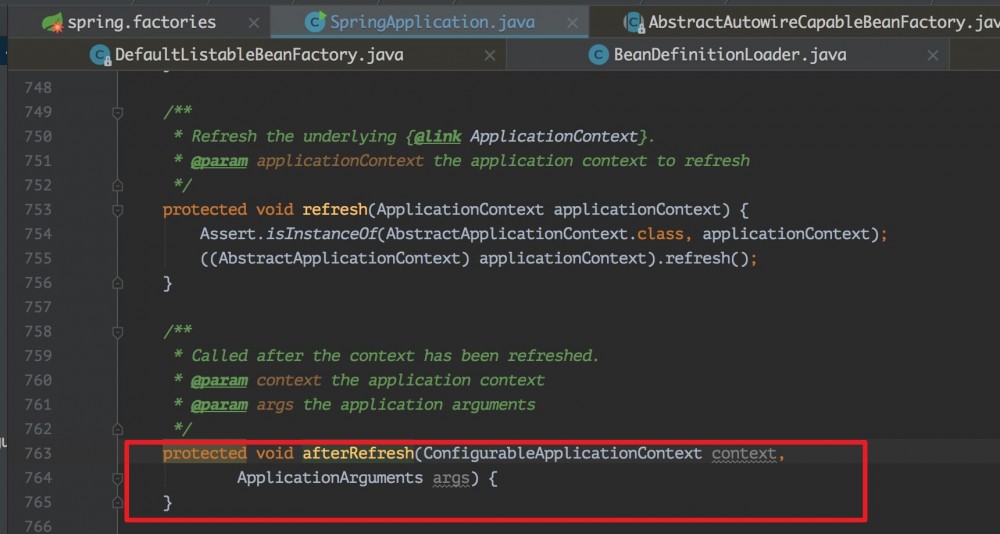
发现没做任何操作了之后,就觉得有点奇怪,所以把当前版本和 1.5.12 对比了下,发现:
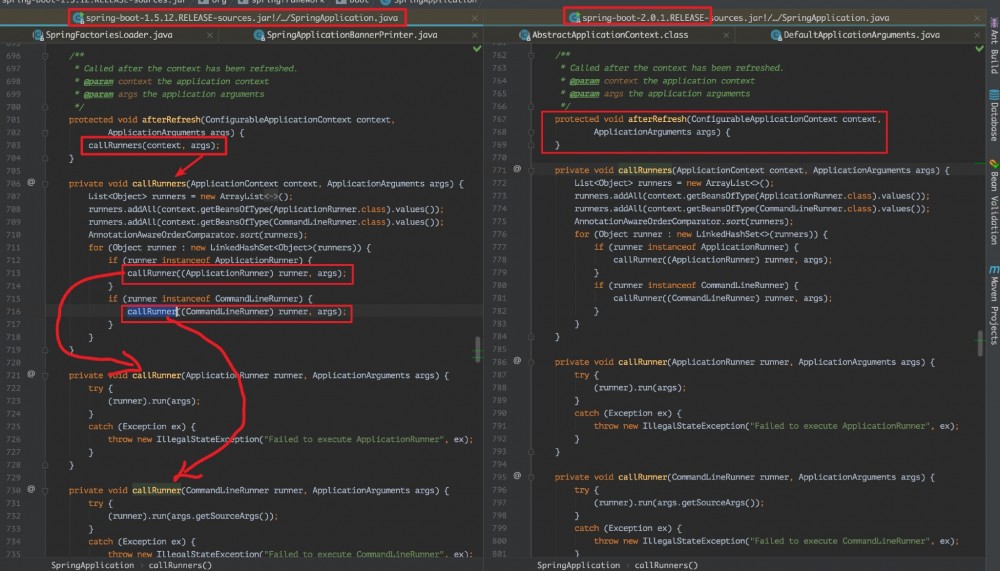
在 1.5.12 中的 afterRefresh() 方法中调用了 callRunners() 方法,但是在 2.0.1 版本中的 run 方法中调用了 callRunners () 方法:

这里不得不说 SpringApplicationRunListeners 在 2.0.1 中的改变:

可以发现在 run 方法中,SpringApplicationRunListeners 监听器的状态花生了变化,这也是通过对比不同版本的代码才知道的区别,所以说我们看源码需要多对比着看。
so,我们来看下这个 SpringApplicationRunListeners 这个接口:
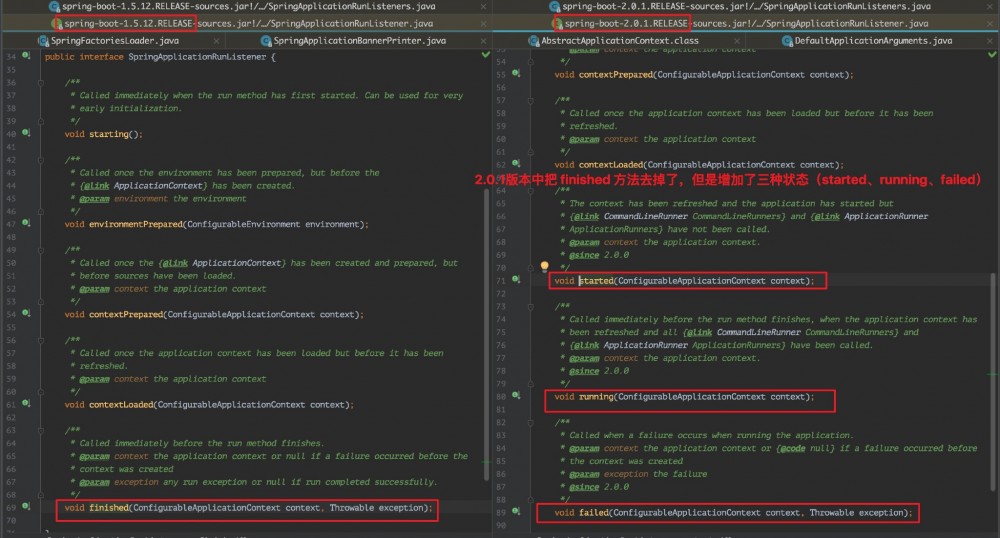
started 状态:The context has been refreshed and the application has started but CommandLineRunner and ApplicationRunner have not been called
running 状态:Called immediately before the run method finishes, when the application context has been refreshed and all CommandLineRunner and ApplicationRunners have been called.
相关文章
1、 Spring Boot 2.0系列文章(一):Spring Boot 2.0 迁移指南
2、 Spring Boot 2.0系列文章(二):Spring Boot 2.0 新特性详解
3、 Spring Boot 2.0系列文章(三):Spring Boot 2.0 配置改变
4、 Spring Boot 2.0系列文章(四):Spring Boot 2.0 源码阅读环境搭建
5、 Spring Boot 2.0系列文章(五):Spring Boot 2.0 项目源码结构预览
6、 Spring Boot 2.0系列文章(六):Spring boot 2.0 中 SpringBootApplication 注解详解
7、 Spring Boot 2.0系列文章(七):SpringApplication 深入探索
总结
本文从源码级别分析了 Spring Boot 应用程序的启动过程,着重看了 SpringApplication 类中的 run 方法其内部实现,并把涉及到的流程代码都过了一遍。
感悟:有时候跟代码跟着跟着,发现越陷越深,好难跳出来!后面还需多向别人请教阅读源码的技巧!
最后
虽然源码很难,但随着不断的探索,源码在你面前将会一览无遗,享受这种探索后的成就感!加油!骚年!
自己本人能力有限,源码看的不多,上面如有不对的还请留言交流。
赏
谢谢你支持我买服务器!
 支付宝
支付宝
 微信
微信
正文到此结束
- 本文标签: 配置 CEO 参数 文章 Property id root db cat 注释 BeanUtils ACE BeanDefinition MQ synchronized web tab 线程 响应式 list 博客 Security Collection 构造方法 java 源码 时间 value http message IO 静态方法 spring classpath tar 代码 key core 监听器 cache equals logo 启动过程 Bootstrap 实例 src Logging bean ArrayList 定制 https UI App 总结 Listeners Service springboot ssl struct 支付宝 CTO final trigger Action Spring Boot 服务器 servlet
- 版权声明: 本文为互联网转载文章,出处已在文章中说明(部分除外)。如果侵权,请联系本站长删除,谢谢。
- 本文海报: 生成海报一 生成海报二
热门推荐


相关文章


Loading...
![[HBLOG]公众号](http://www.liuhaihua.cn/img/qrcode_gzh.jpg)

