SpringBoot2-第一章:整合基础框架
在很早以前,我发过javaweb系列教程,探索了从spring框架的配置整合到springboot,中间还讲解了一个博客小项目。具体信息请访问:https://acheng1314.cn
快速搭建springboot2框架
本项目的GitHub:https://github.com/pc859107393/Go2SpringBoot.git
有兴趣交流springboot进行快速开发的同学可以加一下下面的企鹅群。

为什么要使用springboot?
在很早以前,我的项目中探索Spring+SpringMvc+Druid+Mybatis框架整合的时候,我们可是花了两个章节详细的讨论spring框架的整合,同样的哪怕是一个熟练的Java程序员要搭建一个完整稳定的框架也要很长的时间。 但是springboot解决了这个问题,笔者现在搭建一个springboot项目仅仅需要几分钟时间。下面我们一起一点点的看下去。
需要的工具
- JDK1.8
- IntelliJ IDEA 2018.1.4(目前我所使用的最低版本)
- MySQL、Navicat或DataGrip
- 构建工具:maven或gradle,推荐使用gradle,毕竟我用的gradle
- 其他,后续使用到的地方我们持续跟进
- git,使用是这个工具去我的github上面同步项目:https://github.com/pc859107393/Go2SpringBoot.git
创建项目
按照前面项目的国际惯例,使用IntelliJ IDEA构建项目,这一次还是像以前一样贴出图片。
①. 在idea的欢迎界面,我们选择 Create New Project ,如图1.1所示。
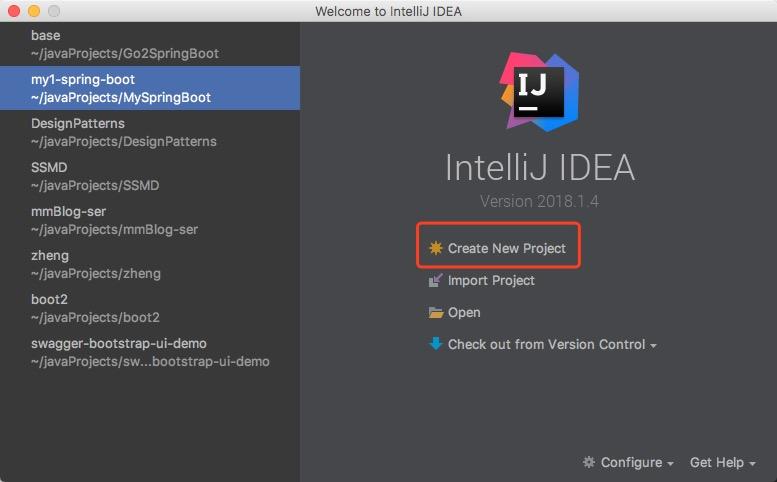
图1.1 欢迎界面
②. 接着我们选择左侧的 Spring Initializr 然后点击 next ,进入 Project Metadata 界面,如图1.2所示。
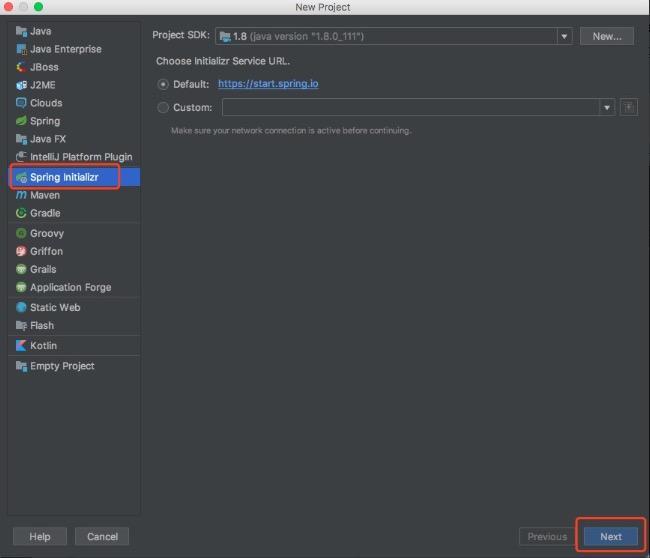
图1.2 选择Spring项目初始化
③. 紧接着开始配置项目的基本参数,我们在这里一点点的实现,如图1.3所示。
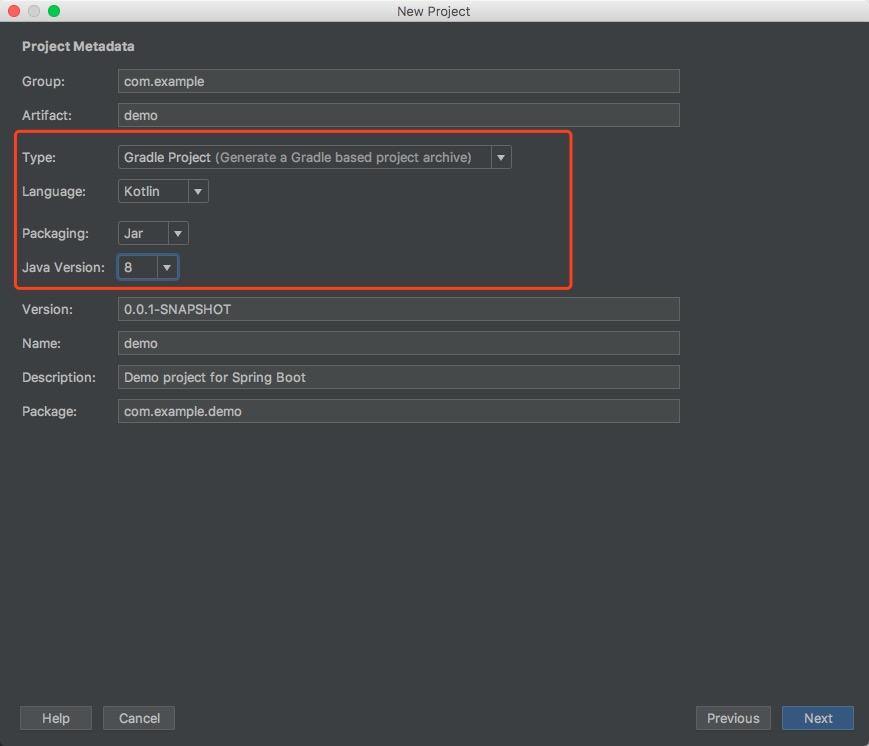
图1.3 配置项目基本参数
在图1.3中,我们需要着重注意的是: 项目类型设置为Gradle project,开发语言我选择的是kotlin,打包方式jar,java语言版本是8,其他的参数大家自行百度
④. 完成了上面的项目参数配置后,我们接着选择项目资源依赖。项目资源依赖也就是我们需要使用哪些jar包扩展。界面如图1.4所示。
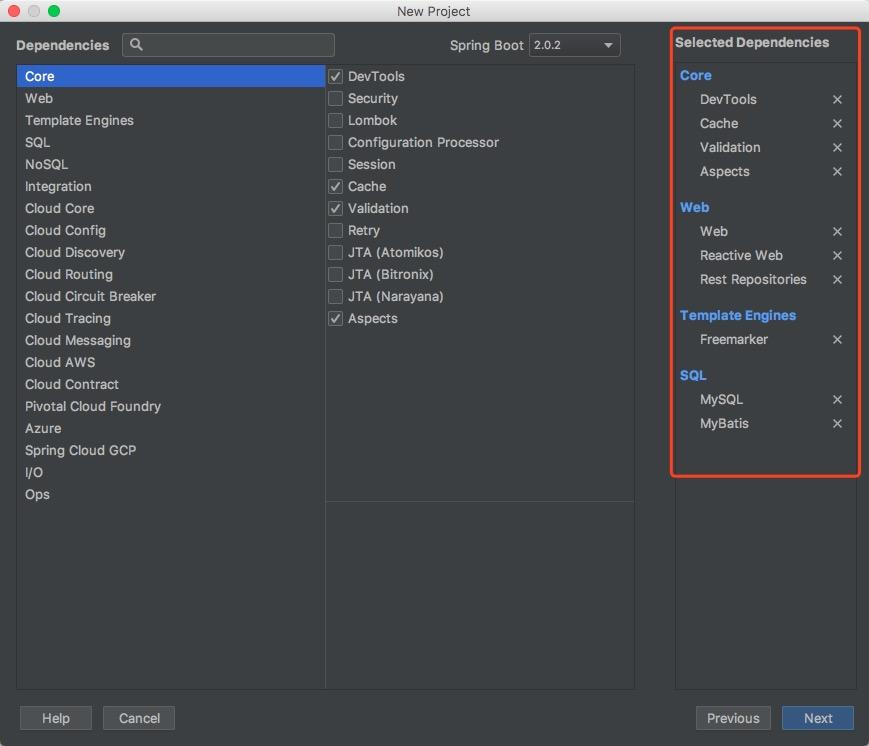
图1.4 选择项目依赖资源
在上面的图1.4中,左边是资源的父类别,中间是具体的资源详细名称,右边是我们选中的依赖,同样的已经把目录层级展示出来了,大家请根据我选中的做出相应的选择。注意:SpringBoot版本我们默认就行。
⑤. 当我们把图1.4点击 next 后,进入了一个项目目录命名环节,我们可以取自己心仪的名字。 注意:写完名字不要立即点击finish!写完名字不要立即点击finish!写完名字不要立即点击finish!
在这里我们有一个很值得注意的小细节,在这里我们可以加快项目构建速度。
1. gradle项目的构建是需要gradle环境的。
 2. gradle和maven一样是进行远程资源依赖的,所以合理的远程资源仓库可以加快构建速度(资源下载速度快了,减少大部分等待时间)。
 3. 修改文件内容 项目目录->gradle->wrapper->gradle-wrapper.properties 中的distributionUrl的值为:http/://7xlmzq.com1.z0.glb.clouddn.com/gradle-4.5.1-bin.zip
 4. 在项目中的build.gradle文件中修改repositories字段相关的内容。添加如下内容:

    maven { url "http://maven.aliyun.com/nexus/content/repositories/central" }
⑥. 做完这两步后,我们就可以选择finish进入项目中。 大概模样如图1.5所示。
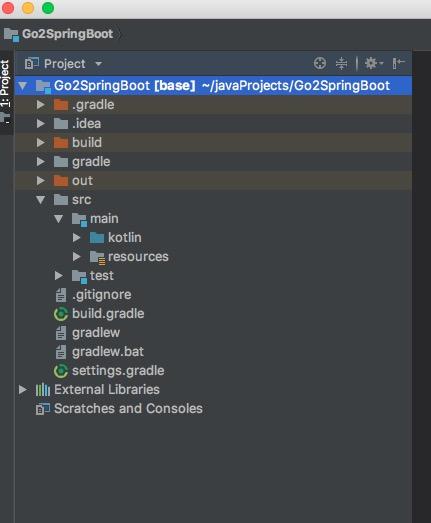
图1.5 项目构建完成
添加依赖资源
在传统的JavaWeb应用中,我们一般采用经典三层来解决问题,经典三层指: dao->service->web ,同样的我们这里也先来整合这三层。
①. 打开 build.gradle ,查看底部的 dependencies 包含哪些依赖。这个时候项目的依赖应该如下所示:
dependencies {
   //aop支持
   compile('org.springframework.boot:spring-boot-starter-aop')
   //缓存
   compile('org.springframework.boot:spring-boot-starter-cache')
   //快捷生成RESTFul文档
   compile('org.springframework.boot:spring-boot-starter-data-rest')
   //模板引擎
   compile('org.springframework.boot:spring-boot-starter-freemarker')
   //数据校验
   compile('org.springframework.boot:spring-boot-starter-validation')
   //传统的web
   compile('org.springframework.boot:spring-boot-starter-web')
   //新的webflux
   compile('org.springframework.boot:spring-boot-starter-webflux')
   //mybatis的支持
   compile('org.mybatis.spring.boot:mybatis-spring-boot-starter:1.3.2')
   //Kotlin支持
   compile("org.jetbrains.kotlin:kotlin-stdlib-jdk8")
   compile("org.jetbrains.kotlin:kotlin-reflect")
   //springweb项目快速重启
   runtime('org.springframework.boot:spring-boot-devtools')
   //mysql链接
   runtime('mysql:mysql-connector-java')
   //测试支持
   testCompile('org.springframework.boot:spring-boot-starter-test')
   testCompile('io.projectreactor:reactor-test')
   //在上面的依赖中 compile是任何时候都需要的依赖,runtime是紧紧在运行时需要依赖,testCompile是在测试的编译和运行时候均需要。
}
在以前我的系列教程中,我们主要采用了哪些框架呢?主要采用了:Spring+SpringMvc+Mybatis+Druid+SpringFox,所以这些组成一个完整web应用的框架集合是不能少的,所以我们需要加入下面的一些依赖。
compile 'com.alibaba:druid-spring-boot-starter:1.1.9'

    compile 'com.google.code.gson:gson:2.7'
    //mybatis-plus插件支持
    compile 'com.baomidou:mybatis-plus:2.3'
    compile 'com.baomidou:mybatis-plus-boot-starter:2.3'

    compile "io.springfox:springfox-swagger2:${springfoxVersion}"
    compile "io.springfox:springfox-staticdocs:2.6.1"
    compile "io.springfox:springfox-swagger-ui:${springfoxVersion}"
    compile 'com.github.xiaoymin:swagger-bootstrap-ui:1.7.2'
-
个人原因经常使用gson,上面的springfoxVersion='2.8.0'
接着我们刷新gradle或者选择右下角提示的 Import Changes,导入我们加入的依赖资源。到这一步我们的依赖添加完毕。
框架整合
其实框架整合无外乎就是这些基于Spring的bean模式构建的各个bean协调工作,这一点在传统手动配置的Spring应用中是一个很难很繁琐的过程。但是我们springboot时代,一切都简化了,我们只需要找到相应资源的官方文档,参照文档进行整合就行了。
我整合的配置文件 application.properties 如下:
debug=false
trace=false

# Druid连接池配置,官方配置参考:https://github.com/alibaba/druid/tree/master/druid-spring-boot-starter
spring.datasource.druid.url=jdbc:mysql://localhost:3306/cc_db?useUnicode=true&characterEncoding=utf8&autoReconnect=true
spring.datasource.driver-class-name= com.mysql.jdbc.Driver
spring.datasource.druid.username=root
spring.datasource.druid.password=laopo5201314
spring.datasource.druid.initial-size=5
spring.datasource.druid.max-active=20
spring.datasource.druid.min-idle=10
spring.datasource.druid.max-wait=10
spring.datasource.druid.filters=stat,wall
spring.datasource.druid.filter.stat.log-slow-sql=true
spring.datasource.druid.filter.stat.slow-sql-millis=2000

# 配置StatFilter
spring.datasource.druid.filter.stat.db-type=mysql
spring.datasource.druid.aop-patterns= -cn.acheng1314.*

# 配置WallFilter
spring.datasource.druid.filter.wall.enabled=true
spring.datasource.druid.filter.wall.db-type=mysql
spring.datasource.druid.filter.wall.config.delete-allow=false
spring.datasource.druid.filter.wall.config.drop-table-allow=false

## Druid WebStatFilter配置,说明请参考Druid Wiki,配置_配置WebStatFilter
spring.datasource.druid.filter.stat.enabled=true
spring.datasource.druid.web-stat-filter.url-pattern=/*
spring.datasource.druid.web-stat-filter.exclusions=*.gif,*.png,*.jpg,*.html,*.js,*.css,*.ico,/druid/*
#
## Druid StatViewServlet配置,说明请参考Druid Wiki,配置_StatViewServlet配置
#spring.datasource.druid.stat-view-servlet.enabled=true
#spring.datasource.druid.stat-view-servlet.url-pattern=/druid/*
#spring.datasource.druid.stat-view-servlet.reset-enable=true
#spring.datasource.druid.stat-view-servlet.login-username=admin
#spring.datasource.druid.stat-view-servlet.login-password=admin
#spring.datasource.druid.stat-view-servlet.allow=
#spring.datasource.druid.stat-view-servlet.deny=

#事物提交失败回滚和aop
spring.transaction.rollback-on-commit-failure=true
spring.aop.auto=true
spring.aop.proxy-target-class=true

spring.http.encoding.force=true
spring.http.encoding.force-request=true
spring.http.encoding.charset=utf-8
spring.http.converters.preferred-json-mapper=jackson
spring.servlet.multipart.enabled=true
spring.servlet.multipart.max-file-size=1024mb
spring.servlet.multipart.max-request-size=1024mb

#freemarker配置
spring.freemarker.template-loader-path=classpath:/templates/
spring.freemarker.cache=true
spring.freemarker.content-type=text/html
spring.freemarker.charset=UTF-8
spring.freemarker.check-template-location=true
spring.freemarker.enabled=true
spring.freemarker.suffix=.ftl
spring.freemarker.expose-request-attributes=true
spring.freemarker.expose-session-attributes=true
spring.freemarker.request-context-attribute=req

server.port=8181
spring.resources.static-locations=classpath:/static/

#Mybatis配置,官方参考:http://www.mybatis.org/spring-boot-starter/mybatis-spring-boot-autoconfigure/
mybatis.mapper-locations=classpath:/mapper/*.xml
mybatis.type-aliases-package=cn.acheng1314.base.domain
mybatis.configuration.map-underscore-to-camel-case=true
mybatis.configuration.use-generated-keys=true
mybatis.configuration.use-column-label=true

mybatis-plus.mapper-locations=classpath:/mapper/*.xml
mybatis-plus.type-aliases-package=cn.acheng1314.base.domain
#主键类型  0:"数据库ID自增", 1:"用户输入ID",2:"全局唯一ID (数字类型唯一ID)", 3:"全局唯一ID UUID";
mybatis-plus.global-config.id-type=0
#字段策略 0:"忽略判断",1:"非 NULL 判断"),2:"非空判断"
mybatis-plus.global-config.field-strategy=0
#驼峰下划线转换
mybatis-plus.global-config.db-column-underline=true
#刷新mapper 调试神器
mybatis-plus.global-config.refresh-mapper=true
mybatis-plus.global-config.capital-mode=true
mybatis-plus.configuration.cache-enabled=true
mybatis-plus.configuration.map-underscore-to-camel-case=true
#配置文件設置請參考官網文檔:https://docs.spring.io/spring-boot/docs/2.0.2.RELEASE/reference/htmlsingle/#production-ready-endpoints
在上面的配置文件中,我们在项目开发目录中 resources 对应编译后的目录为 classes 。
至此为止,我们的框架整合差不多完成,具体的细节,我建议大家还是去官网文档查看一下。当然最重要的还是框架整合的基础思想,有兴趣的童鞋可以查看我以前的相关教程。
测试整合效果
①. 测试json输出,代码如下:
@GetMapping(value = ["/"], produces = [MediaType.APPLICATION_JSON_UTF8_VALUE])
   @ResponseBody
   fun MainLocal(): Any = User("程", "18976962315", "123456", "吹牛", Date())
②. 测试freemarker页面渲染
@GetMapping(value = ["/test"], produces = [MediaType.TEXT_HTML_VALUE])
   fun getTest(map: ModelMap): String {
       map["test"] = MainLocal()
       return "test1"
   }
具体的测试页面不用再放出来了,同样这种类似的测试也可以考虑使用Spring的相关测试框架来检查。
正文到此结束
- 本文标签: ACE cache session java db tar 数据 GitHub json 参数 build Word mapper bug spring tab js 调试 Google DOM mybatis autoReconnect=true 博客 bean springboot 目录 classpath https UI API HTML REST autoReconnect Service id Reactor mysql 测试 git 配置 RESTful 程序员 插件 dataSource http Action Master 缓存 编译 ip map NSA App SpringMVC 同步 core Freemarker AOP Proxy root servlet sql CSS CTO value 百度 src 下载 IO JDBC web cat Bootstrap 时间 key 开发 lib 神器 图片 连接池 zip maven 数据库 IDE 代码 XML dependencies dist
- 版权声明: 本文为互联网转载文章,出处已在文章中说明(部分除外)。如果侵权,请联系本站长删除,谢谢。
- 本文海报: 生成海报一 生成海报二
热门推荐


相关文章

近期评论
-
你这基本没有更新呀,最近文章显示还是2019年的文章。不符合要求哈
-
关键词:慕云博客 链接:https://www.lilun.me 描述:分享原创文字的个人博客
-
-
-
可以提供一下源码吗
-
不是商业站,鸡娃学习笔记
-
-
-
-
听他们说很厉害的样子
Loading...
![[HBLOG]公众号](http://www.liuhaihua.cn/img/qrcode_gzh.jpg)

