Java基础复习-容器篇
Java中的容器大概分为三大类 数组, Collection, Map。
具体的继承关系如下图:

1. 数组
数组每种编程语言中都是最重要的存储数据的方法。
//数组的定义方式
int[] a = new int[2]; //推荐写法
int a[] = new int[2];
int[] a = {1,2,3,4};
int[] a = new int[]{1,2,3,4};
//二维数组
int[][] a = new int[3][];
int[][] a = new int[3][5];
int[][] a = new int[][]{{1,2},{3,4}};
int[][] a = {{1,2},{3,4}};
数组是最<code>Java</code>中最基本的连续的存储结构,用来存储固定大小的同类型元素。
需要注意的是数组的长度是固定的,但是并不代表里面存储了多少个我们自己的数据,而是代表这个数组可以存储多少个数据。
int[] a = new int[10];
a[0] = 1;
a[1] = 2;
a[2] = 3;
//a.length = 10;
//实际存储的只有 1,2,3 这三个值,但是length返回的是10, 剩下的7个位置根据数组的类型存储默认的值。
2. Collection
Collection 是一个接口,有两个接口继承了他,分别是 Set 和 List , 我们非常熟悉的ArrayList、LinkedList、HashSet 等常用的集合类就是实现了这两个接口。
2.1 List相关知识点以及源码分析
List接口及其实现类是容量可变的列表,可按索引访问集合中的元素, 是有序的。
特点:集合中的元素有序、可重复;
常用List的特点如下表:
|List | 实现方式| 特点
|------ |----|-----|
|ArrayList|数组|线程不安全,查询效率高,增删慢|
|Vector|数组|线程安全,查询效率高,增删慢|
|LinkedList|链表|线程不安全,增删效率高,查询慢|
|CopyOnWriteArrayList|数组|线程安全,查询效率高,增删慢|
ArrayList代码分析:
ArrayList在Android的framework和javaSE中的实现略微不同,但是思想都一样。以后的所有文章都会基于Android6.0的源码进行分析。
- ArrayList的实现方式
/**
     * The number of elements in this list.
     * 保存真正的元素个数,而不是array的长度。
     */
    int size;

    /**
     * The elements in this list, followed by nulls.
     * ArrayList是靠一个Object数组实现的
     */
    transient Object[] array;
- ArrayList的初始化
//这里是ArrayList的三个构造函数
     /**
     * Constructs a new instance of  ArrayList} with the specified
     * initial capacity.
     *
     * capacity
     *            the initial capacity of this  ArrayList}.
     * 指定ArrayList容量进行初始化
     */
    public ArrayList(int capacity) {
        if (capacity < 0) {
            throw new IllegalArgumentException("capacity < 0: " + capacity);
        }
        array = (capacity == 0 ? EmptyArray.OBJECT : new Object[capacity]);
    }

    /**
     * Constructs a new  ArrayList} instance with zero initial capacity.
     * 这是我们常用的一种构造方式,这种方式仅仅构造一个空的array
     */
    public ArrayList() {
        array = EmptyArray.OBJECT;
    }

    /**
     * Constructs a new instance of  ArrayList} containing the elements of
     * the specified collection.
     *
     * collection
     *            the collection of elements to add.
     * 另一种我们常用的构造方法,根据一个集合进行初始化。
     */
    public ArrayList(Collection<? extends E> collection) {
        if (collection == null) {
            throw new NullPointerException("collection == null");
        }

        Object[] a = collection.toArray();
        if (a.getClass() != Object[].class) {
            Object[] newArray = new Object[a.length];
            System.arraycopy(a, 0, newArray, 0, a.length);
            a = newArray;
        }
        array = a;
        size = a.length;
    }
- ArrayList添加对象
/**
     * Adds the specified object at the end of this  ArrayList}.
     *
     * object
     *            the object to add.
     * always true
     *
     */
     public boolean add(E object) {
        Object[] a = array;
        int s = size;
        if (s == a.length) {
            Object[] newArray = new Object[s +
                    (s < (MIN_CAPACITY_INCREMENT / 2) ?
                     MIN_CAPACITY_INCREMENT : s >> 1)];
            System.arraycopy(a, 0, newArray, 0, s);
            array = a = newArray;
        }
        a[s] = object;
        size = s + 1;
        modCount++;
        return true;
    }
上面这个方法是我们最常用的添加一个元素的方法,会在ArrayList的末尾添加一个元素。
MIN_CAPACITY_INCREMENT = 12, 是ArrayList里面定义的常量,表示ArrayList动态扩容时,数组最小的增加长度。
添加元素时首先判断当前ArrayList的元素个数与数组的长度是否相等,分为两种情况:
-
ArrayList的元素个数 == 数组的长度
这种情况说明数组已经满了,无法再添加元素,需要扩容,扩容就需要确定扩大多少,也就是新数组的长度,这里又分为两种情况:
- 当前ArrayList的元素个数 < MIN_CAPACITY_INCREMENT / 2(也就是6) , 那么新数组的长度就增加 MIN_CAPACITY_INCREMENT
- 当前ArrayList的元素个数 >= MIN_CAPACITY_INCREMENT / 2,那么新数组的长度就增加 ArrayList元素个数 / 2
- ArrayList的元素个数 != 数组的长度 说明数组还有空间可以容纳新添加的元素,可以直接添加
/**
     * Inserts the specified object into this  ArrayList} at the specified
     * location. The object is inserted before any previous element at the
     * specified location. If the location is equal to the size of this
     *  ArrayList}, the object is added at the end.
     *
     * index
     *            the index at which to insert the object.
     * object
     *            the object to add.
     * IndexOutOfBoundsException
     *             when  location < 0 || location > size()}
     */
     public void add(int index, E object) {
        Object[] a = array;
        int s = size;
        if (index > s || index < 0) {
            throwIndexOutOfBoundsException(index, s);
        }

        if (s < a.length) {
            // s-index 表示index位置之后的元素个数,这里就是把原数组从index开始,所有的元素往后移一位,空出a[index],然后把要添加的元素插入这里
            System.arraycopy(a, index, a, index + 1, s - index);
        } else {
            // assert s == a.length;
            //数组扩容
            Object[] newArray = new Object[newCapacity(s)];
            //把原数组的前index个元素copy到新数组。
            System.arraycopy(a, 0, newArray, 0, index);
            //把原数组剩下的s - index个元素,从新数组的index+1位置开始,copy过来
            //这样就会把新数组的index位置空出来
            System.arraycopy(a, index, newArray, index + 1, s - index);
            array = a = newArray;
        }
        //把新元素添加到index位置
        a[index] = object;
        size = s + 1;
        modCount++;
    }
这个方法是另一个比较常用的方法,原理与上面的 <font color='HotPink'>add(E object)</font>相似,还是先判断元素个数与数组长度的关系,不同的是增加一步移动元素的操作,给被插入的元素移出一个位置。
ArrayList还有两个添加集合的方法:
public boolean addAll(Collection<? extends E> collection) {
    ...
}
public boolean addAll(int index, Collection<? extends E> collection) {
    ...
}
这两个方法的原理与添加单个元素基本相同。值得关注的是在源码中 <code><font color='HotPink'> add(int index, E object)、addAll(Collection<? extends E> collection)、addAll(int index, Collection<? extends E> collection) </font></code>这三个方法在扩容时都用到了一个方法 <font color='HotPink'>newCapacity(int currentCapacity)</font>,这个方法就是我们上面分析<font color='HotPink'> add(iE object)</font>时的扩容逻辑,由于<font color='HotPink'> add(iE object)</font>是最常用的方法,为了优化性能,减少一次函数调用,直接把该逻辑写到add方法里面了。
- ArrayList的其他方法
//两个remove元素的方法,源码里面值得注意的是有个小细节,删除元素之后,后面的元素前移一位,
//最后一位的元素就会有两份,需要后面一份置为null
public boolean remove(Object object);
public boolean remove(int index);
LinkedList代码分析:
- LinkedList的实现原理
LinkedList的实现是一个双向链表(链表会在后面数据结构的专题里面复习),通过一个data为空的Node保存链表头和链表尾,添加和删除元素的时候从头(尾)开始向后(前)查找,然后插入和删除节点。
LinkedList的每个元素都是一个链表的节点(node),在源码中定一个了一个静态内部类 LinK<ET> 代表节点,代码如下,
private static final class Link<ET> {
        //我们保存的元素
        ET data;
        //当前元素的前一个元素和后一个元素
        Link<ET> previous, next;

        Link(ET o, Link<ET> p, Link<ET> n) {
            data = o;
            previous = p;
            next = n;
        }
    }
用图形表示:

- LinkedList的初始化
LinkedList有两个构造函数:
/**
     * Constructs a new empty instance of  LinkedList}.
     */
    public LinkedList() {
        voidLink = new Link<E>(null, null, null);
        voidLink.previous = voidLink;
        voidLink.next = voidLink;
    }

    /**
     * Constructs a new instance of  LinkedList} that holds all of the
     * elements contained in the specified  collection}. The order of the
     * elements in this new  LinkedList} will be determined by the
     * iteration order of  collection}.
     *
     * collection
     *            the collection of elements to add.
     */
    public LinkedList(Collection<? extends E> collection) {
        this();
        addAll(collection);
    }
第一个无参构造方法是我们分析的重点,第二个带数据的构造参数是调用第一个,然后调用addAll方法添加。在下面会分析addAll这个方法。
第一个构造方法中,初始化了一个 Link 类型变量:<font color='HotPink'> voidLink </font>.这个变量是整个LinkedList的核心,也就是上面说的data为空的保存链表头和链表尾的node。代码中将这个node前一个节点指向自己,后一个节点也指向自己,构造了一个“环”,如下图所示:

- LinkedList添加元素
LinkedList的添加方法有很多个,默认add是添加到链表尾,也可以指定添加到链表头,或者任意位置。
我们以add方法为例,分析一下如何向链表中插入元素。先看源码:
/**
     * Adds the specified object at the end of this  LinkedList}.
     *
     * object
     *            the object to add.
     * always true
     */

    public boolean add(E object) {
        return addLastImpl(object);
    }

    private boolean addLastImpl(E object) {
        Link<E> oldLast = voidLink.previous;
        Link<E> newLink = new Link<E>(object, oldLast, voidLink);
        voidLink.previous = newLink;
        oldLast.next = newLink;
        size++;
        modCount++;
        return true;
    }
我们具体来分析一下,如果当前LinkedList里面没有元素,那么只有一个voildList,它的前一个元素和后一个元素都是它自己,这时我们想要添加一个Object1进来,执行到代码:
//这里voidLink.previous还是voildList,这是构造函数里面赋值的。所以oldLast还是voidLink本身。
Link<E> oldLast = voidLink.previous;
接着往下走:
//新建一个节点,这个节点的previous指向voidList, next还是指向voidList
Link<E> newLink = new Link<E>(object, oldLast, voidLink);
//把voidLink的previous 指向新节点,把voidLink的next指向新节点
voidLink.previous = newLink;
oldLast.next = newLink;
做完所有的操作之后,链表里面的各个节点关系如下图:

还有第二种情况, 链表里面已经有元素了,继续添加Object2之后我们可以看一下各个节点的关系图:

其中,
1表示 Link<E> newLink = new Link<E>(object, oldLast, voidLink);
2表示 voidLink.previous = newLink;
3表示 oldLast.next = newLink;
LinkedList的其他常用方法<code>remove</code>,<code>addAll</code>等可以参照add的原理查看源码。
List接口的常用类还有一个Vector,与ArrayList基本相同,不过大部分方法都加了一个<code>synchronized</code>关键字来保证线程安全。
2.2 Set相关知识点以及源码分析
Set接口不保存重复的元素,你可以很容易的知道某个对象是否是在Set中。Set具有与Collection完全一样的接口,没有任何额外的功能,Set实际上就是Collection,只是行为不同。
特点:Set中的元素<b>不</b>可重复;
常用Set的特点如下表:
| List | 实现方式 | 特点 |
|---|---|---|
| HashSet | map | 为快速查询而设计的Set,存入的元素必须定义hashCode() |
| TreeSet | 树 | 使用它可以从Set中提取有序的序列。元素必须实现Comparable接口 |
| LinkedHashSet | 链表 | 具有HashSet的查询速度,按插入次序保存元素,必须定义hashCode() |
Set的实现大部分是基于Map,源码比较简洁,后面分析完Map之后,Set相关的知识就会显得很简单。
3. Map
Map是映射表(也称为关联数组),基本思想是维护键-值的关系,因此你可以使用键来查找值。
标准的Java类库中包含了Map的几种基本实现,包括:<b>HashMap,TreeMap,Hashtable,LinkedHashMap,WeakHashMap,ConcurrentHashMap,IdentityHashMap</b>等。
特点:Map规定 不能包含重复 的键值,每个键最多可以映射一个值。
常用Map的特点如下表:
|Map | 实现方式| 特点
|------ |----|-----|
|HashMap|数组加链表(java8以后添加了红黑树)|允许key和value为null,线程不安全|
|Hashtable|数组加链表|不允许key和value为null,线程安全(不建议使用)|
|TreeMap|红黑树|实现SortedMap接口, 能够把它保存的记录根据键排序,默认是按键值的升序排序,也可以指定排序的比较器。不允许key为null,允许value为null|
| LinkedHashMap|数组加链表|HashMap子类,与HashMap特点一致,加了一个链表用于保存顺序,用于在迭代器中顺序返回,可以按照插入顺序返回,也可以按照访问顺序返回|
|ConcurrentHashMap|分段锁,数组加链表|数据分段加锁,保证访问当前数据段时线程同步,并且不影响其他数据段的访问|
HashMap代码分析
HashMap是使用频率最高的用于映射(键值对)处理的数据类型。随着JDK版本的更新,JDK1.8对HashMap底层的实现进行了优化,例如引入红黑树的数据结构和扩容的优化等。本文的分析基于Android6.0的源码,其实现与JDK1.7类似,JDK1.8开始HashMap的实现引入了红黑树的数据结构,当一个链表里面的节点大于8个的时候会把链表转成红黑树。
- HashMap的实现方式
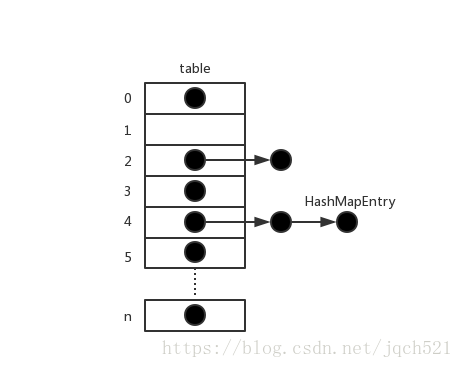
HashMap的实现方式是通过一个数组来存储链表实现的,如下图所示:
关于HashMap的几个重要的变量
/**
    * 存储的键值对数量
    */
    transient int size;

    /**
     * 扩容的阈值,一般是table数组长度的3/4(jdk1.7的源码里面有个loadFactor变量来保存这个值), 只要size的数量大于这个值,就会触发扩容。
     * 这么做的目的是为了保持数据均匀散列,如果这个值太大,散列效果不好,数据容易堆积在一个index,影响查询效率;
     * 如果这个值太小,数组占用的内存太大
     */
    private transient int threshold;

    /**
     * 每个key - value 都会生成一个Entry来存储,所有的Entry都会存到不同的链表里面,所有的链表都存在table数组中
     */
    transient HashMapEntry<K, V>[] table;

    /**
     * HashMap允许存储一组key为null的值,存取过程与其他的非空key过程不一样。
     */
    transient HashMapEntry<K, V> entryForNullKey;

    /**
    * 存储key-value的实体类,也是一个链表的node
    */
    static class HashMapEntry<K, V> implements Entry<K, V> {
        final K key;
        V value;
        final int hash;
        HashMapEntry<K, V> next;

        HashMapEntry(K key, V value, int hash, HashMapEntry<K, V> next) {
            this.key = key;
            this.value = value;
            this.hash = hash;
            this.next = next;
        }
        ...
    }
- HashMap的初始化
// 最常用的构造方法
    public HashMap() {
        table = (HashMapEntry<K, V>[]) EMPTY_TABLE;
        threshold = -1; // Forces first put invocation to replace EMPTY_TABLE
    }

    // 指定table的初始容量
    public HashMap(int capacity) {
        if (capacity < 0) {
            throw new IllegalArgumentException("Capacity: " + capacity);
        }

        if (capacity == 0) {
           ("unchecked")
            HashMapEntry<K, V>[] tab = (HashMapEntry<K, V>[]) EMPTY_TABLE;
            table = tab;
            threshold = -1; // Forces first put() to replace EMPTY_TABLE
            return;
        }

        if (capacity < MINIMUM_CAPACITY) {
            capacity = MINIMUM_CAPACITY;
        } else if (capacity > MAXIMUM_CAPACITY) {
            capacity = MAXIMUM_CAPACITY;
        } else {
            capacity = Collections.roundUpToPowerOfTwo(capacity);
        }
        makeTable(capacity);
    }

    // 指定table的初始容量和负载因子(默认3/4), but在Android的源码里面没有实现这个方法!
    public HashMap(int capacity, float loadFactor) {
        this(capacity);

        if (loadFactor <= 0 || Float.isNaN(loadFactor)) {
            throw new IllegalArgumentException("Load factor: " + loadFactor);
        }

        /*
         * Note that this implementation ignores loadFactor; it always uses
         * a load factor of 3/4. This simplifies the code and generally
         * improves performance.
         */
    }

    // 根据一个已有的HashMap初始化一个新的HashMap
    public HashMap(Map<? extends K, ? extends V> map) {
        this(capacityForInitSize(map.size()));
        constructorPutAll(map);
    }
- HashMap 如何存储一个Key-Value (put方法)
/**
     * 存储一组 key-value
     */
    public V put(K key, V value) {
        //如果key是null, 用单独的处理方式
        if (key == null) {
            return putValueForNullKey(value);
        }
        /**
         * Collections.secondaryHash(key)的具体实现如下,参数h 是key的hashCode
         * private static int secondaryHash(int h) {
         *     h += (h <<  15) ^ 0xffffcd7d;
         *     h ^= (h >>> 10);
         *     h += (h <<   3);
         *     h ^= (h >>>  6);
         *     h += (h <<   2) + (h << 14);
         *     return h ^ (h >>> 16);
         *  }
         *
         * Collections.secondaryHash能够使得hash过后的值的分布更加均匀,尽可能地避免冲突,
         * 具体原理可以看这里:http://burtleburtle.net/bob/hash/integer.html
         */
        int hash = Collections.secondaryHash(key);
        HashMapEntry<K, V>[] tab = table;

        /**
         * 要把hash映射到table数组中,需要把hash转成 [0 , table.length) 的index,
         * 最好的办法就是用hash对table.length取余,也就是 hash % table.length,
         * 但是 % 的效率比较低,所以转成位运算hash & (tab.length - 1)。
         *
         * 为什么位运算 等价于 % 呢, 解释如下:
         * 1. table.length为2的幂次方,转成二进制就是从右向左第n+1位是1,其他位是0
         * 2. table.length - 1, 转成二进制就是从右向左第0到n位都是1,其他位都是0
         * 3. hash 和 (tab.length - 1) 进行 '&' 操作,就会得到一个不大于table.length的index
         * 举个例子,假设hash = 62 ,table.length = 16,也就是2的4次方, 转成二进制:10000
         *
         *                  十进制       二进制
         *      hash          62       111110
         *  table.length      16        10000
         *  table.length -1   15        01111
         *
         *  hash & (table.length-1)=> 111110 & 01111 => 1110 => 14, index就是14
         *
         * 再来一个, hash = 187, table.length = 16,
         *                  十进制       二进制
         *      hash         187      10111011
         *  table.length      16        10000
         *  table.length -1   15        01111
         *
         *  hash & (table.length-1)=> 10111011 & 01111 => 1011 => 11, index就是11
         *
         * 很多时候hash值的低位可能相同,比如hash = 126,二进制1111110,运算完成之后index也是14,
         * 这就出现了hash碰撞。出现了碰撞就需要通过链表来存储不同的key-value,具体的实现在下面进行分析。
         */
        int index = hash & (tab.length - 1);

        /**
         * 通过hash得到index后,我们就可以通过这个index去table里面找node,但是找到的可能不止一个node,
         * 这个时候就需要遍历整个链表, 如果找到了就替换原来的值,并返回旧值,不会继续往下走。
         */
        for (HashMapEntry<K, V> e = tab[index]; e != null; e = e.next) {
            if (e.hash == hash && key.equals(e.key)) {
                preModify(e);
                V oldValue = e.value;
                e.value = value;
                return oldValue;
            }
        }

        // 如果遍历整个链表之后发现这个key之前没有存过,就新添加一个
        modCount++;
        // 添加新的之前,先判断添加之后size是不是大于阈值。
        if (size++ > threshold) {
            //如果添加之后size大于阈值,就进行扩容操作,扩容方法在下面会详细分析
            tab = doubleCapacity();
            //扩容完之后,tab.length改变了,重新算一下index
            index = hash & (tab.length - 1);
        }
        addNewEntry(key, value, hash, index);
        return null;
    }

    private V putValueForNullKey(V value) {
        HashMapEntry<K, V> entry = entryForNullKey;
        if (entry == null) {
            //处理第一次添加key为null的键值对
            addNewEntryForNullKey(value);
            size++;
            modCount++;
            return null;
        } else {
            //已经添加过一次key为null的键值对,修改上次的value为最新的value
            preModify(entry);
            V oldValue = entry.value;
            entry.value = value;
            return oldValue;
        }
    }

    //为entryForNullKey赋值
    void addNewEntryForNullKey(V value) {
        entryForNullKey = new HashMapEntry<K, V>(null, value, 0, null);
    }

    //这是一个空方法,目的是为了让HashMap的子类LinkedHashMap有机会对Node进行操作
    void preModify(HashMapEntry<K, V> e) { }

    void addNewEntry(K key, V value, int hash, int index) {
        /**
         * 1. new一个HashMapEntry并把新的HashMapEntry的next指向当前index里面的HashMapEntry。
         *    这样就把新的HashMapEntry添加到当前链表的头。
         * 2. 把新的HashMapEntry放到table的index,完成添加。
         */
        table[index] = new HashMapEntry<K, V>(key, value, hash, table[index]);
    }

    //扩容方法
    private HashMapEntry<K, V>[] doubleCapacity() {
        HashMapEntry<K, V>[] oldTable = table;
        int oldCapacity = oldTable.length;
        //如果当前的容量已经到了最大值,无能为力!
        if (oldCapacity == MAXIMUM_CAPACITY) {
            return oldTable;
        }
        //每次扩容就把当前容量扩大一倍
        int newCapacity = oldCapacity * 2;
        //创建新的table,里面会给threshold赋值,下面会具体分析
        HashMapEntry<K, V>[] newTable = makeTable(newCapacity);
        //如果是当前map里面没有数据,直接返回。
        if (size == 0) {
            return newTable;
        }

        //如果当前map里面有数据,但是tab.length变了,需要对所有的数据进行重新确定index,以减少hash冲突。
        for (int j = 0; j < oldCapacity; j++) {
            /*
             * Rehash the bucket using the minimum number of field writes.
             * This is the most subtle and delicate code in the class.
             * 上面这段是源码里面的注释,表示这段代码是HashMap里面的精髓,奇技淫巧!
             */
            //拿到当前index里面的HashMapEntry, 如果是null就继续遍历下一个index
            HashMapEntry<K, V> e = oldTable[j];
            if (e == null) {
                continue;
            }
            /**
             * 首先我们要记住前面说的,table的length也就是capacity,是2的n次方,转成二进制一定是
             * 1后面跟着几个0的格式,像这样'10....0',e.hash & oldCapacity的值就取决与e.hash的二进制
             * 从右向左数第n位的值是0还是1,如果是0那么highBit就是0,如果是1那么highBit的值就是oldCapacity
             *
             * 假设 oldCapacity二进制是 1000 :
             * 当 e.hash = 11110110101, e.hash & oldCapacity = 0000 = 0
             * 当 e.hash = 11110111101, e.hash & oldCapacity = 1000 = oldCapacity
             * 这样highBit的值就确定了,0 或者 oldCapacity
             *
             * 我们是对oldCapacity进行遍历,所以j<oldCapacity, oldCapacity的二进制是n位,j最大就是n-1位
             * 当 highBit = 0 时, j | highBit = j,
             * 当 highBit = oldCapacity 时, j | highBit = oldCapacity + j,
             *
             * 这样扩容后的index就会根据e.hash值不同,映射到原位置,或者原位置 + oldCapacity。
             *
             * 比如 j = 3, oldCapacity = 8,newCapacity = 16 , 那么 j | highBit = 3 或者 11
             * 变相的解决了hash冲突问题
             */
            int highBit = e.hash & oldCapacity;
            HashMapEntry<K, V> broken = null;
            newTable[j | highBit] = e;
            for (HashMapEntry<K, V> n = e.next; n != null; e = n, n = n.next) {
                //取下一个节点的hash值,计算下一个节点的highBit, 保存在变量nextHighBit中
                int nextHighBit = n.hash & oldCapacity;
                /**
                 * 如果下一个节点的highBit与上一个节点的highBit相同,那么他们的新index一样,
                 * 让下一个节点继续跟在上一个节点后面就行,不用做任何处理.
                 * 如果不一样就进入if分支, 我们假设这两个不一样的index分别为indexA,indexB
                 */
                if (nextHighBit != highBit) {
                    /**
                     * broken存储的是一个节点,这个节点的下一个节点(n)的indexB与broken节点的indexA不一致。
                     *
                     * 如果broken == null 那么这个节点就是第一个跟上一个节点indexA不一致的节点,
                     * 把这个不一致的节点放到新的indexB里面,这个节点是n,他的上一个节点是e,把e赋值给broken。
                     * 把这个不一致的节点放到新的indexB里面的同时,整个链表的剩余部分也移动到了indexB下面,
                     * broken指向的就是indexA下面的链表的最后一个节点。
                     *
                     *
                     * 循环继续,但是当前未遍历到的节点是在indexB下面的,如果继续出现nextHighBit != highBit
                     * 那么说明这个节点的新index应该是indexA,也就是要放到broken的后面, 整个链表的剩余部分也移
                     * 动到了indexA下面,然后把broken指向indexB的最后一个节点。
                     *
                     * 就这样跳过来跳过去,完成整个链表的遍历。
                     */
                    if (broken == null)
                        newTable[j | nextHighBit] = n;
                    else
                        broken.next = n;
                    broken = e;
                    highBit = nextHighBit;
                }
            }
            /**
             * 遍历完成后,我们考虑一种情况,整个链表一个5个节点,第1、3、4、5个节点是在indexA下面,第2个节点
             * 是在indexB下面,这样broken指向的就是第二个节点,但是第二个节点的next还是指向第三个节点的,那么就会
             * 出现错误,所以需要把broken节点的next赋值null。
             */
            if (broken != null)
                broken.next = null;
        }
        //整个hashmap最绕的扩容过程到这里就结束了。
        return newTable;
    }

    //创建新的table
    private HashMapEntry<K, V>[] makeTable(int newCapacity) {
        //按照给定的容量创建一个新的table数组
        HashMapEntry<K, V>[] newTable
                = (HashMapEntry<K, V>[]) new HashMapEntry[newCapacity];
        table = newTable;
        //重新给阈值赋值,值是新容量的3/4
        threshold = (newCapacity >> 1) + (newCapacity >> 2); // 3/4 capacity
        return newTable;
    }
上述代码是 <code>put(k, v)</code> 相关的分析, 很多地方还没有分析清楚,美团的一遍关于 HashMap 的文章推荐给大家, 里面比较详细的讲解了jdk1.8里面关于hashmap的知识。
- HashMap 如何通过key获取value(get方法)
//前面已经分析了如何获取hash,如何根据hash确定table的下标,再来看get就比较简单。
public V get(Object key) {
        //key为null,单独处理
        if (key == null) {
            HashMapEntry<K, V> e = entryForNullKey;
            return e == null ? null : e.value;
        }
        //存的是进行了二次hash,取得时候同样要二次hash
        int hash = Collections.secondaryHash(key);
        HashMapEntry<K, V>[] tab = table;
        //通过hash确定table中的下标,然后取链表头的节点开始循环。
        for (HashMapEntry<K, V> e = tab[hash & (tab.length - 1)];
                e != null; e = e.next) {
            K eKey = e.key;
            //如果这个key与存储时用的key是同一个对象,或者逻辑上相等,就返回
            if (eKey == key || (e.hash == hash && key.equals(eKey))) {
                return e.value;
            }
        }
        //所有的case都走遍了,依然没有发现对应的key,返回null
        return null;
    }
- HashMap 如何删除key-value(remove方法)
public V remove(Object key) {
        if (key == null) {
            return removeNullKey();
        }
        int hash = Collections.secondaryHash(key);
        HashMapEntry<K, V>[] tab = table;
        int index = hash & (tab.length - 1);
        for (HashMapEntry<K, V> e = tab[index], prev = null;
                e != null; prev = e, e = e.next) {
            if (e.hash == hash && key.equals(e.key)) {
                if (prev == null) {
                    tab[index] = e.next;
                } else {
                    //非常典型的链表移除操作,把头一个节点的next指向要删除节点的下一个节点。
                    prev.next = e.next;
                }
                modCount++;
                size--;
                postRemove(e);
                return e.value;
            }
        }
        return null;
    }
4. 迭代器 - Iterator
任何容器类,都必须有某种方式可以插入元素并将它们再次取出来。毕竟,持有对象是容器最基本的工作。比如List,<code>add()</code>是插入元素的方法之一,<code>get()</code>是取出元素的方法之一。
如果从更高的设计角度来讲,遍历容器时需要知道具体的容器类型,来进行不同方式的遍历。这么做也没有问题,但是本来我的容器是List,后来变成Set了,代码就不通用了。这个时候就需要 迭代器 了。
迭代器 是一个对象(也是一种设计模式),它的工作就是遍历并选择容器中的对象,而我们不需要知道这个容器是什么。此外,迭代器通常被称为 轻量级对象 :创建它的代价小,所以有一些限制:
例如,Java的 Iterator 只能单向移动,这个 Iterator 只能用来:
- 使用方法<code>iterator()</code>要求容器返回一个 Iterator 。 Iterator 将准备好返回容器的第一个元素
- 使用<code>next()</code>获得容器中的下一个元素。
- 使用<code>hasNext()</code>检查容器中是否还有元素。
- 使用<code>remove()</code>将迭代器新近返回的元素删除。
5. Collections的实用方法
Java中有很多用户集合的实用方法,它们大部分都是 java.util.Collections 类的静态方法,比如addAll(), reverseOrder(),binarySearch(),synchronizedMap(),unmodifiableList()等一系列非常有用的方法。在这里就不多做分析。
正文到此结束
- 本文标签: 源码 cat 设计模式 value 同步 1111 集合类 静态方法 java 线程 注释 key Java类 ACE 线程同步 equals rmi 代码 Collections java基础 删除 id ArrayList js SDN 遍历 final http MQ LinkedList https IDE Android 锁 DDL Collection 索引 struct 数据 HTML 参数 entity IO ConcurrentHashMap node map CTO 美团 src ORM HashTable synchronized tab 安全 空间 list 详细分析 文章 HashMap 构造方法
- 版权声明: 本文为互联网转载文章,出处已在文章中说明(部分除外)。如果侵权,请联系本站长删除,谢谢。
- 本文海报: 生成海报一 生成海报二
热门推荐


相关文章


Loading...
![[HBLOG]公众号](http://www.liuhaihua.cn/img/qrcode_gzh.jpg)

