Java编程架构实战——OKHTTP3源码和设计模式(上篇)
本文来探究一下 OkHttp3 的源码和其中的设计思想。
关于 OkHttp3 的源码分析的文章挺多,不过大多还是在为了源码而源码。个人觉得如果读源码不去分析源码背后的设计模式或设计思想,那么读源码的意义不大。 同时,如果熟悉的设计模式越多,那么读某个框架的源码的时候就越容易,两者是相辅相成的,这也是许多大牛认为多读源码能提高编程能力的原因。
整体架构
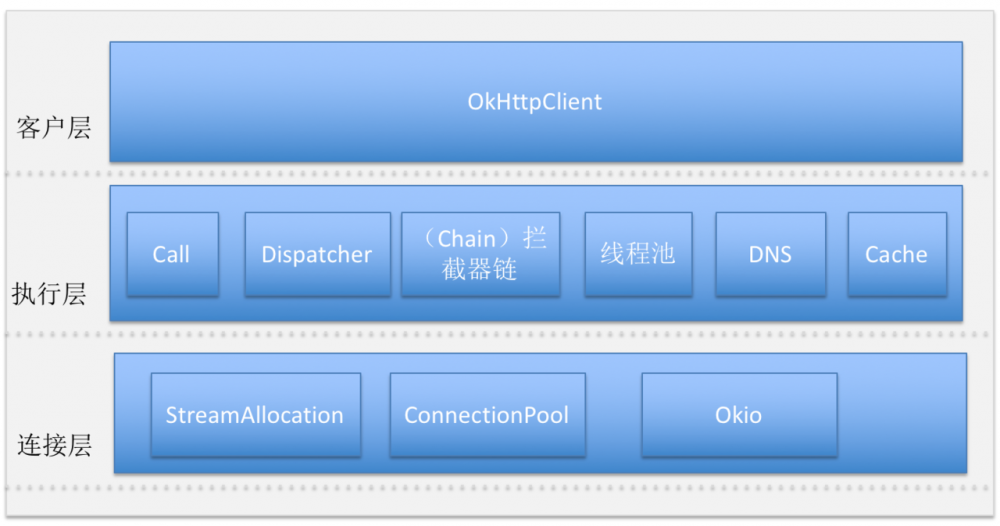
为了方面后面的理解,我这里简单画了个架构图,图中画出了 OkHttp3 核心的功能模块。为了方便整体理解,这里分了三个层次: 客户层、执行层和连接层。
首先,客户层的OkHttpClient ,使用过 OkHttp 网络库的同学应该都熟悉,在发送网络请求,执行层决定怎么处理请求,比如同步还是异步,同步请求的话直接在当前线程完成请求, 请求要经过多层拦截器处理; 如果是异步处理,需要 Dispatcher 执行分发策略, 线程池管理执行任务; 又比如,一个请求下来,要不要走缓存,如果不走缓存,进行网络请求。最后执行层将从连接层进行网络 IO 获取数据。
OkHttpClient
使用过 OkHttp 网络库的同学应该都熟悉 OkHttpClient , 许多第三方框架都会提供一个类似的类作为客户访问的一个入口。 关于 OkHttpClient 代码注释上就说的很清楚:
/** * Factory for {@linkplain Call calls}, which can be used to send HTTP requests and read their * responses. * * <h3>OkHttpClients should be shared</h3> * * <p>OkHttp performs best when you create a single {@code OkHttpClient} instance and reuse it for * all of your HTTP calls. This is because each client holds its own connection pool and thread * pools. Reusing connections and threads reduces latency and saves memory. Conversely, creating a * client for each request wastes resources on idle pools. * * <p>Use {@code new OkHttpClient()} to create a shared instance with the default settings: * <pre> {@code * * // The singleton HTTP client. * public final OkHttpClient client = new OkHttpClient(); * }</pre> * * <p>Or use {@code new OkHttpClient.Builder()} to create a shared instance with custom settings: * <pre> {@code * * // The singleton HTTP client. * public final OkHttpClient client = new OkHttpClient.Builder() * .addInterceptor(new HttpLoggingInterceptor()) * .cache(new Cache(cacheDir, cacheSize)) * .build(); * }</pre> * .... 省略*/复制代码
简单提炼:
1、OkHttpClient, 可以通过 new OkHttpClient() 或 new OkHttpClient.Builder() 来创建对象, 但是—特别注意, OkHttpClient() 对象最好是共享的, 建议使用单例模式创建。 因为每个 OkHttpClient 对象都管理自己独有的线程池和连接池。 这一点很多同学,甚至在我经历的团队中就有人踩过坑, 每一个请求都创建一个 OkHttpClient 导致内存爆掉。
2、 从上面的整体框架图,其实执行层有很多属性功能是需要OkHttpClient 来制定,例如缓存、线程池、拦截器等。如果你是设计者你会怎样设计 OkHttpClient ? 建造者模式,OkHttpClient 比较复杂, 太多属性, 而且客户的组合需求多样化, 这种情况下就考虑使用建造者模式。 new OkHttpClien() 创建对象, 内部默认指定了很多属性:
public OkHttpClient() { this(new Builder());}复制代码
在看看 new Builder() 的默认实现:
public Builder() { dispatcher = new Dispatcher(); protocols = DEFAULT_PROTOCOLS; connectionSpecs = DEFAULT_CONNECTION_SPECS; eventListenerFactory = EventListener.factory(EventListener.NONE); proxySelector = ProxySelector.getDefault(); cookieJar = CookieJar.NO_COOKIES; socketFactory = SocketFactory.getDefault(); hostnameVerifier = OkHostnameVerifier.INSTANCE; certificatePinner = CertificatePinner.DEFAULT; proxyAuthenticator = Authenticator.NONE; authenticator = Authenticator.NONE; connectionPool = new ConnectionPool(); dns = Dns.SYSTEM; followSslRedirects = true; followRedirects = true; retryOnConnectionFailure = true; connectTimeout = 10_000; readTimeout = 10_000; writeTimeout = 10_000; pingInterval = 0;}复制代码
默认指定 Dispatcher (管理线程池)、链接池、超时时间等。
3、 内部对于线程池、链接池管理有默认的管理策略,例如空闲时候的线程池、连接池会在一定时间自动释放,但如果你想主动去释放也可以通过客户层去释放。(很少)
执行层
Response response = mOkHttpClient.newCall(request).execute();
复制代码
这是应用程序中发起网络请求最顶端的调用,newCall(request) 方法返回 RealCall 对象。RealCall 封装了一个 request 代表一个请求调用任务,RealCall 有两个重要的方法 execute() 和 enqueue(Callback responseCallback)。 execute() 是直接在当前线程执行请求,enqueue(Callback responseCallback) 是将当前任务加到任务队列中,执行异步请求。
同步请求
@Override public Response execute() throws IOException { synchronized (this) { if (executed) throw new IllegalStateException("Already Executed"); executed = true; } captureCallStackTrace(); try { // client.dispatcher().executed(this) 内部只是记录下执行状态, client.dispatcher().executed(this); // 真正执行发生在这里 Response result = getResponseWithInterceptorChain(); if (result == null) throw new IOException("Canceled"); return result; } finally { // 后面再解释 client.dispatcher().finished(this); }}复制代码
执行方法关键在 getResponseWithInterceptorChain() 这个方法中, 关于 client.dispatcher().executed(this) 和 client.dispatcher().finished(this); 这里先忽略 ,后面再看。
请求过程要从执行层说到连接层,涉及到 getResponseWithInterceptorChain 方法中组织的各个拦截器的执行过程,内容比较多,后面章节在说。先说说 RealCall 中 enqueue(Callback responseCallback) 方法涉及的异步请求和线程池。
Dispatcher 和线程池
@Override public void enqueue(Callback responseCallback) { synchronized (this) { if (executed) throw new IllegalStateException("Already Executed"); executed = true;} captureCallStackTrace(); client.dispatcher().enqueue(new AsyncCall(responseCallback));}复制代码
调用了 dispatcher 的 enqueue()方法
dispatcher 结合线程池完成了所有异步请求任务的调配。
synchronized void enqueue(AsyncCall call) {
if (runningAsyncCalls.size() < maxRequests && runningCallsForHost(call) < maxRequestsPerHost) {
runningAsyncCalls.add(call);
executorService().execute(call);
} else {
readyAsyncCalls.add(call);
}
}
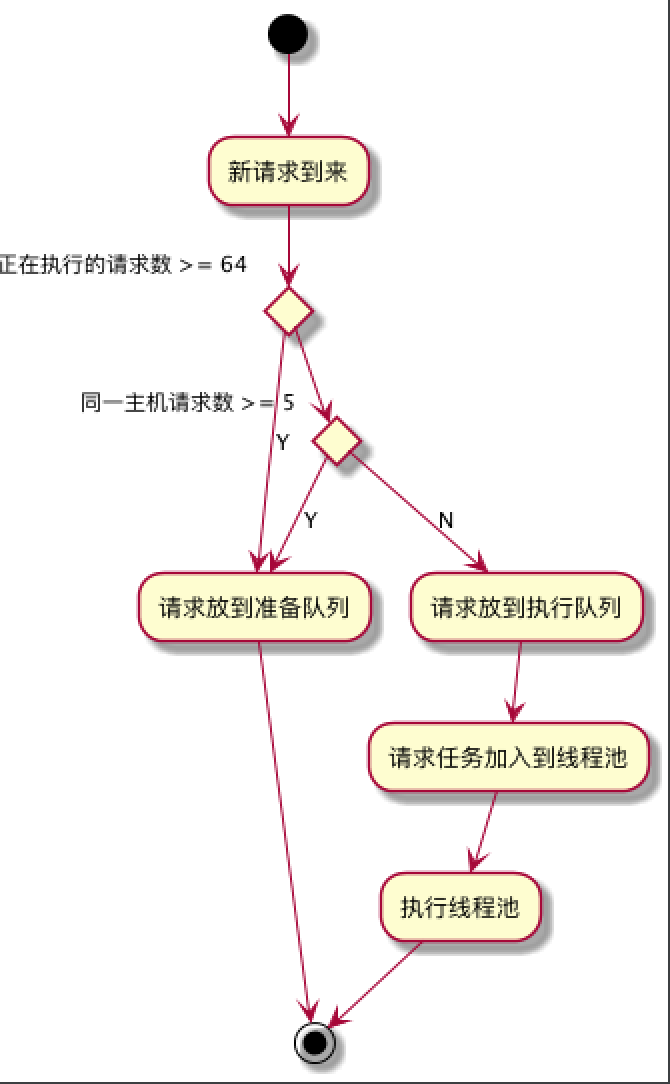
dispatcher 主要维护了三两个队列 readyAsyncCalls、runningAsyncCalls 和 runningSyncCalls,分别代表了准备中队列, 正在执行的异步任务队列和正在执行的同步队列, 重点关注下前面两个。
现在我们可以回头来看看前面 RealCall 方法 client.dispatcher().finished(this) 这个疑点了。
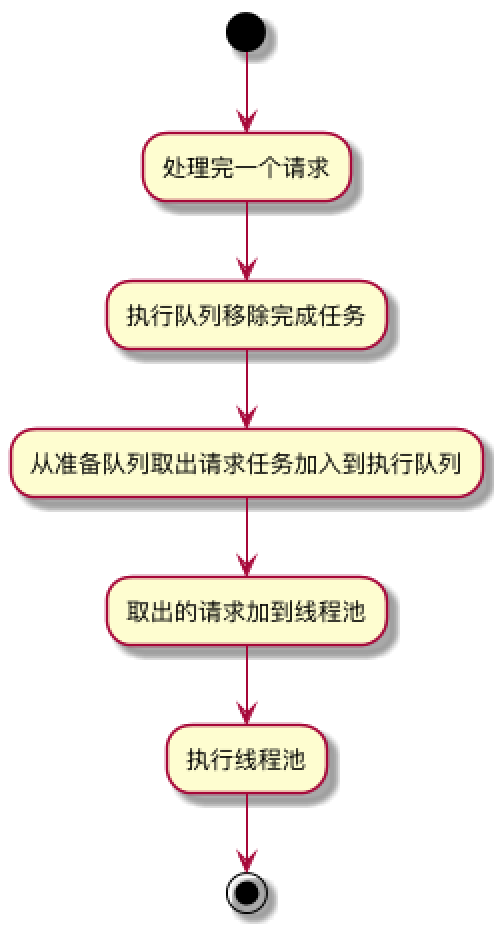
在每个任务执行完之后要回调 client.dispatcher().finished(this) 方法, 主要是要将当前任务从 runningAsyncCalls 或 runningSyncCalls 中移除, 同时把 readyAsyncCalls 的任务调度到 runningAsyncCalls 中并执行。
线程池
public synchronized ExecutorService executorService() { if (executorService == null) { executorService = new ThreadPoolExecutor(0, Integer.MAX_VALUE, 60, TimeUnit.SECONDS, new SynchronousQueue<Runnable>(), Util.threadFactory("OkHttp Dispatcher", false)); } return executorService; }复制代码
默认实现是一个不限容量的线程池 , 线程空闲时存活时间为 60 秒。线程池实现了对象复用,降低线程创建开销,从设计模式上来讲,使用了享元模式。
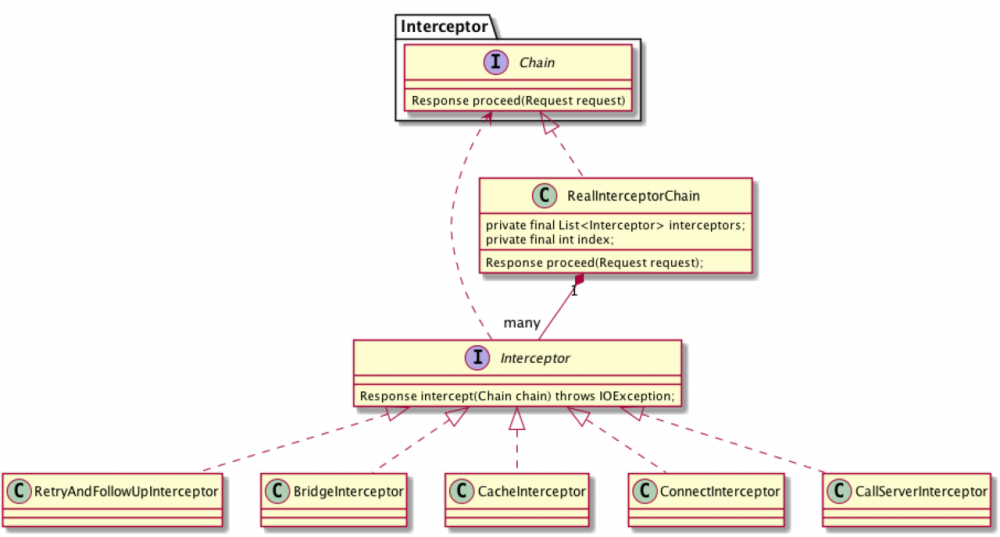
责任链 (拦截器执行过程)
Response getResponseWithInterceptorChain() throws IOException {// Build a full stack of interceptors.List<Interceptor> interceptors = new ArrayList<>();interceptors.addAll(client.interceptors());interceptors.add(retryAndFollowUpInterceptor);interceptors.add(new BridgeInterceptor(client.cookieJar()));interceptors.add(new CacheInterceptor(client.internalCache()));interceptors.add(new ConnectInterceptor(client));if (!forWebSocket) { interceptors.addAll(client.networkInterceptors());}interceptors.add(new CallServerInterceptor(forWebSocket)); Interceptor.Chain chain = new RealInterceptorChain( interceptors, null, null, null, 0, originalRequest);return chain.proceed(originalRequest); }}复制代码
要跟踪 Okhttp3 的网络请求任务执行过程 ,需要看懂以上代码,看懂以上代码必须理解设计模式-责任链。在责任链模式里,很多对象由每一个对象对其下家的引用而连接起来形成一条链。请求在这个链上传递,直到链上的某一个对象决定处理此请求。发出这个请求的客户端并不知道链上的哪一个对象最终处理这个请求,这使得系统可以在不影响客户端的情况下动态地重新组织和分配责任。 网络请求过程,是比较典型的复合责任链的场景,比如请求传递过程,我们需要做请求重试, 需要执行缓存策略, 需要建立连接等, 每一个处理节点可以由一个链上的对象来处理; 同时客户端使用的时候可能也会在请求过程中做一些应用层需要的事情,比如我要记录网络请求的耗时、日志等, 责任链还可以动态的扩展到客户业务方。
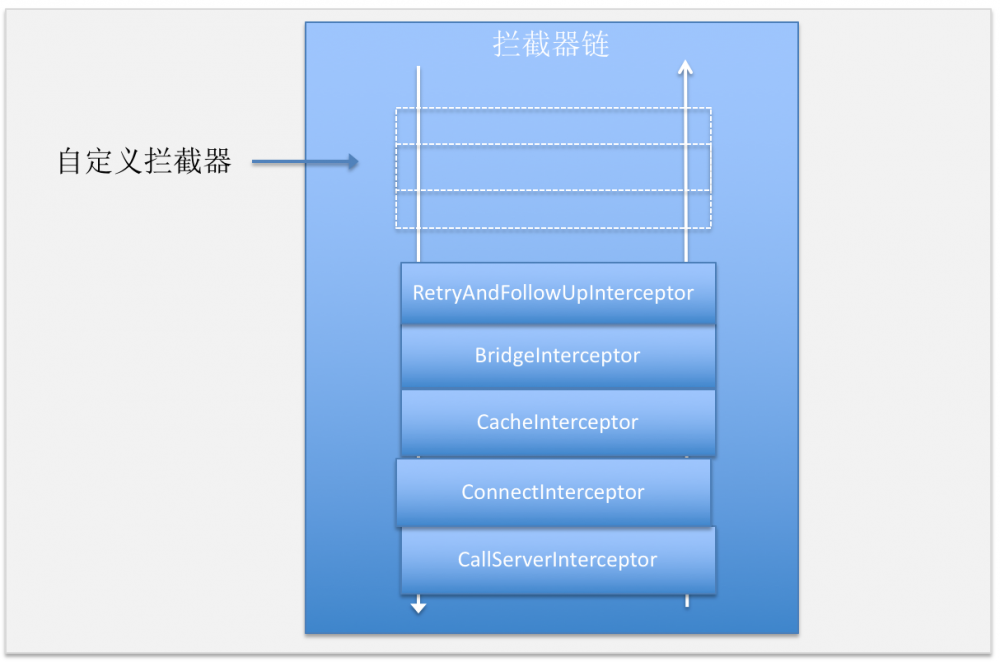
在 OkHttp3 的拦截器链中, 内置了5个默认的拦截器,分别用于重试、请求对象转换、缓存、链接、网络读写。
以上方法中先是添加了客户端自定义的连接器,然后在分别添加内置拦截器。
Okhttp3 拦截器类图
现在我们把对 OkHttp 网络请求执行过程的研究转化对每个拦截器处理的研究。
retryAndFollowUpInterceptor 重试机制
retryAndFollowUpInterceptor 处于内置拦截器链的最顶端,在一个循环中执行重试过程:
1、首先下游拦截器在处理网络请求过程如抛出异常,则通过一定的机制判断一下当前链接是否可恢复的(例如,异常是不是致命的、有没有更多的线路可以尝试等),如果可恢复则重试,否则跳出循环。
2、 如果没什么异常则校验下返回状态、代理鉴权、重定向等,如果需要重定向则继续,否则直接跳出循环返回结果。
3、 如果重定向,则要判断下是否已经达到最大可重定向次数, 达到则抛出异常,跳出循环。
@Override public Response intercept(Chain chain) throws IOException {
Request request = chain.request();
// 创建连接池管理对象
streamAllocation = new StreamAllocation(client.connectionPool(), createAddress(request.url()), callStackTrace);
int followUpCount = 0;Response priorResponse = null;
while (true) {
if (canceled) {
streamAllocation.release();
throw new IOException("Canceled");
}
Response response = null;
boolean releaseConnection = true;
try {
// 将请求处理传递下游拦截器处理
response = ((RealInterceptorChain) chain).proceed(request, streamAllocation, null, null); releaseConnection = false;
} catch (RouteException e) {
// The attempt to connect via a route failed. The request will not have been sent.
// 线路异常,判断满足可恢复条件,满足则继续循环重试
if (!recover(e.getLastConnectException(), false, request)) {
throw e.getLastConnectException();
}
releaseConnection = false;
continue;
} catch (IOException e) {
// An attempt to communicate with a server failed. The request may have been sent.
// IO异常,判断满足可恢复条件,满足则继续循环重试
boolean requestSendStarted = !(e instanceof ConnectionShutdownException);
if (!recover(e, requestSendStarted, request))
throw e;releaseConnection = false;continue;
} finally {// We’re throwing an unchecked exception. Release any resources.
if (releaseConnection) {
streamAllocation.streamFailed(null);streamAllocation.release();
}
// Attach the prior response if it exists. Such responses never have a body. if (priorResponse != null) { response = response.newBuilder() .priorResponse(priorResponse.newBuilder() .body(null) .build()) .build(); } // 是否需要重定向 Request followUp = followUpRequest(response); if (followUp == null) { if (!forWebSocket) { streamAllocation.release(); } // 不需要重定向,正常返回结果 return response; } closeQuietly(response.body()); if (++followUpCount > MAX_FOLLOW_UPS) { // 达到次数限制 streamAllocation.release(); throw new ProtocolException("Too many follow-up requests: " + followUpCount); } if (followUp.body() instanceof UnrepeatableRequestBody) { streamAllocation.release(); throw new HttpRetryException("Cannot retry streamed HTTP body", response.code()); } if (!sameConnection(response, followUp.url())) { streamAllocation.release(); streamAllocation = new StreamAllocation( client.connectionPool(), createAddress(followUp.url()), callStackTrace); } else if (streamAllocation.codec() != null) { throw new IllegalStateException("Closing the body of " + response + " didn't close its backing stream. Bad interceptor?"); } request = followUp; priorResponse = response; }}复制代码
BridgeInterceptor
/** * Bridges from application code to network code. First it builds a network request from a user * request. Then it proceeds to call the network. Finally it builds a user response from the network * response. */复制代码
这个拦截器比较简单, 一个实现应用层和网络层直接的数据格式编码的桥。 第一: 把应用层客户端传过来的请求对象转换为 Http 网络协议所需字段的请求对象。 第二, 把下游网络请求结果转换为应用层客户所需要的响应对象。 这个设计思想来自适配器设计模式,大家可以去体会一下。
CacheInterceptor 数据策略(策略模式)
CacheInterceptor 实现了数据的选择策略, 来自网络还是来自本地? 这个场景也是比较契合策略模式场景, CacheInterceptor 需要一个策略提供者提供它一个策略(锦囊), CacheInterceptor 根据这个策略去选择走网络数据还是本地缓存。
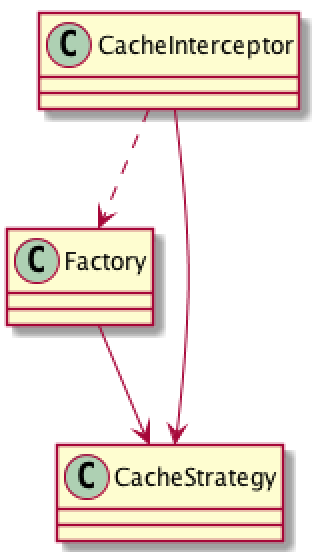
缓存的策略过程:
1、 请求头包含 “If-Modified-Since” 或 “If-None-Match” 暂时不走缓存
2、 客户端通过 cacheControl 指定了无缓存,不走缓存
3、客户端通过 cacheControl 指定了缓存,则看缓存过期时间,符合要求走缓存。
4、 如果走了网络请求,响应状态码为 304(只有客户端请求头包含 “If-Modified-Since” 或 “If-None-Match” ,服务器数据没变化的话会返回304状态码,不会返回响应内容), 表示客户端继续用缓存。
@Override public Response intercept(Chain chain) throws IOException {
Response cacheCandidate = cache != null? cache.get(chain.request()): null;
long now = System.currentTimeMillis();
CacheStrategy strategy = new CacheStrategy.Factory(now, chain.request(), cacheCandidate).get();
// 获取缓存策略
Request networkRequest = strategy.networkRequest;
Response cacheResponse = strategy.cacheResponse;
if (cache != null) {
cache.trackResponse(strategy);
}if (cacheCandidate != null && cacheResponse == null) {
closeQuietly(cacheCandidate.body());
// The cache candidate wasn’t applicable. Close it.
}
// If we’re forbidden from using the network and the cache is insufficient, fail.
if (networkRequest == null && cacheResponse == null) {
return new Response.Builder().request(chain.request()).protocol(Protocol.HTTP_1_1).code(504).message(“Unsatisfiable Request (only-if-cached)”).body(Util.EMPTY_RESPONSE).sentRequestAtMillis(-1L).receivedResponseAtMillis(System.currentTimeMillis()).build();
}
// 走缓存
if (networkRequest == null) {
return cacheResponse.newBuilder().cacheResponse(stripBody(cacheResponse)).build();}Response networkResponse = null ;
try {
// 执行网络
networkResponse = chain.proceed(networkRequest);
} finally {
// If we’re crashing on I/O or otherwise, don’t leak the cache body.
if (networkResponse == null && cacheCandidate != null) {
closeQuietly(cacheCandidate.body());
}
}
// 返回 304 仍然走本地缓存
if (cacheResponse != null) {
if (networkResponse.code() == HTTP_NOT_MODIFIED) {
Response response = cacheResponse.newBuilder() .headers(combine(cacheResponse.headers(), networkResponse.headers())) .sentRequestAtMillis(networkResponse.sentRequestAtMillis()) .receivedResponseAtMillis(networkResponse.receivedResponseAtMillis()) .cacheResponse(stripBody(cacheResponse))
.networkResponse(stripBody(networkResponse))
.build();
networkResponse.body().close();
// Update the cache after combining headers but before stripping the
// Content-Encoding header (as performed by initContentStream()). cache.trackConditionalCacheHit();
cache.update(cacheResponse, response); return response;
} else {
closeQuietly(cacheResponse.body());
}
}
Response response = networkResponse.newBuilder() .cacheResponse(stripBody(cacheResponse))
.networkResponse(stripBody(networkResponse))
.build();
if (cache != null) {
if (
HttpHeaders.hasBody(response) && CacheStrategy.isCacheable(response, networkRequest)) {
// 存储缓存
CacheRequest cacheRequest = cache.put(response);
return cacheWritingResponse(cacheRequest, response);
} if (HttpMethod.invalidatesCache(networkRequest.method())) {
try {
cache.remove(networkRequest);
} catch (IOException ignored) {
// The cache cannot be written.
}
}
}
return response;
}
缓存实现
OkHttp3 内部缓存默认实现是使用的 DiskLruCache, 这部分代码有点绕:
interceptors.add(new CacheInterceptor(client.internalCache()));
初始化 CacheInterceptor 时候 client.internalCache() 这里获取OkHttpClient的缓存。
InternalCache internalCache() { return cache != null ? cache.internalCache : internalCache;}复制代码
注意到, 这个方法是非公开的。 客户端只能通过 OkhttpClient.Builder的 cache(cache) 定义缓存, cache 是一个 Cache 对实例。 在看看 Cache 的内部实现, 内部有一个 InternalCache 的内部类实现。 内部调用时使用 InternalCache 实例提供接口,而存储逻辑在 Cache 中实现。
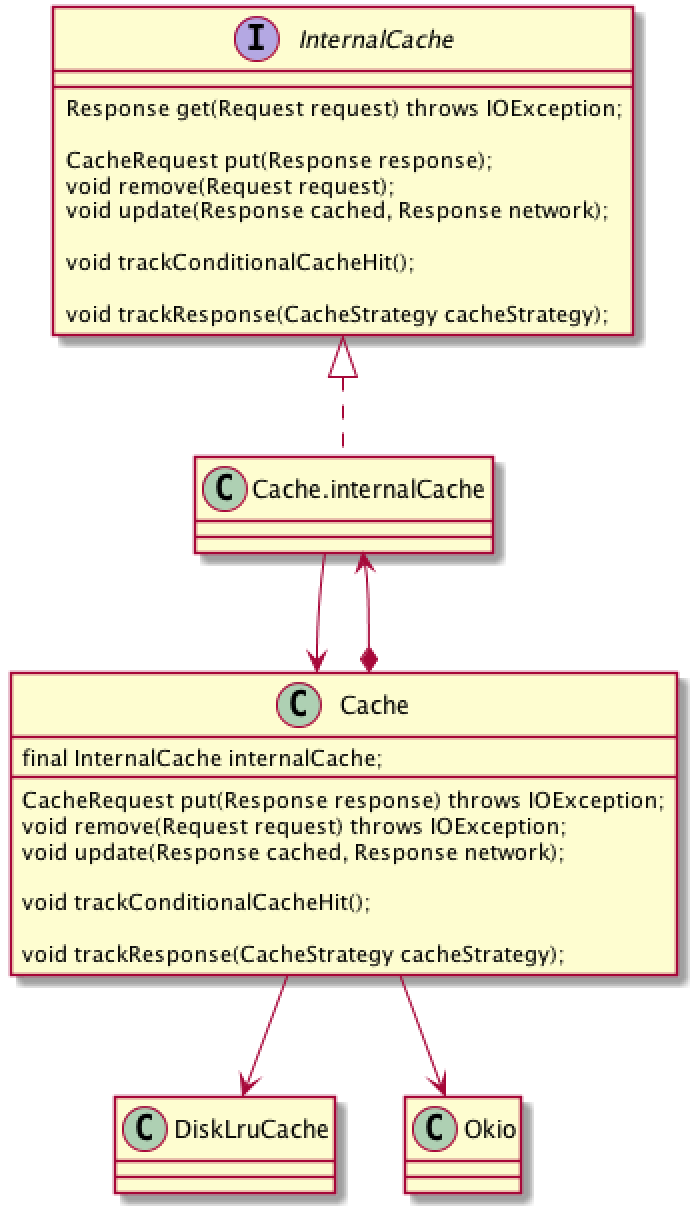
Cache 为什么不直接实现 InternalCache ,而通过持有 InternalCache 的一个内部类对象来实现方法? 是希望控制缓存实现, 不希望用户外部去实现缓存,同时对内保持一定的扩展。
链接层
RealCall 封装了请求过程, 组织了用户和内置拦截器,其中内置拦截器 retryAndFollowUpInterceptor -> BridgeInterceptor -> CacheInterceptor 完执行层的大部分逻辑 ,ConnectInterceptor -> CallServerInterceptor 两个拦截器开始迈向连接层最终完成网络请求。
喜欢的关注下笔者,顺便点个赞呗。
正文到此结束
- 本文标签: MQ 缓存 java ip 数据 注释 value client 线程池 IO Proxy tab UI Full Stack 实例 build Logging executor 连接池 源码 cat 时间 Select Connection 任务调度 cache synchronized 类图 协议 线程 需求 代码注释 ThreadPoolExecutor 文章 ArrayList stream ssl tar 代码 App 同步 ACE ORM cookies 重试机制 服务器 管理 CTO final http Service id retry web DNS NSA CEO 组织 ECS queue 希望 适配器 update https IDE 设计模式 list src message
- 版权声明: 本文为互联网转载文章,出处已在文章中说明(部分除外)。如果侵权,请联系本站长删除,谢谢。
- 本文海报: 生成海报一 生成海报二
热门推荐


相关文章

近期评论
-
你这基本没有更新呀,最近文章显示还是2019年的文章。不符合要求哈
-
关键词:慕云博客 链接:https://www.lilun.me 描述:分享原创文字的个人博客
-
-
-
可以提供一下源码吗
-
不是商业站,鸡娃学习笔记
-
-
-
-
听他们说很厉害的样子
Loading...
![[HBLOG]公众号](http://www.liuhaihua.cn/img/qrcode_gzh.jpg)

