JAVA NIO编程入门(二)
上一篇文章 JAVA NIO编程入门(一) 我们学习了NIO编程的基础知识,并通过一个小demo实战帮助了解NIO编程的channel,buffer等概念。本文会继续学习JAVA NIO编程,并通过一个小示例来帮助理解相关知识,通过本文你将可以学习到
- buffer的聚集和分散(Scatter/Gather)
- SocketChannel和ServerSocketChannel的使用
- 选择器的使用
二、什么是聚集和分散(Scatter/Gather)
- 分散(scatter)从Channel中读取是指在读操作时将读取的数据写入多个buffer中。因此,Channel将从Channel中读取的数据“分散(scatter)”到多个Buffer中。
- 聚集(gather)写入Channel是指在写操作时将多个buffer的数据写入同一个Channel,因此,Channel 将多个Buffer中的数据“聚集(gather)”后发送到Channel。
分散(Scatter)示意图
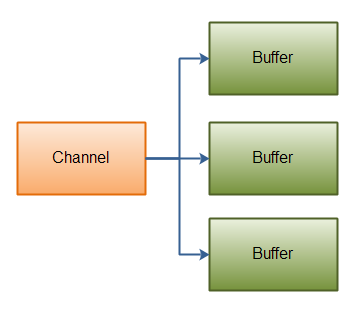
从通道填充buffer,必须填充完前一个buffer才会填充后面的buffer,这也意味着不能动态调整每个buffer的接受大小。
聚集(Gather)示意图
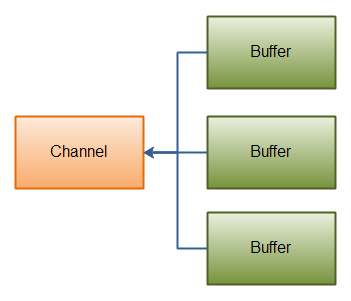
聚集和分散是相反的形式,从buffer写入数据到通道,只会写入buffer的positon位置到limit位置的内容,也就是意味着可以动态的写入内容到通道中。
三、选择器
什么是选择器
Selector(选择器)是Java NIO中能够检测多个NIO通道,并能够知道通道是否为诸如读写事件做好准备的组件。这样,一个单独的线程可以管理多个channel,从而管理多个网络连接,提高效率。
为什么要用选择器
使用了选择器就可以用一个线程管理多个channel,如果多个channel由多个线程管理,线程之前的切换是消耗资源的,而单个线程就避免了线程之间切换的消耗。
选择器常用方法
| 方法名 | 功能 |
|---|---|
| register(Selector sel, int ops) | 向选择器注册通道,并且可以选择注册指定的事件,目前事件分为4种;1.Connect,2.Accept,3.Read,4.Write,一个通道可以注册多个事件 |
| select() | 阻塞到至少有一个通道在你注册的事件上就绪了 |
| selectNow() | 不会阻塞,不管什么通道就绪都立刻返回 |
| select(long timeout) | 和select()一样,除了最长会阻塞timeout毫秒(参数) |
| selectedKeys() | 一旦调用了select()方法,并且返回值表明有一个或更多个通道就绪了,然后可以通过调用selector的selectedKeys()方法,访问“已选择键集(selected key set)”中的就绪通道 |
| wakeUp() | 可以使调用select()阻塞的对象返回,不阻塞。 |
| close() | 用完Selector后调用其close()方法会关闭该Selector,且使注册到该Selector上的所有SelectionKey实例无效。通道本身并不会关闭 |
四、实战
实战需求说明
编码客户端和服务端,服务端可以接受客户端的请求,并返回一个报文,客户端接受报文并解析输出。
服务端代码
try {
            //创建一个服socket并打开
            ServerSocketChannel serverSocketChannel = ServerSocketChannel.open();
            //监听绑定8090端口
            serverSocketChannel.socket().bind(new InetSocketAddress(8090));
            //设置为非阻塞模式
            serverSocketChannel.configureBlocking(false);
            while(true){
            //获取请求连接
                SocketChannel socketChannel = serverSocketChannel.accept();
                if (socketChannel!=null){
                    ByteBuffer buf1 = ByteBuffer.allocate(1024);
                    socketChannel.read(buf1);
                    buf1.flip();
                    if(buf1.hasRemaining())
                        System.out.println(">>>服务端收到数据:"+new String(buf1.array()));
                    buf1.clear();
                //构造返回的报文,分为头部和主体,实际情况可以构造复杂的报文协议,这里只演示,不做特殊设计。
                    ByteBuffer header = ByteBuffer.allocate(6);
                    header.put("[head]".getBytes());
                    ByteBuffer body   = ByteBuffer.allocate(1024);
                    body.put("i am body!".getBytes());
                    header.flip();
                    body.flip();
                    ByteBuffer[] bufferArray = { header, body };
                    socketChannel.write(bufferArray);

                    socketChannel.close();
                }else{
                    Thread.sleep(1000);
                }
            }
        } catch (IOException e) {
            e.printStackTrace();
        } catch (InterruptedException e) {
            e.printStackTrace();
        }
复制代码
服务端selector(选择器版本)
try {
            //打开选择器
            Selector selector = Selector.open();
            ServerSocketChannel serverSocketChannel = ServerSocketChannel.open();
            serverSocketChannel.socket().bind(new InetSocketAddress(8090));
            serverSocketChannel.configureBlocking(false);
            //向通道注册选择器,并且注册接受事件
            serverSocketChannel.register(selector, SelectionKey.OP_ACCEPT);
            while (true) {
                //获取已经准备好的通道数量
                int readyChannels = selector.selectNow();
                //如果没准备好,重试
                if (readyChannels == 0) continue;
                //获取准备好的通道中的事件集合
                Set selectedKeys = selector.selectedKeys();
                Iterator keyIterator = selectedKeys.iterator();
                while (keyIterator.hasNext()) {
                    SelectionKey key = (SelectionKey) keyIterator.next();
                    if (key.isAcceptable()) {
                        //在自己注册的事件中写业务逻辑,
                         //我这里注册的是accept事件,
                         //这部分逻辑和上面非选择器服务端代码一样。
                        ServerSocketChannel serverSocketChannel1 = (ServerSocketChannel) key.channel();
                        SocketChannel socketChannel = serverSocketChannel1.accept();
                        ByteBuffer buf1 = ByteBuffer.allocate(1024);
                        socketChannel.read(buf1);
                        buf1.flip();
                        if (buf1.hasRemaining())
                            System.out.println(">>>服务端收到数据:" + new String(buf1.array()));
                        buf1.clear();

                        ByteBuffer header = ByteBuffer.allocate(6);
                        header.put("[head]".getBytes());
                        ByteBuffer body = ByteBuffer.allocate(1024);
                        body.put("i am body!".getBytes());
                        header.flip();
                        body.flip();
                        ByteBuffer[] bufferArray = {header, body};
                        socketChannel.write(bufferArray);

                        socketChannel.close();
                    } else if (key.isConnectable()) {
                    } else if (key.isReadable()) {
                    } else if (key.isWritable()) {

                    }
                    //注意每次迭代末尾的keyIterator.remove()调用。
                    //Selector不会自己从已选择键集中移除SelectionKey实例。必须在处理完通道时自己移除。
                    //下次该通道变成就绪时,Selector会再次将其放入已选择键集中
                    keyIterator.remove();
                }
            }
        } catch (IOException e) {
            e.printStackTrace();
        }
复制代码
客户端代码
try {
            //打开socket连接,连接本地8090端口,也就是服务端
            SocketChannel socketChannel = SocketChannel.open();
            socketChannel.connect(new InetSocketAddress("127.0.0.1", 8090));
            //请求服务端,发送请求
            ByteBuffer buf1 = ByteBuffer.allocate(1024);
            buf1.put("来着客户端的请求".getBytes());
            buf1.flip();
            if (buf1.hasRemaining())
                socketChannel.write(buf1);
            buf1.clear();
            //接受服务端的返回,构造接受缓冲区,我们定义头6个字节为头部,后续其他字节为主体内容。
            ByteBuffer header = ByteBuffer.allocate(6);
            ByteBuffer body   = ByteBuffer.allocate(1024);
            ByteBuffer[] bufferArray = { header, body };

            socketChannel.read(bufferArray);
            header.flip();
            body.flip();
            if (header.hasRemaining())
                System.out.println(">>>客户端接收头部数据:" + new String(header.array()));
            if (body.hasRemaining())
                System.out.println(">>>客户端接收body数据:" + new String(body.array()));
            header.clear();
            body.clear();


            socketChannel.close();
        } catch (IOException e) {
            e.printStackTrace();
        }
复制代码
运行结果
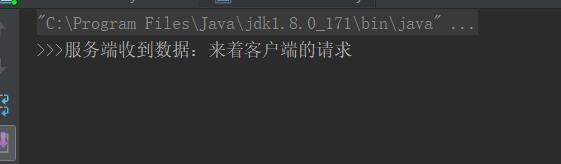
服务端:
客户端:
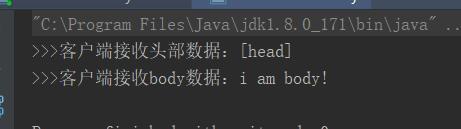
这里给出了服务端代码的两个版本,一个是非选择器的版本,一个是选择器的版本。查看最后运行结果,发现客户端根据双方约定的协议格式,正确解析到了头部和body的内容,其实这也是聚集和分散最主要的作用和应用场景,在网络交互中,进行协议报文格式的定义和实现。后续学完NIO编程入门后我们最后进行总结性的实战,编写一个RPC的demo框架,实现分布式系统的远程调用,有兴趣的同学可以关注笔者和后续的文章。
正文到此结束
热门推荐


相关文章


Loading...
![[HBLOG]公众号](http://www.liuhaihua.cn/img/qrcode_gzh.jpg)

