使用JHipster领域语言在30分钟内创建完整的微服务栈
JHipster是Java Web应用程序和微服务开发的开发平台。到目前为止我实现的最酷的功能肯定是使用JDL生成多个应用程序。
电子商务应用程序
那么让我们看看如何使用JHipster创建一个微服务堆栈。我们今天将建立一个电子商务商店。堆栈包括 -
1/ 使用JHipster Registry进行服务发现,这是一个包含Eureka服务器和Spring云配置服务器的Spring启动应用程序。
2. 使用Spring Boot,Netflix Zuul,ReactJS和Swagger的API管理和网关。
3. 使用Spring Boot的微服务。
4. 使用由弹性堆栈(ELK)和Zipkin组成的JHipster控制台进行监控。
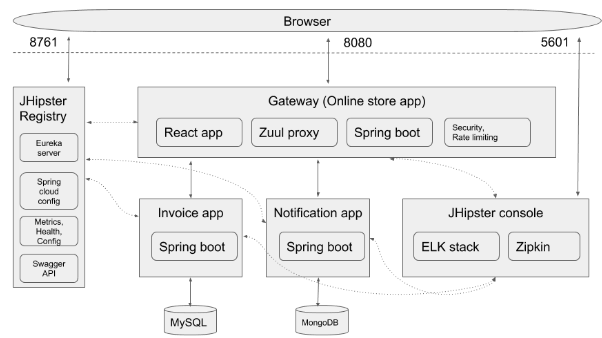
网关将请求路由到两个微服务,Invoice应用程序和Notification应用程序。
要求
为了学习本教程,您需要在计算机上安装最新版本的Docker,Docker-compose,NodeJS和Java 8。以下是我安装的版本。
$ docker -v
Docker version 18.06.1-ce, build e68fc7a

$ docker-compose -v
docker-compose version 1.20.1, build 5d8c71b

$ node -v
v8.11.4

$ java -version
java version "1.8.0_131"
Java(TM) SE Runtime Environment (build 1.8.0_131-b11)
Java HotSpot(TM) 64-Bit Server VM (build 25.131-b11, mixed mode)
首先,安装最新版本的JHipster
$ npm install generator-jhipster -g
通过运行验证您是否具有5.3.4或更高版本
$ jhipster --version
创建JDL
现在让我们创建我们的JDL。转到 JDL Studio (暂时使用旧版本,因为JDL 3更新尚未针对新的JDL工作室发布)或喜欢的IDE /编辑器(如果您愿意,可以使用 JHipster IDE插件 )。
首先,让我们定义我们的应用程序。我们将从Gateway开始:
application {
  config {
    baseName store,
    applicationType gateway,
    packageName com.jhipster.demo.store,
    serviceDiscoveryType eureka,
    authenticationType jwt,
    prodDatabaseType mysql,
    cacheProvider hazelcast,
    buildTool gradle,
    clientFramework react,
    useSass true,
    testFrameworks [protractor]
  }
  entities *
}
大多数的选项是不言自明的,我们正在建立一个名为store类型应用,其网关带有JWT认证,以eureka为基础的服务发现。该应用程序使用MySQL数据库和Hazelcast作为缓存。它是使用Gradle构建的。对于客户端,它使用React和Sass。它还有用于端到端测试的Protractor。
在定义的最后你可以看到entities *,我们稍后会讨论。
现在让我们定义我们的Invoice微服务:
application {
  config {
    baseName invoice,
    applicationType microservice,
    packageName com.jhipster.demo.invoice,
    serviceDiscoveryType eureka,
    authenticationType jwt,
    prodDatabaseType mysql,
    buildTool gradle,
    serverPort 8081,
    skipUserManagement true
  }
  entities Invoice, Shipment
}
它遵循类似的选项,如我们的网关,因为它是微服务,它没有定义任何客户端选项,也跳过用户管理,因为它将由网关处理。此外,我们还提到了自定义端口8081,因为我们不希望此应用程序与网关使用的默认端口8080冲突。
现在让我们定义第二个微服务,Notification应用程序:
application {
  config {
    baseName notification,
    applicationType microservice,
    packageName com.jhipster.demo.notification,
    serviceDiscoveryType eureka,
    authenticationType jwt,
    databaseType mongodb,
    prodDatabaseType mongodb,
    devDatabaseType mongodb,
    cacheProvider no,
    enableHibernateCache false,
    buildTool gradle,
    serverPort 8082,
    skipUserManagement true
  }
  entities Notification
}
此应用程序遵循许多类似于Gateway和Invoice应用程序的选项,但它不使用MySQL,而是使用MongoDB作为其数据库并禁用缓存。
现在我们的应用程序定义已经完成,我们将继续定义我们的实体模型。
对于我们的网关商店应用程序,让我们定义以下实体和枚举:
/** Product sold by the Online store */
entity Product {
    name String required
    description String
    price BigDecimal required min(0)
    size Size required
    image ImageBlob
}
enum Size {
    S, M, L, XL, XXL
}
entity ProductCategory {
    name String required
    description String
}
entity Customer {
    firstName String required
    lastName String required
    gender Gender required
    email String required pattern(/^[^@/s]+@[^@/s]+/.[^@/s]+$/)
    phone String required
    addressLine1 String required
    addressLine2 String
    city String required
    country String required
}
enum Gender {
    MALE, FEMALE, OTHER
}
entity ProductOrder {
    placedDate Instant required
    status OrderStatus required
    code String required
    invoiceId Long
}
enum OrderStatus {
    COMPLETED, PENDING, CANCELLED
}
entity OrderItem {
    quantity Integer required min(0)
    totalPrice BigDecimal required min(0)
    status OrderItemStatus required
}
enum OrderItemStatus {
    AVAILABLE, OUT_OF_STOCK, BACK_ORDER
}
relationship OneToOne {
    Customer{user(login) required} to User
}
relationship ManyToOne {
    OrderItem{product(name) required} to Product
}
relationship OneToMany {
    Customer{order} to ProductOrder{customer(email) required},
    ProductOrder{orderItem} to OrderItem{order(code) required} ,
    ProductCategory{product} to Product{productCategory(name)}
}
service Product, ProductCategory, Customer, ProductOrder, OrderItem with serviceClass
paginate Product, Customer, ProductOrder, OrderItem with pagination
JDL定义实体,枚举,实体和选项(如分页和服务层)之间的关系。
实体字段定义遵循语法:
entity <entity name> {
  <field name> <type> [<validation>*]
}
关系定义遵循语法:
relationship (OneToMany | ManyToOne | OneToOne | ManyToMany) {
    <from entity>[{<relationship name>[(<display field>)]}]
    to
    <to entity>[{<relationship name>[(<display field>)]}]
}
请参阅 JDL文档 以获取完整的DSL参考。
Invoice微服务应用程序具有以下实体:
entity Invoice {
    code String required
    date Instant required
    details String
    status InvoiceStatus required
    paymentMethod PaymentMethod required
    paymentDate Instant required
    paymentAmount BigDecimal required
}
enum InvoiceStatus {
    PAID, ISSUED, CANCELLED
}
entity Shipment {
    trackingCode String
    date Instant required
    details String
}
enum PaymentMethod {
    CREDIT_CARD, CASH_ON_DELIVERY, PAYPAL
}
relationship OneToMany {
    Invoice{shipment} to Shipment{invoice(code) required}
}
service Invoice, Shipment with serviceClass
paginate Invoice, Shipment with pagination
microservice Invoice, Shipment with invoice
注意这里声明的最后一行microservice选项,它指定这些实体属于名为invoice的微服务,以便我们的网关知道在哪里为这些实体路由请求。
现在让我们看一下Notification微服务应用程序的实体:
entity Notification {
    date Instant required
    details String
    sentDate Instant required
    format NotificationType required
    userId Long required
    productId Long required
}
enum NotificationType {
    EMAIL, SMS, PARCEL
}
microservice Notification with notification
现在让我们在看看定义中使用的实体:
application {
  config {
    ...
  }
  entities *
}
application {
  config {
    ...
  }
  entities Invoice, Shipment
}
application {
  config {
    ...
  }
  entities Notification
}
/* Entities for Store Gateway */
entity Product {
    ...
}
entity ProductCategory {
    ...
}
entity Customer {
    ...
}
entity ProductOrder {
    ...
}
entity OrderItem {
    ...
}
microservice Invoice, Shipment with invoice
/* Entities for Invoice microservice */
entity Invoice {
    ...
}
entity Shipment {
    ...
}
/* Entities for notification microservice */
entity Notification {
    ...
}
microservice Notification with notification
在这里,我们指示商店网关应用程序它应该包含JDL中定义的所有实体,并且网关将知道跳过属于被调用微服务的实体代码,因此只会为这些实体生成调用者客户端代码,这里是 Invoice, Shipment, 和 Notification。
我们还指示Invoice应用程序和Notification应用程序包含其实体。
生成应用程序
创建一个我们想要创建微服务堆栈的文件夹:
$ mkdir ecommerce && cd ecommerce
现在,让我们将所有内容放在一起成为JDL文件。让我们调用它app.jdl并将其保存到此文件夹中。
application {
  config {
    baseName store,
    applicationType gateway,
    packageName com.jhipster.demo.store,
    serviceDiscoveryType eureka,
    authenticationType jwt,
    prodDatabaseType mysql,
    cacheProvider hazelcast,
    buildTool gradle,
    clientFramework react,
    useSass true,
    testFrameworks [protractor]
  }
  entities *
}
application {
  config {
    baseName invoice,
    applicationType microservice,
    packageName com.jhipster.demo.invoice,
    serviceDiscoveryType eureka,
    authenticationType jwt,
    prodDatabaseType mysql,
    buildTool gradle,
    serverPort 8081,
    skipUserManagement true
  }
  entities Invoice, Shipment
}
application {
  config {
    baseName notification,
    applicationType microservice,
    packageName com.jhipster.demo.notification,
    serviceDiscoveryType eureka,
    authenticationType jwt,
    databaseType mongodb,
    prodDatabaseType mongodb,
    devDatabaseType mongodb,
    cacheProvider no,
    enableHibernateCache false,
    buildTool gradle,
    serverPort 8082,
    skipUserManagement true
  }
  entities Notification
}
/* Entities for Store Gateway */
/** Product sold by the Online store */
entity Product {
    name String required
    description String
    price BigDecimal required min(0)
    size Size required
    image ImageBlob
}
enum Size {
    S, M, L, XL, XXL
}
entity ProductCategory {
    name String required
    description String
}
entity Customer {
    firstName String required
    lastName String required
    gender Gender required
    email String required pattern(/^[^@/s]+@[^@/s]+/.[^@/s]+$/)
    phone String required
    addressLine1 String required
    addressLine2 String
    city String required
    country String required
}
enum Gender {
    MALE, FEMALE, OTHER
}
entity ProductOrder {
    placedDate Instant required
    status OrderStatus required
    code String required
    invoiceId Long
}
enum OrderStatus {
    COMPLETED, PENDING, CANCELLED
}
entity OrderItem {
    quantity Integer required min(0)
    totalPrice BigDecimal required min(0)
    status OrderItemStatus required
}
enum OrderItemStatus {
    AVAILABLE, OUT_OF_STOCK, BACK_ORDER
}
relationship OneToOne {
    Customer{user(login) required} to User
}
relationship ManyToOne {
 OrderItem{product(name) required} to Product
}
relationship OneToMany {
   Customer{order} to ProductOrder{customer(email) required},
   ProductOrder{orderItem} to OrderItem{order(code) required} ,
   ProductCategory{product} to Product{productCategory(name)}
}
service Product, ProductCategory, Customer, ProductOrder, OrderItem with serviceClass
paginate Product, Customer, ProductOrder, OrderItem with pagination
/* Entities for Invoice microservice */
entity Invoice {
    code String required
    date Instant required
    details String
    status InvoiceStatus required
    paymentMethod PaymentMethod required
    paymentDate Instant required
    paymentAmount BigDecimal required
}
enum InvoiceStatus {
    PAID, ISSUED, CANCELLED
}
entity Shipment {
    trackingCode String
    date Instant required
    details String
}
enum PaymentMethod {
    CREDIT_CARD, CASH_ON_DELIVERY, PAYPAL
}
relationship OneToMany {
    Invoice{shipment} to Shipment{invoice(code) required}
}
service Invoice, Shipment with serviceClass
paginate Invoice, Shipment with pagination
microservice Invoice, Shipment with invoice
/* Entities for notification microservice */
entity Notification {
    date Instant required
    details String
    sentDate Instant required
    format NotificationType required
    userId Long required
    productId Long required
}
enum NotificationType {
    EMAIL, SMS, PARCEL
}
microservice Notification with notification
现在让我们调用JHipster CLI来导入这个文件:
$ jhipster import-jdl app.jdl
这将创建商店,发票和通知文件夹,并在每个文件夹中执行以下操作
生成适当的应用程序和实体配置。
根据配置生成应用程序和实体源代码。
为应用程序安装NPM依赖项。
完成该过程后,您应该在控制台上看到以下内容:
Entity Product generated successfully.
Entity ProductCategory generated successfully.
Entity Customer generated successfully.
Entity ProductOrder generated successfully.
Entity OrderItem generated successfully.
Entity Invoice generated successfully.
Entity Shipment generated successfully.
Entity Notification generated successfully.
Congratulations, JHipster execution is complete!
使用Docker运行应用程序
首先让我们使用JHipster生成一些docker compose配置。
在ecommerce文件夹中创建一个新文件夹,然后运行JHipster docker-compose命令
$ mkdir
docker -compose && cd docker -compose $ jhipster docker-compose
[/code

它会提示您几个问题,选择下面突出显示的答案:

[code]
Files will be generated in folder: /home/deepu/workspace/temp/ecommerce/docker-compose
✔ Docker is installed

? Which *type* of application would you like to deploy? Microservice application

? Which *type* of gateway would you like to use? JHipster gateway based on Netflix Zuul

? Enter the root directory where your gateway(s) and microservices are located ../

3 applications found at /home/deepu/workspace/temp/ecommerce/
? Which applications do you want to include in your configuration? invoice, notification, store

? Which applications do you want to use with clustered databases (only available with MongoDB and Couchbase)?

? Do you want to setup monitoring for your applications ? Yes, for logs and metrics with the JHipster Console (based on ELK and Zipkin)

? You have selected the JHipster Console which is based on the ELK stack and additional technologies, which one do you want to use ? Zipkin, for distributed tracing (only compatible with
 JHipster >= v4.2.0)

JHipster registry detected as the service discovery and configuration provider used by your apps
? Enter the admin password used to secure the JHipster Registry
 admin
这将为堆栈生成所有必需的docker-compose配置,并且还将打印出构建docker镜像的更多指令。
Docker Compose configuration generated with missing images!
To generate the missing Docker image(s), please run:
  ./gradlew -Pprod bootWar buildDocker in /home/deepu/workspace/temp/ecommerce/invoice
  ./gradlew -Pprod bootWar buildDocker in /home/deepu/workspace/temp/ecommerce/notification
  ./gradlew -Pprod bootWar buildDocker in /home/deepu/workspace/temp/ecommerce/store
按照说明构建docker镜像。构建完所有3个后,从docker-compose文件夹中运行以下命令以启动所有内容。
$ docker-compose up -d
容器启动后,可以使用以下命令流式传输日志
docker-compose logs -f
浏览 http://localhost:8080/ 看到你的电子商务网站上线了。
正文到此结束
- 本文标签: id zuul root db cat IDE Select client neToMany 希望 Netflix web node 数据库 数据 MongoDB build ManyToOne IO mongo zip 端口 description UI App provider ACE cache Mysql数据库 java tab 配置 CTO 开发 Word ORM ELK category spring 认证 js 安装 代码 分页 http Service 模型 微服务 云 测试 https sql 电子商务 Eureka entity ManyToMany zipkin 缓存 mysql ssl ip HBase API 插件 src Spring Boot docker-compose 服务器 mail 网站 管理 Docker dist OneToOne
- 版权声明: 本文为互联网转载文章,出处已在文章中说明(部分除外)。如果侵权,请联系本站长删除,谢谢。
- 本文海报: 生成海报一 生成海报二
热门推荐


相关文章

近期评论
-
你这基本没有更新呀,最近文章显示还是2019年的文章。不符合要求哈
-
关键词:慕云博客 链接:https://www.lilun.me 描述:分享原创文字的个人博客
-
-
-
可以提供一下源码吗
-
不是商业站,鸡娃学习笔记
-
-
-
-
听他们说很厉害的样子
Loading...
![[HBLOG]公众号](http://www.liuhaihua.cn/img/qrcode_gzh.jpg)

