「小程序JAVA实战」小程序的springboot后台拦截器(60)
之前咱们把用户登录,注册成功的信息都放到redis里面了,如果产品经理有一种场景,就是同一个用户在同一个时间以最后一个登录为准,那么前一个就需要重新登录,并且清空前一个用户缓存。这就用到了springboot的缓存机制。源码:https://github.com/limingios/wxProgram.git 中No.15和springboot
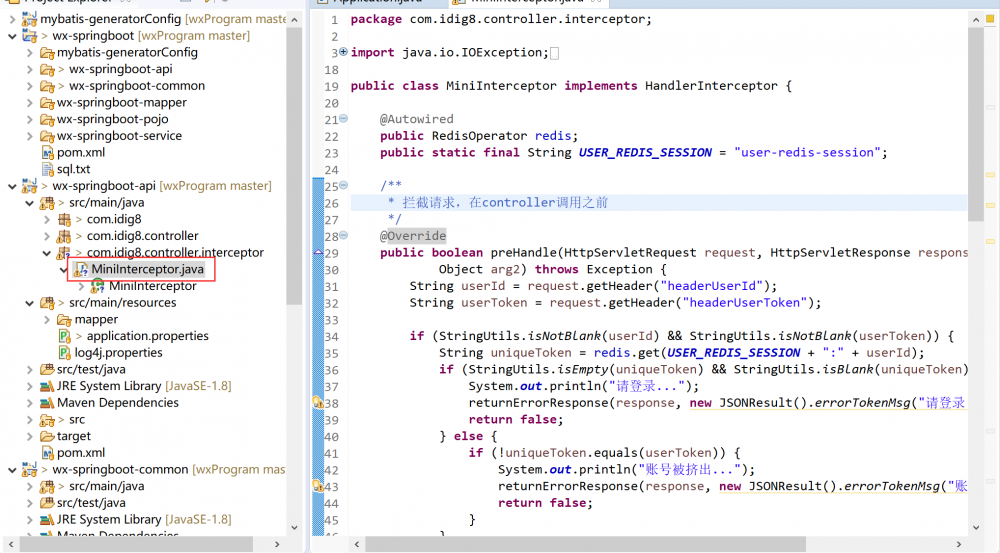
拦截器的创建
通过前端传递过来的userToken,和从redis里面获取到的userToken对比,如果不一致,前端传递过来的这个session奖杯提示用户被挤出,直接缓存失效。需要重新登录。
package com.idig8.controller.interceptor;

import java.io.IOException;
import java.io.OutputStream;
import java.io.UnsupportedEncodingException;

import javax.servlet.http.HttpServletRequest;
import javax.servlet.http.HttpServletResponse;

import org.apache.commons.lang3.StringUtils;
import org.springframework.beans.factory.annotation.Autowired;
import org.springframework.web.servlet.HandlerInterceptor;
import org.springframework.web.servlet.ModelAndView;

import com.idig8.utils.JSONResult;
import com.idig8.utils.JsonUtils;
import com.idig8.utils.RedisOperator;

public class MiniInterceptor implements HandlerInterceptor {

    @Autowired
    public RedisOperator redis;
    public static final String USER_REDIS_SESSION = "user-redis-session";

    /**
     * 拦截请求,在controller调用之前
     */
    @Override
    public boolean preHandle(HttpServletRequest request, HttpServletResponse response,
            Object arg2) throws Exception {
        String userId = request.getHeader("headerUserId");
        String userToken = request.getHeader("headerUserToken");

        if (StringUtils.isNotBlank(userId) && StringUtils.isNotBlank(userToken)) {
            String uniqueToken = redis.get(USER_REDIS_SESSION + ":" + userId);
            if (StringUtils.isEmpty(uniqueToken) && StringUtils.isBlank(uniqueToken)) {
                System.out.println("请登录...");
                returnErrorResponse(response, new JSONResult().errorTokenMsg("请登录..."));
                return false;
            } else {
                if (!uniqueToken.equals(userToken)) {
                    System.out.println("账号被挤出...");
                    returnErrorResponse(response, new JSONResult().errorTokenMsg("账号被挤出..."));
                    return false;
                }
            }
        } else {
            System.out.println("请登录...");
            returnErrorResponse(response, new JSONResult().errorTokenMsg("请登录..."));
            return false;
        }


        /**
         * 返回 false:请求被拦截,返回
         * 返回 true :请求OK,可以继续执行,放行
         */
        return true;
    }

    public void returnErrorResponse(HttpServletResponse response, JSONResult result)
            throws IOException, UnsupportedEncodingException {
        OutputStream out=null;
        try{
            response.setCharacterEncoding("utf-8");
            response.setContentType("text/json");
            out = response.getOutputStream();
            out.write(JsonUtils.objectToJson(result).getBytes("utf-8"));
            out.flush();
        } finally{
            if(out!=null){
                out.close();
            }
        }
    }

    /**
     * 请求controller之后,渲染视图之前
     */
    @Override
    public void postHandle(HttpServletRequest arg0, HttpServletResponse arg1, Object arg2, ModelAndView arg3)
            throws Exception {
    }

    /**
     * 请求controller之后,视图渲染之后
     */
    @Override
    public void afterCompletion(HttpServletRequest arg0, HttpServletResponse arg1, Object arg2, Exception arg3)
            throws Exception {
    }

}
每一个拦截器有需要实现HandlerInterceptor接口,这个接口有三个方法,每个方法会在请求调用的不同时期完成,因为我们需要在接口调用之前拦截请求判断是否登陆,所以这里需要使用preHandle方法,在里面是验证逻辑,最后返回true或者false,确定请求是否合法。
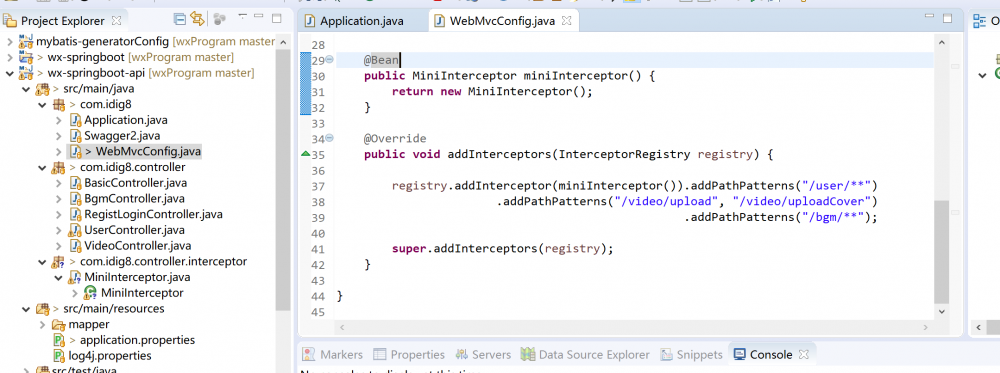
拦截器加入配置中
原来咱们在spring mvc的时候都是通过xml配置文件的方法,springboot为了简化,都是通过java来进行配置,刚创建的拦截器需要配置在webconfig里面
package com.idig8;

import org.springframework.beans.factory.annotation.Value;
import org.springframework.context.annotation.Bean;
import org.springframework.context.annotation.Configuration;
import org.springframework.web.servlet.config.annotation.InterceptorRegistry;
import org.springframework.web.servlet.config.annotation.ResourceHandlerRegistry;
import org.springframework.web.servlet.config.annotation.WebMvcConfigurerAdapter;

import com.idig8.controller.interceptor.MiniInterceptor;

@Configuration
public class WebMvcConfig extends WebMvcConfigurerAdapter {

    @Value("${server.file.path}")
    private String fileSpace;

    @Override
    public void addResourceHandlers(ResourceHandlerRegistry registry) {
        //资源的路径.swagger2的资源.所在的目录,
        registry.addResourceHandler("/**")
        .addResourceLocations("classpath:/META-INF/resources/")
        .addResourceLocations("file:"+fileSpace);

    }


    @Bean
    public MiniInterceptor miniInterceptor() {
        return new MiniInterceptor();
    }

    @Override
    public void addInterceptors(InterceptorRegistry registry) {

        registry.addInterceptor(miniInterceptor()).addPathPatterns("/user/**")
                       .addPathPatterns("/video/upload", "/video/uploadCover")
                                                  .addPathPatterns("/bgm/**");

        super.addInterceptors(registry);
    }

}
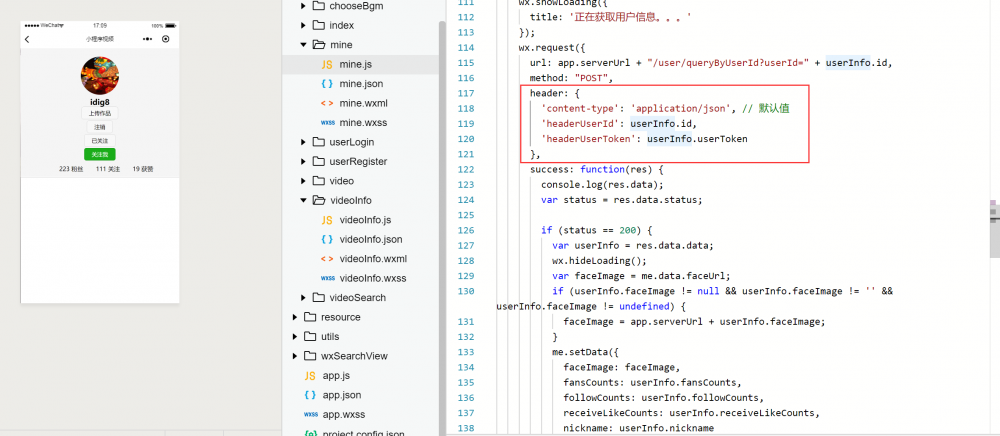
小程序针对返回的502问题添加判断
在通过userId获取用户的信息时,在header中添加用户的userId,userToken,针对登录后返回502进行提示并清空用户信息缓存。
“` javascript
// pages/mine/mine.js
const app = getApp()
var videoUtils = require(‘../../utils/videoUtils.js’)
Page({
/**
* 页面的初始数据
*/
data: {
faceImage: “../../resource/images/noneface.png”,
nickname: “昵称”,
fansCounts: 0,
followCounts: 0,
receiveLikeCounts: 0,
},
/**
* 用户注销
*/
logout: function(e) {
var user = app.getGlobalUserInfo();
wx.showLoading({
title: ‘正在注销中。。。’
});
wx.request({
url: app.serverUrl + “/logout?userId=” + user.id,
method: “POST”,
header: {
‘content-type’: ‘application/json’ // 默认值
},
success: function(res) {
console.log(res.data);
var status = res.data.status;
wx.hideLoading();
if (status == 200) {
wx.showToast({
title: “用户注销成功~!”,
icon: ‘none’,
duration: 3000
})
// app.userInfo = null;
wx.removeStorageSync(“userInfo”);
wx.redirectTo({
url: ‘../userRegister/userRegister’,
})
} else if (status == 500) {
      wx.showToast({
        title: res.data.msg,
        icon: 'none',
        duration: 3000
      })
    }
  }
})
},
/**
* 头像上传
*/
uploadFace: function(e) {
// var user = app.userInfo;
var user = app.getGlobalUserInfo();
var me = this;
wx.chooseImage({
count: 1, // 默认9
sizeType: [‘compressed’], // 可以指定是原图还是压缩图,默认二者都有
sourceType: [‘album’, ‘camera’], // 可以指定来源是相册还是相机,默认二者都有
success: function(res) {
// 返回选定照片的本地文件路径列表,tempFilePath可以作为img标签的src属性显示图片
var tempFilePaths = res.tempFilePaths
if (tempFilePaths.length > 0) {
console.log(tempFilePaths[0]);
wx.uploadFile({
url: app.serverUrl + “/user/uploadFace?userId=” + user.id, //仅为示例,非真实的接口地址
filePath: tempFilePaths[0],
name: ‘file’,
success: function(res) {
var data = JSON.parse(res.data);
console.log(data);
wx.hideLoading();
if (data.status == 200) {
wx.showToast({
title: “用户上传成功~!”,
icon: ‘none’,
duration: 3000
})
me.setData({
faceUrl: app.serverUrl + data.data
})
} else if (data.status == 500) {
            wx.showToast({
              title: data.msg,
              icon: 'none',
              duration: 3000
            })
          }
        }
      })
    }

  }
})
},
/**
* 生命周期函数–监听页面加载
*/
onLoad: function(options) {
var me = this;
var userInfo = app.getGlobalUserInfo();
wx.showLoading({
title: ‘正在获取用户信息。。。’
});
wx.request({
url: app.serverUrl + “/user/queryByUserId?userId=” + userInfo.id,
method: “POST”,
header: {
‘content-type’: ‘application/json’, // 默认值
‘headerUserId’: userInfo.id,
‘headerUserToken’: userInfo.userToken
},
success: function(res) {
console.log(res.data);
var status = res.data.status;
if (status == 200) {
      var userInfo = res.data.data;
      wx.hideLoading();
      var faceImage = me.data.faceUrl;
      if (userInfo.faceImage != null && userInfo.faceImage != '' && userInfo.faceImage != undefined) {
        faceImage = app.serverUrl + userInfo.faceImage;
      }
      me.setData({
        faceImage: faceImage,
        fansCounts: userInfo.fansCounts,
        followCounts: userInfo.followCounts,
        receiveLikeCounts: userInfo.receiveLikeCounts,
        nickname: userInfo.nickname
      })
    } else if (status == 502){
      wx.showToast({
        title: res.data.msg,
        duration:3000,
        icon:'none',
        complete:function(){
          wx.removeStorageSync("userInfo");

          wx.navigateTo({
            url: '../userLogin/userLogin',
          })
        }
      })

    }
  }
})
},
uploadVideo: function(e) {
videoUtils.uploadVideo();
},
/**
* 生命周期函数–监听页面初次渲染完成
*/
onReady: function() {
},
/**
* 生命周期函数–监听页面显示
*/
onShow: function() {
},
/**
* 生命周期函数–监听页面隐藏
*/
onHide: function() {
},
/**
* 生命周期函数–监听页面卸载
*/
onUnload: function() {
},
/**
* 页面相关事件处理函数–监听用户下拉动作
*/
onPullDownRefresh: function() {
},
/**
* 页面上拉触底事件的处理函数
*/
onReachBottom: function() {
},
/**
* 用户点击右上角分享
*/
onShareAppMessage: function() {
}
})
““
PS:通过拦截器的方式很好的保护后台的程序正常的运行。
百度未收录
>>原创文章,欢迎转载。转载请注明:转载自IT人故事会,谢谢!
>>原文链接地址:
正文到此结束
- 本文标签: classpath 产品 IT人 final message session web GitHub value IOS token apache js IDE XML 文章 springboot java https redis json ACE id spring git 数据 parse 生命 IO 目录 ip UI App http 图片 stream logo servlet 配置 CTO src bean 缓存 源码 cat 时间 百度 JavaScript equals
- 版权声明: 本文为互联网转载文章,出处已在文章中说明(部分除外)。如果侵权,请联系本站长删除,谢谢。
- 本文海报: 生成海报一 生成海报二
热门推荐


相关文章

近期评论
-
你这基本没有更新呀,最近文章显示还是2019年的文章。不符合要求哈
-
关键词:慕云博客 链接:https://www.lilun.me 描述:分享原创文字的个人博客
-
-
-
可以提供一下源码吗
-
不是商业站,鸡娃学习笔记
-
-
-
-
听他们说很厉害的样子
Loading...
![[HBLOG]公众号](http://www.liuhaihua.cn/img/qrcode_gzh.jpg)

