ActiveMQ结合Spring收发消息
ActiveMQ 结合 Spring 收发消息
直接使用 ActiveMQ 的方式需要重复写很多代码,且不利于管理,Spring 提供了一种更加简便的方式————Spring JMS ,通过它可以更加方便地使用 ActiveMQ。
Maven 依赖
结合Spring使用ActiveMQ的依赖如下:
<!-- Spring JMS -->
<dependency>
    <groupId>org.springframework</groupId>
    <artifactId>spring-jms</artifactId>
    <version>${spring.version}</version>
</dependency>
<!-- xbean 如<amq:connectionFactory /> -->
<dependency>
    <groupId>org.apache.xbean</groupId>
    <artifactId>xbean-spring</artifactId>
    <version>3.16</version>
</dependency>
<!-- ActiiveMQ -->
<dependency>
    <groupId>org.apache.activemq</groupId>
    <artifactId>activemq-core</artifactId>
    <version>5.7.0</version>
</dependency>
<dependency>
    <groupId>org.apache.activemq</groupId>
    <artifactId>activemq-pool</artifactId>
    <version>5.7.0</version>
</dependency>
ActiveMQ.xml 文件
<?xml version="1.0" encoding="UTF-8"?>
<beans xmlns="http://www.springframework.org/schema/beans"
       xmlns:xsi="http://www.w3.org/2001/XMLSchema-instance"
       xmlns:amq="http://activemq.apache.org/schema/core"
       xsi:schemaLocation="http://www.springframework.org/schema/beans

http://www.springframework.org/schema/beans/spring-beans-4.0.xsd


http://activemq.apache.org/schema/core


http://activemq.apache.org/schema/core/activemq-core-5.12.1.xsd">

    <!-- ActiveMQ 连接工厂 -->
    <amq:connectionFactory id="amqConnectionFactory"
                           brokerURL="tcp://localhost:61616"
                           userName="admin"
                           password="admin" />
    <!-- 提高效率,配置JMS连接工厂 -->
    <bean id="connectionFactory" class="org.springframework.jms.connection.CachingConnectionFactory">
        <constructor-arg ref="amqConnectionFactory" />
        <property name="sessionCacheSize" value="100" />
    </bean>
    <!-- 定义消息队列(Queue)-->
   <!-- <bean id="QueueDestination" class="org.apache.activemq.command.ActiveMQQueue">
        <!– 设置消息队列的名字 –>
        <constructor-arg value="Queue-zy"/>
    </bean>-->
    <!--定义主题(Topic)-->
    <bean id="topicDestination" class="org.apache.activemq.command.ActiveMQTopic">
        <constructor-arg value="Topic-zy"/>
    </bean>
    <!-- 配置JMS模板(Queue),Spring提供的JMS工具类,利用它发送、接收消息。 -->
    <bean id="jmsTemplate" class="org.springframework.jms.core.JmsTemplate">
        <property name="connectionFactory" ref="connectionFactory" />
        <property name="defaultDestination" ref="topicDestination" />
        <property name="receiveTimeout" value="10000" />
        <!-- true是topic,false是queue,默认是false -->
        <property name="pubSubDomain" value="true" />
    </bean>
    <!-- 配置消息队列监听者(Queue or Topic) -->
    <bean id="messageListener" class="com.service.TopicMessageListener" />
    <!-- 显示注入消息监听容器,配置连接工厂,监听的目标是QueueDestination,监听器是上面定义的监听器 -->
    <bean id="ListenerContainer"
          class="org.springframework.jms.listener.DefaultMessageListenerContainer">
        <property name="connectionFactory" ref="connectionFactory" />
        <property name="destination" ref="topicDestination" />
        <property name="messageListener" ref="messageListener" />
    </bean>
</beans>
配置 connectionFactory
connectionFactory 是 Spring 用于创建到 JMS 服务器链接的,Spring 提供了多种 connectionFactory。
<!-- ActiveMQ 连接工厂 -->
<amq:connectionFactory id="amqConnectionFactory"
                       brokerURL="tcp://localhost:61616"
                       userName="admin"
                       password="admin" />
<!-- 提高效率,配置JMS连接工厂 -->
<bean id="connectionFactory" class="org.springframework.jms.connection.CachingConnectionFactory">
    <constructor-arg ref="amqConnectionFactory" />
    <property name="sessionCacheSize" value="100" />
</bean>
配置Queue
<bean id="QueueDestination" class="org.apache.activemq.command.ActiveMQQueue">
       <!-- 设置消息队列的名字 -->
       <constructor-arg value="Queue-zy"/>
</bean>
配置Topic
<bean id="topicDestination" class="org.apache.activemq.command.ActiveMQTopic">
        <constructor-arg value="Topic-zy"/>
</bean>
配置JMS消息模板——jmsTemplate
<!-- 配置JMS模板,Spring提供的JMS工具类,利用它发送、接收消息-->
<bean id="jmsTemplate" class="org.springframework.jms.core.JmsTemplate">
    <property name="connectionFactory" ref="connectionFactory" />
    <property name="defaultDestination" ref="QueueDestination" />
    <!--<property name="defaultDestination" ref="topicDestination" />-->
    <property name="receiveTimeout" value="10000" />
    <property name="pubSubDomain" value="false" /><!-- true是topic,false是queue,默认是false -->
</bean>
最后,在 applicationContext.xml 中引入配置好的 ActiveMQ.xml
<import resource="ActiveMQ.xml" />
以上就是配置文件相关的,下面是具体的业务代码。
消息生产者服务
@Service
public class ProducerService {
    @Autowired
    private JmsTemplate jmsTemplate;
    //使用默认目的地
    public void sendMessageDefault(final String msg){
        Destination destination = jmsTemplate.getDefaultDestination();
        System.out.println("向队列: " + destination + " 成功发送一条消息");
        jmsTemplate.send(new MessageCreator() {
            public Message createMessage(Session session) throws JMSException {
                return session.createTextMessage(msg);
            }
        });
    }
    //可指定目的地
    public void sendMessage(Destination destination,final String msg){
        jmsTemplate.send(destination, new MessageCreator() {
            public Message createMessage(Session session) throws JMSException {
                return session.createTextMessage(msg);
            }
        });
    }
}
消息消费者服务
@Service
public class ConsumerService {
    @Autowired
    private JmsTemplate jmsTemplate;
    //从指定的Destination接收消息
    public TextMessage recive(Destination destination){
        TextMessage message = (TextMessage) jmsTemplate.receive(destination);
        try {
            System.out.println("从队列" + destination.toString() + "收到了消息" + message.getText());
        } catch (JMSException e) {
            e.printStackTrace();
        }
        return message;
    }
    //从默认的Destination接收消息
    public void reciveDefault(){

        Destination destination = jmsTemplate.getDefaultDestination();
        jmsTemplate.setReceiveTimeout(5000);
        while(true){
            TextMessage message = (TextMessage) jmsTemplate.receive(destination);
            try {
                //这里还是同一个消费者
                System.out.println("消费者  从目的地 " + destination.toString() + " 收到了消息" + message.getText());
            } catch (JMSException e) {
                e.printStackTrace();
            }
        }
    }
}
生产者
直接在 main 方法中获取 ApplicationContext 运行,便于测试。
@Component
public class MsgProducer {
    @Autowired
    private ProducerService producerService;
    public void send(){
        System.out.println("生产者开始发送消息:");
        for(int i = 1; i < 11; i++){
            String msg = "生产者发出的消息";
            producerService.sendMessageDefault(msg + "-----" + i);
        }
    }
    public static void main(String[] args) {
        ApplicationContext context = new ClassPathXmlApplicationContext("classpath:/applicationContext.xml");
        MsgProducer msgProducer = context.getBean(MsgProducer.class);
        msgProducer.send();
    }
}
消费者
@Component
public class MsgConsumer {
    @Autowired
    private ConsumerService consumerService;
    public void recive(){
        System.out.println("消费者 1 开始接收消息:");
        consumerService.reciveDefault();
    }
    public static void main(String[] args) {
        ApplicationContext context = new ClassPathXmlApplicationContext("classpath:/applicationContext.xml");
        MsgConsumer msgConsumer = context.getBean(MsgConsumer.class);
        msgConsumer.recive();
    }
}
接下来就可以启动项目。同样是使用两种方式测试。
第一种方式————点对点(Queue)
同步的方式
先启动生产者发送10条消息, 再启动消费者,可以看到控制台显示成功收到10条消息。

异步监听的方式
通过监听器即可实现异步接收消息的效果,而不是像上面使用 while() 轮询同步的方式。
项目中一般都是使用异步监听的方式,在 A 服务中发送了一条消息,B 服务可以利用消息监听器监听,当收到消息后,进行相应的操作。
消息监听器(3种)
通过继承 JMS 中的 MessageListener 接口,实现 onMessage() 方法,就可以自定义监听器。这是最基本的监听器。(可根据业务实现自定义的功能)
另外spring也给我们提供了其他类型的消息监听器,比如 SessionAwareMessageListener,它的作用不仅可以接收消息,还可以发送一条消息通知对方表示自己收到了消息。(还有一种是 MessageListenerAdapter)
一个简单的自定义监听器如下:收到消息后打印消息
public class QueueMessageListener implements MessageListener {
    public void onMessage(Message message) {
        //如果有消息
        TextMessage tmessage = (TextMessage) message;
        try {
            if(tmessage != null){
                System.out.println("监听器监听消息:"+tmessage.getText());
            }
        } catch (JMSException e) {
            e.printStackTrace();
        }
    }
}
在 ActiveMQ.xml 中引入消息监听器:
<!-- 配置消息队列监听者(Queue) -->
    <bean id="queueMessageListener" class="com.service.QueueMessageListener" />

 <!-- 显示注入消息监听容器,配置连接工厂,监听的目标是QueueDestination 或 topicDestination,监听器是上面自定义的监听器 -->
    <bean id="queueListenerContainer"
          class="org.springframework.jms.listener.DefaultMessageListenerContainer">
        <property name="connectionFactory" ref="connectionFactory" />
        <property name="destination" ref="QueueDestination" />
        <!--<property name="destination" ref="topicDestination" />-->
        <property name="messageListener" ref="queueMessageListener" />
    </bean>
可以看到,当使用消息监听器之后,每发送一条消息立马就会被监听到:

第二种方式————发布/订阅(Topic)
同步的方式
类似点对点中同步的方式,只是每个消费者都能收到生产者发出的全部消息,不再赘述。
异步监听的方式
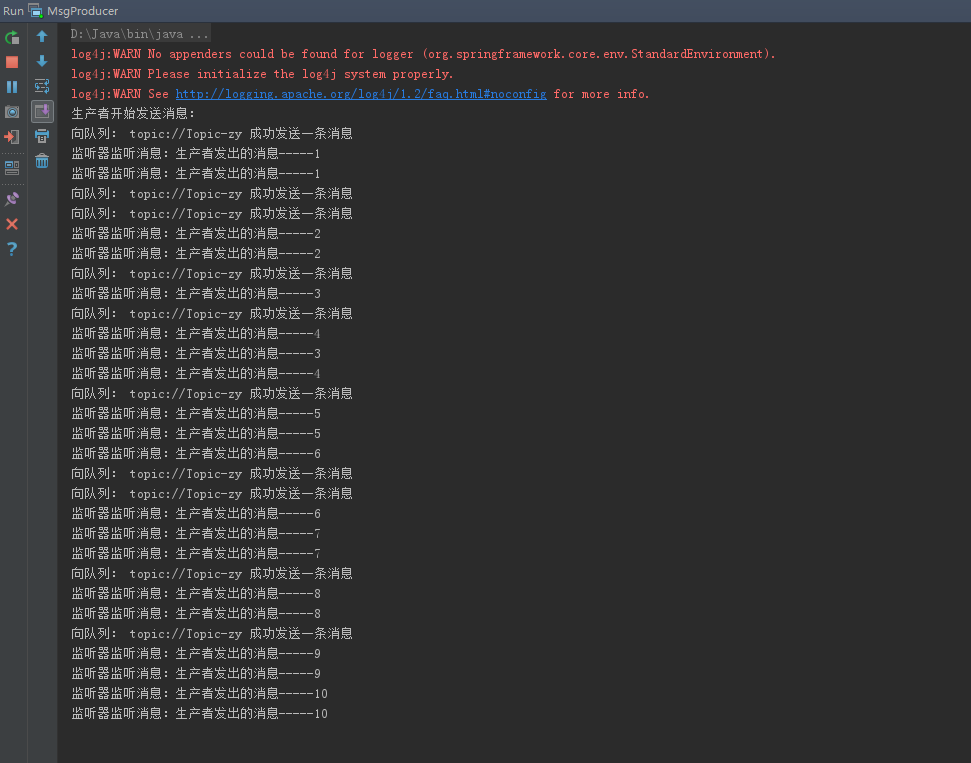
启动两个监听器(两个消费者),对消息进行异步监听。看是否各自能收到生产者发送的消息。
<!-- 配置两个监听器 -->
<bean id="messageListener" class="com.service.TopicMessageListener" />
<bean id="messageListener2" class="com.service.TopicMessageListener2" />

可以看到,每个监听器各自都收到了生产者发送的10条消息。
正文到此结束
- 本文标签: maven 代码 value core producer MQ classpath 管理 XML src message IO 测试 UI 消息队列 schema ActiveMQ cache 服务器 配置 DOM Connection JMS bean apache cat HTML 同步 监听器 Service spring https App consumer ACE Property struct CTO final Word connectionFactory session TCP list http queue id
- 版权声明: 本文为互联网转载文章,出处已在文章中说明(部分除外)。如果侵权,请联系本站长删除,谢谢。
- 本文海报: 生成海报一 生成海报二
热门推荐


相关文章

近期评论
-
你这基本没有更新呀,最近文章显示还是2019年的文章。不符合要求哈
-
关键词:慕云博客 链接:https://www.lilun.me 描述:分享原创文字的个人博客
-
-
-
可以提供一下源码吗
-
不是商业站,鸡娃学习笔记
-
-
-
-
听他们说很厉害的样子
Loading...
![[HBLOG]公众号](http://www.liuhaihua.cn/img/qrcode_gzh.jpg)

