ActiveMQ学习-Api介绍 (4)
Session
第一节提到了消息提供者在创建session的时候第一个参数是事务的意思,如果将其改成 true ,那么当发送完消息后就要 commit() 一下,消息才能发出
public class Producer {

  public static void main(String[] args) throws JMSException {
    // 省略了的代码...

    // 如果session不支持事件,就是FALSE,支持事务就是true
    Session session = connection.createSession(Boolean.TRUE, Session.AUTO_ACKNOWLEDGE);

    // 省略了的代码...

    // 上面开启了事务,这里就要提交一下
    session.commit();

    // 当然如果上面发送消息出问题了,也可以通过 rollback() 回滚掉
    // session.rollback();
  }
}
消息消费者在消费消息的时候 session 的事务就没有意义了,true, false 都一样的消费,不过为了保持一致,还是建议都写成一样的,既:提供者开启事务,消费者也开启事务
创建session的时候,第二个参数是签收模式,有以下几种
TextMessage.acknowledge()
MessageProducer
MessageProducer的send方法最多有5个参数
void send(
  Destination destination,
  Message message,
  int deliveryMode,
  int priority,
  long timeToLive)
  throws JMSException;
- destination 目的地,消息要发送到哪去,通过session创建
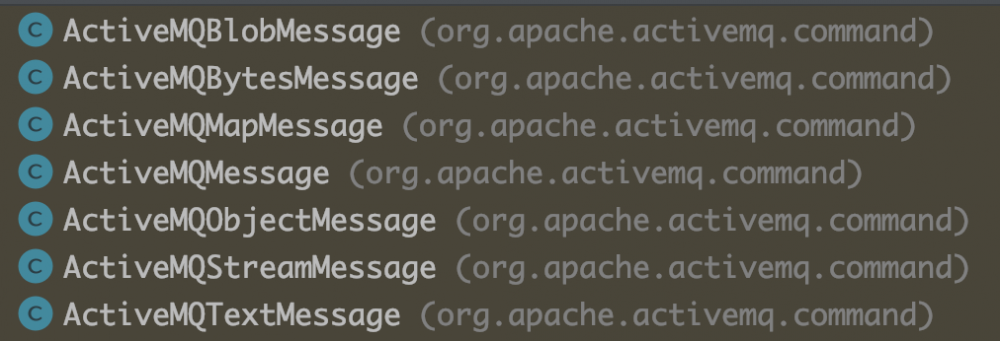
Destination destination = session.createQueue("amq-demo"); - message 消息内容,它是一个接口,实现有以下几种消息类型
- deliveryMode 消息的传输模式
- DeliveryMode.NON_PERSISTENT 消息不做持久化
- DeliveryMode.PERSISTENT 消息持久化
- priority 消息优先级,有0-9十个级别,0-4为普通消息,5-9是加急消息,默认为4
- 优先级开启要在
activemq.xml里进行配置才能生效,找到policyEntries标签,在里面加上<policyEntry queue="amq-demo" prioritizedMessages="true" useCache="false" expireMessagesPeriod="0" queuePrefetch="1"/>即可
- 优先级开启要在
- timeToLive 消息存活时间,默认一直存活
MessageConsumer
MessageConsumer是session创建的,一般给一个Destination即可,不过它还有两个参数
// 创建队列消费者
MessageConsumer createConsumer(
  Destination destination,
  java.lang.String messageSelector,
  boolean NoLocal)
  throws JMSException;

// 创建主题消费者
TopicSubscriber createDurableSubscriber(
  Topic topic,
  String name,
  String messageSelector,
  boolean noLocal)
  throws JMSException;
MapMessages
这里说一下MessageSelector
举见个例子
// 选择名字为 z3 的消息
String selector1 = "name = 'z3'";
// 选择年龄大于20的消息
String selector2 = "age > 20";
// 选择名字为 z3 和 年龄大于20的消息
String selector3 = "name = 'z3' AND age > 20";

MessageConsumer consumer = session.createConsumer(destination, selector1);
消息的接收方式,通过 receive() 方法来接收,该方法是阻塞的,一般会用一个监听来实现
HelloWorld里接收方式是通过 while(true){} 来实现的,这种代码不推荐
while(true) {
  TextMessage msg = (TextMessage) consumer.receive();
  System.out.println("消费数据:" + msg.getText());
}
下面是通过监听的方式来接收消息
public class Consumer {

  public static void main(String[] args) throws JMSException {
    ConnectionFactory connectionFactory = new ActiveMQConnectionFactory(
        ActiveMQConnectionFactory.DEFAULT_USER,
        ActiveMQConnectionFactory.DEFAULT_PASSWORD,
        "tcp://localhost:61616"
    );

    Connection connection = connectionFactory.createConnection();
    connection.start();

    Session session = connection.createSession(Boolean.FALSE, Session.AUTO_ACKNOWLEDGE);

    Destination destination = session.createQueue("amq-demo");
    MessageConsumer consumer = session.createConsumer(destination);

    consumer.setMessageListener(new MsgListener());

//    while(true) {
//      TextMessage msg = (TextMessage) consumer.receive();
//      System.out.println("消费数据:" + msg.getText());
//    }
  }

  static class MsgListener implements MessageListener {

    public void onMessage(Message message) {
      try {
        System.out.println("消费数据:" + ((TextMessage) message).getText());
      } catch (JMSException e) {
        e.printStackTrace();
      }
    }
  }
}
看起来是不是优雅多了 : )
创建临时消息
消息提供者还可以创建临时消息,通过 session.createTemporaryQueue() 方法创建,这种方式创建的消息,当connection关闭之后,消息也就没有了
发布订阅
除了队列,ActiveMQ还可以创建主题,消费者可以通过订阅主题来消费消息,用法跟队列基本一致,下面上代码
提供者
public class Producer {

  public static void main(String[] args) throws JMSException {
    ConnectionFactory connectionFactory = new ActiveMQConnectionFactory(
        ActiveMQConnectionFactory.DEFAULT_USER,
        ActiveMQConnectionFactory.DEFAULT_PASSWORD,
        "tcp://localhost:61616"
    );

    Connection connection = connectionFactory.createConnection();
    connection.start();

    // 如果session不支持事件,就是FALSE,支持事务就是true
    Session session = connection.createSession(Boolean.FALSE, Session.AUTO_ACKNOWLEDGE);
    Destination destination = session.createTopic("amq-topic-demo");

    MessageProducer producer = session.createProducer(null);

    for (int i = 0; i < 100; i++) {
      TextMessage msg = session.createTextMessage("生产消息" + i);
      producer.send(destination, msg);
    }

//    session.commit();
//    session.rollback();

    connection.close();
  }
}
消费者1 与 消费者2 是一样的,把日志内容改一下就可以了
public class Consumer1 {

  public static void main(String[] args) throws JMSException {

    ConnectionFactory connectionFactory = new ActiveMQConnectionFactory(
        ActiveMQConnectionFactory.DEFAULT_USER,
        ActiveMQConnectionFactory.DEFAULT_PASSWORD,
        "tcp://localhost:61616"
    );

    Connection connection = connectionFactory.createConnection();
    connection.start();

    Session session = connection.createSession(Boolean.FALSE, Session.AUTO_ACKNOWLEDGE);

    Destination destination = session.createTopic("amq-topic-demo");
    MessageConsumer consumer = session.createConsumer(destination);

    consumer.setMessageListener(new MsgListener());

  }

  static class MsgListener implements MessageListener {

    public void onMessage(Message message) {
      try {
        System.out.println("消费者1 消费数据:" + ((TextMessage) message).getText());
      } catch (JMSException e) {
        e.printStackTrace();
      }
    }
  }
}
这个启动就要先启动所有的消费者,然后再启动提供者,这样提供者发布的主题消息,消费者才能进行消费,运行一下,可以看到消费者1跟消费者2都消费了提供者提供的消息
原文链接:
正文到此结束
热门推荐


相关文章

近期评论
-
你这基本没有更新呀,最近文章显示还是2019年的文章。不符合要求哈
-
关键词:慕云博客 链接:https://www.lilun.me 描述:分享原创文字的个人博客
-
-
-
可以提供一下源码吗
-
不是商业站,鸡娃学习笔记
-
-
-
-
听他们说很厉害的样子
Loading...
![[HBLOG]公众号](http://www.liuhaihua.cn/img/qrcode_gzh.jpg)

