Spring MVC 4.2.4 文档实践(一)--- 菜鸟从零开始学系列
本文后续将开启一个系列,顺着作者学习 Spring MVC 文档的脚步,从零开始搭建一个基于 Spring MVC 的 web 应用,并且根据 Spring MVC 的文档内容,选择现有的,用的比较多的,实现性比较好的特性,基于其代码实现,来讲解其源码和背后的原理,这既是对自己在 Spring 全家桶的学习的检验,也可以让我讲一讲自己对于 Spring MVC 的一些特性的理解。本人也是菜鸟程序员一枚,开始写这个系列的时候入行也不到半年。因此,尽量可以站在初学者的角度,来解决我们大家在学习的路上一些老师想当然,而我们却一直没有办法自己解决的问题。希望可以在不影响工作的情况下,尽量做到每周一更甚至每周两更,希望这个系列可以帮助到各位。相关代码可以移步 我的 github 仓库 ,如果有什么问题,也烦请大佬们在这个系列中,多多指正。
2 前期准备
初始化 maven 工程
使用 Intellij 新建工程选项,在 maven 选项卡里面选择 maven-archetype-webapp,输入对应的工程名,点击创建,可以得到一个已经初始化了 webapp 文件。
工程目录初始化设置
在 main 文件夹下,分别创建 java 和 resources 文件夹,点击 File - Project Structure,将 main 和 resources 设置为 Source Folders (蓝色),和 Resource Folder (紫色)。
之后,在 java 的文件夹中设置好 package 的路径,本例的 package 名字为 com.test.myapp 。
maven 依赖
为了让工程支持 Spring 的特性,需要在 pom.xml 中引入 springframework 的依赖
<dependency>
	<groupId>org.springframework</groupId>
	<artifactId>spring-webmvc</artifactId>
	<version>5.1.0.RELEASE</version>
</dependency>
复制代码
下面,就开始用代码实例解释 Spring MVC 的文档。
3 Spring MVC 用 DispatcherServlet 处理请求
这一部分主要告诉我们:DispatcherServlet 是 Spring MVC 的中央处理器,它负责把请求分发到控制器中,这被称为“前端控制器”的设计模式,模式框架如下图所示:
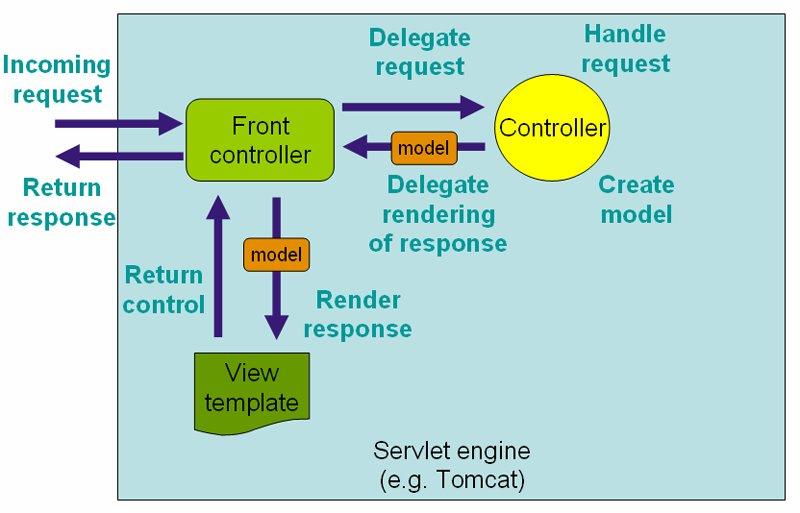
因此,DispatcherServlet 前端的 Incoming Request 发到(Delegate)对应的 Controller 下面,在 Controller 处理了 Request,并且创建 model 之后,将响应和 model 封装到对应的 view template 中,之后 view template 将控制权交还到 DispatcherServlet,并由其返回响应。
3.1 DispatcherServlet 创建
而实际操作中,DispatcherServlet 由于继承了 HttpServlet 类,也需要在 web.xml 文件下进行声明。因此,可以照着文档中的例子进行 DispatchServlet 的配置:
<!DOCTYPE web-app PUBLIC
 "-//Sun Microsystems, Inc.//DTD Web Application 2.3//EN"
 "http://java.sun.com/dtd/web-app_2_3.dtd" >

<web-app>
    <display-name>Dispatched Servlet Demo</display-name>

    <servlet>
        <servlet-name>example</servlet-name>
        <servlet-class>org.springframework.web.servlet.DispatcherServlet</servlet-class>
        <load-on-startup>1</load-on-startup>
        <!--load on startup 大于 0 代表这个容器在应用启动时就加载,而等于 0 则表示在这个容器被选择时加载-->
        <!--load-on-startup 的值越小,代表加载的优先级越大-->
    </servlet>

    <servlet-mapping>
        <servlet-name>example</servlet-name>
        <url-pattern>/example/*</url-pattern>
    </servlet-mapping>

</web-app>
复制代码
如上述代码所示,我们配置了一个名为 example 的 dispatcherServlet,而当 url 的后缀为 example 时,默认将使用该 DispatcherServlet 进行请求(request)的转发和视图(view )的返回。
值得一提的是,我们在 web.xml 中定义了名为 example 的 DispatcherServlet,Spring 将为在 WEB-INF 中寻找名为 example-servlet.xml 的文件以获取对应的 bean 配置信息。因此,我们还需要创建 example-servlet.xml 的文件以设置对应的 bean 信息。
3.2 example-servlet 的配置
example-servlet 中需要我们指定 bean 的位置,即 Spring MVC 系统需要去哪个地方寻找 bean 的配置并自动装配。另一方面,需要配置 viewResolver 以便返回视图。因此,我们在 example-servlet.xml 中首先需要包含这些信息,下述代码配置了 example-servlet 中的 bean 的扫描路径,以及视图解析器 viewResolver。
<beans xmlns="http://www.springframework.org/schema/beans"
       xmlns:context="http://www.springframework.org/schema/context"
       xmlns:xsi="http://www.w3.org/2001/XMLSchema-instance" xmlns:p="http://www.springframework.org/schema/p"
       xsi:schemaLocation="http://www.springframework.org/schema/beans
            http://www.springframework.org/schema/beans/spring-beans-3.2.xsd
            http://www.springframework.org/schema/context
            http://www.springframework.org/schema/context/spring-context-3.2.xsd">

    <context:component-scan base-package="com.test.myapp.example">
        <context:include-filter type="annotation" expression="org.springframework.stereotype.Controller"/>
    </context:component-scan>

    <bean class="org.springframework.web.servlet.view.InternalResourceViewResolver"
          p:prefix="/WEB-INF/views/" p:suffix=".jsp" p:order="1">
    </bean>

</beans>
复制代码
首先解释一下头文件
- beans:文件的根节点
- Xmlns:xmlns 是 xml name space 的缩写,用于区分这个 xml 文件下的定义和其他 xml 文件下的定义。
- Xmlns:<组件>:表示一个组件配置的 namespace,比如上文用到了 context 的组件来扫描 component 注解,则需要配置 xmlns:context
- xmlns:xsi:是指xml文件遵守xml规范,xsi 全名 xml schema instance ,表示具体用到的 schema 资源文件里定义的元素所准守的规范。
- xsi:schemaLocation:表示 xml 的某个组件需要遵循的规范,比如 xmls:context 需要遵循的规范就是
- www.springframework.org/schema/cont…
- www.springframework.org/schema/cont…
头文件的配置更多的是理解一个类似于 package 的概念,在定义了 namespace(xmlns) 之后,你需要哪些元素或者组件,则定义他的规则以及 instance 的规则,以便后续的 xml 配置使用这些配置。
context部分表示了这个工程要去哪里去寻找这个应用的 component,并实现实例的自动装配,这里制定了一个针对 component 的过滤器(filter),使它只会在遇到 controller 的类时候进行自动装配。
3.3 配置 Controller 和 jsp
在配置好 servlet 的转发后,我们需要配置其扫描路径下的 Controller 和对应的 jsp 视图。在整理完成对应用途的文件和文件夹之后,工程结构如下图所示:

首先在 com.test.my.example.controller 下创建对应的 controller 类:
package com.test.myapp.example.controller;

import org.springframework.stereotype.Controller;
import org.springframework.web.bind.annotation.RequestMapping;
import org.springframework.web.bind.annotation.RequestMethod;

@Controller
@RequestMapping
public class ExampleController {
    @RequestMapping(value="/hello", method = RequestMethod.GET)
    public String helloWorld() {
        return "hello";
    }
}
复制代码
值得注意的是,由于在 example-servlet.xml 中已经配置了 url 的格式,它表示这个 servlet 只在 /example/* 的 url 格式下面才会生效。因此当我们在 helloWorld 这个方法上指定 RequestMapping 为 "hello" 时,则令其实际生效的 url 应当为 /example/hello 。由于 helloWorld() 方法返回了 "hello",则 viewResolver 在 views 下面去寻找名为 hello.jsp 的文件。因此,我们还需要一个 hello.jsp 的视图文件
<%@ page contentType="text/html;charset=UTF-8" language="java" %>
<html>
<head>
    <title>hello world</title>
</head>
<body>
    <h1>example::::::hello world!</h1>
</body>
</html>
复制代码
之后就是运行 tomcat 时所用到的相关配置,并且 maven 打包这个工程,本机使用了 localhost:8080 端口,则输入了 http://localhost:8080/example/hello 之后,网页出现了

的样子,则说明这个 controller 成功返回了 view 视图。类比上述“前端控制器”的设计模式,我们可以看到:
当前端有请求进来时,比如 /example/hello,Spring MVC 将会识别这个 url 下生效的 servlet,然后该 servlet 会把它分发到 url 映射到的方法上,而该方法会返回一个视图的名称到 servlet;之后,servlet 会去找对应名字的 template,组装完成后,再返回到用户的前端。因此,我们才可以看到 hello.jsp 的前端样式展现在我们眼前。
4 配置根 context 对象代替 Servlet.xml
这篇文档的最后提到了这样一句话:
当你的应用中只需要一个 DispatcherServlet 时,只配置一个根 context 对象也是可行的。
因此,我们可以试一下只配置一个 ContextConfig 的条件下,能不能导航到这个 hello.jsp 文件。
4.1 配置 Root Context
首先,更新 web.xml 的配置,使其只使用一个 ContextConfig 来管理 servlet 下面的 beans,配置内容如下:
<?xml version="1.0" encoding="UTF-8"?>
<web-app xmlns="http://xmlns.jcp.org/xml/ns/javaee"
         xmlns:xsi="http://www.w3.org/2001/XMLSchema-instance"
         xsi:schemaLocation="http://xmlns.jcp.org/xml/ns/javaee http://xmlns.jcp.org/xml/ns/javaee/web-app_3_1.xsd"
         version="3.1">


    <display-name>Dispatched Servlet Demo</display-name>

    <!--使用根 context 來管理 servlet 的配置-->
    <context-param>
        <param-name>contextConfigLocation</param-name>
        <param-value>WEB-INF/root-context.xml</param-value>
    </context-param>

    <servlet>
        <servlet-name>dispatcher</servlet-name>
        <servlet-class>org.springframework.web.servlet.DispatcherServlet</servlet-class>
        <init-param>
            <param-name>contextConfigLocation</param-name>
            <param-value></param-value>
        </init-param>
        <load-on-startup>1</load-on-startup>
    </servlet>
    <servlet-mapping>
        <servlet-name>dispatcher</servlet-name>
        <url-pattern>*.do</url-pattern>
    </servlet-mapping>
    <listener>
        <listener-class>org.springframework.web.context.ContextLoaderListener</listener-class>
    </listener>

</web-app>
复制代码
这里注意一下 servlet-mapping 的 url 拦截问题,其实源文档的这种配置会有问题,如果不加 .do 的话,会把 jsp 解析的请求也拦截下来,造成 * noHandlerFound for .jsp 的问题,因此需要一个特殊的 url 后缀进行区分,防止 servlet 拦截不该拦截的请求。其次,我们需要配置 WEB-INF 路径下的 root-context.xml 文件,配置方法与上面的 example-servlet.xml 的相同。controller 亦然,需要主要的是,现在是当你输入 /hello.do 时,可以返回 hello.jsp 的视图。
之后也是运行 tomcat 时所用到的相关配置,并且 maven 打包这个工程,本机使用了 localhost:8080 端口,则输入了 http://localhost:8080/hello.do 之后,网页出现了

证明我们的 root context 的配置是有效的。
4.2 RootContext.xml 和 Servlet.xml 的差别
通过上面的配置,看起来 RootContext 和 servlet 的配置文件对 Spring MVC 工程的作用是一样的,其实不然,根据官方文档:
Spring lets you define multiple contexts in a parent-child hierarchy.
The applicationContext.xml defines the beans for the "root webapp context", i.e. the context associated with the webapp.
The spring-servlet.xml (or whatever else you call it) defines the beans for one servlet's app context. There can be many of these in a webapp, one per Spring servlet (e.g. spring1-servlet.xml for servlet spring1, spring2-servlet.xml for servlet spring2).
Beans in spring-servlet.xml can reference beans in applicationContext.xml, but not vice versa.
All Spring MVC controllers must go in the spring-servlet.xml context.
In most simple cases, the applicationContext.xml context is unnecessary. It is generally used to contain beans that are shared between all servlets in a webapp. If you only have one servlet, then there's not really much point, unless you have a specific use for it.
大概的意思是,ApplicationContext.xml 和 Servlet.xml 是父子之间的关系,其中一个 Spring mvc 工程里应当只有一个 ApplicationContext,然而可以有多个 Servlet 的配置;并且,Servlet.xml 可以去引用 ApplicationContext 中的 bean,但是反过来却不行。
5 总结
本章讨论了 Spring MVC 中 web.xml,以及下面的 servlet.xml 或者 contextConfig.xml 的配置方法及注意事项,并用实际代码的方式,理解 Spring MVC 的前端控制器设计思想。
正文到此结束
热门推荐


相关文章


Loading...
![[HBLOG]公众号](http://www.liuhaihua.cn/img/qrcode_gzh.jpg)

