Spring Security系列之入门应用(二)

文章来源
上一篇文章 Spring Security系列之体系结构概述(一),我们介绍了Spring Security的基础架构,这一节我们通过Spring官方给出的一个guides例子,来了解Spring Security是如何保护我们的应用的,之后会对进行一个解读。
引入依赖
<dependencies>
    <dependency>
        <groupId>org.springframework.boot</groupId>
        <artifactId>spring-boot-starter-web</artifactId>
    </dependency>
    <dependency>
        <groupId>org.springframework.boot</groupId>
        <artifactId>spring-boot-starter-security</artifactId>
    </dependency>
    <dependency>
        <groupId>org.springframework.boot</groupId>
        <artifactId>spring-boot-starter-thymeleaf</artifactId>
    </dependency>
</dependencies>
复制代码
由于我们集成了springboot,所以不需要显示的引入Spring Security文档中描述core,config依赖,只需要引入spring-boot-starter-security即可。
创建一个不受安全限制的web应用
这是一个首页,不受安全限制
src/main/resources/templates/home.html
<!DOCTYPE html>
<html xmlns="http://www.w3.org/1999/xhtml" xmlns:th="http://www.thymeleaf.org" xmlns:sec="http://www.thymeleaf.org/thymeleaf-extras-springsecurity3">
    <head>
        <title>Spring Security Example</title>
    </head>
    <body>
        <h1>Welcome!</h1>

        <p>Click <a th:href="@{/hello}">here</a> to see a greeting.</p>
    </body>
</html>
复制代码
这个简单的页面上包含了一个链接,跳转到”/hello”。对应如下的页面
src/main/resources/templates/hello.html
<!DOCTYPE html>
<html xmlns="http://www.w3.org/1999/xhtml" xmlns:th="http://www.thymeleaf.org"
      xmlns:sec="http://www.thymeleaf.org/thymeleaf-extras-springsecurity3">
    <head>
        <title>Hello World!</title>
    </head>
    <body>
        <h1>Hello world!</h1>
    </body>
</html>
复制代码
接下来配置Spring MVC,使得我们能够访问到页面。
@Configuration
public class MvcConfig extends WebMvcConfigurerAdapter {

    @Override
    public void addViewControllers(ViewControllerRegistry registry) {
        registry.addViewController("/home").setViewName("home");
        registry.addViewController("/").setViewName("home");
        registry.addViewController("/hello").setViewName("hello");
        registry.addViewController("/login").setViewName("login");
    }

}
复制代码
配置Spring Security
一个典型的安全配置如下所示:
@Configuration
@EnableWebSecurity #<1>
public class WebSecurityConfig extends WebSecurityConfigurerAdapter { <1>
    @Override
    protected void configure(HttpSecurity http) throws Exception {
        http #<2>
            .authorizeRequests()
                .antMatchers("/", "/home").permitAll()
                .anyRequest().authenticated()
                .and()
            .formLogin()
                .loginPage("/login")
                .permitAll()
                .and()
            .logout()
                .permitAll();
    }

    @Autowired
    public void configureGlobal(AuthenticationManagerBuilder auth) throws Exception {
        auth #<3>
            .inMemoryAuthentication()
                .withUser("admin").password("admin").roles("USER");
    }
}
复制代码
- <1> @EnableWebSecurity注解使得SpringMVC集成了Spring Security的web安全支持。另外,WebSecurityConfig配置类同时集成了WebSecurityConfigurerAdapter,重写了其中的特定方法,用于自定义Spring Security配置。整个Spring Security的工作量,其实都是集中在该配置类,不仅仅是这个入门应用,实际项目中也是如此。
- <2> configure(HttpSecurity)定义了哪些URL路径应该被拦截,如字面意思所描述:”/“, “/home”允许所有人访问,”/login”作为登录入口,也被允许访问,而剩下的”/hello”则需要登陆后才可以访问。
- <3> configureGlobal(AuthenticationManagerBuilder)在内存中配置一个用户,admin/admin分别是用户名和密码,这个用户拥有USER角色。
我们目前还没有登录页面,下面创建登录页面:
<!DOCTYPE html>
<html xmlns="http://www.w3.org/1999/xhtml" xmlns:th="http://www.thymeleaf.org"
      xmlns:sec="http://www.thymeleaf.org/thymeleaf-extras-springsecurity3">
    <head>
        <title>Spring Security Example </title>
    </head>
    <body>
        <div th:if="${param.error}">
            Invalid username and password.
        </div>
        <div th:if="${param.logout}">
            You have been logged out.
        </div>
        <form th:action="@{/login}" method="post">
            <div><label> User Name : <input type="text" name="username"/> </label></div>
            <div><label> Password: <input type="password" name="password"/> </label></div>
            <div><input type="submit" value="Sign In"/></div>
        </form>
    </body>
</html>
复制代码
这个Thymeleaf模板提供了一个用于提交用户名和密码的表单,其中name=”username”,name=”password”是默认的表单值,并发送到“/ login”。 在默认配置中,Spring Security提供了一个拦截该请求并验证用户的过滤器。 如果验证失败,该页面将重定向到“/ login?error”,并显示相应的错误消息。 当用户选择注销,请求会被发送到“/ login?logout”。
最后,我们为hello.html添加一些内容,用于展示用户信息。
<!DOCTYPE html>
<html xmlns="http://www.w3.org/1999/xhtml" xmlns:th="http://www.thymeleaf.org"
      xmlns:sec="http://www.thymeleaf.org/thymeleaf-extras-springsecurity3">
    <head>
        <title>Hello World!</title>
    </head>
    <body>
        <h1 th:inline="text">Hello [[${#httpServletRequest.remoteUser}]]!</h1>
        <form th:action="@{/logout}" method="post">
            <input type="submit" value="Sign Out"/>
        </form>
    </body>
</html>
复制代码
我们使用Spring Security之后,HttpServletRequest#getRemoteUser()可以用来获取用户名。 登出请求将被发送到“/ logout”。 成功注销后,会将用户重定向到“/ login?logout”。
添加启动类
@SpringBootApplication
public class Application {

    public static void main(String[] args) throws Throwable {
        SpringApplication.run(Application.class, args);
    }

}
复制代码
测试
访问首页http://localhost:8080/:
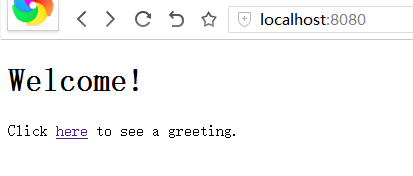
点击here,尝试访问受限的页面:/hello,由于未登录,结果被强制跳转到登录也/login:

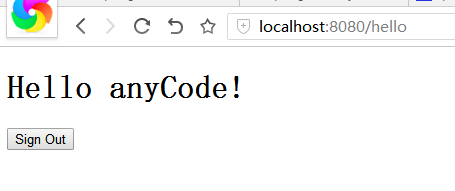
输入正确的用户名和密码之后,跳转到之前想要访问的/hello:
点击Sign out退出按钮,访问:/logout,回到登录页面:

总结
本篇文章没有什么干货,基本算是翻译了Spring Security Guides的内容,稍微了解Spring Security的朋友都不会对这个翻译感到陌生。考虑到受众的问题,一个入门的例子是必须得有的,方便后续对Spring Security的自定义配置进行讲解。下一节,以此为例,讲解这些最简化的配置背后,Spring Security都帮我们做了什么工作。
本节所有的代码,可以直接在Spring的官方仓库下载得到, git clone 。不过,建议初学者根据文章先一步步配置,出了问题,再与demo进行对比。

正文到此结束
- 本文标签: springboot rmi servlet IDE dependencies 文章 logo UI SpringMVC Word Spring Security remote 配置 value http id authenticate 安全 XML core IO 测试 cat HTML src ORM 翻译 tar 初学者 build Action web https App example Security 并发 spring git 代码 总结 下载
- 版权声明: 本文为互联网转载文章,出处已在文章中说明(部分除外)。如果侵权,请联系本站长删除,谢谢。
- 本文海报: 生成海报一 生成海报二
热门推荐


相关文章

近期评论
-
你这基本没有更新呀,最近文章显示还是2019年的文章。不符合要求哈
-
关键词:慕云博客 链接:https://www.lilun.me 描述:分享原创文字的个人博客
-
-
-
可以提供一下源码吗
-
不是商业站,鸡娃学习笔记
-
-
-
-
听他们说很厉害的样子
Loading...
![[HBLOG]公众号](http://www.liuhaihua.cn/img/qrcode_gzh.jpg)

