BIO到NIO源码的一些事儿之NIO 下 Buffer解读 下
此系列文章会详细解读NIO的功能逐步丰满的路程,为Reactor-Netty 库的讲解铺平道路。
关于Java编程方法论-Reactor与Webflux的视频分享,已经完成了Rxjava 与 Reactor,b站地址如下:
Rxjava源码解读与分享: www.bilibili.com/video/av345…
Reactor源码解读与分享: www.bilibili.com/video/av353…
本系列相关视频分享: www.bilibili.com/video/av432…
本系列源码解读基于JDK11 api细节可能与其他版本有所差别,请自行解决jdk版本问题。
本系列前几篇:
BIO到NIO源码的一些事儿之BIO
BIO到NIO源码的一些事儿之NIO 上
BIO到NIO源码的一些事儿之NIO 中
BIO到NIO源码的一些事儿之NIO 下 之 Selector BIO到NIO源码的一些事儿之NIO 下 Buffer解读 上
一些操作系统知识
在了解 NIO 中 DirectByteBuffer 操作 Buffer 之前,我们有必要了解操作系统的相关知识,这样也就能理解程序为什么要这么设计实现了。
用户态与内核态
这里,我们以Linux操作系统为例,首先来看一张图:
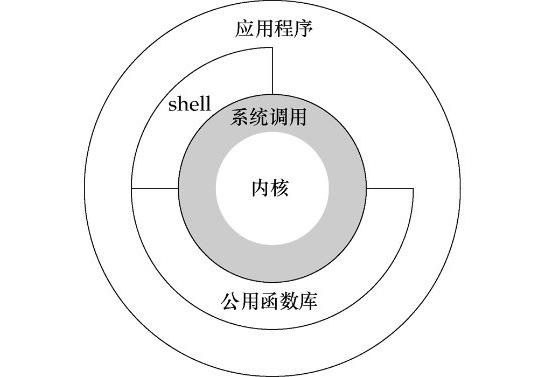
图1
如上图所示,从宏观上看, Linux 操作系统的架构体系分为内核态和用户态。操作系统本质上是运行在硬件资源上的软件。而硬件资源,拿 Intel x86 架构 CPU 来说,在 CPU 的所有指令中,有一些指令是非常危险的,如果用错,将导致整个系统崩溃。如:清理内存、设置时钟等。如果所有的程序都能使用这些指令,那么你的系统一天到晚也就在崩溃中度过了。所以, CPU 将指令分为 特权指令 和 非特权指令 ,对于那些危险的指令,只允许操作系统及其相关模块使用,普通的应用程序只能使用那些不会造成灾难的指令。由此, Intel 的 CPU 将特权级别分为 4 个级别: RING0 、 RING1 、 RING2 、 RING3 。
对应操作系统, RING0 实际就是内核态,拥有最高权限。而一般应用程序处于 RING3 状态--用户态。在权限约束上,使用的是高特权等级状态可以读低等级状态的数据,例如进程上下文、代码、数据等等,但是反之则不可。即 RING0 最高可以读取 RING0-3 所有的内容, RING1 可以读 RING1-3 的, RING2 以此类推, RING3 只能读自己的数据。也就是 Ring3 状态不能访问 Ring0 的地址空间,包括代码和数据。
我们知道,在 32 位机器上 Linux 操作系统中的进程的地址空间大小是 4G ,其中 0-3G 对应 用户空间 , 3G-4G 对应 内核空间 。假如我们物理机的内存只有2G大小呢?所以,这个 4G 的 地址空间 其实就是我们所说的 虚拟地址内存空间 (所以,当在32位操作系统下,如 windows ,我们会遇到在物理内存大于 8 个 G 的情况下,只识别 4 个 G 内存)。
那虚拟地址内存空间是什么呢,它与实际物理内存空间又是怎样对应的呢?
进程使用虚拟地址内存中的地址,由操作系统协助相关硬件,把它“转换”成真正的物理地址。虚拟地址通过页表( Page Table )映射到物理内存,页表由操作系统维护并被处理器引用。内核空间在页表中拥有最高特权级,因此用户态程序试图访问这些页时会导致一个页错误( page fault )。在 Linux 中,内核空间是持续存在的,并且在所有进程中都映射到同样的物理内存。内核代码和数据总是可寻址,随时准备处理中断和系统调用。与此相反,用户模式地址空间的映射随进程切换的发生而不断变化。
Linux进程在虚拟内存中的标准内存段布局如下图所示:
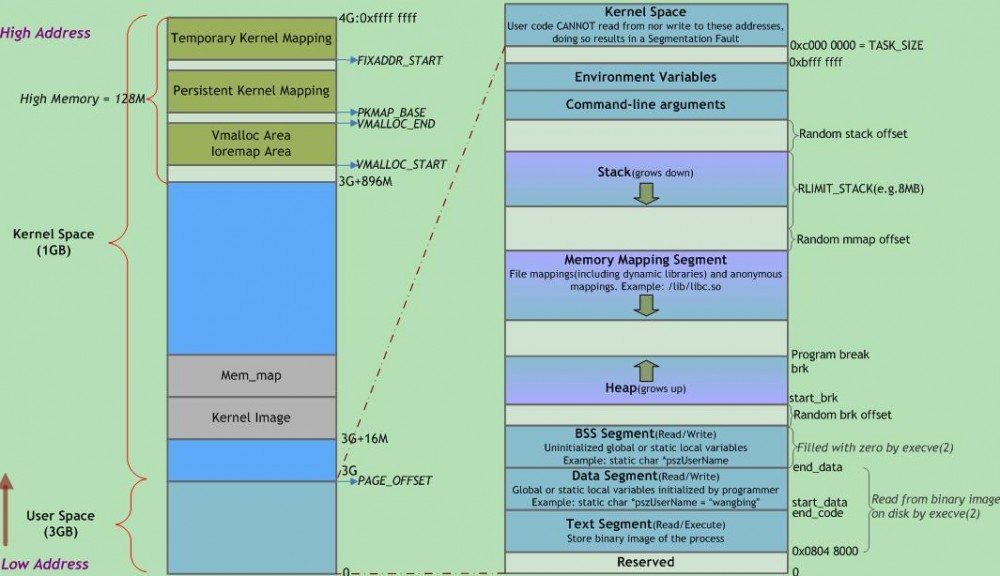
图2
注意这里是32位内核地址空间划分,64位内核地址空间划分是不同的。
由上图,我们从左侧 Kernel Space 可以看到在 x86 结构中,内核空间分三种类型的区域:
ZONE_DMA内存开始的16MB
ZONE_NORMAL16MB~896MB
ZONE_HIGHMEM896MB ~ 结束
高位内存的由来
当内核模块代码或进程访问内存时,代码中所指向的内存地址都为逻辑地址,而对应到真正的物理内存地址,需要地址 一对一 的映射,如逻辑地址 0xc0000003 对应的物理地址为 0×3 , 0xc0000004 对应的物理地址为 0×4 ,… …,逻辑地址与物理地址对应的关系为:
物理地址 = 逻辑地址 – 0xC0000000
| 逻辑地址 | 物理内存地址 |
|---|---|
| 0xc0000000 | 0×0 |
| 0xc0000001 | 0×1 |
| 0xc0000002 | 0×2 |
| 0xc0000003 | 0×3 |
| … | … |
| 0xe0000000 | 0×20000000 |
| … | … |
| 0xffffffff | **0×40000000 ** |
假 设按照上述简单的地址映射关系,那么由 图2 可知,内核逻辑地址空间访问为 0xc0000000 ~ 0xffffffff ,那么对应的物理内存范围就为 0×0 ~ 0×40000000 ,即只能访问 1G 物理内存。若机器中安装 8G 物理内存,那么内核就只能访问前 1G 物理内存,后面 7G 物理内存将会无法访问,因为内核 的地址空间已经全部映射到物理内存地址范围 0×0 ~ 0×40000000 。即使安装了8G物理内存,那么物理地址为 0×40000001 的内存,内核该怎么去访问呢?代码中必须要有内存逻辑地址 的, 0xc0000000 ~ 0xffffffff 的地址空间已经被用完了,所以无法访问物理地址 0×40000000 以后的内存。
显 然不能将内核地址空间 0xc0000000 ~ 0xfffffff 全部用来简单的地址映射。因此x86架构中将内核地址空间划分三部分: ZONE_DMA 、 ZONE_NORMAL 和 ZONE_HIGHMEM 。 ZONE_HIGHMEM 即为高位内存,这就是高位内存概念的由来。
那么如内核是 如何通过借助128MB高位内存地址空间达到可以访问所有物理内存的目的 ?
当内核想访问高于 896MB 物理地址内存时,从 0xF8000000 ~ 0xFFFFFFFF 地址空间范围内找一段相应大小空闲的逻辑地址空间,借用一会。借用这段逻辑地址空间,建立映射到想访问的那段物理内存(即填充内核 PTE 页面表), 临时用一会,用完后归还 。这样别人也可以借用这段地址空间访问其他物理内存,实现了使用有限的地址空间,访问所有所有物理内存。
例如内核想访问 2G 开始的一段大小为 1MB 的物理内存,即物理地址范围为 0×80000000 ~ 0x800FFFFF 。访问之前先找到一段 1MB 大小的空闲地址空间,假设找到的空闲地址空间为 0xF8700000 ~ 0xF87FFFFF ,用这 1MB 的逻辑地址空间映射到物理地址空间 0×80000000 ~ 0x800FFFFF 的内存。映射关系如下:
| 逻辑地址 | 物理内存地址 |
|---|---|
| 0xF8700000 | 0×80000000 |
| 0xF8700001 | 0×80000001 |
| 0xF8700002 | 0×80000002 |
| … | … |
| 0xF87FFFFF | 0x800FFFFF |
当内核访问完 0×80000000 ~ 0x800FFFFF 物理内存后,就将 0xF8700000 ~ 0xF87FFFFF 内核线性空间释放。这样其他进程或代码也可以使用 0xF8700000 ~ 0xF87FFFFF 这段地址访问其他物理内存。
从上面的描述,我们可以知道 高位内存的最基本思想 :借一段地址空间,建立临时地址映射,用完后释放,达到这段地址空间可以循环使用,访问所有物理内存。
看到这里,不禁有人会问:万一有内核进程或模块一直占用某段逻辑地址空间不释放,怎么办?若真的出现的这种情况,则内核的高位内存地址空间越来越紧张,若都被占用不释放,则没有可建立映射到物理内存的高位地址空间,也就无法访问对应的物理内存了。
进程的虚拟空间
简单的说,进程在使用内存的时候,都不是直接访问内存物理地址的,进程访问的都是虚拟内存地址,然后虚拟内存地址再转化为内存物理地址。 进程看到的所有地址组成的空间,就是虚拟空间。虚拟空间是某个进程对分配给它的所有物理地址(已经分配的和将会分配的)的重新映射。
这里可以认为虚拟空间都被映射到了硬盘空间中,并且由页表记录映射位置,当访问到某个地址的时候,通过页表中的有效位,可以得知此数据是否在内存中,如果不是,则通过缺页异常,将硬盘对应的数据拷贝到内存中,如果没有空闲内存,则选择牺牲页面,替换其他页面(即覆盖老页面)。
此处想进一步深入可参考linux 进程的虚拟内存
我们回到内核态与用户态这两个概念。操作系统的内核态是用来控制计算机的硬件资源,并提供上层应用程序运行的环境。用户态即上层应用程序的活动空间,应用程序的执行必须依托于内核提供的资源,包括 CPU 资源、存储资源、 I/O 资源等。为了使上层应用能够访问到这些资源,内核必须为上层应用提供访问的接口:即系统调用。
系统调用是操作系统的最小功能单位,这些系统调用根据不同的应用场景可以进行扩展和裁剪,现在各种版本的 Unix 实现都提供了不同数量的系统调用,如Linux的不同版本提供了 240-260 个系统调用, FreeBSD 大约提供了 320 个。我们可以把系统调用看成是一种不能再化简的操作(类似于原子操作,但是不同概念),有人把它比作一个汉字的一个“笔画”,而一个“汉字”就代表一个上层应用。
用户空间的应用程序,通过系统调用,进入内核空间。这个时候用户空间的进程要传递很多变量、参数的值给内核,内核态运行的时候也要保存用户进程的一些寄存器值、变量等。所谓的“进程上下文”,可以看作是用户进程传递给内核的这些参数以及内核要保存的那一整套的变量和寄存器值和当时的环境等。
#### 系统IO调用
那我们来看一下一般的IO调用。在传统的文件IO操作中,都是调用操作系统提供的底层标准IO系统调用函数 read()、write() ,此时调用此函数的进程(在JAVA中即java进程)由当前的用户态切换到内核态,然后OS的内核代码负责将相应的文件数据读取到内核的IO缓冲区,然后再把数据从内核IO缓冲区拷贝到进程的私有地址空间中去,这样便完成了一次IO操作。如下图所示。
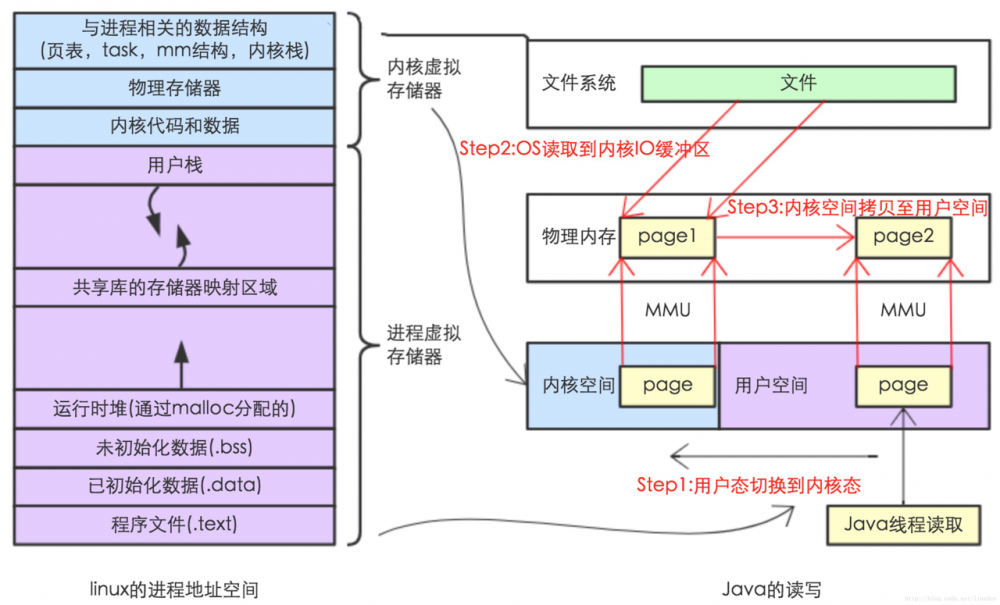
图3
此处,我们通过一个Demo来捋一下这个过程:
byte[] b = new byte[1024];

while((read = inputStream.read(b))>=0) {
        total = total + read;
            // other code....
        }
复制代码
我们通过 new byte[1024] 来创建一个缓冲区,由于JVM处于用户态进程中,所以,此处创建的这个缓冲区为用户缓冲区。然后在一个while循环里面调用read()方法读数据来触发 syscall read 系统调用。 我们着重来分析下 inputStream.read 调用时所发生的细节:
- 内核给硬盘控制器发命令:我要读硬盘上的某硬盘块上的数据。
- 在DMA的控制下,把硬盘上的数据读入到内核缓冲区。
- 内核把数据从内核缓冲区复制到用户缓冲区。
这里的用户缓冲区就是我们代码中所 new 的字节数组。整个过程请对照图3所示内容进行理解。
对于操作系统而言,JVM处于用户态空间中。而处于用户态空间的进程是不能直接操作底层的硬件的。而IO操作就需要操作底层的硬件,比如硬盘。因此,IO操作必须得借助内核的帮助才能完成(中断,trap),即:会有用户态到内核态的切换。
我们写代码 new byte[] 数组时,一般是都是“随意” 创建一个“任意大小”的数组。比如,new byte[128]、new byte[1024]、new byte[4096]....
但是,对于硬盘块的读取而言,每次访问硬盘读数据时,并不是读任意大小的数据的,而是:每次读一个硬盘块或者若干个硬盘块(这是因为访问硬盘操作代价是很大的) 因此,就需要有一个“中间缓冲区”--即内核缓冲区。先把数据从硬盘读到内核缓冲区中,然后再把数据从内核缓冲区搬到用户缓冲区。
这也是为什么我们总感觉到第一次read操作很慢,而后续的read操作却很快的原因。对于 后续 的read操作而言,它所需要读的数据很可能已经在内核缓冲区了,此时只需将内核缓冲区中的数据拷贝到用户缓冲区即可,并未涉及到底层的读取硬盘操作,当然就快了。
而当数据不可用,这个处理进程将会被挂起,并等待内核从硬盘上把数据取到内核缓冲区中。
DMA---用来在设备内存与主存RAM之间直接进行数据交换,这个过程无需CPU干预,对于系统中有大量数据交换的设备而言,如果能够充分利用DMA特性,可以大大提高系统性能。可参考Linux内核中DMA分析
直接内存映射IO
DMA读取数据这种操作涉及到底层的硬件,硬件一般是不能直接访问用户态空间的,也就是DMA不能直接访问用户缓冲区,普通IO操作需要将数据来回地在 用户缓冲区 和 内核缓冲区移动,这在一定程序上影响了IO的速度。那有没有相应的解决方案呢?
这里就涉及到了我们想要提及的核心内容:直接内存映射IO。
虚拟地址空间有一块区域,在内存映射文件的时候将某一段的虚拟地址和文件对象的某一部分建立起映射关系,此时并没有拷贝数据到内存中去,而是当进程代码第一次引用这段代码内的虚拟地址时,触发了缺页异常,这时候OS根据映射关系直接将文件的相关部分数据拷贝到进程的用户私有空间中去,如下图所示。

图4
从图4可以看出:内核空间的 buffer 与 用户空间的 buffer 都映射到同一块 物理内存区域。
它的主要特点如下:
- 对文件的操作不需要再发出read 或者 write 系统IO调用
- 当用户进程访问“内存映射文件”地址时,自动产生缺页异常,然后由底层的OS负责将硬盘上的数据写到内存。
- 内存映射文件的效率比标准IO高的重要原因就是因为少了把数据拷贝到OS内核缓冲区这一步。
探究DirectByteBuffer
在经过了上面的层层铺垫之后,我们再来回顾下 ByteBuffer 。 ByteBuffer 作为一个抽象类,其实现分为两类: HeapByteBuffer 与 DirectByteBuffer 。 HeapByteBuffer 是堆内 ByteBuffer ,基于用户态的实现,使用 byte[] 存储数据,我们前面已经接触过。 DirectByteBuffer 是堆外 ByteBuffer ,直接使用堆外内存空间存储数据,使用直接内存映射IO,这也是 NIO 高性能的核心所在之一。那么我们一起来分析一下 DirectByteBuffer 的相关实现。
DirectByteBuffer的创建
我们可以使用 java.nio.ByteBuffer#allocateDirect 方法来实例化一个 DirectByteBuffer 。
//java.nio.ByteBuffer#allocateDirect
public static ByteBuffer allocateDirect(int capacity) {
    return new DirectByteBuffer(capacity);
}


DirectByteBuffer(int cap) {   // package-private
	// 初始化Buffer四个核心属性
    super(-1, 0, cap, cap);
    // 判断是否需要页面对齐,通过参数-XX:+PageAlignDirectMemory控制,默认为false
    boolean pa = VM.isDirectMemoryPageAligned();
    // 获取每页内存大小
    int ps = Bits.pageSize();
    // 分配内存的大小,如果是按页对齐方式,需要再加一页内存的容量
    long size = Math.max(1L, (long)cap + (pa ? ps : 0));
    // 用Bits类保存总分配内存(按页分配)的大小和实际内存的大小
    Bits.reserveMemory(size, cap);

    long base = 0;
    try {
        // 调用unsafe方法分配内存
        base = UNSAFE.allocateMemory(size);
    } catch (OutOfMemoryError x) {
        // 分配失败,释放内存
        Bits.unreserveMemory(size, cap);
        throw x;
    }

    // 初始化分配内存空间,指定内存大小,该空间中每个位置值为0
    UNSAFE.setMemory(base, size, (byte) 0);
     // 设置内存起始地址,如果需要页面对齐,
     // 则判断base是否有对齐,有且不是一个页的起始位置则通过计算进行地址对齐操作
    if (pa && (base % ps != 0)) {
        // Round up to page boundary
        address = base + ps - (base & (ps - 1));
    } else {
        address = base;
    }
     // 创建一个cleaner,最后会调用Deallocator.run来释放内存
    cleaner = Cleaner.create(this, new Deallocator(base, size, cap));
    att = null;
}
复制代码
页面对齐
首先,通过 VM.isDirectMemoryPageAligned() 判断是否需要页面对齐,关于对齐,我们这里来接触下内在理论。
在现代计算架构中,从内存中读取数据,基本上都是按 2^N 个字节来从主存加载 CPU 中。这个值,基本是 cache line 的大小。也就是说,如果所读数据在同一块 cache line 之内是最快的。目前来说,多数PC的 cache line 值是128个字节。 对于首地址也是一样的。在32位机器上,如果有4个字节的内存块,跨2个 cache line ,那么被加载到CPU的时候,需要2次内存缺失中断。
好了,言归正传。对于任何一种小内存请求,都不会按实际大小分配,首先会按照一定规则进行对齐。这种对齐的规则比较复杂,一般会依照系统页大小,机器字大小,和系统特性来定制。通常来说,会在不同区间采用不同的步长。举个例子:
| 序号 | 大小区间 | 字节对齐 |
|---|---|---|
| 0 | [0--16] | 8 |
| 1 | (16 , 128] | 16 |
| 2 | (128 , 256] | 32 |
| 3 | (256 , 512] | 64 |
由于每个区间的步长不一样,又被划分成更多的区间。比如(256 , 320]之间长度请求,实际被分配应该是320个字节,而不是512。而1个字节的请求,总是被分配8个字节。
简单点说,其实就是效率问题,现代计算机读取内存的时候,一般只能在偶数边界上开始读,什么意思呢,打个比方,在 32 位的机器上,一个 int 变量变量占用 4 字节,假如这个变量的真实物理内存地址是 0x400005 ,那计算机在取数的时候会先从 0x400004 取 4 个字节,再从 0x400008 取 4 个字节,然后这个变量的值就是前 4 个字节的后三位和后 4 个字节的第一位,也就是说如果一个变量的地址从奇数开始,就可能要多读一次内存,而如果从偶数开始,特别是 计算机位数/8 的倍数开始,效率就高了!
当需要按页对齐的时候,内核总是会把 vmalloc 函数的参数 size 调整到页对齐,并在调整后的数值上再加一个页面的大小.内核之所以加一个页面大小,是为了防止可能出现的越界访问。页是可传输到IO设备的最小内存块。因此,将数据与页面大小对齐,并使用页面大小作为分配单元,以此在写入硬盘/网络设备时对交互产生影响。这样,通过多分配一页空间,可以在数据超出一页大小时,类似于上一段所描述的场景,多读一次内存,以及要多占用一页空间。
// -- Processor and memory-system properties --

    private static int PAGE_SIZE = -1;
// java.nio.Bits#pageSize
    static int pageSize() {
        if (PAGE_SIZE == -1)
            PAGE_SIZE = UNSAFE.pageSize();
        return PAGE_SIZE;
    }
/**
 * Reports the size in bytes of a native memory page (whatever that is).
 * This value will always be a power of two.
 */
public native int pageSize();

复制代码
判断可分配空间是否满足需求
由上面 DirectByteBuffer(int cap) 这个构造器代码中给的中文注释可知,申请分配内存前会调用 java.nio.Bits#reserveMemory 判断是否有足够的空间可供申请:
//java.nio.Bits#tryReserveMemory
private static boolean tryReserveMemory(long size, int cap) {

    // -XX:MaxDirectMemorySize limits the total capacity rather than the
    // actual memory usage, which will differ when buffers are page
    // aligned.
    //通过-XX:MaxDirectMemorySize来判断用户申请的大小是否合理,
    long totalCap;
    //可使用最大空间减去已使用空间,剩余可用空间满足需求分配的空间的话设定相关参数,并返回true
    while (cap <= MAX_MEMORY - (totalCap = TOTAL_CAPACITY.get())) {
        if (TOTAL_CAPACITY.compareAndSet(totalCap, totalCap + cap)) {
            RESERVED_MEMORY.addAndGet(size);
            COUNT.incrementAndGet();
            return true;
        }
    }

    return false;
}
// java.nio.Bits#reserveMemory
// size:根据是否按页对齐,得到的真实需要申请的内存大小
// cap:用户指定需要的内存大小(<=size)
static void reserveMemory(long size, int cap) {
    // 获取最大可以申请的对外内存大小
    // 可通过参数-XX:MaxDirectMemorySize=<size>设置这个大小
    if (!MEMORY_LIMIT_SET && VM.initLevel() >= 1) {
        MAX_MEMORY = VM.maxDirectMemory();
        MEMORY_LIMIT_SET = true;
    }

    // optimist!
    // 有足够空间可供分配,则直接return,否则,继续执行下面逻辑,尝试重新分配
    if (tryReserveMemory(size, cap)) {
        return;
    }

    final JavaLangRefAccess jlra = SharedSecrets.getJavaLangRefAccess();
    boolean interrupted = false;
    try {

        // Retry allocation until success or there are no more
        // references (including Cleaners that might free direct
        // buffer memory) to process and allocation still fails.
        boolean refprocActive;
        do {
            //这个do while循环中,若没有更多引用(包括可能释放直接缓冲区内存的Cleaners)进行处理,接着就重新尝			  //试判断所申请内存空间是否满足条件,如果这个过程发生异常,则interrupted设定为true,同时在最后的				//finally代码块中打断当前所在线程。
            try {
                refprocActive = jlra.waitForReferenceProcessing();
            } catch (InterruptedException e) {
                // Defer interrupts and keep trying.
                interrupted = true;
                refprocActive = true;
            }
            if (tryReserveMemory(size, cap)) {
                return;
            }
        } while (refprocActive);

        // trigger VM's Reference processing
        System.gc();

        long sleepTime = 1;
        int sleeps = 0;
        while (true) {
            if (tryReserveMemory(size, cap)) {
                return;
            }
            if (sleeps >= MAX_SLEEPS) {
                break;
            }
            try {
                if (!jlra.waitForReferenceProcessing()) {
                    Thread.sleep(sleepTime);
                    sleepTime <<= 1;
                    sleeps++;
                }
            } catch (InterruptedException e) {
                interrupted = true;
            }
        }

        // no luck
        throw new OutOfMemoryError("Direct buffer memory");

    } finally {
        if (interrupted) {
            // don't swallow interrupts
            Thread.currentThread().interrupt();
        }
    }
}
复制代码
该方法主要用于判断申请的堆外内存是否超过了用例指定的最大值,如果还有足够空间可以申请,则更新对应的变量,如果已经没有空间可以申请,则抛出 OutOfMemoryError 。
默认可以申请的最大堆外内存
上文提到了 DirectByteBuffer 申请内存前会判断是否有足够的空间可供申请。用户可以通过设定 -XX:MaxDirectMemorySize=<size> 来控制可以申请最大的 DirectByteBuffer 内存。但是默认情况下这个大小是多少呢?
由上面代码可知, DirectByteBuffer 通过 sun.misc.VM#maxDirectMemory 来获取这个值,我们来看一下对应的代码:
// A user-settable upper limit on the maximum amount of allocatable direct
    // buffer memory.  This value may be changed during VM initialization if
    // "java" is launched with "-XX:MaxDirectMemorySize=<size>".
    //
    // The initial value of this field is arbitrary; during JRE initialization
    // it will be reset to the value specified on the command line, if any,
    // otherwise to Runtime.getRuntime().maxMemory().
    //
    private static long directMemory = 64 * 1024 * 1024;

    // Returns the maximum amount of allocatable direct buffer memory.
    // The directMemory variable is initialized during system initialization
    // in the saveAndRemoveProperties method.
    //
    public static long maxDirectMemory() {
        return directMemory;
    }
复制代码
这里 directMemory 赋值为64MB,那堆外内存默认最大是64MB吗?答案是否定的,我们来看注释,可以知道,这个值会在 JRE 初始化启动的过程中被重新设置为用户指定的值,如果用户没有指定,则会设置为 Runtime.getRuntime().maxMemory() 。
/**
 * Returns the maximum amount of memory that the Java virtual machine
 * will attempt to use.  If there is no inherent limit then the value
 * {@link java.lang.Long#MAX_VALUE} will be returned.
 *
 * @return  the maximum amount of memory that the virtual machine will
 *          attempt to use, measured in bytes
 * @since 1.4
 */
public native long maxMemory();

//src/java.base/share/native/libjava/Runtime.c
JNIEXPORT jlong JNICALL
Java_java_lang_Runtime_maxMemory(JNIEnv *env, jobject this)
{
    return JVM_MaxMemory();
}
//src/hotspot/share/include/jvm.h
JNIEXPORT jlong JNICALL
JVM_MaxMemory(void);

//src/hotspot/share/prims/jvm.cpp
JVM_ENTRY_NO_ENV(jlong, JVM_MaxMemory(void))
  JVMWrapper("JVM_MaxMemory");
  size_t n = Universe::heap()->max_capacity();
  return convert_size_t_to_jlong(n);
JVM_END
复制代码
我们来看 JRE 相关的初始化启动源码:
/**
	 * java.lang.System#initPhase1
     * Initialize the system class.  Called after thread initialization.
     */
    private static void initPhase1() {

        // VM might invoke JNU_NewStringPlatform() to set those encoding
        // sensitive properties (user.home, user.name, boot.class.path, etc.)
        // during "props" initialization, in which it may need access, via
        // System.getProperty(), to the related system encoding property that
        // have been initialized (put into "props") at early stage of the
        // initialization. So make sure the "props" is available at the
        // very beginning of the initialization and all system properties to
        // be put into it directly.
        props = new Properties(84);
        initProperties(props);  // initialized by the VM

        // There are certain system configurations that may be controlled by
        // VM options such as the maximum amount of direct memory and
        // Integer cache size used to support the object identity semantics
        // of autoboxing.  Typically, the library will obtain these values
        // from the properties set by the VM.  If the properties are for
        // internal implementation use only, these properties should be
        // removed from the system properties.
        //
        // See java.lang.Integer.IntegerCache and the
        // VM.saveAndRemoveProperties method for example.
        //
        // Save a private copy of the system properties object that
        // can only be accessed by the internal implementation.  Remove
        // certain system properties that are not intended for public access.
        // 我们关注此处即可
        VM.saveAndRemoveProperties(props);

        lineSeparator = props.getProperty("line.separator");
        StaticProperty.javaHome();          // Load StaticProperty to cache the property values
        VersionProps.init();

        FileInputStream fdIn = new FileInputStream(FileDescriptor.in);
        FileOutputStream fdOut = new FileOutputStream(FileDescriptor.out);
        FileOutputStream fdErr = new FileOutputStream(FileDescriptor.err);
        setIn0(new BufferedInputStream(fdIn));
        setOut0(newPrintStream(fdOut, props.getProperty("sun.stdout.encoding")));
        setErr0(newPrintStream(fdErr, props.getProperty("sun.stderr.encoding")));

        // Setup Java signal handlers for HUP, TERM, and INT (where available).
        Terminator.setup();

        // Initialize any miscellaneous operating system settings that need to be
        // set for the class libraries. Currently this is no-op everywhere except
        // for Windows where the process-wide error mode is set before the java.io
        // classes are used.
        VM.initializeOSEnvironment();

        // The main thread is not added to its thread group in the same
        // way as other threads; we must do it ourselves here.
        Thread current = Thread.currentThread();
        current.getThreadGroup().add(current);

        // register shared secrets
        setJavaLangAccess();

        // Subsystems that are invoked during initialization can invoke
        // VM.isBooted() in order to avoid doing things that should
        // wait until the VM is fully initialized. The initialization level
        // is incremented from 0 to 1 here to indicate the first phase of
        // initialization has completed.
        // IMPORTANT: Ensure that this remains the last initialization action!
        VM.initLevel(1);
    }
复制代码
上述源码中的中文注释部分表示即为我们关心的相关过程,即对 directMemory 赋值发生在 sun.misc.VM#saveAndRemoveProperties 函数中:
// Save a private copy of the system properties and remove
    // the system properties that are not intended for public access.
    //
    // This method can only be invoked during system initialization.
    public static void saveAndRemoveProperties(Properties props) {
        if (initLevel() != 0)
            throw new IllegalStateException("Wrong init level");

        @SuppressWarnings({"rawtypes", "unchecked"})
        Map<String, String> sp =
            Map.ofEntries(props.entrySet().toArray(new Map.Entry[0]));
        // only main thread is running at this time, so savedProps and
        // its content will be correctly published to threads started later
        savedProps = sp;

        // Set the maximum amount of direct memory.  This value is controlled
        // by the vm option -XX:MaxDirectMemorySize=<size>.
        // The maximum amount of allocatable direct buffer memory (in bytes)
        // from the system property sun.nio.MaxDirectMemorySize set by the VM.
        // The system property will be removed.
        String s = (String)props.remove("sun.nio.MaxDirectMemorySize");
        if (s != null) {
            if (s.equals("-1")) {
                // -XX:MaxDirectMemorySize not given, take default
                directMemory = Runtime.getRuntime().maxMemory();
            } else {
                long l = Long.parseLong(s);
                if (l > -1)
                    directMemory = l;
            }
        }

        // Check if direct buffers should be page aligned
        s = (String)props.remove("sun.nio.PageAlignDirectMemory");
        if ("true".equals(s))
            pageAlignDirectMemory = true;

        // Remove other private system properties
        // used by java.lang.Integer.IntegerCache
        props.remove("java.lang.Integer.IntegerCache.high");

        // used by sun.launcher.LauncherHelper
        props.remove("sun.java.launcher.diag");

        // used by jdk.internal.loader.ClassLoaders
        props.remove("jdk.boot.class.path.append");
    }
复制代码
所以默认情况下, DirectByteBuffer 堆外内存默认最大为 Runtime.getRuntime().maxMemory() ,而这个值等于可用的最大Java堆大小,也就是我们 -Xmx 参数指定的值。
System.gc探究
同时,我们在此处也看到了代码内有主动调用 System.gc() ,以清理已分配 DirectMemory 中的不用的对象引用,腾出空间。这里主动调用 System.gc() 的目的也是为了想触发一次 full gc ,此时,我们要看它所处的位置,如果堆外内存申请不到足够的空间,则堆外内存会超过其阈值,此时,jdk会通过 System.gc() 的内在机制触发一次 full gc ,来进行回收。调用 System.gc() 本身就是执行一段相应的逻辑,那我们来探索下其中的细节。
//java.lang.System#gc
    public static void gc() {
        Runtime.getRuntime().gc();
    }
//java.lang.Runtime#gc
    public native void gc();
复制代码
JNIEXPORT void JNICALL
Java_java_lang_Runtime_gc(JNIEnv *env, jobject this)
{
    JVM_GC();
}
复制代码
可以看到直接调用了JVM_GC()方法,这个方法的实现在jvm.cpp中
//src/hotspot/share/prims/jvm.cpp
JVM_ENTRY_NO_ENV(void, JVM_GC(void))
  JVMWrapper("JVM_GC");
  if (!DisableExplicitGC) {
    Universe::heap()->collect(GCCause::_java_lang_system_gc);
  }
JVM_END

//src/hotspot/share/runtime/interfaceSupport.inline.hpp
#define JVM_ENTRY_NO_ENV(result_type, header)                        /
extern "C" {                                                         /
  result_type JNICALL header {                                       /
    JavaThread* thread = JavaThread::current();                      /
    ThreadInVMfromNative __tiv(thread);                              /
    debug_only(VMNativeEntryWrapper __vew;)                          /
    VM_ENTRY_BASE(result_type, header, thread)
    ...
    #define JVM_END } }

#define VM_ENTRY_BASE(result_type, header, thread)                   /
  TRACE_CALL(result_type, header)                                    /
  HandleMarkCleaner __hm(thread);                                    /
  Thread* THREAD = thread;                                           /
  os::verify_stack_alignment();                                      /
  /* begin of body */

复制代码
宏定义浅析
此处 #define JVM_ENTRY_NO_ENV 属于宏定义,这里可能大家不是很了解,就简单说下。
宏定义分类:
-
不带参数的宏定义
#define TRUE 1
-
带参数的宏: #define 宏名 ( 参数表) [宏体]
宏定义作用:
-
方便程序的修改
- 上面的
#define TRUE 1就是一个实例
- 上面的
-
提高程序的运行效率
- 宏定义的展开是在程序的预处理阶段完成的,无需运行时分配内存,能够部分实现函数的功能,却没有函数调用的压栈、弹栈开销,效率较高
-
增强可读性
- 这点不言而喻,当我们看到类似PI这样的宏定义时,自然可以想到它对应的是圆周率常量
-
字符串拼接
例如:
#define CAT(a,b,c) a##b##c

main()
{
    printf("%d/n" CAT(1,2,3));
    printf("%s/n", CAT('a', 'b', 'c');
}
复制代码
程序的输出会是:
123
abc
复制代码
- 参数转化成字符串
示例:
#defind CAT(n) "abc"#n

main()
{
    printf("%s/n", CAT(15));
}
复制代码
输出的结果会是
abc15
复制代码
- 用于程序调试跟踪
- 常见的用于调试的宏有,_ L I N E 、 F I L E 、 D A T E 、 T I M E 、 S T D C _
- 实现可变宏 举例来说:
#define PR(...) printf(_ _VA_ARGS_ _)
复制代码
其实有点像解释器模式,简单点说,我们彼此约定,我喊 1,你就说:天生我材必有用。接下来我们进行如下定义:
#define a abcdefg(也可以是很长一段代码一个函数)
复制代码
同理宏就相当于你和编译器之间的约定,你告诉它 ,当我写 a ,其实就是指后面那段内容。那么,预编译的时候, 编译器一看 a是这个,这时候它就会把所有的a都替换成了后面那个字符串。
想要继续深入,可以参考[C++宏定义详解]( www.cnblogs.com/fnlingnzb-l… )。
参考我们在前面列出的 jvm.cpp 中 JVM_GC() 相关的部分代码,可以知道, interfaceSupport.inline.hpp 内定义了 JVM_ENTRY_NO_ENV 的宏逻辑,而下面这段代码则定义了 JVM_GC 的相关逻辑,然后 JVM_GC 作为子逻辑在 JVM_ENTRY_NO_ENV 的宏逻辑中执行。
JVM_ENTRY_NO_ENV(void, JVM_GC(void))
  JVMWrapper("JVM_GC");
  if (!DisableExplicitGC) {
    Universe::heap()->collect(GCCause::_java_lang_system_gc);
  }
JVM_END
复制代码
我们这里再接触个 JDK 中我们常见的 AccessController.doPrivileged 方法,它是在 jvm.cpp 中对应的实现为:
JVM_ENTRY(jobject, JVM_DoPrivileged(JNIEnv *env, jclass cls, jobject action, jobject context, jboolean wrapException))
  JVMWrapper("JVM_DoPrivileged");

  # 省略的方法体
JVM_END
复制代码
JVM_ENTRY 也是是一个宏定义,位于 interfaceSupport.hpp 中:
#define JVM_ENTRY(result_type, header)                               /
extern "C" {                                                         /
  result_type JNICALL header {                                       /
    JavaThread* thread=JavaThread::thread_from_jni_environment(env); /
    ThreadInVMfromNative __tiv(thread);                              /
    debug_only(VMNativeEntryWrapper __vew;)                          /
    VM_ENTRY_BASE(result_type, header, thread)
复制代码
然后转换后,得到结果如下:
extern "C" {                                                         /
  jobject JNICALL JVM_DoPrivileged(JNIEnv *env, jclass cls, jobject action, jobject context, jboolean wrapException) {                                       /
    JavaThread* thread=JavaThread::thread_from_jni_environment(env); /
    ThreadInVMfromNative __tiv(thread);                              /
    debug_only(VMNativeEntryWrapper __vew;)                          /
  	....
                }
           }
复制代码
关于 interfaceSupport.inline.hpp 内定义的 JVM_ENTRY_NO_ENV 宏逻辑中的 extern "C" 就是下面代码以 C 语言方式进行编译,C++可以嵌套 C 代码。
源码中特别常见的 JNICALL 就是一个空的宏定义,只是为了告诉人这是一个 JNI 调用,宏定义如下:
#define JNICALL
复制代码
关于JNI,我们可以参考https://docs.oracle.com/javase/8/docs/technotes/guides/jni/spec/jniTOC.html文档来深入。
JVM_GC方法解读
参考前面给出的相关源码,我们可以知道,最终调用的是heap的collect方法, GCCause 为 _java_lang_system_gc ,即因为什么原因而产生的 gc 。我们可以通过其相关源码来看到造成GC的各种状况定义。
//
// This class exposes implementation details of the various
// collector(s), and we need to be very careful with it. If
// use of this class grows, we should split it into public
// and implementation-private "causes".
//
// The definitions in the SA code should be kept in sync
// with the definitions here.
//
// src/hotspot/share/gc/shared/gcCause.hpp
class GCCause : public AllStatic {
 public:
  enum Cause {
    /* public */
    _java_lang_system_gc,
    _full_gc_alot,
    _scavenge_alot,
    _allocation_profiler,
    _jvmti_force_gc,
    _gc_locker,
    _heap_inspection,
    _heap_dump,
    _wb_young_gc,
    _wb_conc_mark,
    _wb_full_gc,

    /* implementation independent, but reserved for GC use */
    _no_gc,
    _no_cause_specified,
    _allocation_failure,

    /* implementation specific */

    _tenured_generation_full,
    _metadata_GC_threshold,
    _metadata_GC_clear_soft_refs,

    _cms_generation_full,
    _cms_initial_mark,
    _cms_final_remark,
    _cms_concurrent_mark,

    _old_generation_expanded_on_last_scavenge,
    _old_generation_too_full_to_scavenge,
    _adaptive_size_policy,

    _g1_inc_collection_pause,
    _g1_humongous_allocation,

    _dcmd_gc_run,

    _z_timer,
    _z_warmup,
    _z_allocation_rate,
    _z_allocation_stall,
    _z_proactive,

    _last_gc_cause
  };
复制代码
我们接着回到 JVM_GC 定义中,这里需要注意的是 DisableExplicitGC ,如果为 true 就不会执行 collect 方法,也就使得 System.gc() 无效, DisableExplicitGC 这个参数对应配置为 -XX:+DisableExplicitGC ,默认是 false ,可自行配置为 true 。
当 DisableExplicitGC 为默认值的时候,会进入 Universe::heap()->collect(GCCause::_java_lang_system_gc); 代码逻辑,此时,我们可以看到,这是一个函数表达式,传入的参数为 Universe::heap() :
// The particular choice of collected heap.
static CollectedHeap* heap() { return _collectedHeap; }
CollectedHeap*  Universe::_collectedHeap = NULL;
CollectedHeap* Universe::create_heap() {
  assert(_collectedHeap == NULL, "Heap already created");
  return GCConfig::arguments()->create_heap();
}
复制代码

如上图所示, heap 有好几种,具体是哪种 heap ,需要看我们所选择使用的 GC 算法,这里以常用的 CMS GC 为例,其对应的 heap 是 CMSHeap ,所以我们再看看 cmsHeap.hpp 对应的 collect 方法:
//src/hotspot/share/gc/cms/cmsHeap.hpp
class CMSHeap : public GenCollectedHeap {
public:
  CMSHeap(GenCollectorPolicy *policy);
...
  void CMSHeap::collect(GCCause::Cause cause) {
  if (should_do_concurrent_full_gc(cause)) {
    // Mostly concurrent full collection.
    collect_mostly_concurrent(cause);
  } else {
    GenCollectedHeap::collect(cause);
  }
}
    ...
}
//src/hotspot/share/gc/shared/genCollectedHeap.cpp

void GenCollectedHeap::collect(GCCause::Cause cause) {
  if (cause == GCCause::_wb_young_gc) {
    // Young collection for the WhiteBox API.
    collect(cause, YoungGen);
  } else {
#ifdef ASSERT
  if (cause == GCCause::_scavenge_alot) {
    // Young collection only.
    collect(cause, YoungGen);
  } else {
    // Stop-the-world full collection.
    collect(cause, OldGen);
  }
#else
    // Stop-the-world full collection.
    collect(cause, OldGen);
#endif
  }
}

复制代码
首先通过 should_do_concurrent_full_gc 方法判断是否需要进行一次并行 Full GC ,如果是则调用 collect_mostly_concurrent 方法,进行并行 Full GC ;如果不是则一般会走到 collect(cause, OldGen) 这段逻辑,进行 Stop-the-world full collection ,我们一般称之为 全局暂停(STW)Full GC 。
我们先看看 should_do_concurrent_full_gc 到底有哪些条件:
bool CMSHeap::should_do_concurrent_full_gc(GCCause::Cause cause) {
  switch (cause) {
    case GCCause::_gc_locker:           return GCLockerInvokesConcurrent;
    case GCCause::_java_lang_system_gc:
    case GCCause::_dcmd_gc_run:         return ExplicitGCInvokesConcurrent;
    default:                            return false;
  }
}

复制代码
如果是 _java_lang_system_gc 并且 ExplicitGCInvokesConcurrent 为 true 则进行并行 Full GC ,这里又引出了另一个参数 ExplicitGCInvokesConcurrent ,如果配置 -XX:+ExplicitGCInvokesConcurrent 为 true ,进行 并行Full GC ,默认为 false 。
并行Full GC
我们先来看 collect_mostly_concurrent ,是如何进行并行 Full GC 。
//src/hotspot/share/gc/cms/cmsHeap.cpp
void CMSHeap::collect_mostly_concurrent(GCCause::Cause cause) {
  assert(!Heap_lock->owned_by_self(), "Should not own Heap_lock");

  MutexLocker ml(Heap_lock);
  // Read the GC counts while holding the Heap_lock
  unsigned int full_gc_count_before = total_full_collections();
  unsigned int gc_count_before      = total_collections();
  {
    MutexUnlocker mu(Heap_lock);
    VM_GenCollectFullConcurrent op(gc_count_before, full_gc_count_before, cause);
    VMThread::execute(&op);
  }
}
复制代码
最终通过 VMThread 来进行 VM_GenCollectFullConcurrent 中的 void VM_GenCollectFullConcurrent::doit() 方法来进行回收(相关英文注释很明确,就不再解释了):
// VM operation to invoke a concurrent collection of a
// GenCollectedHeap heap.
void VM_GenCollectFullConcurrent::doit() {
  assert(Thread::current()->is_VM_thread(), "Should be VM thread");
  assert(GCLockerInvokesConcurrent || ExplicitGCInvokesConcurrent, "Unexpected");

  CMSHeap* heap = CMSHeap::heap();
  if (_gc_count_before == heap->total_collections()) {
    // The "full" of do_full_collection call below "forces"
    // a collection; the second arg, 0, below ensures that
    // only the young gen is collected. XXX In the future,
    // we'll probably need to have something in this interface
    // to say do this only if we are sure we will not bail
    // out to a full collection in this attempt, but that's
    // for the future.
    assert(SafepointSynchronize::is_at_safepoint(),
      "We can only be executing this arm of if at a safepoint");
    GCCauseSetter gccs(heap, _gc_cause);
    heap->do_full_collection(heap->must_clear_all_soft_refs(), GenCollectedHeap::YoungGen);
  } // Else no need for a foreground young gc
  assert((_gc_count_before < heap->total_collections()) ||
         (GCLocker::is_active() /* gc may have been skipped */
          && (_gc_count_before == heap->total_collections())),
         "total_collections() should be monotonically increasing");

  MutexLockerEx x(FullGCCount_lock, Mutex::_no_safepoint_check_flag);
  assert(_full_gc_count_before <= heap->total_full_collections(), "Error");
  if (heap->total_full_collections() == _full_gc_count_before) {
    // Nudge the CMS thread to start a concurrent collection.
    CMSCollector::request_full_gc(_full_gc_count_before, _gc_cause);
  } else {
    assert(_full_gc_count_before < heap->total_full_collections(), "Error");
    FullGCCount_lock->notify_all();  // Inform the Java thread its work is done
  }
}
复制代码
简单的说,这里执行了一次 Young GC 来回收 Young 区,接着我们来关注 CMSCollector::request_full_gc 这个方法:
//src/hotspot/share/gc/cms/concurrentMarkSweepGeneration.cpp
void CMSCollector::request_full_gc(unsigned int full_gc_count, GCCause::Cause cause) {
  CMSHeap* heap = CMSHeap::heap();
  unsigned int gc_count = heap->total_full_collections();
  if (gc_count == full_gc_count) {
    MutexLockerEx y(CGC_lock, Mutex::_no_safepoint_check_flag);
    _full_gc_requested = true;
    _full_gc_cause = cause;
    CGC_lock->notify();   // nudge CMS thread
  } else {
    assert(gc_count > full_gc_count, "Error: causal loop");
  }
}
复制代码
这里主要关注在 gc_count == full_gc_count 的情况下, _full_gc_requested 被设置成 true 以及唤醒 CMS 回收线程。 这里需要提及一下, CMS GC 有个后台线程一直在扫描,以确定是否进行一次 CMS GC ,这个线程默认 2s 进行一次扫描,其中有个 _full_gc_requested 是否为 true 的判断条件,如果为 true ,进行一次 CMS GC ,对 Old 和 Perm 区进行一次回收。
正常Full GC
正常Full GC会执行下面的逻辑:
void GenCollectedHeap::collect(GCCause::Cause cause, GenerationType max_generation) {
  // The caller doesn't have the Heap_lock
  assert(!Heap_lock->owned_by_self(), "this thread should not own the Heap_lock");
  MutexLocker ml(Heap_lock);
  collect_locked(cause, max_generation);
}

// this is the private collection interface
// The Heap_lock is expected to be held on entry.
//src/hotspot/share/gc/shared/genCollectedHeap.cpp
void GenCollectedHeap::collect_locked(GCCause::Cause cause, GenerationType max_generation) {
  // Read the GC count while holding the Heap_lock
  unsigned int gc_count_before      = total_collections();
  unsigned int full_gc_count_before = total_full_collections();
  {
    MutexUnlocker mu(Heap_lock);  // give up heap lock, execute gets it back
    VM_GenCollectFull op(gc_count_before, full_gc_count_before,
                         cause, max_generation);
    VMThread::execute(&op);
  }
}


复制代码
通过 VMThread 调用 VM_GenCollectFull 中的 void VM_GenCollectFull::doit() 方法来进行回收。
//src/hotspot/share/gc/shared/vmGCOperations.cpp
void VM_GenCollectFull::doit() {
  SvcGCMarker sgcm(SvcGCMarker::FULL);

  GenCollectedHeap* gch = GenCollectedHeap::heap();
  GCCauseSetter gccs(gch, _gc_cause);
  gch->do_full_collection(gch->must_clear_all_soft_refs(), _max_generation);
}

//src/hotspot/share/gc/shared/genCollectedHeap.cpp
void GenCollectedHeap::do_full_collection(bool clear_all_soft_refs,
                                          GenerationType last_generation) {
  GenerationType local_last_generation;
  if (!incremental_collection_will_fail(false /* don't consult_young */) &&
      gc_cause() == GCCause::_gc_locker) {
    local_last_generation = YoungGen;
  } else {
    local_last_generation = last_generation;
  }

  do_collection(true,                   // full
                clear_all_soft_refs,    // clear_all_soft_refs
                0,                      // size
                false,                  // is_tlab
                local_last_generation); // last_generation
  // Hack XXX FIX ME !!!
  // A scavenge may not have been attempted, or may have
  // been attempted and failed, because the old gen was too full
  if (local_last_generation == YoungGen && gc_cause() == GCCause::_gc_locker &&
      incremental_collection_will_fail(false /* don't consult_young */)) {
    log_debug(gc, jni)("GC locker: Trying a full collection because scavenge failed");
    // This time allow the old gen to be collected as well
    do_collection(true,                // full
                  clear_all_soft_refs, // clear_all_soft_refs
                  0,                   // size
                  false,               // is_tlab
                  OldGen);             // last_generation
  }
}
复制代码
这里最终会通过 GenCollectedHeap 的 do_full_collection 方法(此方法代码量比较多,就不展开分析了)进行一次 Full GC ,将回收 Young 、 Old 、 Perm 区,并且即使 Old 区使用的是 CMS GC ,也会对 Old 区进行 compact ,也就是MSC,标记-清除-压缩。
并行和正常Full GC的比较
stop the world
我们前面有提到 VMThread ,在 JVM 中通过这个线程不断轮询它的队列,该队列里主要是存一些 VM_operation 的动作,比如最常见的就是内存分配失败,并要求做GC操作的请求等,在对 GC 这些操作执行的时候会先将其他业务线程都进入到安全点,也就是这些线程从此不再执行任何字节码指令,只有当出了安全点的时候才让他们继续执行原来的指令,因此这其实就是我们说的 stop the world(STW) ,整个进程相当于静止了。
CMS GC
CMS GC 我们可分为 background 和 foreground 两种模式,顾名思义,其中 background 是在后台做的,也就是可以不影响正常的业务线程跑,触发条件比如在 old 的内存占比超过多少的时候就可能触发一次 background 的 CMS GC ,这个过程会经历 CMS GC 的所有阶段,该暂停的暂停,该并行的并行,效率相对来说还比较高,毕竟有和业务线程并行的 GC 阶段;而 foreground 则不然,它发生的场景比如业务线程请求分配内存,但是内存不够了,于是可能触发一次 CMS GC ,这个过程就必须是要等内存分配到了线程才能继续往下面走的,因此整个过程必须是 STW 的,此时的 CMS GC 整个过程都是暂停应用的,但是为了提高效率,它并不是每个阶段都会走的,只走其中一些阶段,跳过的阶段主要是并行阶段,即 Precleaning 、 AbortablePreclean , Resizing 这几个阶段都不会经历,其中 sweep 阶段是同步的,但不管怎么说如果走了类似 foreground 的 cms gc ,那么整个过程业务线程都是不可用的,效率会影响挺大。
正常 Full GC 其实是整个 GC 过程是真正意义上的 Full GC ,还有些场景虽然调用 Full GC 的接口,但是并不会都做,有些时候只做 Young GC ,有些时候只做 cms gc 。而且由前面的代码可知,最终都是由 VMThread 来执行的,因此整个时间是 Young GC+CMS GC 的时间之和,其中 CMS GC 是上面提到的 foreground 式的,因此整个过程会比较长,也是我们要避免的。
并行Full GC也通样会做 YGC 和 CMS GC ,但是效率高就高在 CMS GC 是走的 background 的,整个暂停的过程主要是 YGC+CMS_initMark+CMS_remark 几个阶段。
GenCollectedHeap::collect 这个方法中有一句注释 The caller doesn't have the Heap_lock ,即调用者并不持有 Heap_lock ,也就能理解 foreground 了。
总结
System.gc() 会触发 Full GC ,可以通过 -XX:+DisableExplicitGC 参数屏蔽 System.gc() ,在使用 CMS GC 的前提下,也可以使用 -XX:+ExplicitGCInvokesConcurrent 参数来进行并行 Full GC ,提升性能。 不过,一般不推荐使用 System.gc() ,因为 Full GC 耗时比较长,对应用影响较大。同样也不建议设置 -XX:+DisableExplicitGC ,特别是在有使用堆外内存的情况下,如果堆外内存申请不到足够的空间, jdk 会触发一次 System.gc() ,来进行回收,如果屏蔽了,申请不到内存,自然就 OOME 了。
参考博客 :
lovestblog.cn/blog/2015/0…
www.jianshu.com/p/40412b008…
使用Unsafe.allocateMemory分配内存
sun.misc.Unsafe 提供了一组方法来进行内存的分配,重新分配,以及释放。它们和 C 的 malloc/free 方法很像:
- long Unsafe.allocateMemory(long size) ——分配一块内存空间。这块内存可能会包含垃圾数据(没有自动清零)。如果分配失败的话会抛一个
java.lang.OutOfMemoryError的异常。它会返回一个非零的内存地址。 - Unsafe.reallocateMemory(long address, long size) ——重新分配一块内存,把数据从旧的内存缓冲区(
address指向的地方)中拷贝到的新分配的内存块中。如果地址等于0,这个方法和allocateMemory的效果是一样的。它返回的是新的内存缓冲区的地址。 - Unsafe.freeMemory(long address) ——释放一个由前面那两方法生成的内存缓冲区。如果
address为0则什么也不做。
//jdk.internal.misc.Unsafe#allocateMemory
public long allocateMemory(long bytes) {
        allocateMemoryChecks(bytes);

        if (bytes == 0) {
            return 0;
        }

        long p = allocateMemory0(bytes);
        if (p == 0) {
            throw new OutOfMemoryError();
        }

        return p;
    }
//jdk.internal.misc.Unsafe#allocateMemory0
private native long allocateMemory0(long bytes);
复制代码
关于 allocateMemory0 这个本地方法定义如下:
//src/hotspot/share/prims/unsafe.cpp
UNSAFE_ENTRY(jlong, Unsafe_AllocateMemory0(JNIEnv *env, jobject unsafe, jlong size)) {
  size_t sz = (size_t)size;

  sz = align_up(sz, HeapWordSize);
  void* x = os::malloc(sz, mtOther);

  return addr_to_java(x);
} UNSAFE_END
复制代码
可以看出 sun.misc.Unsafe#allocateMemory 使用 malloc 这个C标准库的函数来申请内存。如果使用的是Linux,多半就是用的 Linux 自带的 glibc 里的 ptmalloc 。
DirectByteBuffer内存释放原理
在 DirectByteBuffer 的构造函数的最后,我们看到这行代码:
// 创建一个cleaner,最后会调用Deallocator.run来释放内存
cleaner = Cleaner.create(this, new Deallocator(base, size, cap));
复制代码
DirectByteBuffer 本身是一个 Java 对象,其是位于堆内存中的,通过 JDK 的 GC 机制可以自动帮我们回收,但其申请的直接内存,不在 GC 范围之内,无法自动回收。我们是不是可以为 DirectByteBuffer 这个堆内存对象注册一个钩子函数(这里可以通过 Runnable 接口的 run 方法来实现这个动作),当 DirectByteBuffer 对象被 GC 回收的时候,会回调这个 run 方法,即在这个方法中执行释放 DirectByteBuffer 引用的直接内存,也就是在 run 方法中调用 Unsafe 的 freeMemory 方法。由上面所示代码可知,注册是通过 sun.misc.Cleaner 类的 Create 方法来实现的。
//jdk.internal.ref.Cleaner#create
/**
 * Creates a new cleaner.
 *
 * @param  ob the referent object to be cleaned
 * @param  thunk
 *         The cleanup code to be run when the cleaner is invoked.  The
 *         cleanup code is run directly from the reference-handler thread,
 *         so it should be as simple and straightforward as possible.
 *
 * @return  The new cleaner
 */
public static Cleaner create(Object ob, Runnable thunk) {
    if (thunk == null)
        return null;
    return add(new Cleaner(ob, thunk));
}

//jdk.internal.ref.Cleaner#clean
/**
 * Runs this cleaner, if it has not been run before.
 */
public void clean() {
    if (!remove(this))
        return;
    try {
        thunk.run();
    } catch (final Throwable x) {
        AccessController.doPrivileged(new PrivilegedAction<>() {
            public Void run() {
                if (System.err != null)
                    new Error("Cleaner terminated abnormally", x)
                    .printStackTrace();
                System.exit(1);
                return null;
            }});
    }
}
复制代码
由之前代码和上面代码注释可知,其中第一个参数是一个堆内存对象,这里是指 DirectByteBuffer 对象,第二个参数是一个 Runnable 任务,其内定义了一个动作,表示这个堆内存对象被回收的时候,需要执行的回调方法。我们可以看到在 DirectByteBuffer 的最后一行中,传入的这两个参数分别是 this ,和一个 Deallocator (实现了 Runnable 接口),其中 this 表示就是当前 DirectByteBuffer 实例,也就是当前 DirectByteBuffer 被回收的时候,回调 Deallocator 的 run 方法,清除 DirectByteBuffer 引用的直接内存,代码如下所示:
private static class Deallocator
    implements Runnable
{

    private long address;
    private long size;
    private int capacity;

    private Deallocator(long address, long size, int capacity) {
        assert (address != 0);
        this.address = address;
        this.size = size;
        this.capacity = capacity;
    }

    public void run() {
        if (address == 0) {
            // Paranoia
            return;
        }
        UNSAFE.freeMemory(address);
        address = 0;
        Bits.unreserveMemory(size, capacity);
    }

}
复制代码
可以看到 run 方法中调用了 UNSAFE.freeMemory 方法释放了直接内存的引用。
DirectByteBuffer内存释放流程
因为 DirectByteBuffer 申请的内存是在堆外,而 DirectByteBuffer 本身也只保存了内存的起始地址,所以 DirectByteBuffer 的内存占用是由堆内的 DirectByteBuffer 对象与堆外的对应内存空间共同构成。
按照我们之前的玩法,Java中可以利用的特性有 finalize 函数,但是 finalize 机制是Java官方不推荐的,因为有诸多需要注意的地方,推荐的做法是使用虚引用来处理对象被回收时的后续处理工作。这里 JDK 提供了 Cleaner 类来简化这个操作, Cleaner 是 PhantomReference 的子类,那么就可以在 PhantomReference 被加入 ReferenceQueue 时触发对应的 Runnable 回调。
DirectByteBuffer读写操作
DirectByteBuffer 最终会使用 sun.misc.Unsafe#getByte(long) 和 sun.misc.Unsafe#putByte(long, byte) 这两个方法来读写堆外内存空间的指定位置的字节数据。无非就是通过地址来读写相应内存位置的数据,具体代码如下所示。
//java.nio.Buffer#nextGetIndex()
final int nextGetIndex() {                          // package-private
    if (position >= limit)
        throw new BufferUnderflowException();
    return position++;
}
//java.nio.DirectByteBuffer
public long address() {
    return address;
}

private long ix(int i) {
    return address + ((long)i << 0);
}

public byte get() {
    try {
        return ((UNSAFE.getByte(ix(nextGetIndex()))));
    } finally {
        Reference.reachabilityFence(this);
    }
}

public byte get(int i) {
    try {
        return ((UNSAFE.getByte(ix(checkIndex(i)))));
    } finally {
        Reference.reachabilityFence(this);
    }
}

public ByteBuffer put(byte x) {
    try {
        UNSAFE.putByte(ix(nextPutIndex()), ((x)));
    } finally {
        Reference.reachabilityFence(this);
    }
    return this;
}

public ByteBuffer put(int i, byte x) {
    try {
        UNSAFE.putByte(ix(checkIndex(i)), ((x)));
    } finally {
        Reference.reachabilityFence(this);
    }
    return this;
}
复制代码
MappedByteBuffer的二三事
MappedByteBuffer 本应该是 DirectByteBuffer 的子类,但为了保持结构规范清晰简单,并且出于优化目的,反过来更恰当,也是因为 DirectByteBuffer 属于包级别的私有类(即class关键字前并没有类权限定义),在定义抽象类的时候本就是为了可扩展,这样,大家也就可以明白JDK为何这么设计了。虽然 MappedByteBuffer 在逻辑上应该是DirectByteBuffer的子类,而且 MappedByteBuffer 的内存的GC和 DirectByteBuffer 的GC类似(和堆GC不同),但是分配的 MappedByteBuffer 的大小不受 -XX:MaxDirectMemorySize 参数影响。 因为要基于系统级别的IO操作,所以需要给其设定一个 FileDescriptor 来映射 buffer 的操作,如果并未映射到 buffer ,那这个 FileDescriptor 为 null 。
MappedByteBuffer 封装的是内存映射文件操作,也就是只能进行文件IO操作。 MappedByteBuffer 是根据 mmap 产生的映射缓冲区,这部分缓冲区被映射到对应的文件页上,通过 MappedByteBuffer 可以直接操作映射缓冲区,而这部分缓冲区又被映射到文件页上,操作系统通过对应内存页的调入和调出完成文件的写入和写出。
FileChannel中map方法解读
我们可以通过 java.nio.channels.FileChannel#map(MapMode mode,long position, long size) 得到 MappedByteBuffer ,我们来看 sun.nio.ch.FileChannelImpl 对它的实现:
private static final int MAP_RO = 0;
private static final int MAP_RW = 1;
private static final int MAP_PV = 2;
//sun.nio.ch.FileChannelImpl#map
public MappedByteBuffer map(MapMode mode, long position, long size)
throws IOException
{
    ensureOpen();
    if (mode == null)
        throw new NullPointerException("Mode is null");
    if (position < 0L)
        throw new IllegalArgumentException("Negative position");
    if (size < 0L)
        throw new IllegalArgumentException("Negative size");
    if (position + size < 0)
        throw new IllegalArgumentException("Position + size overflow");
    //最大2G
    if (size > Integer.MAX_VALUE)
        throw new IllegalArgumentException("Size exceeds Integer.MAX_VALUE");

    int imode = -1;
    if (mode == MapMode.READ_ONLY)
        imode = MAP_RO;
    else if (mode == MapMode.READ_WRITE)
        imode = MAP_RW;
    else if (mode == MapMode.PRIVATE)
        imode = MAP_PV;
    assert (imode >= 0);
    if ((mode != MapMode.READ_ONLY) && !writable)
        throw new NonWritableChannelException();
    if (!readable)
        throw new NonReadableChannelException();

    long addr = -1;
    int ti = -1;
    try {
        beginBlocking();
        ti = threads.add();
        if (!isOpen())
            return null;

        long mapSize;
        int pagePosition;
        synchronized (positionLock) {
            long filesize;
            do {
                //nd.size()返回实际的文件大小
                filesize = nd.size(fd);
            } while ((filesize == IOStatus.INTERRUPTED) && isOpen());
            if (!isOpen())
                return null;

            //如果实际文件大小 小于所需求文件大小,则增大文件的大小,
            //文件的大小被改变,文件增大的部分默认设置为0。
            if (filesize < position + size) { // Extend file size
                if (!writable) {
                    throw new IOException("Channel not open for writing " +
                        "- cannot extend file to required size");
                }
                int rv;
                do {
                    //增大文件的大小
                    rv = nd.truncate(fd, position + size);
                } while ((rv == IOStatus.INTERRUPTED) && isOpen());
                if (!isOpen())
                    return null;
            }
            //如果要求映射的文件大小为0,则不调用操作系统的mmap调用,
            //只是生成一个空间容量为0的DirectByteBuffer并返回
            if (size == 0) {
                addr = 0;
                // a valid file descriptor is not required
                FileDescriptor dummy = new FileDescriptor();
                if ((!writable) || (imode == MAP_RO))
                    return Util.newMappedByteBufferR(0, 0, dummy, null);
                else
                    return Util.newMappedByteBuffer(0, 0, dummy, null);
            }
            //allocationGranularity为所映射的缓冲区分配内存大小,pagePosition为第多少页
            pagePosition = (int)(position % allocationGranularity);
            //得到映射的位置,即从mapPosition开始映射
            long mapPosition = position - pagePosition;
            //从页的最开始映射加pagePosition,以此增大映射空间
            mapSize = size + pagePosition;
            try {
                //后面会进行解读
                // If map0 did not throw an exception, the address is valid
                addr = map0(imode, mapPosition, mapSize);
            } catch (OutOfMemoryError x) {
                // An OutOfMemoryError may indicate that we've exhausted
                // memory so force gc and re-attempt map
                System.gc();
                try {
                    Thread.sleep(100);
                } catch (InterruptedException y) {
                    Thread.currentThread().interrupt();
                }
                try {
                    addr = map0(imode, mapPosition, mapSize);
                } catch (OutOfMemoryError y) {
                    // After a second OOME, fail
                    throw new IOException("Map failed", y);
                }
            }
        } // synchronized

        // On Windows, and potentially other platforms, we need an open
        // file descriptor for some mapping operations.
        FileDescriptor mfd;
        try {
            mfd = nd.duplicateForMapping(fd);
        } catch (IOException ioe) {
            unmap0(addr, mapSize);
            throw ioe;
        }

        assert (IOStatus.checkAll(addr));
        assert (addr % allocationGranularity == 0);
        int isize = (int)size;
        Unmapper um = new Unmapper(addr, mapSize, isize, mfd);
        if ((!writable) || (imode == MAP_RO)) {
            return Util.newMappedByteBufferR(isize,
                                                addr + pagePosition,
                                                mfd,
                                                um);
        } else {
            return Util.newMappedByteBuffer(isize,
                                            addr + pagePosition,
                                            mfd,
                                            um);
        }
    } finally {
        threads.remove(ti);
        endBlocking(IOStatus.checkAll(addr));
    }
}
复制代码
我们来看 sun.nio.ch.FileChannelImpl#map0 的实现:
//src/java.base/unix/native/libnio/ch/FileChannelImpl.c
JNIEXPORT jlong JNICALL
Java_sun_nio_ch_FileChannelImpl_map0(JNIEnv *env, jobject this,
                                     jint prot, jlong off, jlong len)
{
    void *mapAddress = 0;
    jobject fdo = (*env)->GetObjectField(env, this, chan_fd);
     //这里得到所操作文件的读取状态,即对应的文件描述符的值
    jint fd = fdval(env, fdo);
    int protections = 0;
    int flags = 0;

    if (prot == sun_nio_ch_FileChannelImpl_MAP_RO) {
        protections = PROT_READ;
        flags = MAP_SHARED;
    } else if (prot == sun_nio_ch_FileChannelImpl_MAP_RW) {
        protections = PROT_WRITE | PROT_READ;
        flags = MAP_SHARED;
    } else if (prot == sun_nio_ch_FileChannelImpl_MAP_PV) {
        protections =  PROT_WRITE | PROT_READ;
        flags = MAP_PRIVATE;
    }
//这里就是操作系统调用了,mmap64是宏定义,实际最后调用的是mmap
    mapAddress = mmap64(
        0,                    /* Let OS decide location */
        len,                  /* Number of bytes to map */
        protections,          /* File permissions */
        flags,                /* Changes are shared */
        fd,                   /* File descriptor of mapped file */
        off);                 /* Offset into file */

    if (mapAddress == MAP_FAILED) {
        if (errno == ENOMEM) {
            //如果没有映射成功,直接抛出OutOfMemoryError
            JNU_ThrowOutOfMemoryError(env, "Map failed");
            return IOS_THROWN;
        }
        return handle(env, -1, "Map failed");
    }

    return ((jlong) (unsigned long) mapAddress);
}
复制代码
这里要注意的是,虽然 FileChannel.map() 的 size 参数是 long ,但是 size 的大小最大为 Integer.MAX_VALUE ,也就是最大只能映射最大 2G 大小的空间。实际上操作系统提供的 mmap 可以分配更大的空间,但是 JAVA 在此处限制在 2G 。 这里我们来涉及一个生产事故,使用 spark 处理较大的数据文件,遇到了分区2G限制的问题, spark 会报如下的日志:
WARN scheduler.TaskSetManager: Lost task 19.0 in stage 6.0 (TID 120, 10.111.32.47): java.lang.IllegalArgumentException: Size exceeds Integer.MAX_VALUE
at sun.nio.ch.FileChannelImpl.map(FileChannelImpl.java:828)
at org.apache.spark.storage.DiskStore.getBytes(DiskStore.scala:123)
at org.apache.spark.storage.DiskStore.getBytes(DiskStore.scala:132)
at org.apache.spark.storage.BlockManager.doGetLocal(BlockManager.scala:517)
at org.apache.spark.storage.BlockManager.getLocal(BlockManager.scala:432)
at org.apache.spark.storage.BlockManager.get(BlockManager.scala:618)
at org.apache.spark.CacheManager.putInBlockManager(CacheManager.scala:146)
at org.apache.spark.CacheManager.getOrCompute(CacheManager.scala:70)

复制代码
结合之前的源码:
//最大2G
if (size > Integer.MAX_VALUE)
    throw new IllegalArgumentException("Size exceeds Integer.MAX_VALUE");
复制代码
我们是不是可以很轻易的定位到错误的所在,以及为何会产生这样的错误,虽然日志里写的也很清楚,但我们从本质上有了更深入的理解。于是我们就可以想办法了,既然改变不了2G这个限制,那么我们就把容器数量提高上来就可以了,也就是手动设置RDD的分区数量。当前使用的 Spark 默认 RDD 分区是 18 个,手动设置为 500 个(具体还需要根据自己生产环境中的实际内存容量考虑),上面这个问题就迎刃而解了。具体操作为,可以在 RDD 加载后,使用 RDD.repartition(numPart:Int) 函数重新设置分区数量。
val data_new = data.repartition(500)
复制代码
MappedByteBuffer是通过mmap产生得到的缓冲区,这部分缓冲区是由操作系统直接创建和管理的,最后JVM通过unmmap让操作系统直接释放这部分内存。
private static void unmap(MappedByteBuffer bb) {
    Cleaner cl = ((DirectBuffer)bb).cleaner();
    if (cl != null)
        cl.clean();
}
复制代码
可以看到,这里传入的一个 MappedByteBuffer 类型的参数,我们回到 sun.nio.ch.FileChannelImpl#map 方法实现中,为了方便回收,这里对所操作的文件描述符进行再次包装,即 mfd = nd.duplicateForMapping(fd) ,然后同样通过一个 Runnable 接口的实现来定义一个释放内存的行为(这里是 Unmapper 实现),于是 Unmapper um = new Unmapper(addr, mapSize, isize, mfd); 也就不难理解了,最后,因为我们要返回一个 MappedByteBuffer 对象,所以,就有如下代码实现:
int isize = (int)size;
    Unmapper um = new Unmapper(addr, mapSize, isize, mfd);
    if ((!writable) || (imode == MAP_RO)) {
        return Util.newMappedByteBufferR(isize,
                                            addr + pagePosition,
                                            mfd,
                                            um);
    } else {
        return Util.newMappedByteBuffer(isize,
                                        addr + pagePosition,
                                        mfd,
                                        um);
    }
复制代码
其实就是创建了一个 DirectByteBuffer 对象,这里的回收策略和我们之前接触的 java.nio.ByteBuffer#allocateDirect (也就是 java.nio.DirectByteBuffer#DirectByteBuffer(int) )是不同的。这里是需要最后调用 munmap 来进行系统回收的。
protected DirectByteBuffer(int cap, long addr,
                                    FileDescriptor fd,
                                    Runnable unmapper)
{

    super(-1, 0, cap, cap, fd);
    address = addr;
    cleaner = Cleaner.create(this, unmapper);
    att = null;

}

// -- Memory-mapped buffers --
//sun.nio.ch.FileChannelImpl.Unmapper
    private static class Unmapper
        implements Runnable
    {
        // may be required to close file
        private static final NativeDispatcher nd = new FileDispatcherImpl();

        // keep track of mapped buffer usage
        static volatile int count;
        static volatile long totalSize;
        static volatile long totalCapacity;

        private volatile long address;
        private final long size;
        private final int cap;
        private final FileDescriptor fd;

        private Unmapper(long address, long size, int cap,
                         FileDescriptor fd)
        {
            assert (address != 0);
            this.address = address;
            this.size = size;
            this.cap = cap;
            this.fd = fd;

            synchronized (Unmapper.class) {
                count++;
                totalSize += size;
                totalCapacity += cap;
            }
        }

        public void run() {
            if (address == 0)
                return;
            unmap0(address, size);
            address = 0;

            // if this mapping has a valid file descriptor then we close it
            if (fd.valid()) {
                try {
                    nd.close(fd);
                } catch (IOException ignore) {
                    // nothing we can do
                }
            }

            synchronized (Unmapper.class) {
                count--;
                totalSize -= size;
                totalCapacity -= cap;
            }
        }
    }
复制代码
此处涉及的 unmap0(address, size) 本地实现如下,可以看到,它调用了 munmap 。
JNIEXPORT jint JNICALL
Java_sun_nio_ch_FileChannelImpl_unmap0(JNIEnv *env, jobject this,
                                       jlong address, jlong len)
{
    void *a = (void *)jlong_to_ptr(address);
    return handle(env,
                  munmap(a, (size_t)len),
                  "Unmap failed");
}
复制代码
FileChannel的map方法小结
关于 FileChannel 的 map 方法,简单的说就是将文件映射为内存映像文件。也就是通过 MappedByteBuffer map(int mode,long position,long size) 可以把文件的从 position 开始的 size 大小的区域映射为内存映像文件, mode 是指可访问该内存映像文件的方式: READ_ONLY , READ_WRITE , PRIVATE 。
-
READ_ONLY(MapMode.READ_ONLY只读):试图修改得到的缓冲区将导致抛出ReadOnlyBufferException。 -
READ_WRITE(MapMode.READ_WRITE读/写):对得到的缓冲区的更改最终将传播到文件;该更改对映射到同一文件的其他程序不一定是可见的。 -
PRIVATE(MapMode.PRIVATE专用): 对得到的缓冲区的更改不会传播到文件,并且该更改对映射到同一文件的其他程序也不是可见的;相反,会创建缓冲区已修改部分的专用副本。
调用 FileChannel 的 map() 方法后,即可将文件的某一部分或全部映射到内存中,而由前文可知,映射内存缓冲区是个直接缓冲区,虽继承自 ByteBuffer ,但相对于 ByteBuffer ,它有更多的优点:
- 读取快
- 写入快
- 随时随地写入
mmap快速了解
简而言之,就是通过 mmap 将文件直接映射到用户态的内存地址,这样对文件的操作就不再是 write/read ,而是直接对内存地址的操作。 在c中提供了三个函数来实现 :
mmap
munmap
msync
首先建立好虚拟内存和硬盘文件之间的映射( mmap 系统调用),当进程访问页面时产生一个缺页中断,内核将页面读入内存(也就是说把硬盘上的文件拷贝到内存中),并且更新页表指向该页面。 所有进程共享同一物理内存,物理内存中可以只存储一份数据,不同的进程只需要把自己的虚拟内存映射过去就可以了,这种方式非常方便于同一副本的共享,节省内存。 经过内存映射之后,文件内的数据就可以用内存读/写指令来访问,而不是用 Read 和 Write 这样的 I/O 系统函数,从而提高了文件存取速度。
更多的可以参考 MappedByteBuffer以及mmap的底层原理
FileChannel中的force探究
为了配合 FileChannel 的 map 方法,这里有必要介绍下它的三个配套方法:
-
force():缓冲区是READ_WRITE模式下,此方法会对缓冲区内容的修改强行写入文件,即将缓冲区内存更新的内容刷到硬盘中。 -
load():将缓冲区的内容载入内存,并返回该缓冲区的引用。 -
isLoaded():如果缓冲区的内容在物理内存中,则返回真,否则返回假。 这里,我们对sun.nio.ch.FileChannelImpl#force实现进行下分析,首来看其相关源码。
//sun.nio.ch.FileChannelImpl#force
public void force(boolean metaData) throws IOException {
    ensureOpen();
    int rv = -1;
    int ti = -1;
    try {
        beginBlocking();
        ti = threads.add();
        if (!isOpen())
            return;
        do {
            rv = nd.force(fd, metaData);
        } while ((rv == IOStatus.INTERRUPTED) && isOpen());
    } finally {
        threads.remove(ti);
        endBlocking(rv > -1);
        assert IOStatus.check(rv);
    }
}
//sun.nio.ch.FileDispatcherImpl#force
int force(FileDescriptor fd, boolean metaData) throws IOException {
return force0(fd, metaData);
}
static native int force0(FileDescriptor fd, boolean metaData)
throws IOException;

//src/java.base/unix/native/libnio/ch/FileDispatcherImpl.c
JNIEXPORT jint JNICALL
Java_sun_nio_ch_FileDispatcherImpl_force0(JNIEnv *env, jobject this,
                                          jobject fdo, jboolean md)
{
    jint fd = fdval(env, fdo);
    int result = 0;

#ifdef MACOSX
    result = fcntl(fd, F_FULLFSYNC);
    if (result == -1 && errno == ENOTSUP) {
        /* Try fsync() in case F_FULLSYUNC is not implemented on the file system. */
        result = fsync(fd);
    }
#else /* end MACOSX, begin not-MACOSX */
    if (md == JNI_FALSE) {
        result = fdatasync(fd);
    } else {
#ifdef _AIX
        /* On AIX, calling fsync on a file descriptor that is opened only for
         * reading results in an error ("EBADF: The FileDescriptor parameter is
         * not a valid file descriptor open for writing.").
         * However, at this point it is not possibly anymore to read the
         * 'writable' attribute of the corresponding file channel so we have to
         * use 'fcntl'.
         */
        int getfl = fcntl(fd, F_GETFL);
        if (getfl >= 0 && (getfl & O_ACCMODE) == O_RDONLY) {
            return 0;
        }
#endif /* _AIX */
        result = fsync(fd);
    }
#endif /* not-MACOSX */
    return handle(env, result, "Force failed");
}
复制代码
我们跳过针对 MACOSX 的实现,只关注针对linux平台的。发现 force 在传入参数为 false 的情况下,调用的是 fdatasync(fsync) 。 通过查询 Linux 函数手册(可参考fdatasync),我们可以看到:
fsync() transfers ("flushes") all modified in-core data of (i.e., modified buffer cache pages for) the file referred to by the file descriptor fd to the disk device (or other permanent storage device) so that all changed information can be retrieved even after the system crashed or was rebooted. This includes writing through or flushing a disk cache if present. The call blocks until the device reports that the transfer has completed. It also flushes metadata information associated with the file (see stat(2)).

Calling fsync() does not necessarily ensure that the entry in the directory containing the file has also reached disk. For that an explicit fsync() on a file descriptor for the directory is also needed.

fdatasync() is similar to fsync(), but does not flush modified metadata unless that metadata is needed in order to allow a subsequent data retrieval to be correctly handled. For example, changes to st_atime or st_mtime (respectively, time of last access and time of last modification; see stat(2)) do not require flushing because they are not necessary for a subsequent data read to be handled correctly. On the other hand, a change to the file size (st_size, as made by say ftruncate(2)), would require a metadata flush.

The aim of fdatasync() is to reduce disk activity for applications that do not require all metadata to be synchronized with the disk.
复制代码
简单描述下, fdatasync 只刷新数据到硬盘。 fsync 同时刷新数据和 inode 信息到硬盘,例如 st_atime 。 因为 inode 和数据不是连续存放在硬盘中,所以 fsync 需要更多的写硬盘,但是可以让 inode 得到更新。如果不关注 inode 信息的情况(例如最近一次访问文件),可以通过使用 fdatasync 提高性能。对于关注 inode 信息的情况,则应该使用 fsync 。
需要注意,如果物理硬盘的 write cache 是开启的,那么 fsync 和 fdatasync 将不能保证回写的数据被完整的写入到硬盘存储介质中(数据可能依然保存在硬盘的cache中,并没有写入介质),因此可能会出现明明调用了 fsync 系统调用但是数据在掉电后依然丢失了或者出现文件系统不一致的情况。
这里,为了保证硬盘上实际文件系统与缓冲区高速缓存中内容的一致性, UNIX 系统提供了 sync 、 fsync 和 fdatasync 三个函数。 sync 函数只是将所有修改过的块缓冲区排入写队列,然后就返回,它并不等待实际写硬盘操作结束。 通常称为 update 的系统守护进程会周期性地(一般每隔 30 秒)调用 sync 函数。这就保证了定期冲洗内核的块缓冲区。命令 sync(1) 也调用 sync 函数。 fsync 函数只对由文件描述符 filedes 指定的单一文件起作用,并且等待写硬盘操作结束,然后返回。 fsync 可用于数据库这样的应用程序,这种应用程序需要确保将修改过的块立即写到硬盘上。 fdatasync 函数类似于 fsync ,但它只影响文件的数据部分。而除数据外, fsync 还会同步更新文件的属性。
也就是说,对于 fdatasync 而言,会首先写到 page cache ,然后由 pdflush 定时刷到硬盘中,那这么说 mmap 只是在进程空间分配一个内存地址,真实的内存还是使用的 pagecache 。所以 force 是调用 fsync 将 dirty page 刷到硬盘中,但 mmap 还有共享之类的实现起来应该很复杂。
也就是说,在 Linux 中,当 FileChannel 中的 force 传入参数为 true 时,调用 fsync , false 调用 fdatasync , fdatasync 只刷数据不刷 meta 数据 。即使不调用 force ,内核也会定期将 dirty page 刷到硬盘,默认是 30s 。
最后,我们给出一个使用的Demo:
FileOutputStream outputStream = new FileOutputStream("/Users/simviso/b.txt");

// 强制文件数据与元数据落盘
outputStream.getChannel().force(true);

// 强制文件数据落盘,不关心元数据是否落盘
outputStream.getChannel().force(false);

复制代码
零拷贝
使用内存映射缓冲区( Memory-Mapped-Buffer )来操作文件,它比普通的IO操作读文件要快得多。因为,使用内存映射缓冲区操作文件时,并没有显式的进行相关系统调用( read , write ),而且在一定条件下, OS 还会自动缓存一些文件页( memory page )。 通过 zerocopy 可以提高 IO 密集型的 JAVA 应用程序的性能。 IO 操作需要数据频繁地在内核缓冲区和用户缓冲区之间拷贝,而通过 zerocopy 可以减少这种拷贝的次数,同时也降低了上下文切换(用户态与内核态之间的切换)的次数。 我们大多数WEB应用程序执行的一个操作流程就是:接受用户请求-->从本地硬盘读数据-->数据进入内核缓冲区-->用户缓冲区-->内核缓冲区-->用户缓冲区-->通过 socket 发送。 数据每次在内核缓冲区与用户缓冲区之间的拷贝都会消耗 CPU 以及内存的带宽。而通过 zerocopy 可以有效减少这种拷贝次数。 这里,我们来以文件服务器的数据传输为例来分析下整个流程:从 服务器硬盘 中读文件,并把文件通过网络( socket )发送给 客户端 ,写成代码的话,其实核心就两句话:
File.read(fileDesc, buffer, len);
Socket.send(socket, buffer, len);
复制代码
也就两步操作。第一步:将文件读入 buffer ;第二步:将 buffer 中的数据通过 socket 发送出去。但是,这两步操作需要四次上下文切换(也就是用户态与内核态之间的切换)和四次 copy 操作才能完成。整个过程如下图所示:
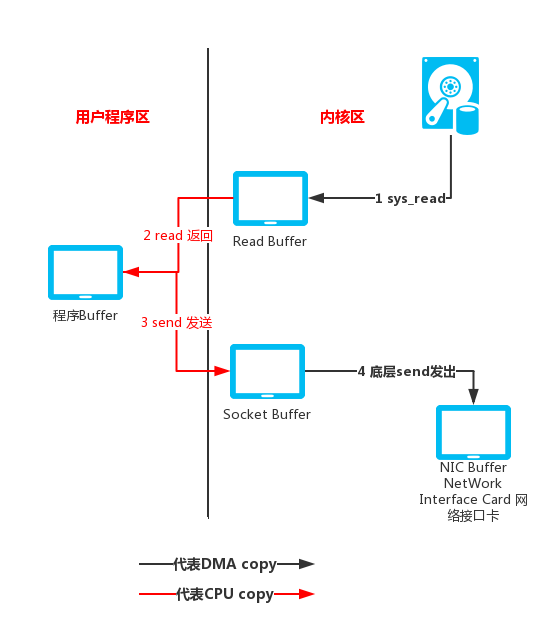
-
第一次上下文切换发生在
read()方法执行,表示服务器要去硬盘上读文件了,这会触发一个sys_read()的系统调用。此时由用户态切换到内核态,完成的动作是:DMA把硬盘上的数据读入到内核缓冲区中(第一次拷贝)。 -
第二次上下文切换发生在
read()方法的返回(read()是一个阻塞调用),表示数据已经成功从硬盘上读到内核缓冲区了。此时,由内核态返回到用户态,完成的动作是:将内核缓冲区中的数据拷贝到用户缓冲区(第二次拷贝)。 -
第三次上下文切换发生在
send()方法执行,表示服务器准备把数据发送出去。此时,由用户态切换到内核态,完成的动作是:将用户缓冲区中的数据拷贝到内核缓冲区(第三次拷贝) -
第四次上下文切换发生在
send()方法的返回,这里的send()方法可以异步返回:线程执行了send()之后立即从send()返回,剩下的数据拷贝及发送就交给操作系统底层实现了。此时,由内核态返回到用户态,完成的动作是:将内核缓冲区中的数据送到NIC Buffer。(第四次拷贝)
内核缓冲区
为什么需要内核缓冲区?因为内核缓冲区提高了性能。通过前面的学习可知,正是因为引入了内核缓冲区(中间缓冲区),使得数据来回地拷贝,降低了效率。那为什么又说内核缓冲区提高了性能?
对于读操作而言,内核缓冲区就相当于一个 预读缓存 ,当用户程序一次只需要读一小部分数据时,首先操作系统会从硬盘上读一大块数据到内核缓冲区,用户程序只取走了一小部分( 比如我只 new byte[128] 这样一个小的字节数组来读)。当用户程序下一次再读数据,就可以直接从内核缓冲区中取了,操作系统就不需要再次访问硬盘了!因为用户要读的数据已经在内核缓冲区中!这也是前面提到的:为什么后续的读操作( read() 方法调用)要明显地比第一次快的原因。从这个角度而言, 内核缓冲区确实提高了读操作的性能 。
再来看写操作:可以做到 “异步写”。所谓的异步,就是在 wirte(dest[]) 时,用户程序告诉操作系统,把 dest[] 数组中的内容写到 XXX文件 中去,然后 write 方法就返回了。操作系统则在后台默默地将用户缓冲区中的内容( dest[] )拷贝到内核缓冲区,再把内核缓冲区中的数据写入硬盘。那么,只要内核缓冲区未满,用户的 write 操作就可以很快地返回。这就是所谓的 异步刷盘策略 。
通过zerocopy处理文件传输
讲到copy,在jdk7引入了 java.nio.file.Files 这个类,方便了很多文件操作,但是它更多应用于小文件的传输,不适合大文件,针对后者,应该使用 java.nio.channels.FileChannel 类下的 transferTo , transferFrom 方法。 这里,我们来分析下 transferTo 方法细节,源码如下:
public long transferTo(long position, long count,
                           WritableByteChannel target)
        throws IOException
    {
        ensureOpen();
        if (!target.isOpen())
            throw new ClosedChannelException();
        if (!readable)
            throw new NonReadableChannelException();
        if (target instanceof FileChannelImpl &&
            !((FileChannelImpl)target).writable)
            throw new NonWritableChannelException();
        if ((position < 0) || (count < 0))
            throw new IllegalArgumentException();
        long sz = size();
        if (position > sz)
            return 0;
        int icount = (int)Math.min(count, Integer.MAX_VALUE);
        if ((sz - position) < icount)
            icount = (int)(sz - position);

        long n;

        // Attempt a direct transfer, if the kernel supports it
        if ((n = transferToDirectly(position, icount, target)) >= 0)
            return n;

        // Attempt a mapped transfer, but only to trusted channel types
        if ((n = transferToTrustedChannel(position, icount, target)) >= 0)
            return n;

        // Slow path for untrusted targets
        return transferToArbitraryChannel(position, icount, target);
    }

复制代码
这里使用了三种不同的方式来尝试去拷贝文件,我们先来看 transferToDirectly :
//sun.nio.ch.FileChannelImpl#transferToDirectly
private long transferToDirectly(long position, int icount,
                                    WritableByteChannel target)
        throws IOException
    {
        if (!transferSupported)
            return IOStatus.UNSUPPORTED;

        FileDescriptor targetFD = null;
        if (target instanceof FileChannelImpl) {
            if (!fileSupported)
                return IOStatus.UNSUPPORTED_CASE;
            targetFD = ((FileChannelImpl)target).fd;
        } else if (target instanceof SelChImpl) {
            // Direct transfer to pipe causes EINVAL on some configurations
            if ((target instanceof SinkChannelImpl) && !pipeSupported)
                return IOStatus.UNSUPPORTED_CASE;

            // Platform-specific restrictions. Now there is only one:
            // Direct transfer to non-blocking channel could be forbidden
            SelectableChannel sc = (SelectableChannel)target;
            if (!nd.canTransferToDirectly(sc))
                return IOStatus.UNSUPPORTED_CASE;

            targetFD = ((SelChImpl)target).getFD();
        }

        if (targetFD == null)
            return IOStatus.UNSUPPORTED;
        int thisFDVal = IOUtil.fdVal(fd);
        int targetFDVal = IOUtil.fdVal(targetFD);
        if (thisFDVal == targetFDVal) // Not supported on some configurations
            return IOStatus.UNSUPPORTED;

        if (nd.transferToDirectlyNeedsPositionLock()) {
            synchronized (positionLock) {
                long pos = position();
                try {
                    return transferToDirectlyInternal(position, icount,
                                                      target, targetFD);
                } finally {
                    position(pos);
                }
            }
        } else {
            return transferToDirectlyInternal(position, icount, target, targetFD);
        }
    }
复制代码
这个方法中的很多细节我们都已经接触过了,大家可以借这个方法的细节回顾下前面的知识,这里,直奔主题,来查看 transferToDirectlyInternal 的细节:
//sun.nio.ch.FileChannelImpl#transferToDirectlyInternal
private long transferToDirectlyInternal(long position, int icount,
                                        WritableByteChannel target,
                                        FileDescriptor targetFD)
    throws IOException
{
    assert !nd.transferToDirectlyNeedsPositionLock() ||
            Thread.holdsLock(positionLock);

    long n = -1;
    int ti = -1;
    try {
        beginBlocking();
        ti = threads.add();
        if (!isOpen())
            return -1;
        do {
            n = transferTo0(fd, position, icount, targetFD);
        } while ((n == IOStatus.INTERRUPTED) && isOpen());
        if (n == IOStatus.UNSUPPORTED_CASE) {
            if (target instanceof SinkChannelImpl)
                pipeSupported = false;
            if (target instanceof FileChannelImpl)
                fileSupported = false;
            return IOStatus.UNSUPPORTED_CASE;
        }
        if (n == IOStatus.UNSUPPORTED) {
            // Don't bother trying again
            transferSupported = false;
            return IOStatus.UNSUPPORTED;
        }
        return IOStatus.normalize(n);
    } finally {
        threads.remove(ti);
        end (n > -1);
    }
}
复制代码
可以看到, transferToDirectlyInternal 最后调用的是 transferTo0 ,我们只看其在 Linux 下的实现:
Java_sun_nio_ch_FileChannelImpl_transferTo0(JNIEnv *env, jobject this,
                                            jobject srcFDO,
                                            jlong position, jlong count,
                                            jobject dstFDO)
{
    jint srcFD = fdval(env, srcFDO);
    jint dstFD = fdval(env, dstFDO);

#if defined(__linux__)
    off64_t offset = (off64_t)position;
    jlong n = sendfile64(dstFD, srcFD, &offset, (size_t)count);
    if (n < 0) {
        if (errno == EAGAIN)
            return IOS_UNAVAILABLE;
        if ((errno == EINVAL) && ((ssize_t)count >= 0))
            return IOS_UNSUPPORTED_CASE;
        if (errno == EINTR) {
            return IOS_INTERRUPTED;
        }
        JNU_ThrowIOExceptionWithLastError(env, "Transfer failed");
        return IOS_THROWN;
    }
    return n;
    ....
}
复制代码
这里我们可以看到使用是 sendfile 的调用,这里我们通过一张图来解读这个动作:

在发生 sendfile 调用后,数据首先通过 DMA 从硬件设备(此处是硬盘)读取到内核空间,然后将内核空间数据拷贝到 socket buffer ,之后 socket buffer 数据拷贝到协议引擎(比如我们常用的网卡,也就是之前涉及到的 NIC )写到服务器端。这里减去了传统 IO 在内核和用户之间的拷贝,但是内核里边的拷贝还是存在。 我们将之前以文件服务器的数据传输为例所画的四次拷贝操做图做相应的改进,如下:
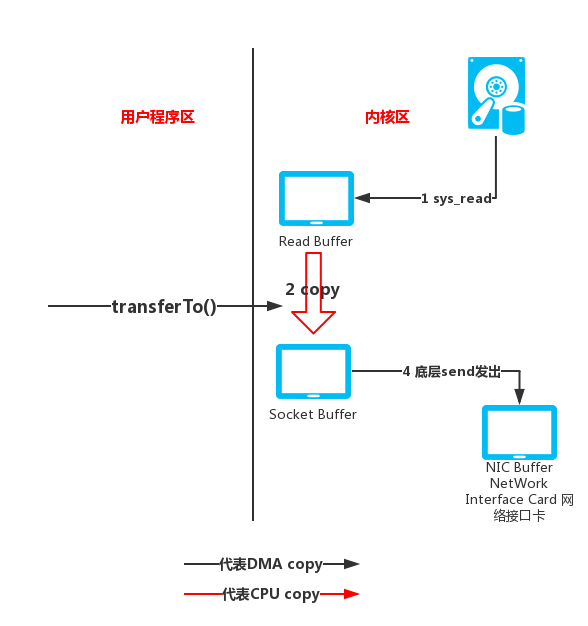
我们对 transferTo() 进行总结下,当此方法被调用时,会由用户态切换到内核态。所进行的动作:DMA将数据从磁盘读入 Read buffer 中(第一次数据拷贝)。接着,依然在内核空间中,将数据从 Read buffer 拷贝到 Socket buffer (第二次数据拷贝),最终再将数据从 Socket buffer 拷贝到 NIC buffer (第三次数据拷贝)。最后,再从内核态返回到用户态。 上面整个过程涉及到三次数据拷贝和二次上下文切换。直观上感觉也就减少了一次数据拷贝。但这里已经不涉及用户空间的缓冲区了。 而且,在这三次数据拷贝中,只有在第2次拷贝时需要到CPU的干预。但是前面的传统数据拷贝需要四次且有三次拷贝需要CPU的干预。
而在Linux2.4以后的版本又有了改善:
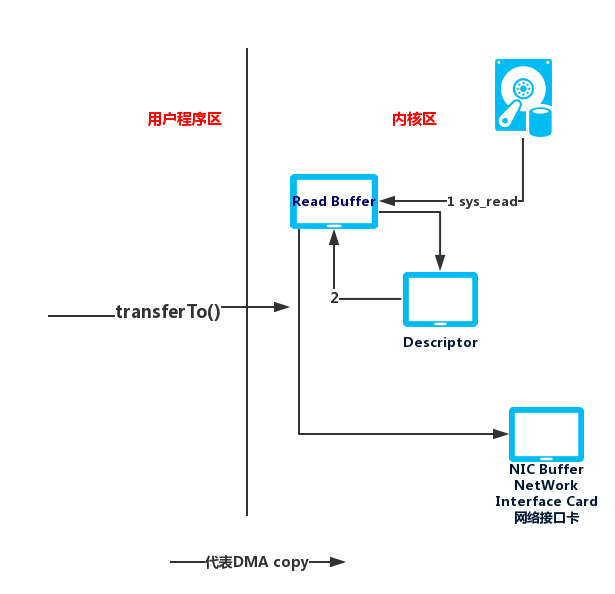
socket buffer 在这里不是一个缓冲区了,而是一个文件描述符,描述的是数据在内核缓冲区的数据从哪里开始,长度是多少,里面基本上不存储数据,大部分是指针,然后协议引擎 protocol engine (这里是 NIC )也是通过 DMA 拷贝的方式从文件描述符读取。 也就是说用户程序执行 transferTo() 方法后,导致一次系统调用,从用户态切换到内核态。内在会通过 DMA 将数据从磁盘中拷贝到 Read buffer 。用一个文件描述符标记此次待传输数据的地址以及长度, DMA 直接把数据从 Read buffer 传输到 NIC buffer 。数据拷贝过程都不用 CPU 干预了。这里一共只有两次拷贝和两次上下文切换。
参考文章: Efficient data transfer through zero copy
最后,我们再来看下 sun.nio.ch.FileChannelImpl#transferTo 涉及的其他两种拷贝方式 transferToTrustedChannel 与 transferToArbitraryChannel ,先来看前者的相关源码:
// Maximum size to map when using a mapped buffer
private static final long MAPPED_TRANSFER_SIZE = 8L*1024L*1024L;
//sun.nio.ch.FileChannelImpl#transferToTrustedChannel
private long transferToTrustedChannel(long position, long count,
                                        WritableByteChannel target)
    throws IOException
{
    boolean isSelChImpl = (target instanceof SelChImpl);
    if (!((target instanceof FileChannelImpl) || isSelChImpl))
        return IOStatus.UNSUPPORTED;

    // Trusted target: Use a mapped buffer
    long remaining = count;
    while (remaining > 0L) {
        long size = Math.min(remaining, MAPPED_TRANSFER_SIZE);
        try {
            MappedByteBuffer dbb = map(MapMode.READ_ONLY, position, size);
            try {
                // ## Bug: Closing this channel will not terminate the write
                int n = target.write(dbb);
                assert n >= 0;
                remaining -= n;
                if (isSelChImpl) {
                    // one attempt to write to selectable channel
                    break;
                }
                assert n > 0;
                position += n;
            } finally {
                unmap(dbb);
            }
        } catch (ClosedByInterruptException e) {
           ...
        } catch (IOException ioe) {
           ...
        }
    }
    return count - remaining;
}
复制代码
可以看到 transferToTrustedChannel 是通过 mmap 来拷贝数据,每次最大传输8m( MappedByteBuffer 缓冲区大小)。而 transferToArbitraryChannel 一次分配的 DirectBuffer 最大值为8192:
private static final int TRANSFER_SIZE = 8192;
//sun.nio.ch.FileChannelImpl#transferToArbitraryChannel
private long transferToArbitraryChannel(long position, int icount,
                                        WritableByteChannel target)
    throws IOException
{
    // Untrusted target: Use a newly-erased buffer
    int c = Math.min(icount, TRANSFER_SIZE);
    // Util.getTemporaryDirectBuffer得到的是DirectBuffer
    ByteBuffer bb = Util.getTemporaryDirectBuffer(c);
    long tw = 0;                    // Total bytes written
    long pos = position;
    try {
        Util.erase(bb);
        while (tw < icount) {
            bb.limit(Math.min((int)(icount - tw), TRANSFER_SIZE));
            int nr = read(bb, pos);
            if (nr <= 0)
                break;
            bb.flip();
            // ## Bug: Will block writing target if this channel
            // ##      is asynchronously closed
            int nw = target.write(bb);
            tw += nw;
            if (nw != nr)
                break;
            pos += nw;
            bb.clear();
        }
        return tw;
    } catch (IOException x) {
        if (tw > 0)
            return tw;
        throw x;
    } finally {
        Util.releaseTemporaryDirectBuffer(bb);
    }
}
复制代码
上面所示代码最重要的逻辑无非就是 read(bb, pos) 和 target.write(bb) 。这里,我们只看前者:
//sun.nio.ch.FileChannelImpl#read(java.nio.ByteBuffer, long)
    public int read(ByteBuffer dst, long position) throws IOException {
    if (dst == null)
        throw new NullPointerException();
    if (position < 0)
        throw new IllegalArgumentException("Negative position");
    if (!readable)
        throw new NonReadableChannelException();
    if (direct)
        Util.checkChannelPositionAligned(position, alignment);
    ensureOpen();
    if (nd.needsPositionLock()) {
        synchronized (positionLock) {
            return readInternal(dst, position);
        }
    } else {
        return readInternal(dst, position);
    }
}
//sun.nio.ch.FileChannelImpl#readInternal
private int readInternal(ByteBuffer dst, long position) throws IOException {
    assert !nd.needsPositionLock() || Thread.holdsLock(positionLock);
    int n = 0;
    int ti = -1;

    try {
        beginBlocking();
        ti = threads.add();
        if (!isOpen())
            return -1;
        do {
            n = IOUtil.read(fd, dst, position, direct, alignment, nd);
        } while ((n == IOStatus.INTERRUPTED) && isOpen());
        return IOStatus.normalize(n);
    } finally {
        threads.remove(ti);
        endBlocking(n > 0);
        assert IOStatus.check(n);
    }
}
复制代码
由上可知,最后调用了 IOUtil.read ,再往下追源码,也就是调用了 sun.nio.ch.IOUtil#readIntoNativeBuffer ,最后调用的就是底层的 read 和 pread 。同样, target.write(bb) 最后也是 pwrite 和 write 的系统调用,会占用 cpu 资源的。
最后,我们来思考下,当需要传输的数据远远大于内核缓冲区的大小时,内核缓冲区就会成为瓶颈。此时内核缓冲区已经起不到“缓冲”的功能了,毕竟传输的数据量太大了,这也是为什么在进行大文件传输时更适合使用零拷贝来进行。
总结
本文从操作系统级别开始讲解IO底层实现原理,分析了IO底层实现细节的一些优缺点,同时对 Java NIO 中的 DirectBufferd 以及 MappedByteBuffer 进行了详细解读。最后在之前的基础上结合源码阐述了 zerocopy 技术的实现原理。
本文部分插图来源互联网,版权属于原作者。若有不妥之处,请留言告知,感谢!
正文到此结束
- 本文标签: equals ip retry 数据库 配置 Netty operating system value 总结 http trigger cache apache mmap unix mina Reactor Oracle 安装 API CTO Collections final ask Job mapper update 物理内存 源码 consul 缓存 find map 管理 CEO 实例 volatile core IOS ORM java 文件系统 定制 EXHAUSTED db BIO 事故 安全 NSA 空间 Select 操作系统 entity 2015 Action rmi 虚拟内存 协议 mongo node synchronized tar cat IDE 注释 parse 参数 src 文章 Property linux Collection 编译 本质 windows Full GC 互联网 数据 时间 代码注释 快的 lib ACE 处理器 IO ssl bug cmd 字节码 https tag 进程 调试 需求 HTML REST example Word scala NIO 服务器 一致性 tab JVM 网卡 stream 线程 UI 代码 App 软件 同步 博客 queue 自动缓存 web id aix
- 版权声明: 本文为互联网转载文章,出处已在文章中说明(部分除外)。如果侵权,请联系本站长删除,谢谢。
- 本文海报: 生成海报一 生成海报二
热门推荐


相关文章


Loading...
![[HBLOG]公众号](http://www.liuhaihua.cn/img/qrcode_gzh.jpg)

