Spring Security and Angular 实现用户认证
引言
度过了前端框架的技术选型之后,新系统起步。
ng-alain ,一款功能强大的前端框架,设计得很好,两大缺点,文档不详尽,框架代码不规范。
写前台拦截器的时候是在花了大约半小时的时间对代码进行全面规范化之后才开始进行的。

又回到了最原始的问题,认证授权,也就是 Security 。
认证授权
认证,也就是判断用户是否可登录系统。
授权,用户登录系统后可以干什么,哪些操作被允许。
本文,我们使用 Spring Security 与 Angular 进行用户认证。
开发环境
Java 1.8
Spring Boot 2.0.5.RELEASE
学习
这里给大家介绍一下我学习用户认证的经历。
官方文档
第一步,肯定是想去看官方文档, Spring Security and Angular - Spring.io 。
感叹一句这个文档,实在是太长了!!!
记得当时看这个文档看了一晚上,看完还不敢睡觉,一鼓作气写完,就怕第二天起来把学得都忘了。
我看完这个文档,其实我们需要的并不是文档的全部。总结一下文档的结构:
- 引言
- 讲解前后台不分离项目怎么使用
basic方式登录 - 前后台不分离项目怎么使用
form方式登录,并自定义登录表单 - 讲解
CSRF保护(这块没看懂,好像就是防止伪造然后多存一个X-XSRF-TOKEN) - 修改架构,启用
API网关进行转发(计量项目原实现方式) - 使用
Spring Session自定义token - 实现
Oauth2登录
文档写的很好,讲解了许多 why? ,我们为什么要这么设计。
我猜想这篇文章应该默认学者已经掌握 Spring Security ,反正我零基础看着挺费劲的。初学建议结合 IBM 开发者社区上的博客进行学习(最近才发现的,上面写的都特别好,有的作者怕文字说不明白的还特意录了个视频放在上面)。
学习 - IBM中国
这是我结合学习的文章: Spring Security 的 Web 应用和指纹登录实践
实现
引入 Security 依赖
<!-- Security -->
<dependency>
    <groupId>org.springframework.boot</groupId>
    <artifactId>spring-boot-starter-security</artifactId>
</dependency>
基础配置
继承配置适配器 WebSecurityConfigurerAdapter ,就实现了 Spring Security 的配置。
重写 configure ,自定义认证规则。
注意, configure 里的代码不要当成代码看,否则会死得很惨。就把他当成普通的句子看!!!
@Component
public class SecurityConfig extends WebSecurityConfigurerAdapter {

    @Override
    protected void configure(HttpSecurity http) throws Exception {
        http
                // 使用Basic认证方式进行验证进行验证
                .httpBasic()
                // 要求SpringSecurity对后台的任何请求进行认证保护
                .and().authorizeRequests().anyRequest().authenticated();
    }
}
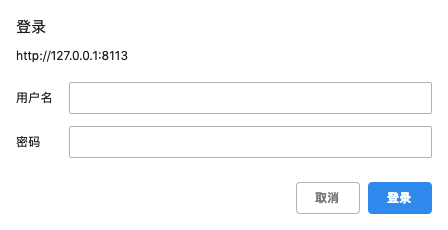
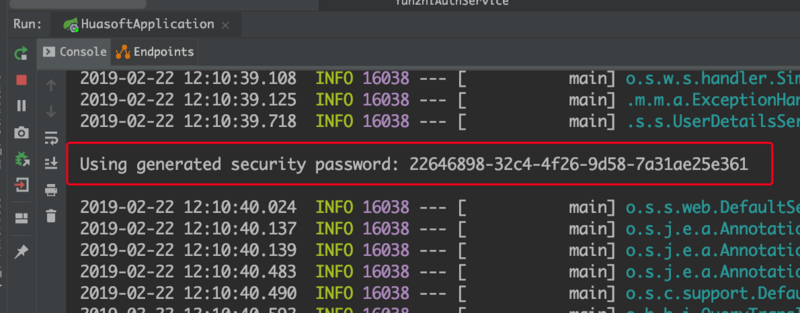
如此,我们后台的接口就被 Spring Security 保护起来了,当访问接口时,浏览器会弹出登录提示框。
用户名是 user ,密码已打印在控制台:
自定义认证
这不行呀,不可能项目一上线,用的还是随机生成的用户名和密码,应该去数据库里查。
实现 UserDetailsService 接口并交给 Spring 托管,在用户认证时, Spring Security 即自动调用我们实现的 loadUserByUsername 方法,传入 username ,然后再用我们返回的对象进行其他认证操作。
该方法要求我们根据我们自己的 User 来构造 Spring Security 内置的 org.springframework.security.core.userdetails.User ,如果抛出 UsernameNotFoundException ,则 Spring Security 代替我们返回 401 。
@Component
public class YunzhiAuthService implements UserDetailsService {

    @Autowired
    private UserRepository userRepository;

    private static final Logger logger = LoggerFactory.getLogger(YunzhiAuthService.class);

    @Override
    public UserDetails loadUserByUsername(String username) throws UsernameNotFoundException {
        logger.debug("根据用户名查询用户");
        User user = userRepository.findUserByUsername(username);

        logger.debug("用户为空,则抛出异常");
        if (user == null) {
            throw new UsernameNotFoundException("用户名不存在");
        }

        // TODO: 学习Spring Security中的role授权,看是否对项目有所帮助
        return new org.springframework.security.core.userdetails.User(username, user.getPassword(), AuthorityUtils.createAuthorityList("admin"));
    }
}
基础的代码大家都能看懂,这里讲解一下最后一句。
return new org.springframework.security.core.userdetails.User(username, user.getPassword(), AuthorityUtils.createAuthorityList("admin"));
构建一个用户,用户名密码都是我们查出来 set 进去的,对该用户授权 admin 角色(暂且这么写,这个对用户授予什么角色关系到授权,我们日后讨论)。
然后 Spring Security 就调用我们返回的 User 对象进行密码判断与用户授权。
用户冻结
Spring Security 只有用户名和密码认证吗?那用户冻结了怎么办呢?
这个无须担心,点开 org.springframework.security.core.userdetails.User ,一个三个参数的构造函数,一个七个参数的构造函数,去看看源码中的注释,一切都不是问题。 Spring Security 设计得相当完善。
public User(String username, String password,
        Collection<? extends GrantedAuthority> authorities) {
    this(username, password, true, true, true, true, authorities);
}

public User(String username, String password, boolean enabled,
        boolean accountNonExpired, boolean credentialsNonExpired,
        boolean accountNonLocked, Collection<? extends GrantedAuthority> authorities) {

    if (((username == null) || "".equals(username)) || (password == null)) {
        throw new IllegalArgumentException(
                "Cannot pass null or empty values to constructor");
    }

    this.username = username;
    this.password = password;
    this.enabled = enabled;
    this.accountNonExpired = accountNonExpired;
    this.credentialsNonExpired = credentialsNonExpired;
    this.accountNonLocked = accountNonLocked;
    this.authorities = Collections.unmodifiableSet(sortAuthorities(authorities));
}
启用密码加密
忘了当时是什么场景了,好像是写完 YunzhiAuthService 之后再启动项目,控制台中就有提示:具体内容记不清了,大体意思就是推荐我采用密码加密。
特意查了一下数据库中的密码需不需要加密,然后就查到了 CSDN 的密码泄露事件,很多开发者都批判 CSDN 的程序员,说明文存储密码是一种非常不服责任的行为。
然后又搜到了腾讯有关的一些文章,反正密码加密了,数据泄露了也不用承担过多的法律责任。腾讯还是走在法律的前列啊,话说是不是腾讯打官司还没输过?
既然这么多人都推荐加密,那我们也用一用吧。去 Google 了一下查了,好像 BCryptPasswordEncoder 挺常用的,就添加到上下文里了,然后 Spring Security 再进行密码判断的话,就会把传来的密码经过 BCryptPasswordEncoder 加密,判断和我们传给它的加密密码是否一致。
@Configuration
public class BeanConfig {

    /**
     * 密码加密
     */
    @Bean
    public PasswordEncoder passwordEncoder() {
        return new BCryptPasswordEncoder();
    }
}
然后一些 User 的细节就参考李宜衡的文章:Hibernate实体监听器。
Help, How is My Application Going to Scale?
其实,如果对技术要求不严谨的人来说,上面已经足够了。如果你也有一颗崇尚技术的心,我们一起往下看。
嘿!我的应用程序怎么扩大规模?
这是 Spring 官方文档中引出的话题,官方文档中对这一块的描述过于学术,什么 TCP ,什么 stateless 。
说实话,这段我看了好几遍也没看懂,但是我非常同意这个结论:我们不能用 Spring Security 帮我们管理 Session 。
以下是我个人的观点:因为这是存在本地的,当我们的后台有好多台服务器,怎么办?用户这次请求的是 Server1 , Server1 上存了一个 seesion ,然后下次请求的是 Server2 , Server2 没有 session ,完了, 401 。
所以我们要禁用 Spring Security 的 Session ,但是手动管理 Session 又太复杂,所以引入了新项目: Spring Session 。
Spring Session 的一大优点也是支持集群 Session 。

引入 Spring Session
<!-- Redis -->
<dependency>
    <groupId>org.springframework.boot</groupId>
    <artifactId>spring-boot-starter-data-redis</artifactId>
</dependency>

<!-- Session -->
<dependency>
    <groupId>org.springframework.session</groupId>
    <artifactId>spring-session-data-redis</artifactId>
</dependency>
这里引入的是 Spring Session 中的 Session-Redis 项目,使用 Redis 服务器存储 Session ,实现集群共享。
禁用 Spring Security 的 Session 管理
@Component
public class SecurityConfig extends WebSecurityConfigurerAdapter {

    @Override
    protected void configure(HttpSecurity http) throws Exception {
        http
                // 使用Basic认证方式进行验证进行验证
                .httpBasic()
                // 要求SpringSecurity对后台的任何请求进行认证保护
                .and().authorizeRequests().anyRequest().authenticated()
                // 关闭Security的Session,使用Spring Session
                .and().sessionManagement().sessionCreationPolicy(SessionCreationPolicy.NEVER);
    }
}
关闭 Spring Security 的 Session 管理,设置 Session 创建策略为 NEVER 。
Spring Security will never create an HttpSession, but will use the HttpSession if it already exists
Spring Security 不会创建 HttpSession ,但是如果存在,会使用这个 HttpSession 。
启用 Redis 管理 Session
Mac 下使用 Homebrew 安装 redis 十分简单, Mac下安装配置Redis 。
@EnableRedisHttpSession
@Configuration
public class BeanConfig {

    /**
     * 设置Session的token策略
     */
    @Bean
    public HeaderHttpSessionIdResolver httpSessionIdResolver() {
        return new HeaderHttpSessionIdResolver("token");
    }
}
@EnableRedisHttpSession 启用 Redis 的 Session 管理,上下文中加入对象 HeaderHttpSessionIdResolver ,设置从 Http 请求中找 header 里的 token 最为认证字段。
梳理逻辑
很乱是吗?让我们重新梳理一下逻辑。

使用 HttpBasic 方式登录,用户名和密码传给后台, Spring Security 进行用户认证,然后根据我们的配置, Spring Security 使用的是 Spring Session 创建的 Session ,最后存入 Redis 。
以后呢?
登录之后,就是用 token 的方式进行用户认证,将 token 添加到 header 中,然后请求的时候后台识别 header 里的 token 进行用户认证。

所以,我们需要在用户登录的时候返回 token 作为以后用户认证的条件。
登录方案
登录方案,参考官方文档学来的,很巧妙。
以 Spring 的话来说:这个叫 trick ,小骗术。
我们的 login 方法长成这样:
@GetMapping("login")
public Map<String, String> login(@AuthenticationPrincipal Principal user, HttpSession session) {
    logger.info("用户: " + user.getName() + "登录系统");
    return Collections.singletonMap("token", session.getId());
}
简简单单的四行,就实现了后台的用户认证。
原理

因为我们的后台是受 Spring Security 保护的,所以当访问 login 方法时,就需要进行用户认证,认证成功才能执行到 login 方法。
换句话说,只要我们的 login 方法执行到了,那就说明用户认证成功,所以 login 方法完全不需要业务逻辑,直接返回 token ,供之后认证使用。
怎么样,是不是很巧妙?
注销方案
注销相当简单,直接清空当前的用户认证信息即可。
@GetMapping("logout")
public void logout(HttpServletRequest request, HttpServletResponse response) {
    logger.info("用户注销");
    // 获取用户认证信息
    Authentication authentication = SecurityContextHolder.getContext().getAuthentication();

    // 存在认证信息,注销
    if (authentication != null) {
        new SecurityContextLogoutHandler().logout(request, response, authentication);
    }
}
单元测试
如果对整个流程不是很明白的话,看下面的单元测试会有所帮助,代码很详尽,请理解整个认证的流程。
@RunWith(SpringRunner.class)
@SpringBootTest
@AutoConfigureMockMvc
@Transactional
public class AuthControllerTest {

    private static final Logger logger = LoggerFactory.getLogger(AuthControllerTest.class);
    private static final String LOGIN_URL = "/auth/login";
    private static final String LOGOUT_URL = "/auth/logout";
    private static final String TOKEN_KEY = "token";

    @Autowired
    private MockMvc mockMvc;

    @Test
    public void securityTest() throws Exception {
        logger.debug("初始化基础变量");
        String username;
        String password;
        byte[] encodedBytes;
        MvcResult mvcResult;

        logger.debug("1. 测试用户名不存在");
        username = CommonService.getRandomStringByLength(10);
        password = "admin";
        encodedBytes = Base64.encodeBase64((username + ":" + password).getBytes());

        logger.debug("断言401");
        this.mockMvc.perform(MockMvcRequestBuilders.get(LOGIN_URL)
                .header("Authorization", "Basic " + new String(encodedBytes)))
                .andExpect(status().isUnauthorized());

        logger.debug("2. 用户名存在,但密码错误");
        username = "admin";
        password = CommonService.getRandomStringByLength(10);
        encodedBytes = Base64.encodeBase64((username + ":" + password).getBytes());

        logger.debug("断言401");
        this.mockMvc.perform(MockMvcRequestBuilders.get(LOGIN_URL)
                .header("Authorization", "Basic " + new String(encodedBytes)))
                .andExpect(status().isUnauthorized());

        logger.debug("3. 用户名密码正确");
        username = "admin";
        password = "admin";
        encodedBytes = Base64.encodeBase64((username + ":" + password).getBytes());

        logger.debug("断言200");
        mvcResult = this.mockMvc.perform(MockMvcRequestBuilders.get(LOGIN_URL)
                .header("Authorization", "Basic " + new String(encodedBytes)))
                .andExpect(status().isOk())
                .andReturn();

        logger.debug("从返回体中获取token");
        String json = mvcResult.getResponse().getContentAsString();
        JSONObject jsonObject = JSON.parseObject(json);
        String token = jsonObject.getString("token");

        logger.debug("空的token请求后台,断言401");
        this.mockMvc.perform(MockMvcRequestBuilders.get(LOGIN_URL)
                .header(TOKEN_KEY, ""))
                .andExpect(status().isUnauthorized());

        logger.debug("加上token请求后台,断言200");
        this.mockMvc.perform(MockMvcRequestBuilders.get(LOGIN_URL)
                .header(TOKEN_KEY, token))
                .andExpect(status().isOk());

        logger.debug("用户注销");
        this.mockMvc.perform(MockMvcRequestBuilders.get(LOGOUT_URL)
                .header(TOKEN_KEY, token))
                .andExpect(status().isOk());

        logger.debug("注销后,断言该token失效");
        this.mockMvc.perform(MockMvcRequestBuilders.get(LOGIN_URL)
                .header(TOKEN_KEY, token))
                .andExpect(status().isUnauthorized());
    }
}
前台方法
和这么复杂的后台设计相比较,前台没有啥技术含量,把代码粘贴出来大家参考参考即可,没什么要说的。
前台 Service :
@Injectable({
    providedIn: 'root',
})
export class AuthService {

    constructor(private http: _HttpClient) {
    }

    /**
     * 登录
     * @param username 用户名
     * @param password 密码
     */
    public login(username: string, password: string): Observable<ITokenModel> {
        // 新建Headers,并添加认证信息
        let headers = new HttpHeaders();
        headers = headers.append('Content-Type', 'application/x-www-form-urlencoded');
        headers = headers.append('Authorization', 'Basic ' + btoa(username + ':' + password));
        // 发起get请求并返回
        return this.http
            .get('/auth/login?_allow_anonymous=true',
                {},
                { headers: headers });
    }

    /**
     * 注销
     */
    public logout(): Observable<any> {
        return this.http.get('/auth/logout');
    }
}
登录组件核心代码:
this.authService.login(this.userName.value, this.password.value)
    .subscribe((response: ITokenModel) => {
        // 清空路由复用信息
        this.reuseTabService.clear();
        // 设置用户Token信息
        this.tokenService.set(response);
        // 重新获取 StartupService 内容,我们始终认为应用信息一般都会受当前用户授权范围而影响
        this.startupSrv.load().then(() => {
            // noinspection JSIgnoredPromiseFromCall
            this.router.navigateByUrl('main/index');
        });
    }, () => {
        // 显示错误信息提示
        this.showLoginErrorInfo = true;
    });
注销组件核心代码:
// 调用Service进行注销
this.authService.logout().subscribe(() => {
    }, () => {
    }, () => {
        // 清空token信息
        this.tokenService.clear();

        // 跳转到登录页面,因为无论是否注销成功都要跳转,写在complete中
        // noinspection JSIgnoredPromiseFromCall
        this.router.navigateByUrl(this.tokenService.login_url);
    });
前台拦截器
有一点, headers.append('X-Requested-With', 'XMLHttpRequest') ,如果不设置这个,在用户名密码错误的时候会弹出 Spring Security 原生的登录提示框。
还有就是,为什么这里没有处理 token ,因为 Ng-Alain 的默认的拦截器已经对 token 进行添加处理。
// noinspection SpellCheckingInspection
/**
 * Yunzhi拦截器,用于实现添加url,添加header,全局异常处理
 */
@Injectable()
export class YunzhiInterceptor implements HttpInterceptor {

    constructor(private router: Router) {
    }

    intercept(req: HttpRequest<any>, next: HttpHandler): Observable<HttpEvent<any>> {
        /**
         * 为request加上服务端前缀
         */
        let url = req.url;
        if (!url.startsWith('https://') && !url.startsWith('http://')) {
            url = environment.SERVER_URL + url;
        }
        let request = req.clone({ url });

        /**
         * 设置headers,防止弹出对话框
         * https://stackoverflow.com/questions/37763186/spring-boot-security-shows-http-basic-auth-popup-after-failed-login
         */
        let headers = request.headers;
        headers = headers.append('X-Requested-With', 'XMLHttpRequest');
        request = request.clone({ headers: headers });

        /**
         * 数据过滤
         */
        return next.handle(request).pipe(
            // mergeMap = merge + map
            mergeMap((event: any) => {
                return of(event);
            }),
            // Observable对象发生错误时,执行catchError
            catchError((error: HttpErrorResponse) => {
                return this.handleHttpException(error);
            }),
        );
    }

    private handleHttpException(error: HttpErrorResponse): Observable<HttpErrorResponse> {
        switch (error.status) {
            case 401:
                if (this.router.url !== '/passport/login') {
                    // noinspection JSIgnoredPromiseFromCall
                    this.router.navigateByUrl('/passport/login');
                }
                break;
            case 403:
            case 404:
            case 500:
                // noinspection JSIgnoredPromiseFromCall
                this.router.navigateByUrl(`/${error.status}`);
                break;
        }
        // 最终将异常抛出来,便于组件个性化处理
        throw new Error(error.error);
    }
}
解决 H2 控制台看不见问题
Spring Security 直接把 H2 数据库的控制台也拦截了,且禁止查看,启用以下配置恢复控制台查看。
@Component
public class SecurityConfig extends WebSecurityConfigurerAdapter {

    @Override
    protected void configure(HttpSecurity http) throws Exception {
        http
                // 使用Basic认证方式进行验证进行验证
                .httpBasic()
                // 要求SpringSecurity对后台的任何请求进行认证保护
                .and().authorizeRequests().anyRequest().authenticated()
                // 关闭Security的Session,使用Spring Session
                .and().sessionManagement().sessionCreationPolicy(SessionCreationPolicy.NEVER)
                // 设置frameOptions为sameOrigin,否则看不见h2控制台
                .and().headers().frameOptions().sameOrigin()
                // 禁用csrf,否则403. 这个在上线的时候判断是否需要开启
                .and().csrf().disable();
    }
}
总结
一款又一款框架,是前辈们智慧的结晶。
永远,文档比书籍更珍贵!
正文到此结束
- 本文标签: final Word ORM bug logo 源码 struct 集群 IDE 注释 Collections 博客 bean springboot rand 测试 ip cat redis 时间 json 开发 http Service Spring Security 加密 服务器 servlet 数据库 数据 代码 DOM 参数 core Action Spring Boot 单元测试 安装配置 db find 开发者 SDN parse 数据泄露 src Security id 适配器 root IBM tar UI Google 程序员 list client Authorization 服务端 equals web tab 配置 API App value build 监听器 Collection session java authenticate js 安装 管理 CTO key 总结 文章 IO token spring 认证 https map NSA TCP XML
- 版权声明: 本文为互联网转载文章,出处已在文章中说明(部分除外)。如果侵权,请联系本站长删除,谢谢。
- 本文海报: 生成海报一 生成海报二
热门推荐


相关文章

近期评论
-
你这基本没有更新呀,最近文章显示还是2019年的文章。不符合要求哈
-
关键词:慕云博客 链接:https://www.lilun.me 描述:分享原创文字的个人博客
-
-
-
可以提供一下源码吗
-
不是商业站,鸡娃学习笔记
-
-
-
-
听他们说很厉害的样子
Loading...
![[HBLOG]公众号](http://www.liuhaihua.cn/img/qrcode_gzh.jpg)

