什么是 Arthas
本篇文章是我的「三同」好朋友归然原创,三同是“同小区”、“前同事”、“现同事”的意思,归然是他的花名。
我的花名是逅弈,这是我从大学开始就沿用至今的一个昵称,是当时和女朋友玩QQ炫舞,取的情侣昵称,女朋友现在已经成了我老婆。
言归正传,本篇文章我们要了解的是一个线上问题排查利器:Arthas。我也用它在预发环境排查过问题,确实非常方便,当时也想着写一篇文章总结一下,结果一拖就没了下文。
现在归然写了一篇非常详尽的介绍 Arthas 的文章,我看过之后觉得很好,所以厚着脸皮让他把文章在我公众号上发布,让更多的同学也能够学习到,希望对大家有所帮助。
熟悉我的人都知道,我的公众号内都是原创文章,也没有做过任何的商业互吹、互推来吸引粉丝,也没有为了吸引关注做一些福利活动,完全是自由发展。我相信专注于原创,用心写好每一篇文章,能为读者带来实质性的帮助,这样就很好。
============以下是原文=========
记得前段时间遇到了一个页面加载过长的问题,当时就想排查下在哪一步消耗的时间比较长,由于是线上问题,第一反应就是有没有什么办法可以无侵入式的查询调用链路耗时呢?
这时 Arthas 走进了我的眼帘,并成功帮我定位到了问题,就是这样引起了我对 Arthas 的兴趣,于是花了点时间对 Arthas 作了一个了解。
什么是 Arthas
摘录一段官方 Github 上的简介
Arthas 是Alibaba开源的Java诊断工具,深受开发者喜爱。
当你遇到以下类似问题而束手无策时,Arthas 可以帮助你解决:
-
这个类从哪个 jar 包加载的?为什么会报各种类相关的 Exception?
-
我改的代码为什么没有执行到?难道是我没 commit?分支搞错了?
-
遇到问题无法在线上 debug,难道只能通过加日志再重新发布吗?
-
线上遇到某个用户的数据处理有问题,但线上同样无法 debug,线下无法重现!
-
是否有一个全局视角来查看系统的运行状况?
-
有什么办法可以监控到JVM的实时运行状态?
Arthas 支持JDK 6+,支持Linux/Mac/Windows,采用命令行交互模式,同时提供丰富的 Tab 自动补全功能,进一步方便进行问题的定位和诊断。
开源地址:https://github.com/alibaba/arthas/
Arthas 基于哪些工具开发而来
greys-anatomy : Arthas代码基于Greys二次开发而来,非常感谢Greys之前所有的工作,以及Greys原作者对Arthas提出的意见和建议!
termd : Arthas的命令行实现基于termd开发,是一款优秀的命令行程序开发框架,感谢termd提供了优秀的框架。
crash : Arthas的文本渲染功能基于crash中的文本渲染功能开发,可以从这里看到源码,感谢crash在这方面所做的优秀工作。
cli : Arthas的命令行界面基于vert.x提供的cli库进行开发,感谢vert.x在这方面做的优秀工作。
compiler : Arthas里的内存编绎器代码来源
Apache Commons Net : Arthas里的Telnet Client代码来源
JavaAgent :运行在 main方法之前的拦截器,它内定的方法名叫 premain ,也就是说先执行 premain 方法然后再执行 main 方法
ASM :一个通用的Java字节码操作和分析框架。它可以用于修改现有的类或直接以二进制形式动态生成类。ASM提供了一些常见的字节码转换和分析算法,可以从它们构建定制的复杂转换和代码分析工具。ASM提供了与其他Java字节码框架类似的功能,但是主要关注性能。因为它被设计和实现得尽可能小和快,所以非常适合在动态系统中使用(当然也可以以静态方式使用,例如在编译器中)
工程目录
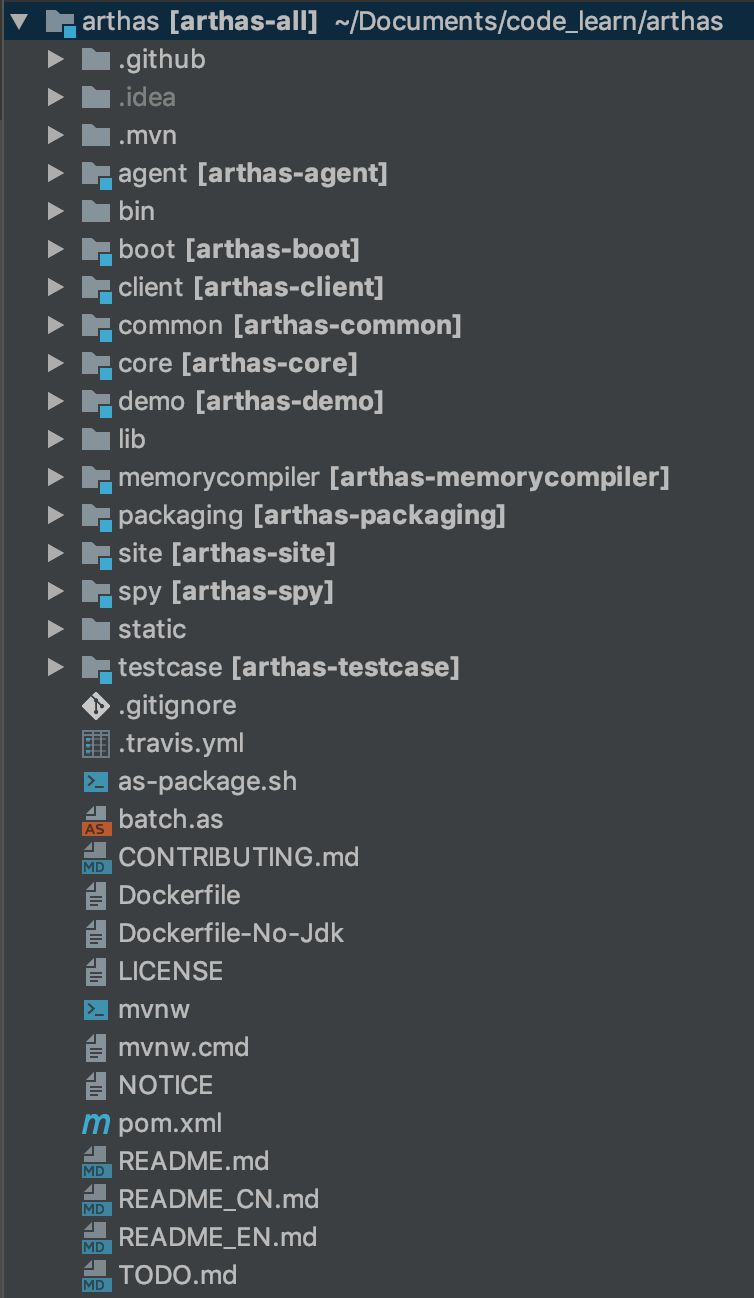
arthas-agent :基于JavaAgent技术的代理
bin :一些启动脚本
arthas-boot :Java版本的一键安装启动脚本
arthas-client :telnet client代码
arthas-common :一些共用的工具类和枚举类
arthas-core :核心库,各种arthas命令的交互和实现
arthas-demo :示例代码
arthas-memorycompiler :内存编绎器代码
arthas-packaging :maven打包相关的
arthas-site :arthas站点
arthas-spy :编织到目标类中的各个切面
static :静态资源
arthas-testcase :测试
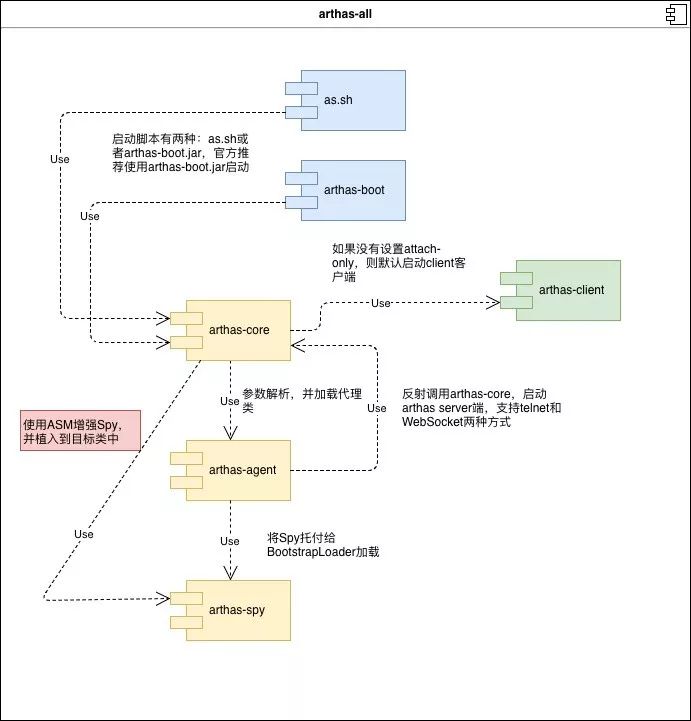
整体流程
首先我们先放出一张整体宏观的模块调用图,下面我们会按照整个 Arthas 启动流程逐步分析,红色部分本篇文章将不涉及,会在后续文章中单独分析
启动方式介绍
使用 arthas-boot 启动(推荐)
下载 arthas-boot.jar,然后用 java -jar 的方式启动:
wget https://alibaba.github.io/arthas/arthas-boot.jar
java -jar arthas-boot.jar
可以加 -h 参数,打印帮助信息:
java -jar arthas-boot.jar -h
如果下载速度比较慢,可以使用aliyun的镜像:
java -jar arthas-boot.jar --repo-mirror aliyun --use-http
使用 as.sh 脚本启动
Arthas 支持在 Linux/Unix/Mac 等平台上一键安装,请复制以下内容,并粘贴到命令行中,敲回车执行即可:
curl -L https://alibaba.github.io/arthas/install.sh | sh
上述命令会下载启动脚本文件 as.sh 到当前目录,你可以放在任何地方或将其加入到 $PATH 中。
直接在shell下面执行 ./as.sh ,就会进入交互界面。
也可以执行 ./as.sh -h 来获取更多参数信息。
Arthas 是如何启动的
既然官方推荐用 arthas-boot 启动,那下面我们就一起来看下 arthas-boot 是如何启动的。
首先我们在 arthas-boot 的 pom 文件中找到启动类:
<archive>
    <manifest>
        <mainClass>com.taobao.arthas.boot.Bootstrap</mainClass>
    </manifest>
    <manifestEntries>
        <Created-By>core engine team, middleware group, alibaba inc.</Created-By>
        <Specification-Title>${project.name}</Specification-Title>
        <Specification-Version>${project.version}</Specification-Version>
        <Implementation-Title>${project.name}</Implementation-Title>
        <Implementation-Version>${project.version}</Implementation-Version>
    </manifestEntries>
</archive>
从pom文件中,我们可以发现arthas-boot的启动类为 com.taobao.arthas.boot.Bootstrap ,下面我们就去看看 Bootstrap 是如何启动 arthas 的,有兴趣的同学也可以自行看下另外一种启动方式 as.sh 。
归然将整个启动的过程全部通过注释在代码中体现出来了,所以:
以下代码超级长,慎入!
以下代码超级长,慎入!
以下代码超级长,慎入!
public static void main(String[] args) throws ParserConfigurationException, SAXException, IOException,
ClassNotFoundException, NoSuchMethodException, SecurityException, IllegalAccessException,
IllegalArgumentException, InvocationTargetException {
Package bootstrapPackage = Bootstrap.class.getPackage();
if (bootstrapPackage != null) {
String arthasBootVersion = bootstrapPackage.getImplementationVersion();
if (arthasBootVersion != null) {
AnsiLog.info("arthas-boot version: " + arthasBootVersion);
}
}
String mavenMetaData = null;
Bootstrap bootstrap = new Bootstrap();
//解析类中所有带@Option、@Argument的方法,初始化CLI
CLI cli = CLIConfigurator.define(Bootstrap.class);
//解析用户的输入参数,初始化所有命令行参数
CommandLine commandLine = cli.parse(Arrays.asList(args));
try {
CLIConfigurator.inject(commandLine, bootstrap);
} catch (Throwable e) {
e.printStackTrace();
System.out.println(usage(cli));
System.exit(1);
}
//设置日志级别
if (bootstrap.isVerbose()) {
AnsiLog.level(Level.ALL);
}
//根据启动参数,判断是否是查看帮助(-h或者--help),如果是查看帮助,则打印usage
if (bootstrap.isHelp()) {
System.out.println(usage(cli));
System.exit(0);
}
if (bootstrap.getRepoMirror() == null || bootstrap.getRepoMirror().trim().isEmpty()) {
bootstrap.setRepoMirror("center");
// 如果在国内,则设置maven源为aliyun
if (TimeUnit.MILLISECONDS.toHours(TimeZone.getDefault().getOffset(System.currentTimeMillis())) == 8) {
bootstrap.setRepoMirror("aliyun");
}
}
AnsiLog.debug("Repo mirror:" + bootstrap.getRepoMirror());
//如果启动参数为查看版本,则显示版本
if (bootstrap.isVersions()) {
if (mavenMetaData == null) {
mavenMetaData = DownloadUtils.readMavenMetaData(bootstrap.getRepoMirror(), bootstrap.isuseHttp());
}
System.out.println(UsageRender.render(listVersions(mavenMetaData)));
System.exit(0);
}
//判断当前环境是否JDK6或者JDK7,如果是,则只支持Http方式启动
if (JavaVersionUtils.isJava6() || JavaVersionUtils.isJava7()) {
bootstrap.setuseHttp(true);
AnsiLog.debug("Java version is {}, only support http, set useHttp to true.",
JavaVersionUtils.javaVersionStr());
}
//检查http和telnet端口是否被占用
int telnetPortPid = -1;
int httpPortPid = -1;
if (bootstrap.getTelnetPort() > 0) {
telnetPortPid = SocketUtils.findTcpListenProcess(bootstrap.getTelnetPort());
if (telnetPortPid > 0) {
AnsiLog.info("Process {} already using port {}", telnetPortPid, bootstrap.getTelnetPort());
}
}
if (bootstrap.getHttpPort() > 0) {
httpPortPid = SocketUtils.findTcpListenProcess(bootstrap.getHttpPort());
if (httpPortPid > 0) {
AnsiLog.info("Process {} already using port {}", httpPortPid, bootstrap.getHttpPort());
}
}
//获取用户指定进程ID,如果没有指定,默认取Telnet端口占用的进程ID
int pid = bootstrap.getPid();
// select pid
if (pid < 0) {
try {
pid = ProcessUtils.select(bootstrap.isVerbose(), telnetPortPid);
} catch (InputMismatchException e) {
System.out.println("Please input an integer to select pid.");
System.exit(1);
}
if (pid < 0) {
System.out.println("Please select an available pid.");
System.exit(1);
}
}
//校验目标进程ID与Telnet或者http端口是否一致
if (telnetPortPid > 0 && pid != telnetPortPid) {
AnsiLog.error("Target process {} is not the process using port {}, you will connect to an unexpected process.",
pid, bootstrap.getTelnetPort());
AnsiLog.error("1. Try to restart arthas-boot, select process {}, shutdown it first.",
telnetPortPid);
AnsiLog.error("2. Or try to use different telnet port, for example: java -jar arthas-boot.jar --telnet-port 9998 --http-port -1");
System.exit(1);
}
if (httpPortPid > 0 && pid != httpPortPid) {
AnsiLog.error("Target process {} is not the process using port {}, you will connect to an unexpected process.",
pid, bootstrap.getHttpPort());
AnsiLog.error("1. Try to restart arthas-boot, select process {}, shutdown it first.",
httpPortPid);
AnsiLog.error("2. Or try to use different http port, for example: java -jar arthas-boot.jar --telnet-port 9998 --http-port 9999", httpPortPid);
System.exit(1);
}
//校验arthas目录中是否存在"arthas-core.jar", "arthas-agent.jar", "arthas-spy.jar"
File arthasHomeDir = null;
if (bootstrap.getArthasHome() != null) {
verifyArthasHome(bootstrap.getArthasHome());
arthasHomeDir = new File(bootstrap.getArthasHome());
}
//指定版本的处理过程
if (arthasHomeDir == null && bootstrap.getUseVersion() != null) {
// try to find from ~/.arthas/lib
File specialVersionDir = new File(System.getProperty("user.home"), ".arthas" + File.separator + "lib"
+ File.separator + bootstrap.getUseVersion() + File.separator + "arthas");
if (!specialVersionDir.exists()) {
// try to download arthas from remote server.
DownloadUtils.downArthasPackaging(bootstrap.getRepoMirror(), bootstrap.isuseHttp(),
bootstrap.getUseVersion(), ARTHAS_LIB_DIR.getAbsolutePath());
}
verifyArthasHome(specialVersionDir.getAbsolutePath());
arthasHomeDir = specialVersionDir;
}
//如果在上面都没有确认arthas home,则获取当前Jar包的父目录
if (arthasHomeDir == null) {
CodeSource codeSource = Bootstrap.class.getProtectionDomain().getCodeSource();
if (codeSource != null) {
try {
// https://stackoverflow.com/a/17870390
File bootJarPath = new File(codeSource.getLocation().toURI().getSchemeSpecificPart());
verifyArthasHome(bootJarPath.getParent());
arthasHomeDir = bootJarPath.getParentFile();
} catch (Throwable e) {
// ignore
}
}
}
//如果仍然没有确定arthas home,则查看ARTHAS_LIB_DIR下是否存在本地版本,并获取远程的最新版本号,对比本地和远程,如果本地版本低于远程,则尝试去下载远端最新版本
if (arthasHomeDir == null) {
boolean checkFile = ARTHAS_LIB_DIR.exists() || ARTHAS_LIB_DIR.mkdirs();
if(!checkFile){
AnsiLog.error("cannot create directory {}: maybe permission denied", ARTHAS_LIB_DIR.getAbsolutePath());
System.exit(1);
}
/**
* <pre>
* 1. get local latest version
* 2. get remote latest version
* 3. compare two version
* </pre>
*/
List<String> versionList = listNames(ARTHAS_LIB_DIR);
Collections.sort(versionList);
String localLastestVersion = null;
if (!versionList.isEmpty()) {
localLastestVersion = versionList.get(versionList.size() - 1);
}
if (mavenMetaData == null) {
mavenMetaData = DownloadUtils.readMavenMetaData(bootstrap.getRepoMirror(), bootstrap.isuseHttp());
}
String remoteLastestVersion = DownloadUtils.readMavenReleaseVersion(mavenMetaData);
boolean needDownload = false;
if (localLastestVersion == null) {
if (remoteLastestVersion == null) {
// exit
AnsiLog.error("Can not find Arthas under local: {} and remote: {}", ARTHAS_LIB_DIR,
bootstrap.getRepoMirror());
System.exit(1);
} else {
needDownload = true;
}
} else {
if (remoteLastestVersion != null) {
if (localLastestVersion.compareTo(remoteLastestVersion) < 0) {
AnsiLog.info("local lastest version: {}, remote lastest version: {}, try to download from remote.",
localLastestVersion, remoteLastestVersion);
needDownload = true;
}
}
}
if (needDownload) {
// try to download arthas from remote server.
DownloadUtils.downArthasPackaging(bootstrap.getRepoMirror(), bootstrap.isuseHttp(),
remoteLastestVersion, ARTHAS_LIB_DIR.getAbsolutePath());
localLastestVersion = remoteLastestVersion;
}
// get the latest version
arthasHomeDir = new File(ARTHAS_LIB_DIR, localLastestVersion + File.separator + "arthas");
}
//再次校验相关jar是否存在
verifyArthasHome(arthasHomeDir.getAbsolutePath());
AnsiLog.info("arthas home: " + arthasHomeDir);
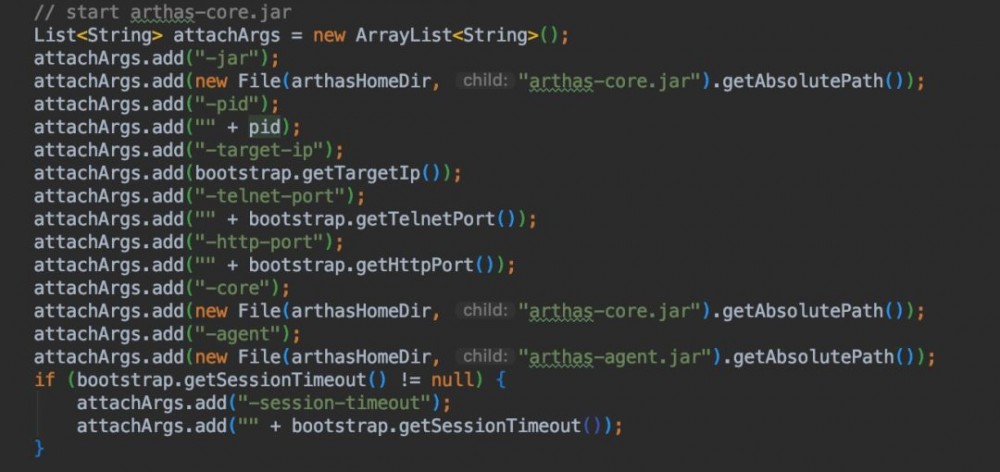
//启动arthas-core.jar,并指定agent
if (telnetPortPid > 0 && pid == telnetPortPid) {
AnsiLog.info("The target process already listen port {}, skip attach.", bootstrap.getTelnetPort());
} else {
// start arthas-core.jar
List<String> attachArgs = new ArrayList<String>();
attachArgs.add("-jar");
attachArgs.add(new File(arthasHomeDir, "arthas-core.jar").getAbsolutePath());
attachArgs.add("-pid");
attachArgs.add("" + pid);
attachArgs.add("-target-ip");
attachArgs.add(bootstrap.getTargetIp());
attachArgs.add("-telnet-port");
attachArgs.add("" + bootstrap.getTelnetPort());
attachArgs.add("-http-port");
attachArgs.add("" + bootstrap.getHttpPort());
attachArgs.add("-core");
attachArgs.add(new File(arthasHomeDir, "arthas-core.jar").getAbsolutePath());
attachArgs.add("-agent");
attachArgs.add(new File(arthasHomeDir, "arthas-agent.jar").getAbsolutePath());
if (bootstrap.getSessionTimeout() != null) {
attachArgs.add("-session-timeout");
attachArgs.add("" + bootstrap.getSessionTimeout());
}
AnsiLog.info("Try to attach process " + pid);
AnsiLog.debug("Start arthas-core.jar args: " + attachArgs);
ProcessUtils.startArthasCore(pid, attachArgs);
AnsiLog.info("Attach process {} success.", pid);
}
//判断是否只做attach操作,如果只做attach,则不连接
if (bootstrap.isAttachOnly()) {
System.exit(0);
}
// 启动telnet客户端
URLClassLoader classLoader = new URLClassLoader(
new URL[] { new File(arthasHomeDir, "arthas-client.jar").toURI().toURL() });
Class<?> telnetConsoleClas = classLoader.loadClass("com.taobao.arthas.client.TelnetConsole");
Method mainMethod = telnetConsoleClas.getMethod("main", String[].class);
List<String> telnetArgs = new ArrayList<String>();
if (bootstrap.getCommand() != null) {
telnetArgs.add("-c");
telnetArgs.add(bootstrap.getCommand());
}
if (bootstrap.getBatchFile() != null) {
telnetArgs.add("-f");
telnetArgs.add(bootstrap.getBatchFile());
}
if (bootstrap.getHeight() != null) {
telnetArgs.add("--height");
telnetArgs.add("" + bootstrap.getHeight());
}
if (bootstrap.getWidth() != null) {
telnetArgs.add("--width");
telnetArgs.add("" + bootstrap.getWidth());
}
// telnet port ,ip
telnetArgs.add(bootstrap.getTargetIp());
telnetArgs.add("" + bootstrap.getTelnetPort());
AnsiLog.info("arthas-client connect {} {}", bootstrap.getTargetIp(), bootstrap.getTelnetPort());
AnsiLog.debug("Start arthas-client.jar args: " + telnetArgs);
mainMethod.invoke(null, new Object[] { telnetArgs.toArray(new String[0]) });
}
到此,Arthas 的启动流程就结束了,在这其中,我们发现了两个关键的 jar 包,arthas-core 和 arthas-agent,那么这两个jar又做了什么事情呢,咱们继续往下走,想要了解这两个jar包的作用,首先我们要先普及一个知识点——Java探针。
Java探针
Java探针主要涉及两个知识点:
JavaAgent
JavaAgent 是一种能够在不影响正常编译的情况下,修改字节码的技术。java作为一种强类型的语言,不通过编译就不能能够进行jar包的生成。
有了 JavaAgent 技术,就可以在字节码这个层面对类和方法进行修改。也可以把 JavaAgent 理解成一种代码注入的方式,但是这种注入比起 Spring的 AOP 更加的优美。
从JDK6开始,有两种代理方式:
-
通过命令行(-javaagent)的形式在应用程序启动前处理(premain方式)
-
在应用程序启动后的某个时机处理(agentmain方式)
ASM字节码
ASM 是一个通用的 Java 字节码操作和分析框架,它可以用于修改现有类或直接以二进制形式动态生成类。
ASM 提供了一些常见的字节码转换和分析算法,可以从中构建自定义复杂转换和代码分析工具。
ASM 提供与其他Java字节码框架类似的功能,但专注于性能。因为它的设计和实现尽可能小而且快,所以它非常适合在动态系统中使用(但当然也可以以静态方式使用,例如在编译器中)。
ASM 用于许多项目,包括:
-
OpenJDK,生成lambda调用站点,以及Nashorn编译器
-
Groovy 编译器和 Kotlin 编译器
-
Cobertura 和 Jacoco,为了衡量代码覆盖率,仪器类
-
CGLIB,用于动态生成代理类(用于其他项目,如Mockito和EasyMock)
-
Gradle,在运行时生成一些类
明白了这两个知识点后,我们一起来看下 Arthas 中的 JavaAgent——arthas-agent
Arthas-Agent
首先我们从Pom文件看起,找到premain和agentmain
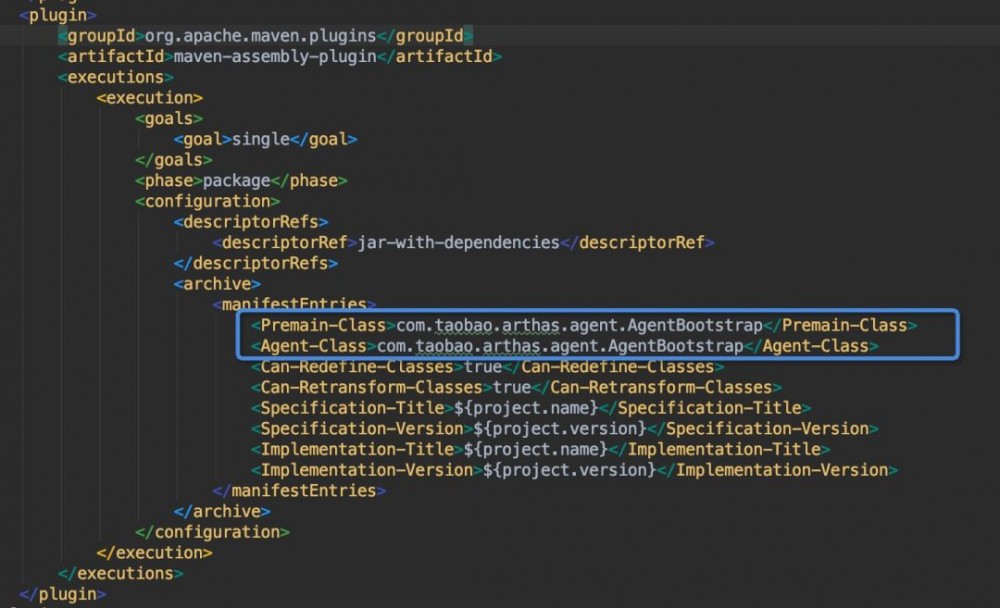
从这里我们很清楚地看到了 premain 和 agentmain 的方法被放在了 com.taobao.arthas.agent.AgentBootstrap 中。
那么接下来我们就走进 AgentBootstrap 类中,了解下它的实现。
在 AgentBootstrap 类中,我们很快发现了这两个方法

这两个方法都同时指向当前类中的main方法,并传递了两个参数,下面我们先对着两个参数做个解读
-
String args
这个参数是我们在 arthas-boot.jar 中启动 arthas-core.jar 时传入的参数
-
Instrumentation inst
java.lang.instrument.Instrumentation 实例,由 JVM 自动传入,集中了几乎所有功能方法,如:类操作、classpath 操作等
了解了这两个参数以后,我们走进 main 方法看下实现
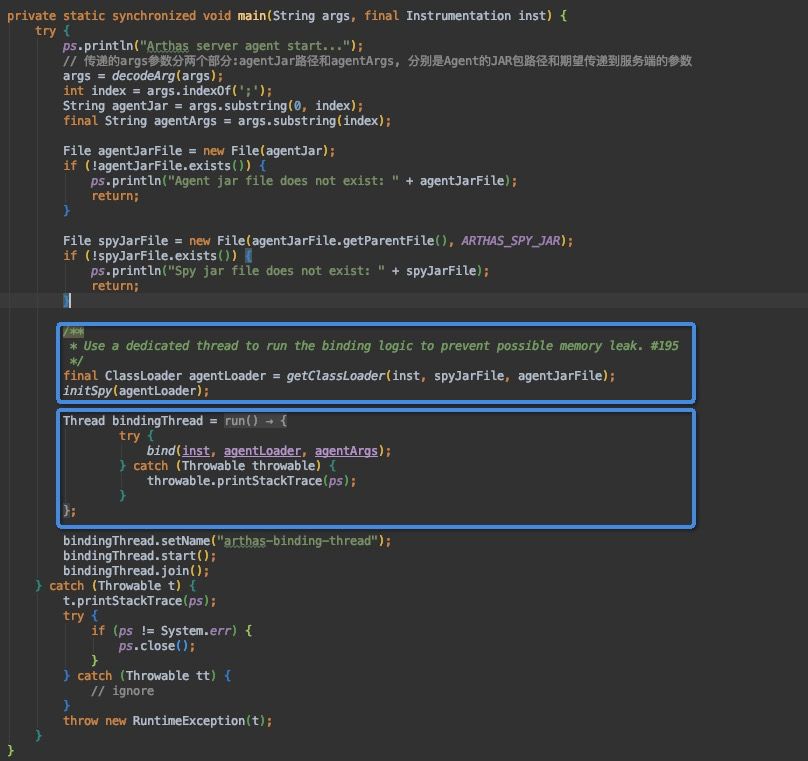
这里主要重点讲下上面圈出来的两点,首先我们来看下第一段的代码。
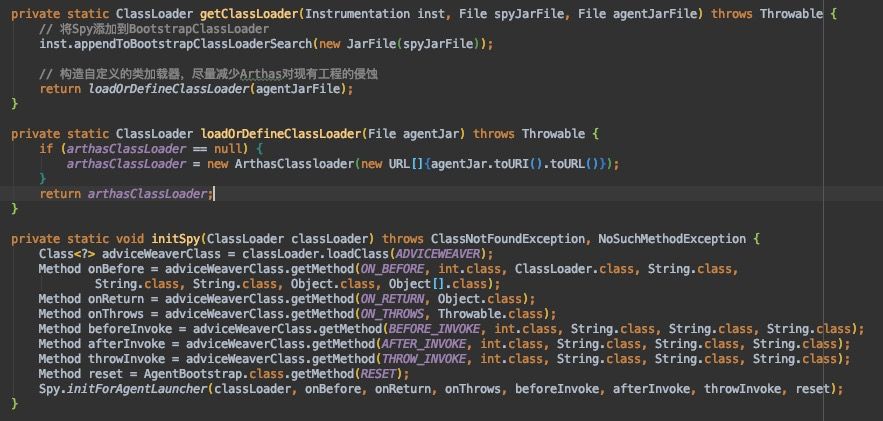
第一步先将我们的 arthas-spy.jar 添加到 BootstrapClassLoader 中,在 Java Instrumention 的实现中,这行代码应该是很常见的。为什么要这样做呢?
在Java中,Java类加载器分为 BootstrapClassLoader、ExtensionClassLoader和SystemClassLoader。
BootstrapClassLoader 主要加载的是JVM自身需要的类,由于双亲委派机制的存在,越基础的类由越上层的加载器进行加载,因此,如果需要在由 BootstrapClassLoader 加载的类的方法中调用由 SystemClassLoader 加载的 arthas-spy.jar ,这违反了双亲委派机制。
而 arthas-spy.jar 添加到 BootstrapClassLoader 的 classpath 中,由 BootstrapClassLoader加载,就解决了这个问题。
initSpy 这个方法则使用 ArthasClassloader 加载 com.taobao.arthas.core.advisor.AdviceWeaver 类(在后续文章中会详细解读),并将其中的 methodOnBegin 、 methodOnReturnEnd 、 methodOnThrowingEnd 等方法取出,并赋给 Spy 类。后面在通过ASM做类增强的时候, Spy 就是连接业务类和Arthas类的桥梁。
接着我们看下第二段蓝色框中的代码。这里面主要是做了一些服务端启动的事情。
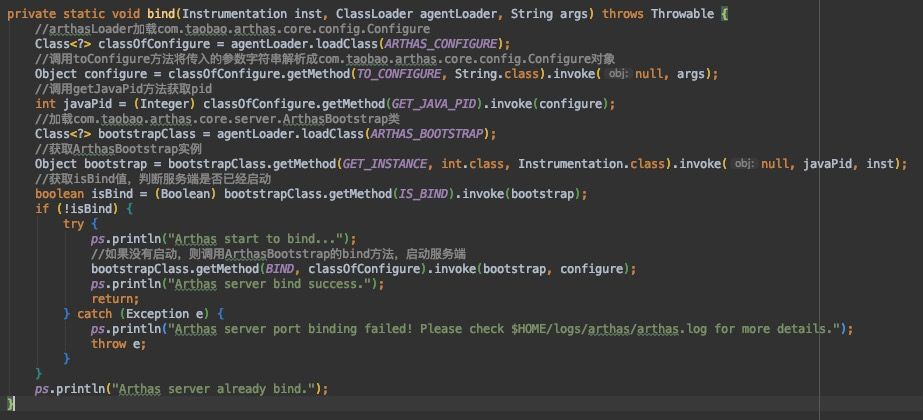
这段代码中,主要通过反射的手段,调用了 ArthasBootstrap 类中的 bind 方法来启动 Arthas 服务端,接下来我们就一起来看下 Arthas 服务端启动的源码。
Arthas服务端启动
废话不多说,先上代码。

这段代码主要是围绕 ShellServer 做一些配置,并调用 listen 方法启动监听
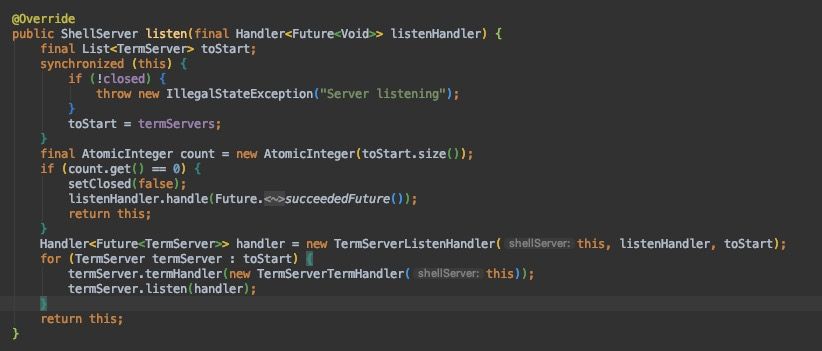
在 listen 方法中,主要是根据之前注册的TermServer来逐个启动,这里以 TelnetTermServer 为例讲解,接下来看下 TelnetTermServer 中的 listen 方法。
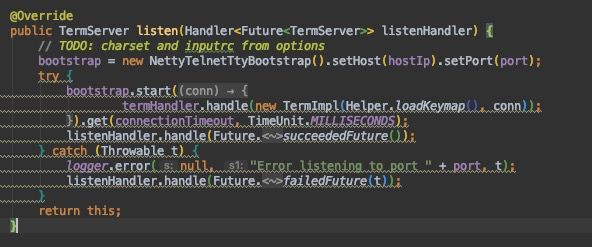
我们跟踪下 start 代码,发现最后调用的是 NettyTelnetBootstrap 的 start 方法。

主要是通过 netty 来启动网络服务。下面我们看下对输入的处理类 TermServerTermHandler 。
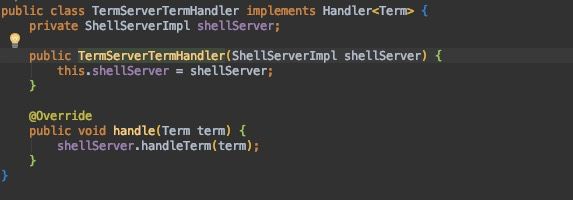
主要是通过调用 shellServer 的 handleTerm 方法。

这里的 session 就是客户端的连接,而readline方法就是用来处理用户的输入的。
至于每个命令是如何工作的,且听下回分解。
总结
arthas中涉及到的知识点很多的了解
-
netty -
termd -
cli -
asm -
JavaAgent
大家如果感兴趣的话,可以花点时间研究下,相信这些框架会让大家受益匪浅。
推荐阅读
线程池是怎样工作的
Nacos 配置实时更新原理分析
Nacos 注册中心原理分析
更好的使用 Nacos 配置中心

如果文章对你有帮助,欢迎转发支持
如果觉得好看,请点击“好看”哦 ↓↓
正文到此结束
- 本文标签: 源码 shell 进程 Netty 解析 参数 lib 下载 MQ 配置中心 Agent apache classpath pom 线程 Bootstrap App REST client 文章 AOP javaagent cglib wget 测试 maven find 数据 CTO list example ACE Collection 原理分析 类加载器 java 定制 remote tar 开发者 TCP Collections 线下 Word IO bug 字节码 spring 编译 端口 UI 注释 实例 Java类 http Property 专注 JVM rmi ssl windows https 配置 时间 Select 开源 DDL Atom id ArrayList 目录 代码覆盖率 tab git 安装 代码 DOM 总结 core Security 服务端 session linux 覆盖率 站点 unix ip cat GitHub parse 开发 src 线程池 希望 注册中心 lambda 探针
- 版权声明: 本文为互联网转载文章,出处已在文章中说明(部分除外)。如果侵权,请联系本站长删除,谢谢。
- 本文海报: 生成海报一 生成海报二
热门推荐


相关文章

近期评论
-
你这基本没有更新呀,最近文章显示还是2019年的文章。不符合要求哈
-
关键词:慕云博客 链接:https://www.lilun.me 描述:分享原创文字的个人博客
-
-
-
可以提供一下源码吗
-
不是商业站,鸡娃学习笔记
-
-
-
-
听他们说很厉害的样子
Loading...
![[HBLOG]公众号](http://www.liuhaihua.cn/img/qrcode_gzh.jpg)

